Fig. 7.1
Absorption in water (blue line) of Er,Cr:YSGG; Er:YAG; and CO2 lasers. Penetration depth in water of laser at different wavelengths (horizontal dotted line)
7.2 Laser Advantages in Restorative Dentistry
Laser technology may be used as a complementary technique as well as an alternative to traditional tools, adding many therapeutic advantages in restorative dentistry. Among them, we can consider the following advantages:
-
It has high affinity for carious tissues and so is selective and minimally invasive.
-
It creates macrocraters that improve the surface for bonding retention.
-
It can be used on both hard and soft tissues, including the pulp.
-
It has strong decontaminating effect.
-
It is safe due to the absence of the use of rotating instruments in the mouth.
-
It provides comfort because it works without contact and vibration on the surface.
-
It is less painful, and in many cases, the use of local anaesthetics can be avoided.
-
It has a favourable psychological impact on phobic and paediatric patients.
Table 7.1 illustrates the operative and clinical advantages of laser technology in restorative dentistry.
Table 7.1
Advantages of laser technology in restorative dentistry
|
Operative advantages
|
|
|
Safety
|
No rotating or cutting instruments used in the mouth
|
|
Comfort
|
No contact and no vibration on the tooth
|
|
Painless
|
Reduction of need for local anaesthesia or no anaesthesia
|
|
Acceptance
|
High and improved patient compliance
|
|
Clinical advantages
|
|
|
Minimally invasive
|
Selective for carious tissue
|
|
Decontaminating effect
|
Deeply in dentin
|
|
Macro-retentive surface
|
Rough, clean surface, no debris and smear layer
|
|
Less rise in temperature
|
In pulp and periodontal surface during irradiation
|
|
Direct pulp capping indication
|
Coagulation/decontamination in case of pulp exposure
|
|
Soft tissue application
|
Exposure of sub-gingival tooth margins during cavity preparation
|
7.3 No Pain Dentistry: Theoretical Aspects
Laser was wrongly proposed in the past to be a “painless” tool. The reality is slightly different and it has to be known in order to optimise the clinical results and the expectations of the operator and of the patient. Only if the mechanism of the perception of pain, the concept of analgesia and its induction in operative dentistry are known can laser therapy allow the execution of complex interventions without the use of local anaesthesia and with benefits for the patient.
7.3.1 Pain Perception and Laser Approach
The absence or the perception of pain is the result of a mixture of subjective and objective factors; both subjective and objective factors are variable and make “pain a personal experience that no one has in common” [1] Fig. 7.2.
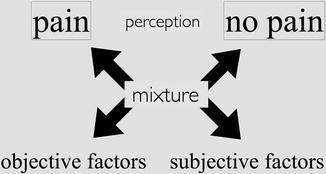
Fig. 7.2
The perception of pain is a mixture of several objective and subjective factors
Among the subjective factors, we find the peripheral limit of pain perception which is almost constant in people and characterises the threshold of pain and the threshold of suffering which is the individual tolerance of pain [2].
The individual tolerance of pain is based on the psychological interpretation of pain which depends on individual factors, such as the patient’s memory of pain (cognitive component), on the emotional status of the patient (emotional component) and on the social behaviour (behavioural component), that is, the individual willingness to react to pain [1]. The psycho-emotional status of the patient is also conditioned by previous negative medical or dental experience; also negative experiences transmitted by parents and relatives can contribute to a considerable state of anxiety, and this could influence the level of tolerance as well as the ability to effectively cooperate with the operator. All these factors characterise the threshold of suffering that describes the individual tolerance of pain [1, 2] (Fig. 7.3).
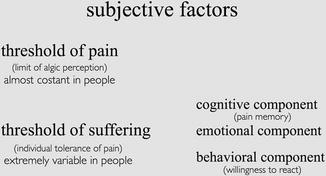
Fig. 7.3
Subjective factors of pain perception include the personal threshold of pain that is almost constant in people and the threshold of suffering, that is, the individual tolerance to pain
Among the objective factors, we must consider the type and the seriousness of the lesion (e.g. simple enamel decay or a deep cavity with pulp exposure), the dentist’s knowledge and skill, and the technique and instruments used, a turbine or blade or a laser [1] (Fig. 7.4).
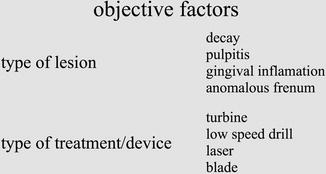
Fig. 7.4
Objective factors of pain include the different seriousness of lesions and the different types of treatment
The lasers work without contact and vibrations (see the operative advantages of laser technology reported in Table 7.1) and are able to raise the threshold of pain (analgesic effect) so conditioning the objective factors of pain. The lasers also influence the subjective factors of pain, because the reduction of painful experiences, of anxiety or fear related to previous negative personal or family experience when needles, drills, scalpels, suture etc. are used. These factors influence the cognitive and emotional status of the patient and so his/her threshold of sufferening [1, 3].
7.4 No Pain Dentistry: Basic Concepts
Irradiation of the operative site, with low laser energy prior to any surgical or nonsurgical procedure, generates an analgesic effect in the area caused by a temporary loss of conductance of the nervous impulse.
Laser irradiation initiates the disruption of the NA+/K+ pump of the cell membrane of the nervous fibre, causing membrane hyperpolarisation that results in loss/decrease of impulse conduction; as a result an analgesic effect is produced, and in order to initiate a potential action, a stimulus of greater intensity is needed [1, 15, 16], thus raising the threshold of pain [1].
All the wavelengths at sub-ablative power, especially those of the near-infrared laser (803–980 nm), can produce analgesia at the irradiated site when used in defocused mode, with a scanner technique and by slowly raising the laser energy.
In the early 1990s, a pre-emptive laser analgesia was first noted with the use of the neodymium-doped yttrium aluminium garnet (Nd:YAG) laser and has received more widespread acceptance with the clinical use of erbium lasers (Er:YAG and Er,Cr:YSGG). When used at pulse rates of 15–20 Hz and at low pulse energies, below the ablation threshold of tooth structure (9–14 J/cm2) (see Sect. 4.6.1), the erbium laser’s energy will penetrate the tooth along the hydroxyapatite crystals towards the dental pulp, where laser frequencies coincide with the natural bioresonance frequency of type C fibre and other nerve fibres in the dental pulp [3, 17]. There is evidence that laser irradiation may selectively target fibres conducting at slow velocities, especially afferent axons from nociceptors (pain receptors). This low-level laser therapy achieves an analgesic effect in the dental pulp prior to restorative procedures, with duration of approximately 15 min, temporarily improving the threshold of pain. No adverse pulpal changes have been reported, either clinically or histologically, over a short or long period of time.
7.4.1 Laser Analgesia: Clinical Procedures
There are several techniques that can be used by the operator to induce laser analgesia.
Naturally, to keep pain below the threshold and to avoid betraying the patient’s trust, we must continue the treatment using the minimal effective energy and power, thus avoiding surpassing the threshold of pain.
7.4.1.1 Margolis Technique
Margolis proposed a laser analgesia technique for erbium laser dental preparation using a tip defocused at 4 mm from the tooth surface and then run slowly across the facial surface of the anterior teeth or the occlusal face of the posterior teeth at 1.5 W, 20 Hz, for 30 s. When metal restoration is present, the laser beam can be aimed at the tip of a cusp instead of the central groove of the tooth. The procedure is repeated for another 15 s at 3.0 W, 20 Hz, before starting ablation at the focused working distance [18].
7.4.1.2 Olivi-Genovese Technique
This technique was initially suggested for the erbium-chromium (Er,Cr:YSSG) laser because of its lower absorption in water and consequently deeper penetration (through the gingiva) into hard dental tissues compared to the Er:YAG laser; it is used today by the authors for both wavelengths. The laser tip is positioned defocused 10 mm farther from the gum-tooth surface (this data depends on the focus distance of different hand-pieces) and is run slowly around the neck of the tooth at the gingival margin for 40–60 s at very low energy (25–50 mJ) and low pulse repetition rate of 10–15 Hz, with a low air-water ratio; the energy level is gradually increased to 75–80 mJ after the first 60 s, always in a defocused mode. Later on the laser beam, still not in focus, is aimed directly at the carious lesion, still at 75–80 mJ. The low pulse repetition rate (10–15 Hz) allows minimal nerve stimulation, permitting a longer thermal time of relaxation. A lower pulse repetition rate (10, 8 pulses for second), with a gradually improved energy (>100 mJ), is more acceptable for the patient than a lower energy with higher pulse frequency, at the same power. When the analgesia is well established, it is possible to increase the pulse repetition to 20 Hz, the air-water spray flow and the energy up to the minimum effective level (see Tables 7.2 and 7.3) and to focus the laser beam on the target, allowing ablation to begin [18] (Figs. 7.5, 7.6 and 7.7).
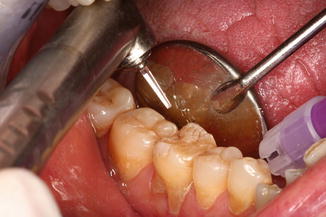
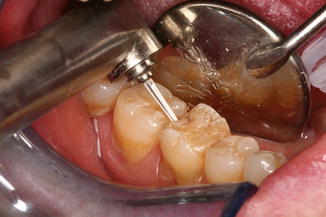
Table 7.2
Clinical parameters for anterior teeth
|
Er,Cr:YSGG
|
Er:YAG
|
|||||||
|---|---|---|---|---|---|---|---|---|
|
Energy
|
Pulses(s)
|
Pulse
duration
|
Tip
|
Energy
|
Pulses(s)
|
Pulse
duration
|
Tip/mirror
|
|
|
Enamel ablation
|
200 > 250 mJ
|
20 > 15 pps
|
140 μs
|
1.1 mm
600 μm
|
200 > 250 mJ
|
20 > 15 pps
|
50 μs
QSP
|
0.9 mm
800 μm
|
|
Dentin ablation
|
180 > 100 mJ
|
20 > 15 pps
|
600 μm
|
200 > 120 mJ
|
20 > 15 pps
|
50–100 μs
|
0.9 mm
800 μm
|
|
|
Dentin decontamination
|
75 mJ
|
10 pps
|
600 μm
|
75 mJ
|
10 pps
|
50 μs
|
0.9 mm 600 μm
|
|
|
Carious removal
|
<150 mJ
|
20 > 15 pps
|
600 μm
|
<150 mJ
|
20 > 15 pps
|
50–100 μs
|
600 μm
|
|
|
Enamel conditioning
|
50–75 mJ
|
25 > 50 pps
|
1.1 mm
600 μm
|
35–80 mJ
|
25 > 50 pps
|
50 μs
|
0.9 mm 600 μm
|
|
|
Dentin conditioning
|
40–50 mJ
|
15 > 10 pps
|
600 μm
|
40–50 mJ
|
15 > 10 pps
|
50–100 μs
|
0.9 mm 600 μm
|
|
Table 7.3
Clinical parameters for posterior teeth
|
Er,Cr:YSGG
|
Er:YAG
|
|||||||
|---|---|---|---|---|---|---|---|---|
|
Energy
|
Pulses(s)
|
Pulse duration
|
Tip
|
Energy
|
Pulses(s)
|
Pulse duration
|
Tip
|
|
|
Enamel ablation
|
200 > 300 mJ
|
20 > 15 pps
|
140 μs
|
1.1 mm
600 μm
|
200 > 350 mJ
|
20 > 15 pps
|
50 μs
QSP
|
0.9 mm
800 μm
|
|
Dentin ablation
|
200 > 100 mJ
|
20 > 15 pps
|
600 μm
|
220 > 120 mJ
|
20 > 15 pps
|
50–100 μs
|
0.9 mm
800 μm
|
|
|
Dentin decontamination
|
75 mJ
|
10 pps
|
600 μm
|
75 mJ
|
10 pps
|
50 μs
|
0.9 mm
600 μm
|
|
|
Carious removal
|
<150 mJ
|
20 > 15 pps
|
600 μm
|
<150 mJ
|
20 > 15 pps
|
50–100 μs
|
600 μm
|
|
|
Enamel conditioning
|
50–75 mJ
|
25 > 50 pps
|
1.1 mm
600 μm
|
35–80 mJ
|
25 > 50 pps
|
50 μs
|
0.9 mm
600 μm
|
|
|
Dentin conditioning
|
40–50 mJ
|
15 > 10 pps
|
600 μm
|
40–50 mJ
|
15 > 10 pps
|
50–100 μs
|
0.9 mm
600 μm
|
|
Fig. 7.5
Olivi-Genovese laser analgesia technique: the laser tip is positioned defocused 10 mm farther from the gum-tooth surface (note that the focus distance is different for different hand-pieces) and run slowly around the neck of the tooth at the gingival margin for 40–60 s at very-low-energy and low pulse repetition rate and low air-water ratio
Fig. 7.6
Olivi-Genovese laser analgesia technique: laser on the laser beam, still not in focus, is aimed directly at the carious lesion, still at 75–80 mJ. The low pulse repetition rate allows minimal nerve stimulation
Fig. 7.7
Laser ablation: when the analgesia is well established, it is possible to increase the pulse repetition, the air-water spray flow and the energy up to the minimum effective level and to focus the laser beam on the target, allowing ablation to begin
Other techniques advocate faster or slower approach to induce analgesia using a high power setting of 3.0–4.5 W, 15 Hz (rabbit technique), or low power setting 0.25 W, 20 Hz (turtle technique). Many laser users have found that a fast approach is often less comfortable for the patient, requires a longer treatment time and provides less patient and dentist satisfaction [18, 19].
7.5 Selective Interaction of Erbium Laser
The research of a system for cavity removal, both efficient and selective and minimally invasive, is still the object of various studies.
A study by Neves Ade et al. used micro-CT scanning to evaluate the relative volume of residual caries and the mineral density at the cavity floor, before and after dentin caries removal, using different systems [20].
The rotative instruments used, with their mechanical action, removed both the healthy and the demineralised part of the tissue, without any distinction; the use of the caries detector increased the risk of over-excavation [20]. On the other hand, the utilisation of less invasive systems, such as the ceramic burs (CeraBur; Komet-Brasseler) and sono-abrasion burs (Cariex; Kavo), left more caries on the cavity floor and on the cavity walls, respectively. The chemo-mechanical system for caries removal used chemical solutions, sodium hypochlorite-based solution (Caridex-Carisolv) and enzyme-based solution (SFC-V and SFC-VIII, 3 M-ESPE), in order to selectively dissolve the affected dental tissue in association with different mechanical systems and metal and plastic excavators, for the affected tissue removal. These methods are mostly selected in removing caries while preserving sound tissue. However, it is the manual mechanical removal with metallic instruments which determined the caries removal effectiveness, whereas the association with plastic excavators did not lead to complete caries removal. The erbium laser system used in this study has a feedback system based on tissue fluorescence that reads the different levels of fluorescence in the same or affected tissue, to control the emission of laser energy; while some specimens revealed many residual caries, others showed over-excavation into sound dentin, so that the Er:YAG laser resulted in non-selective caries removal presenting the lowest minimal invasiveness potential [20]. This study investigated the mini-invasive potential of laser preparation, based on the fluorescence feedback of dental tissue and not on the selective action of Er:YAG. Based on the result, the Er:YAG laser has not been proved to be neither precise nor selective.
The author proposal for a selective and effective carious removal is based on the use of different laser parameters for the different tissues to be treated (see Chap. 4), on the microscopical intraoperative control and the consequent adjustment of the most appropriate energy setting during cavity preparation, in order to confer to laser technology its minimally invasive potential.
Conventional techniques or chemo-mechanical ones require some further steps for the smear layer removal (etching with orthophosphoric acid) and for decontamination (benzalkonium chloride phosphate, sodium hypochlorite).
On the contrary the irradiated laser surface is already highly decontaminated and it does not present smear layer. When laser preparation is also associated with successive procedures of mechanical finishing and chemical conditioning, which improve the adhesive properties of the irradiated surface (see Sect. 7.7), laser represents the most effective and efficient system for selective caries removal. If these procedural steps are not taken into consideration, laser preparation provides inferior adhesion in comparison to conventional preparation, explaining the different results reported by the research using laser in restorative dentistry.
Considering the different content in water of dental tissues (enamel and dentin), the irradiation of erbium laser is selectively absorbed by those with a higher water content. In this way a minor amount of energy is required for the ablation of dentin that is more rich in water [21–23] and even less for caries [24], while a greater amount is required for the ablation of decayed or highly mineralised enamel.
When correctly used, modulating the emitted energy depending on the area to irradiate, laser is a physical tool that works selectively. The optical affinity with water is the key concept of the selectivity and minimal invasiveness of laser preparation in restorative dentistry. Consequently, the choice of the ideal parameters of use must be made keeping this principle in mind. Tables 7.2 and 7.3 show the range of clinical parameters suggested for the Er,Cr:YSGG laser (MD and iPlus, Biolase; CA, USA) and Er:YAG laser (Fidelis and LightWalker, Fotona; Slovenia) (Tables 7.2 and 7.3).
Access to the demineralised tissue can also include the removal of healthy tissue, enamel and dentin which preclude access.
Open cavity lesions, directly accessible in the oral cavity, such as occlusal, buccal or proximal surfaces, are more easily aimed by laser irradiation. In this case the vaporisation of the caries tissue, directly exposed, is simple, quick and selective using lower parameters for the caries tissue, saving the surrounding healthy tissue (Figs. 7.8 and 7.9).
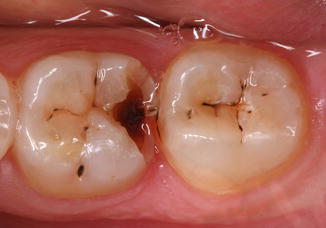
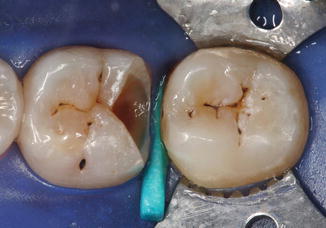
Fig. 7.8
Lower first molar with a large, open cavity on the distal proximal side: the carious tissue is directly exposed to the laser beam, making the interaction easier and faster
Fig. 7.9
Er:YAG laser preparation is completed in a few minutes, carious tissue is removed by laser at 150–180 mJ, 12–15Hz (tipless hand-piece, 0.9 mm), and enamel margins mechanically smoothened
When the occlusal or proximal cavities do not present an evident and large opening to the oral cavity, the approach towards caries requires the elimination of the healthy tissue in order to access the demineralised tissue affected by the carious process, using first the parameters for enamel and then progressively reducing the parameters for dentin and carious tissue (Figs. 7.10 and 7.11); this phase could be long and hard because of the high level of enamel mineralisation in some tooth. When the carious lesion is relapsing or contiguous to previous work in amalgam, which will be included in the preparation, the filling removal will be performed with conventional technique (rotative high-speed drill), while the removal of the decay will be performed using a laser with specific parameters (Figs. 7.12 and 7.13). The composite materials could be removed completely or partially with erbium lasers, according to the clinical situation. However, the complete laser procedure is not advisable because the micro-exploded remains contain microparticles of quartz, glass or zirconium that could damage the tip or the mirror of the laser hand-piece (Figs. 7.14, 7.15, 7.16 and 7.17).
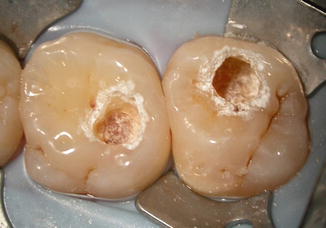
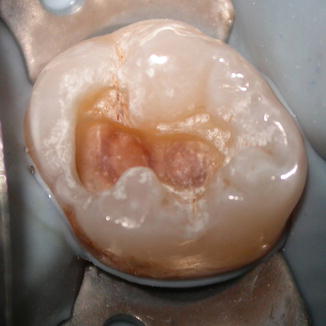
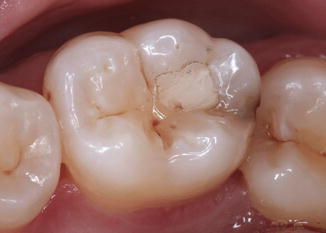
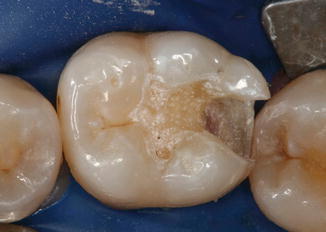
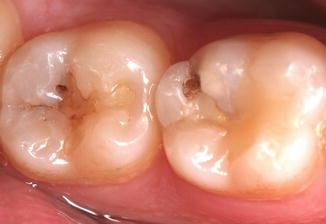
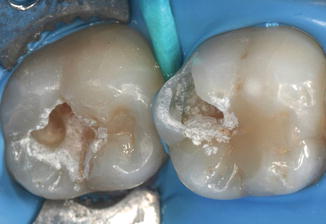
Fig. 7.10
Upper first and second molars show the decayed pits and fissures (Reprinted with permission from Olivi et al. [85])
Fig. 7.11
Er,Cr:YSGG laser class 1 preparation on the upper molars shows very deep decay; enamel ablation required more energy (250 mJ, 20 Hz, 600 μm tip) and more time than the previous case. A mechanical margin finishing will complete the laser preparation (Reprinted with permission from Olivi et al. [85])
Fig. 7.12
Upper first molar with infiltrated old amalgam filling: following laser analgesia on the neck of the tooth and around the filling, on the cusps, the filling is removed with high-speed rotative instruments
Fig. 7.13
Cavity preparation and carious removal are completed with Er,Cr:YSGG laser at 150 and 125 mJ, 20 Hz
Fig. 7.14
Lower first molar presents a decay on the proximal distal wall close to an occlusal composite filling with “coloured” borders; note a microcrack coming from distal to the occlusal surface
Fig. 7.15
Er:YAG laser preparation includes the ablation of affected enamel of the distal proximal wall (250 mJ) and the removal of dentin caries (at 150–120 mJ) and infiltrated composite filling: note the tertiary dentin on the roof of pulp chamber as a dentin reaction to the deep decay
Fig. 7.16
Lower first and second molars show secondary caries due to infiltration on the periphery of old composite fillings
Fig. 7.17
Er:YAG laser preparation includes the ablation of enamel, composite and decayed dentin. A close inspection allows the intraoperative decision to completely remove or not the old filling; note the whiter aspect of the irradiated composite after the complete caries removal
The ablation of healthy hard tissue, occlusal and/or proximal enamel, requires a variable range of energy that goes from 200 to 350 mJ, while a slightly inferior amount of energy is required for the ablation of the healthy underlying dentin (from 100 mJ up to 220 mJ) in order to access the demineralised carious tissue. Less energy is required to vaporise the decayed tissue (<150 mJ) (see Tables 7.2 and 7.3). Not changing the energy while irradiating healthy enamel or decayed dentin during the preparation will result to a quicker but not selective ablation, with an overpreparation of the healthy tissue surrounding the cavity. Close attention should be exercised in very deep cavities, in order to avoid an accidental and involuntary pulp exposure.
The definition of a standard parameter to use is a significant limit to comprehension of the use of laser technology nowadays. Different tissues have different ablation threshold. Moreover, different laser systems in the same range of wavelength and energy parameters have different power of ablation, in relation to the delivery system (articulated arm or optic fibre), the hand-piece (with or without tip), the technology and modality of energy emission. Moreover, the operator’s manual technique influences the result (focusing or defocusing, angulation and speed of irradiation).
7.6 New Cavity Design Concept: A Minimally Invasive Cavity Preparation
Modern adhesive dentistry brought gradual changes in the rules of cavity preparation. The transition (passage) from amalgam restoration to the composite one, the improvement of adhesive materials and the evolution of composite materials from macro filled and micro filled to micro-hybrid and nano filled brought a successive change in the cavity preparation design. This change takes into consideration both the teeth’s biomechanical characteristics and its adhesive peculiars and the material ones. Laser is a different system of preparation compared to the conventional ones, which perfectly match the minimally invasive concepts of contemporary restorative dentistry, allowing for selective carious removal, preventing the unnecessary removal of healthy tissue. Laser preparation must be completed with an accurate finishing in order to better adapt the surfaces and margins of the cavity to the adhesive material used.
7.6.1 Outline Form and Convenience Form
The modern cavity preparation design involves carious and demineralised tissue removal with maximum conservation of the healthy tissue. The selective use of laser allows to perform the preparation for direct restoration of all Black’s cavity classes, outlining a form that corresponds to the caries process extension (Figs. 7.18, 7.19, 7.20, 7.21, 7.22, 7.23, 7.24, 7.25, 7.26 and 7.27). However, cavity preparation includes also the ablation of enamel tissue which is not supported by enough healthy dentin; this principle must take into consideration the anatomical (localisation) of the cavity (working or not working cuspids, proximal walls). The bottom of the cavity does not have to be plane anymore, but can gently follow the depth and the extension of the carious process.

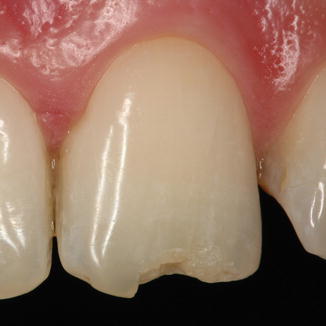
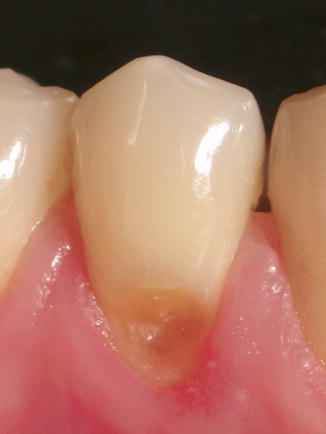
Fig. 7.18
Lower second molar with class 1 cavities on the occlusal fissures
Fig. 7.19
Er,Cr:YSGG ablation allows selective ablation of the caries; the outline form follows the extension of the decay without enlarging in healthy tissue
Fig. 7.20
Upper first molar with class 2 proximal mesial decay; note microcracks on the enamel ridge due to caries undermining the healthy occlusal enamel
Fig. 7.21
Erbium lasers allow a selective removal of the affected tissues without extending the cavity design on the occlusal fissure
Fig. 7.22
The pre-existing diastema between the upper central incisors allows a direct access to a “pure” class 3 cavity on the mesial side
Fig. 7.23
Er,Cr:YSGG laser irradiation and caries removal of the proximal decay without any extension in healthy tissue
Fig. 7.24
Wear and fracture of the incisal margin of the upper central incisor
Fig. 7.25
Minimal tissue removal after Er,Cr:YSGG irradiation just to clean, decontaminate and condition the enamel and dentin surfaces
Fig. 7.26
Lower premolar shows a cervical decay (class 5)
Fig. 7.27
Er:YAG laser class 5 cavity preparation allows minimal, selective and precise carious removal at 150 > 120 mJ; note the absence of any overpreparation both on the enamel and in dentin
The preparation of the cavity for indirect restoration (inlay, onlay and veneer) on the other hand requires a precise outline form, obtained using the drill and diamond burs with a specific shape and size. The correct outline form permits the insertion of the restoration without undercuts, with the removal of dental substance of adequate thickness, especially in the areas exposed to mastication load (working or centric cuspids). In these cases the use of laser is advisable only for the phase of caries tissue removal; a successive composite build-up will permit the filling of the undercuts, leaving more residual dental tissue and bonded composite for the conventional finishing with rotative or ultrasonic tools, which will define the shape.
7.6.2 Retention Form
The old concept of extending the preparation of a decayed occlusal pit into the neighbour fissures or to the proximal surface wall, in order to prevent a possible relapse, is definitively abandoned. The use of adhesive techniques no longer requires the preparation of mechanical retention with undercuts and accessory retentions (dovetails).
7.7 Finishing of the Cavity
The preparation and treatment of the dentin surface as well as the enamel margins of a cavity are some of the most critical steps in restorative dentistry, because they involve carious removal, final decontamination and protection of deep dentin or pulp capping in case of small pulp exposure before restoration and better adaptation of the restorative material to the tooth. Conventional instrumentations also produce smear layer and debris during cavity preparation, elements that affect adhesion during bonding procedures, while laser preparation produces other morphological alterations of the surface that must be considered and modified to reach a more stable and predictable result of the restoration.
7.7.1 Carious Removal and Deep Dentin Decontamination
It has sometimes been suggested to possibly leave a minimum quantity of demineralised tissue on the bottom of the cavity, considering that some technology in use nowadays (laser, ozone therapy) would be able to neutralise the deep dentin and pulpal contamination and that also bacteriostatic and bactericidal medication could work in that way (stepwise and indirect pulp capping techniques).
Considering the difficulty to establish if and how much tissue must be removed or left in the cavity, it is opportune to always precede to complete removal of the caries/demineralised tissue (see also Sect. 8.2).
Sometimes with the aim of removing all the carious tissue, the cavity is overprepared, leading to hypersensitivity or pulp micro-exposure (see also Sect. 8.3).
Erbium lasers decontaminate the bottom of the cavity through the dental walls to a different depth [25–27] and reduce this risk; however, the dental surface at the end of laser preparation must be hard.
The final cleansing and disinfection in the conventional restorative dentistry is usually performed using chemical agents, such as benzalkonium chloride phosphate and sodium hypochlorite, detergents such as EDTA, or a combination of them. The use of these disinfectants, with a suggested contact to the dental surface of 30–60s, could not be enough for deep decontamination.
Türkün et al., experimentally, found no significant differences in the antibacterial activity of 0.75 W and 1 W Er,Cr:YSGG laser power outputs and a chlorhexidine gluconate-based cavity disinfectant [28].
Franzen et al. used very low Er,Cr:YSGG energy of 3.13 mJ, delivered at an incidence angle of 5° to a dentin slice surface, to produce significant bacterial reduction up to a dentin thickness of 500 μm [27].
7.7.2 Conditioning and Medication of the Bottom of the Cavity
The cavity prepared with laser, even if it has been thoroughly cleansed and decontaminated, should be finished and conditioned anyway with sodium hypochlorite before the application of adhesive systems to improve bonding and adaptation of the restorative materials.
At macroscopic inspection, the laser-prepared dentin shows a typical whitish aspect expression of the laser microexplosions (see Sect. 4.7) (Fig. 7.28). Sometimes the dentin presents a dark orange colour, because of the tertiary sclerotic dentin, or blackish, in case of amalgam pigmentation, and it should be probed with an explorer to verify the complete removal of the demineralised dentin (Figs. 7.29 and 7.30).
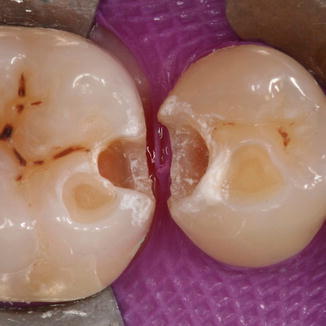
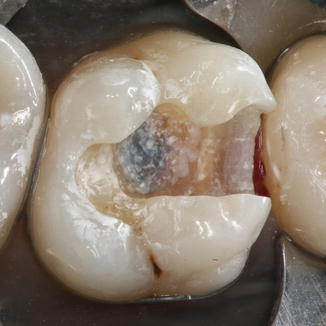
Fig. 7.28
Er:YAG laser cavity preparation: the irradiated dentin shows the typical whitish aspect due to laser microexplosions. The bottom of the cavity must be finished, probed and checked for residual caries
Fig. 7.29
Er:YAG laser cavity preparation: the irradiated dentin also shows the orange-brown colour, typical of tertiary sclerotic dentin. The bottom of the cavity must be probed and checked for residual caries; margins must be smoothened
Fig. 7.30
Er:YAG laser cavity preparation: when an amalgam filling is removed, the dentin may also appear dark black, due to the deep amalgam pigmentation. The bottom of the cavity must be probed and checked for residual caries; margins must be finished
Microscopically the laser-prepared surface is generally without smear layer that is well vaporised during laser ablation and presents open dental tubules. Many studies showed the improvement of dental porosity and the smear layer removal, which are two factors that are potentially positive for a good adhesion of the composites to the substrate [31–34] (Fig. 7.31); in contrast the surface could present flakes of dentin tissue, partially adherent to the dental surface, which contribute to creating the characteristic whitish colour and a possible decrease of the adhesion (Fig. 7.32).
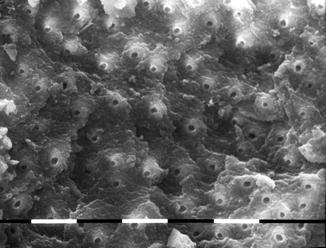
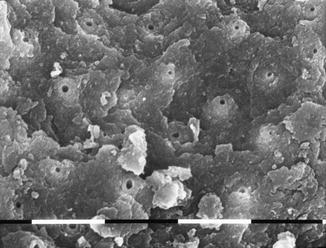
Fig. 7.31
SEM image of Er,Cr:YSGG laser-irradiated dentin at 175 mJ, 20 Hz, 3.5 W, 1.5 mm distance and a 600 μm tip. Air-water spray is 45/35 %. This is a typical image of laser-ablated dentin; the surface is scaly, clean and debris-free with intertubular and peritubular dentin creating depressions and reliefs with open orifices at the top (original magnification × 1,160). Organic collagen matrix has been vaporised by laser ablation
Fig. 7.32
SEM image of Er,Cr:YSGG laser-irradiated dentin at 150 mJ 20 Hz, 3.0 W, 1.5 mm distance and a 600 μm tip. Air-water spray is 30/20 %. The lower air-water flow did not allow thorough cleaning of dentin surfaces: the surface is scaly, some debris are still present and there are some unsupported flakes of dentin (original magnification ×1,280)
Toro et al. investigated the correlation between the remaining demineralised dentin and the dentin permeability of cavities prepared with conventional and Er:YAG laser techniques and concluded that laser produced an increase in permeability that was directly proportional to the amount of removed demineralised tissue [35].
The majority of studies on the adhesion of the irradiated and lased dentin reported yet negative results in terms of improvement of the adhesion [36–39]. This depends on the ultrastructural modifications of the irradiated dentin which include denaturation of the organic matrix (collagen) [40] and the production of flakes on the surface; these modifications if have not been treated with an accurate final finishing produce inferior bonding to the substrate as reported in the quoted studies [36–39].
Some experimental studies and the clinical and experimental experience of the author regarding ultrastructure modifications after laser irradiation and the chemo-physical treatment of the substrate confirmed that finishing of the surface after irradiation contributes to achieving a more efficient adhesion.
The treatment of dentin with low laser energy (laser conditioning at 40–50 mJ) and/or hand excavator permits removal of dentin particles loosely adherent on the surface (flakes), producing a surface which is more homogeneous and suitable for adhesion.
Also de Souza et al. reported that the irradiation in defocused mode at 17 mm resulted in a more homogeneous appearance of the surface than those irradiated at closer distances to the focus. The authors also confirmed that subsequent acid etching on the lased surfaces decreased the superficial irregularities with partial exposure and enlargement of dentin tubules, in all the tested irradiation distances [41].
Mechanical excavation was reported to have a greater influence in dentin than enamel; the combination of excavation and longer etching time (30 s) also exhibited significantly better results in dentin [42] (Figs. 7.33 and 7.34).
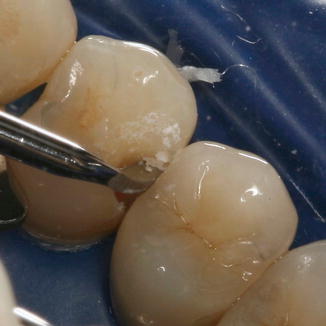
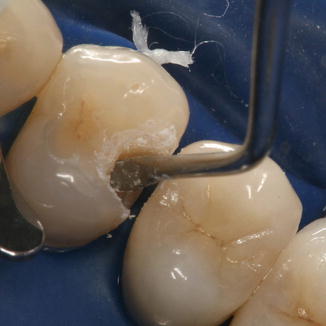
Fig. 7.33
At the end of laser cavity preparation, the use of scalpels or hand excavators helps in removing loosely adherent dentin flakes from the cavity surfaces; a Black’s scalpel is showed here for distal proximal margin finishing
Fig. 7.34
At the end of laser cavity preparation, a hand excavator is used to remove flakes and dentin chips from the lased cavity
SEM and TBS analysis from Chen et al. demonstrated that both low-level laser energy pretreatment and acid etching reduced irregularities and produced a more homogeneous surface, significantly increasing the tensile bond strength of adhesion to the irradiated dentin [43].
Chousterman et al. reported significant increase in tensile bond strength of the samples when the etching time was prolonged up to 90 s [44].
In addition scrubbing out with cotton pellets soaked with sodium hypochlorite can be undertaken to partially remove the denatured collagen layer produced by the thermal effect of the laser or to alter its configuration [40, 45].
A study of Lahmouzi et al. reported that the application of a 5 % NaOCl solution on Er:YAG-irradiated cavities can significantly improve the marginal quality of composite bonding [46] (Figs. 7.35, 7.36, 7.37, 7.38 and 7.39).
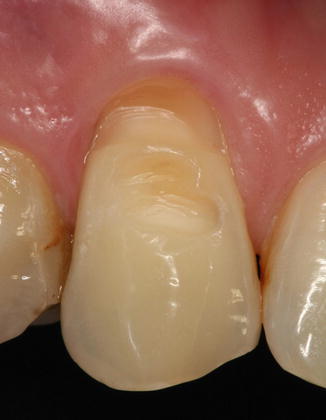
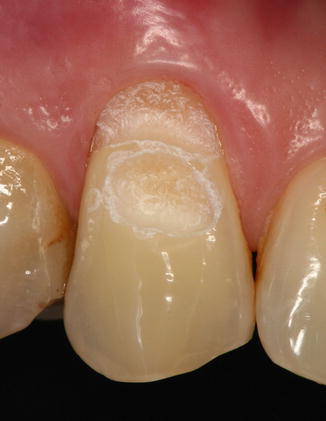
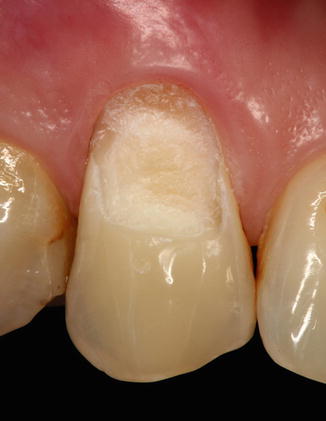

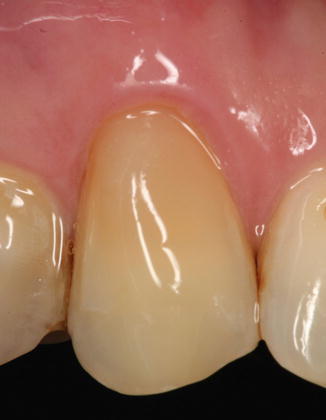
Fig. 7.35
Upper cuspid shows a class 5 with abrasion of the cervical neck and concomitant abfraction: part of the enamel is conserved between the different lesions
Fig. 7.36
Er:YAG laser cavity preparation was performed separately on the two lesions: one cervical and the other more coronal
Fig. 7.37
To have a better aesthetic result, laser preparation was then extended on both cavities in dentin and enamel to create a unique cavity design; the surface of the bottom of the cavity is quite uniform
Fig. 7.38
A final scrubbing with cotton pellets imbedded with 5 % NaOCl solution after erbium laser preparation and the following orthophosphoric acid etching significantly change the aspect of the surface
Fig. 7.39
The micro-hybrid composite filling at 1-month follow-up
The use of sodium hypochlorite also contributes to the decontamination of the cavity surface. The association of mechanical finishing, of the scrub with sodium hypochlorite and of the chemical pretreatment of dentin with orthophosphoric acid before the adhesion procedures makes the obtained results of conventional technique and laser technique uniform [36, 42, 43, 47] (Figs. 7.40, 7.41, 7.42 and 7.43 (for the initial case, see also Figs. 7.14 and 7.15) Figs. 7.55, Fig. 7.56, 7.57 and 7.58).
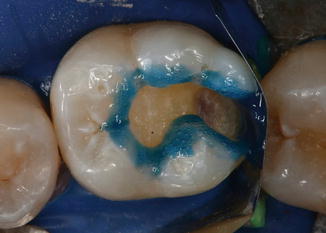
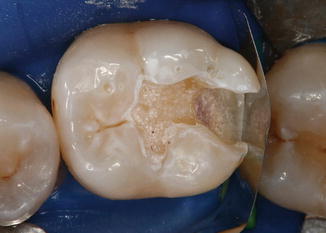
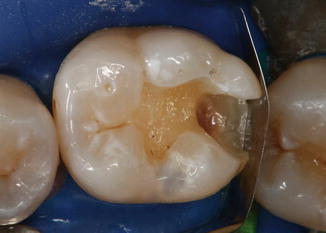
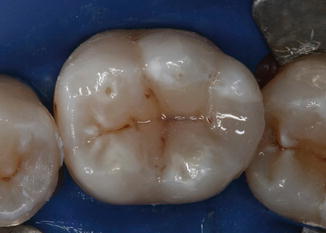
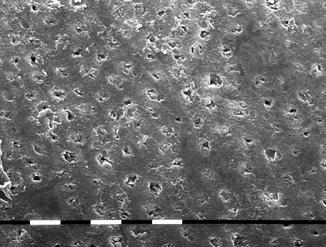
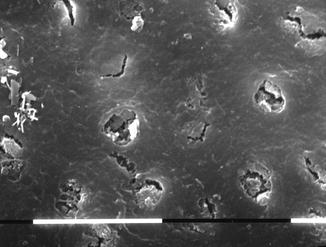
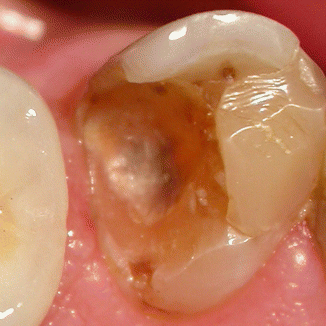
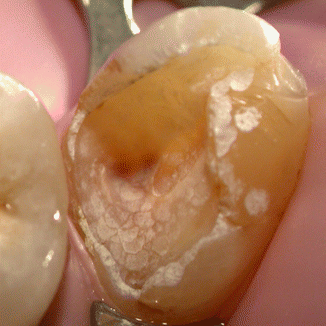

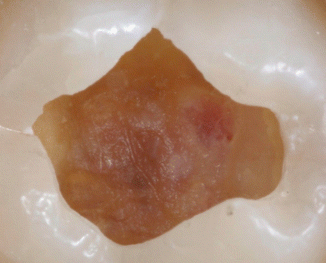
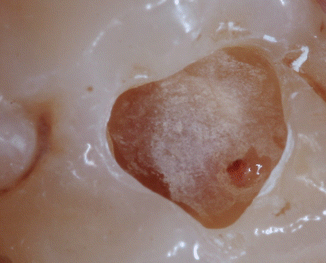
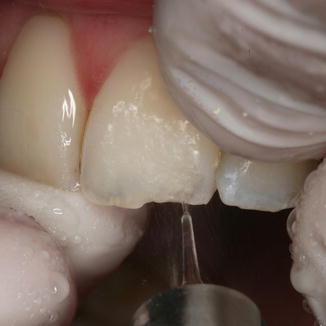
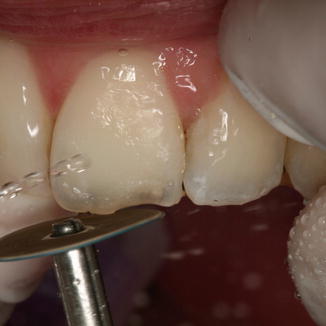
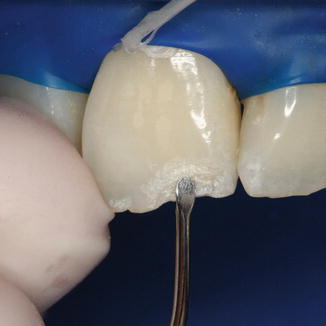
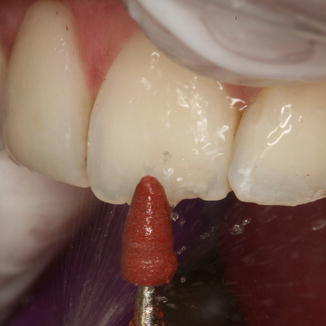

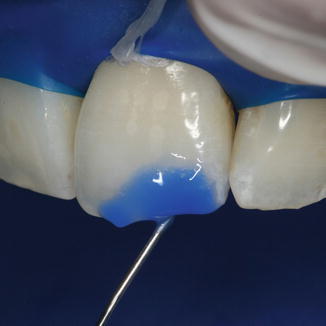
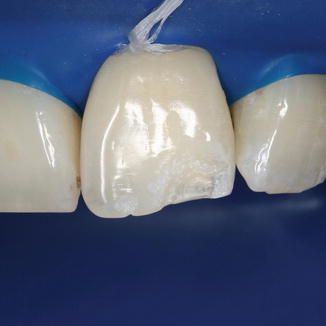
Fig. 7.41
Cavity prepared and conditioned
Fig. 7.42
Self-etching adhesive system applied
Fig. 7.43
Composite filling completed
Fig. 7.44
Scanning electron microscopic (SEM) image shows the result of deep dentin sealing treatment performed with mid-infrared laser. Superficial melting and partial closure of dentin tubules were achieved using Er,Cr:YSGG laser treatment at 0.5 W, 25 mJ and 20 Hz with a 600 μm tip and low air-water spray rate in defocused mode (original magnification ×1,000)
Fig. 7.45
Scanning electron microscopic (SEM) image shows the result of deep dentin sealing treatment performed with laser. Superficial melting and partial closure of dentin tubules were achieved using Er,Cr:YSGG laser treatment at 0.5 W, 25 mJ and 20 Hz with a 600 μm tip and low air-water spray rate in defocused mode (original magnification ×2,300)
Fig. 7.46
Upper cuspid with deep class 3 cavity
Fig. 7.47
Upper cuspid: after Er,Cr:YSGG laser preparation and carious removal, a superficial dentin sealing (melting) is performed at 1 W, 20 Hz, air-water 25/15%, 600 μm tip, in defocused mode (Reprinted with permission from Olivi and Genovese [49])
Fig. 7.48
Upper cuspid: a base of self-hardening calcium hydroxide is positioned on the deep dentin, close to the pulp (Reprinted with permission from Olivi and Genovese [49])
Fig. 7.49
Lower molar with deep class 1 cavity; after a final scrub with pellets imbedded of 5 % NaOCl, a small exposure of pulp tissue occurred
Fig. 7.50
Upper molar with deep class 1 cavity laser prepared; small exposure of pulp tissue and melting of the deep dentin surface
Fig. 7.51
Different procedures for enamel and dentin conditioning: an Er,Cr:YSGG laser with a 400 μm tip is used at 50 mJ to condition the enamel incisal margin after laser preparation; the defocused irradiation at low energy makes the surface more uniform and suitable for adhesive systems
Fig. 7.52
Different approaches for enamel smoothening: a blue Sof-Lex Pop-On is used to smooth the flat enamel incisal margin after laser preparation
Fig. 7.53
Different approaches for enamel smoothening: a hand excavator is used to remove loosely adherent prisms from the flat surface after laser preparation
Fig. 7.54
Different approaches for enamel and dentin conditioning: as an alternative to hand excavators or scalpels, a brown silicon tip is used to smooth the surface
Fig. 7.55
Different approaches for enamel and dentin conditioning: a gentle scrub with cotton pellets imbedded of sodium hypochlorite is very useful to remove the denatured superficial collagen layer and unsupported prisms
Fig. 7.56
Different approaches for enamel and dentin conditioning: 20 s orthophosphoric acid etching
Fig. 7.57
Upper central incisor after laser preparation, finishing, conditioning and etching, ready for the bonding procedures
Fig. 7.58
Upper central incisor restoration completed (micro-hybrid composite)
Finally, dentin hypersensitivity may be avoided by performing a procedure that creates a superficial melting in the proximity of the roof of the pulp chamber (Figs. 7.44 and 7.45) and by paying close attention during the bonding procedures [48].
The application of a protective liner or bioactive dentin substitute product is advisable just in case of close proximity or exposure of the pulp chamber (Figs. 7.46, 7.47 and 7.48). The laser produces clean and decontaminated surface also in the deeper area, and in case of pulp micro-exposure during erbium laser cavity preparation, the bacteria’s load is already considerably reduced and also the risk of pushing infected dental chips into the pulp chamber is inferior to conventional procedures [49–51] (see Sect. 8.3) (Figs. 7.49 and 7.50).
7.7.3 Macro-retentive Surface for Bonding Procedures
The laser-prepared cavity has macro-roughened surfaces that increase the area for the bonding of adhesive resins for retaining composite restorations. The cavity does not require the preparation of accessory mechanical retentions.
Besides the conservative approach to the dental tissues, the modern restorative dentistry must consider the physical characteristics of dental composite and adhesive materials to be used.
The laser-prepared cavity leaves a scaly dental surface, with macrocraters on the enamel, with a depth of 5–15 μm on the enamel and of 7–1 μm on the dentine [52]. These must be reduced with final finishing of the bottom and axial walls and the margins of the cavity, in order to improve the adjustment of the chosen adhesive system anad filling. Different procedures are available to improve the quality of the dentin-adhesive-composite interface and bonding.
The choice of an adhesive that uses or not orthophosphoric acid etching (etch and rinse or self-etch) can resolve this issue. Furthermore, to use one or another adhesive system depends on the presence of the type of dentin, fresh or sclerotic, on the bottom of the cavity.
Jaberi Ansari et al. reported that the use of orthophosphoric acid would be recommended if erbium lasers are used for cavity preparation [53].
The application of the adhesives must be thin and uniform, and a gap of more than 10 μm on the bottom of the cavity could compromise adhesion.
The physical characteristics of modern composite materials are more similar to that of ceramic than resin materials. Because of the high elastic module and rigidity and hardness of the composite, the cavity design requires an adequate support on the bottom of the cavity. Accordingly, the use of different liners, suitable for the different areas, such as glass ionomeric cement [54], bioactive dentin substitute [55–57] or flowable composite, can be advisable because they allow both good protection and biostimulation of the deep dentin-pulp complex and good adaptation at the floor of the cavity, reducing the negative effects of the shrinkage of the restoration materials [58, 59], levelling the contact surface between dentin and composite or ceramic. Also, composites and ceramic require different minimal thickness (at least 1 mm for the composite and 1.5 mm for the ceramic) that should be considered during the preparation regardless of the choice of restoration material and the extension and depth of the cavity.
7.7.4 Finishing and Conditioning of the Margins of the Cavity
The macro-roughened surface of the laser-prepared enamel presents some superficial morphological alterations with micro-prisms detached during ablation, which are barely adherent to the surface and hardly removable by acid etching. Moreover, as for the treatment of the bottom of the cavity, a finishing-smoothening of the enamel margins is suggested; this is another critical step to obtain bonding results that overlap those of conventional techniques [40, 42, 46, 47]. Few of the numerous studies in the scientific literature take into consideration this step; the simple finishing of the enamel allows the realisation of a laser-prepared cavity with a macro-retained surface on the bottom and walls in dentin and smoothened peripheral margins on the enamel, depending on the finishing technique used [40]. The use of the orthophosphoric acid as the final step completes the conditioning, producing a micro-roughened surface more suitable for the bonding systems [53].
Depending on the localisation and biomechanical characteristics of both tooth and restoration, the margins must be flat on the occluding surface (palatine surface of upper anterior teeth and palatine cusps on the upper arch and buccal cusps on the lower arch) or rounded with a chamfer, when better aesthetic and chromatic matching are required (cervical-buccal surfaces). In the area dedicated to the different Black’s classes, the different types of finishing line will be examined (see Sect. 7.10).
The proposed procedure foresees all the advantages of the conventional technique and of the laser technique and can be performed using different modalities, depending also on the type of surface involved.
Low-energy laser irradiation at 35–80 mJ for the laser Er:YAG and from 50 to 75 mJ for the laser Er:Cr:YSGG allows a more delicate interaction with the enamel with very superficial spots. A high frequency pulse, more than 25 pps or Hz (up to 50 pps or Hz), permits the levelling of the micro-craters created during the ablation with a smoothening effect (Fig. 7.51). Another way to control the energy delivered to the target is defocusing the distance of irradiation; as a result slight morphological alterations are produced in comparison to the focus mode. Defocused mode irradiation is therefore more suitable for enamel conditioning than focused irradiation, and the subsequent acid etching on the lased surface partially removed the disorganised tissue [60].
-
The contouring and finishing discs (Soflex and Soflex XT, 3 M) allow to smooth and refine the contours and margins of flat surface of class 4 cavity (angle of anterior tooth) (Fig. 7.52) and the slices of the proximal box in class 2 cavity (see Figs. 7.59 and 7.60).
 Fig. 7.59Different approaches for enamel smoothening: mesial proximal enamel slice of class 2 cavities is smoothened with blue Sof-Lex Pop-On
 Fig. 7.60Different approaches for enamel smoothening: changing the angulation of the hand-piece, the distal proximal enamel slice of class 2 cavities is smoothened with blue Sof-Lex Pop-On
 -
The use of excavators or scalpels is also very effective in the removal of unsupported prisms: excavators can be used for flat enamel buccal surfaces (Fig. 7.53) (see also Figs. 7.33 and 7.34), while mesial and distal Black scalpels (77–78 and 79–80) are used to produce proper finishing lines on the enamel margins of proximal cavities (Figs. 7.61 and 7.62).
 Fig. 7.61Different approaches for enamel smoothening: hand scalpel (Black, 79/80) is used to refinish the gingival margin of the class 2 cavity
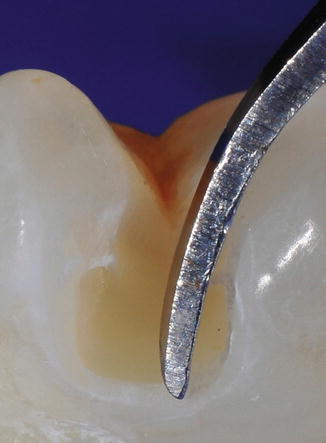 Fig. 7.62Hand scalpel for enamel smoothening: higher magnification shows the elimination of unsupported prisms from the enamel gingival margin of a proximal box
 -
The sonic tips are also very useful for finishing of the occlusal and proximal surfaces in premolars and molars as well as for margin finishing for indirect ceramic veneering.
-
The fine or ultrafine grit diamond burs are used to smooth and finish the occlusal margins in class 1, class 2 and class 5 cavities (Figs. 7.63, 7.64 and 7.65). Different shapes are used depending on the different areas to be treated; round-shaped or chamfer burs are used in the aesthetic buccal areas, and long, thin, or cone-shaped diamond burs are used in scarcely reachable areas. Silicone conical tips are also used for the same purpose (see Fig. 7.54).
 Fig. 7.63Red ring fine grit burs with different shapes are used to refinish the cavity walls and margins
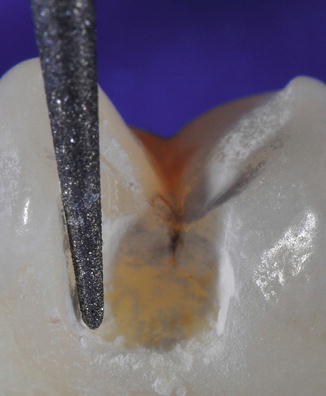 Fig. 7.64Red ring, fine grit, conical-shaped bur is used to smooth the slice of proximal box of the cavity
 Fig. 7.65Red ring, fine grit, round-shaped bur is used to smooth the margins of cavosurface
 -
Orthophosphoric acid etching is used to create a micro-roughened surface of the mechanically smoothened margins [53, 60] (Figs. 7.66 and 7.67).
 Fig. 7.66Orthophosphoric acid etching is used to totally etch the tooth or to only etch the enamel margins, depending on the bonding system used
 Fig. 7.67Laser-prepared cavity as it appears after smoothening, conditioning and etching procedures: the cavity is clean and the margins are smooth
7.8 Erbium Laser Cavity Preparation
Erbium:YAG and erbium, chromium:YSGG lasers are used in restorative dentistry for the preparation of cavities in all Black’s classes and also for the preparation of indirect restoration in combination with conventional rotative instruments.
7.8.1 Class 1 Cavity Preparation
Class 1 cavity, based on Black’s topographic criteria, includes the caries of the occlusal surfaces of all the anterior and posterior teeth: the 2/3 extension of the buccal and lingual surface of molars and premolars (fissures and buccal pit) and the palatal surface of upper incisors and canines (palatal pit).
The diagnosis takes place after inspection, semeiotic tests, and intraoral x-ray examination. The use of DIAGNOdent (KaVo, Germany) is very effective in close forms. Modern cavity preparation does not foresee the use of the conventional principles of retention and prevention; the walls do not have to present parallelism and the regularity of the bottom of the cavity does not have to be created.
Laser preparation permits:
-
The removal of the caries tissue and eventual healthy tissue from the occlusal surface in order to access the carious lesion.
-
The conservation, thanks to selectivity of action, of healthy dentin reducing the weakening of the tooth (dentin is elastic and discharges the forces under the enamel, supporting it). Modern restorative materials, strongly adhesive on the dental structure, have an elastic module very similar to that of natural dentin and they contribute to the reinstatement of tooth’s resistance.
-
The preparation of the bottom of the cavity (follows) the extension, in depth and width, of the caries, limiting overpreparation. Deep cavities in particular benefit from laser preparation, due to the fact that, during conventional mechanical preparation, vicinity to pulp (horn) could lead to an accidental exposure of the pulp (see Figs. 7.49 and 7.50), while laser, slowly working on dentin, is safer.
Removal of caries from the undercuts could be performed using laser when the cavity is very wide (with the loss of one or more cuspids or walls) so allowing the insertion of laser tips that can better fit inside the cavity. The use of a low-speed drill with round multiblade bur, of different diameters, is very useful for the removal of caries from undercuts and for the completion of preparation (Figs. 7.68, 7.69, 7.70, 7.71 and 7.72). For the parameters of use, see Table 7.3.
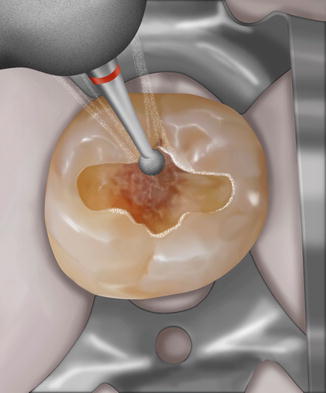
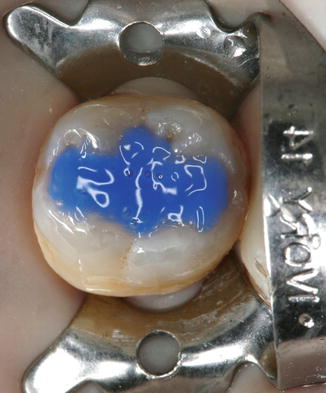
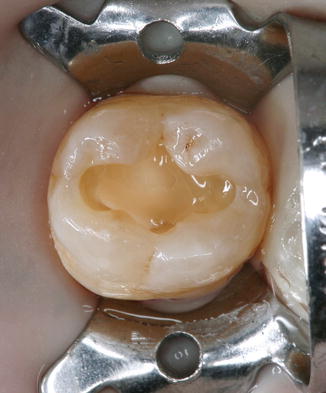
Fig. 7.68
Lower second molar with class 1 cavity prepared with laser; note some irregularities of the margins
Fig. 7.69
Graphic rendering of carious removal in the undercuts using low-speed drill; the bur can work in the undercuts where the laser beam cannot reach, saving healthy tissue on the surface to be removed
Fig. 7.70
Graphic rendering of the high-speed drill margin finishing with a fine grit, round-shaped bur
Fig. 7.71
Orthophosphoric acid etching
Fig. 7.72
A layer of flowable highly filled composite is used on the bottom of the cavity above the calcium hydroxide
7.8.1.1 Large Cavity
A large cavity, already open on the occlusal surface, is the easiest to treat because the mineralised healthy occlusal enamel does not need to be treated. After a first initial irradiation with low-energy and low-wavelength impulses, necessary for establishing analgesia, or after anaesthesia, the laser is set progressively on a sufficient amount of energy for caries removal (150 mJ), starting from the parameters for dentin ablation 220–200 mJ up to 120–100 mJ to 20 > 15 pps, to decrease towards the healthy dentin in depth. Selective laser ablation of the caries tissue is the reason for the minimal invasiveness of this procedure. The laser beam can be directed at the caries surface with ample opportunity to change angle because of the width of the caries cavity. As reported in Chap. 4, the energy emitted is different and should be adjusted when it comes from a more efficient tipless hand-piece or a hand-piece with a different tip diameter that works closer to the teeth (close contact hand-piece at 1–2 mm). The energy should be set taking into consideration the hand-piece or the tip used and the diameter of the tip (fluence), reducing it progressively towards the end of the cavity; the minimum efficient amount of energy should be used for dentin ablation (see threshold of ablation, Sect. 4.6.1) and for decontamination in order to avoid cavity overpreparation (see Sect. 4.10). An efficient water spray will help the cleansing and the cooling of the irradiated tissue.
7.8.1.2 Mine Cavity
Mine cavity, that is, with a minimum opening and development and enlargement of the caries in depth, requires the utilisation of higher energy for opening the cavity. The occlusal undermined enamel must be irradiated with more energy than the dentin (200 > 350 mJ), first perpendicularly to the surface and to the orientation of the prisms, then changing the angle of irradiation, making it parallel to the prism of the enamel, to complete the opening of the cavity. In this cavity, the removal of the decayed dentin can be carried out with hand excavators, exposing more easily the underlying decayed dentin which will be irradiated and vaporised with erbium laser with the correct energy (220 > 150 mJ), progressively reduced towards the bottom in a healthy cavity (>120 > 100 mJ). The residual carious tissue inside the undercuts can be removed with a low-speed drill with multiblade spherical cutters with the right diameter, if the dimensions of the opening of the cavity do not permit the insertion of laser points (Figs. 7.73, 7.74, 7.75, 7.76 and 7.77).

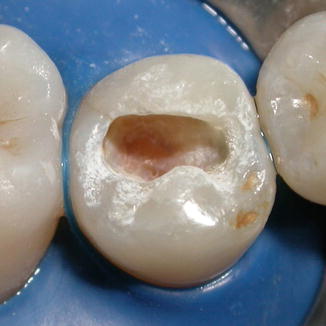
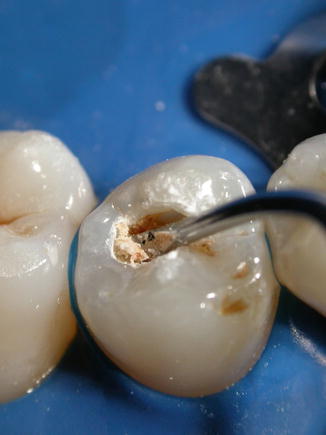
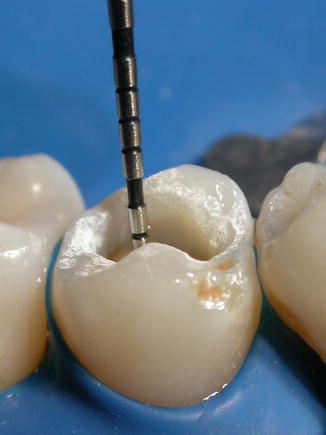
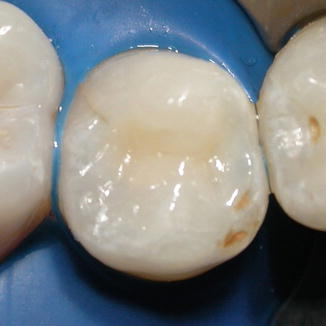
Fig. 7.73
Lower premolar: small decay on the distal part of the occlusal fissure; diagnosis performed with DIAGNOdent, KaVo
Fig. 7.74
Er,Cr:YSGG laser was used for the preparation of class 1 cavity
Fig. 7.75
Caries excavation using a hand excavator completes the carious removal
Fig. 7.76
The probe shows the depth of the cavity
Fig. 7.77
Cavity restoration completed with nano-filled composite
7.8.1.3 Small Cavity
A small cavity is the most difficult to treat. Different erbium lasers have fibres of different diameters, from 400 to 1,100 μm, but the smallest barely sustains the amount of exit energy required for enamel removal (<250 mJ). Small dot-shaped cavities that go from the central pit and from the occlusal fissures of the molars in apical direction must be treated separately, keeping the occlusal enamel healthy. In this case, the combined use of rotative means is advisable. Small diamond burs for micro-preparation (ISO 006–008), assembled on high-speed drill (turbine), are very useful because they allow, working on contact, great precision with focused removal of the tissue; finally the use of a laser with fibres with reduced diameter (400–600 μm) can be used to complete cleansing and cavity decontamination, using less energy (100 > 50 mJ). It should be noted that this type of cavity, deep and narrow, does not afford the possibility to angle the fibre which works only on the final part, perpendicularly to the target and parallel to the walls. It neither affords the possibility to irrigate the bottom of the cavity with the spray (Figs. 7.78, 7.79, and 7.80). Close attention must be paid on the use of a tipless hand-piece for the preparation or finishing of deep and small cavities, because of the difficulty of controlling a precise irradiation and interaction of the laser beam on the cavities’ walls of small dimension, which would be overprepared.

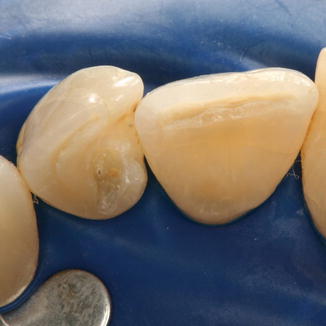
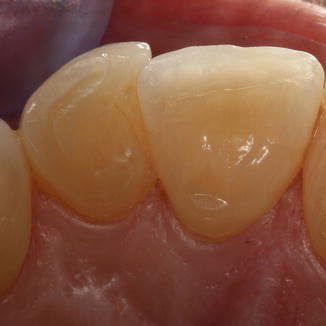
Fig. 7.78
Upper lateral incisor showing class 1 cavity on the pit of the palatal surface
Fig. 7.79
Cavity preparation is performed by an Er,Cr:YSGG laser and smoothened with rotative instrumentation
Fig. 7.80
Upper lateral incisor restored with nano-filled composite
The removal of old fillings in amalgam requires the use of rotative instruments (see Figs. 7.12 and 7.13). The composite filling, after initial removal with rotative diamond burs, can be easily removed with laser from the bottom of the cavity, thanks to the photomechanical action that detaches entire portions of filling due to the weakening of the bonding strength (see Fig. 7.14).
Class 1 cavities must be finished on the bottom and on the margins; the toilette of the bottom of the cavity should be realised with manual excavators and the bottom treated with pellets soaked with sodium hypochlorite or clorexidina. Finishing of the enamel margins has to be carried out with ultrasonic tools or high-speed red grit burs (thin pointed, thin pointed conical, or round in shape) (see Fig. 7.70).
7.8.2 Class 2 Cavity Preparation
Black’s class 2 cavity involves the proximal surface of the posterior teeth. Usually the caries starts under the contact surface that often shows areas of mild decalcification from rubbing with gradual wear of the proximal surface because of the tooth’s movement during chewing and occlusal stress. A microcrack of the proximal enamel ridge can also be a path for the entrance of bacteria and a start of a carious process.
Hess classified different types of class 2 cavity:
-
Pure class 2 or class 2A: with direct access to the lesion because of the lack of the contiguous tooth
-
Class 2B: primary or secondary involvement of the marginal ridge and of the proximal surface (M mesial or D distal cavities)
-
Composed class 2 cavity, which expects the contemporaneous involvement of the two proximal surfaces separately (M and D cavities) or the proximal and occlusal surfaces together (OM, OD and MOD cavities)
Stay updated, free dental videos. Join our Telegram channel
VIDEdental - Online dental courses


