Armamentarium
|
History of the Procedure
Traditionally, patients with severe mandibular deficiency were treated with surgery alone or surgery combined with dental extractions and orthodontics. Individuals who underwent major surgical movements showed limited results, severe relapse, condylysis, temporomandibular arthrosis, postoperative sleep apnea, and failures. The experienced surgeon knows the limitations of orthognathic surgery in several clinical situations, especially in large movements and particularly in patients with syndromic mandibles.
Another limiting issue is correcting the transverse dimension deficiencies. The orthodontist usually tries to increase the intercanine distance with mechanical methods, confronting either relapse or severe periodontal problems secondary to bringing the teeth outside the alveolar bone and producing secondary gingival recessions. Extraoral distraction osteogenesis has been widely used to treat major mandibular deficiencies, but this method has led to facial scars and social inconveniences. The latest technologies in intraoral distraction osteogenesis have evolved to offer a friendly and comfortable surgical technique. The obstetrician, pediatrician, and pedodontist are the first practitioners to evaluate patients with severe three-dimensional mandibular deficiencies, with a severe Class II malocclusion and anterior teeth crowding, with or without symmetry. They should manage this information to guide the patients according to the state of the art technology.
Limitations and Contraindications
Intraoral distraction osteogenesis biology is based on sound surgical principles that depend on vascularity and bone quantity and quality. It should not be applied after radiotherapy or conditions involving very poor bone. Also, this technology requires patient and family collaboration.
Technique: Mandibular Widening
Step 1:
Incision and Dissection
The incision is made 4 to 6 mm labial to the depth of the mandibular vestibule through the orbicularis muscle. After the muscle is transected, the dissection is directed obliquely through the mentalis muscle until contact has been made with the mandibular symphysis. The periosteum is responsible for the distraction chamber healing and must be carefully reflected inferiorly to the lower border of the mandible; a small channel retractor is positioned to protect it throughout the osteotomy procedure.
Step 2:
Osteotomy
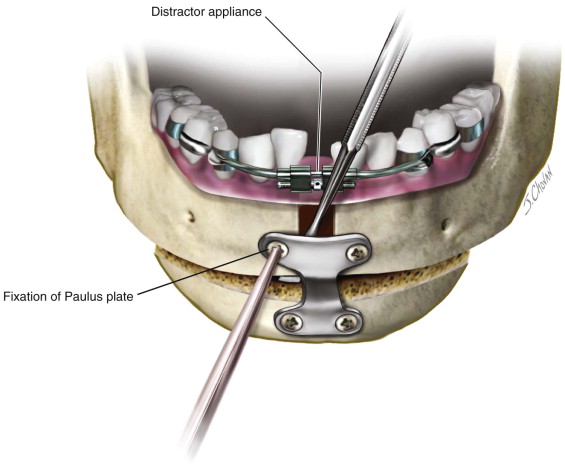
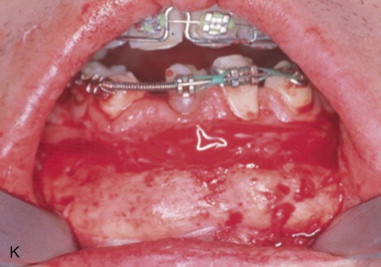
The osteotomy is carried out from the inferior border up to the apices with a reciprocating saw, the soft tissue between the mandibular central incisors is carefully reflected superiorly to the alveolar crest, and a skin hook is used to retract and protect the soft tissues while the interdental osteotomy is completed. The procedure is initiated with a 701 bur mounted in a straight handpiece; just the outer cortex and the sectioning are finalized with a straight chisel below the teeth, and the best anterior interdental space is selected for the osteotomy. A step may be necessary to start in the symphyseal midline and finish between the lateral and canine to avoid postsurgical chin asymmetry. Also, patients who need major widening (more than 8 mm) should have the genioplasty osteotomy performed simultaneously so as not to widen the lower part of the face, an undesirable feature in most women ( Figure 35-1 ).
Step 3:
Distractor Application
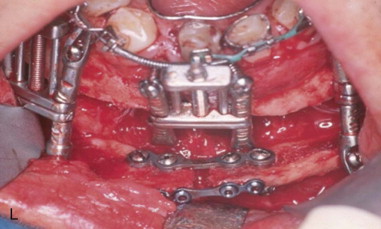
Tooth-borne appliances are commonly used because they are less expensive and save time during surgery. If a bone-borne device is to be used, it must be fixed before the osteotomy is completed. The upper arms of the prebent bone-borne appliance are connected to the anchorage teeth with a 0.024-inch gauge wire, and a 2-mm transmucosal bicortical screw is used on each side to fixate the lower arms. Acrylic is placed over the wires around the teeth to provide more rigidity. The widening obtained is similar to that achieved with any distractor, but the tooth-borne distractor is easier to activate and remove.
Most patients require an advancement genioplasty with vertical augmentation to ideally treat the 3D deformity. This can be done simultaneously by acutely widening the mandibular basal bone with an instrument, fixating the chin segment, then releasing the instrument from the osteotomy site.
At this point, a 0.026-inch gauge wire could be used to unite each central incisor to the consecutive lateral incisor or canine to prevent the teeth from “walking” into the distraction site secondary to transseptal fibers stretching during the activation period. Once the osteotomy and 2-mm activation have been performed, periosteum, muscles, and mucosa wound layers are meticulously closed using a 3-0 chromic suture.
Step 4:
Distraction Protocol
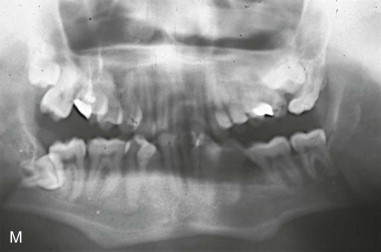
The activation is initiated 7 days later, at a rate of 1 mm per day and a rhythm of once per day. Once the desired widening is obtained, acrylic is placed on the activation screw to stabilize it and the patient is advanced to soft diet. The consolidation or mineralization stage usually lasts 60 days for every centimeter of distraction. Radiographs are used for confirmation, and then the surgeon removes the distraction device to follow orthodontic mechanics. Following distraction removal, the orthodontist places a dental pontic or a plastic tooth, fixed with a bracket to the dental orthodontic arch. This maintains the space open for a few weeks as the teeth are brought together with slow movements of 1 mm per month per side, until there is complete closure. Faster movements into an unconsolidated bone area may create a periodontal defect and a gingival recession.
Technique: Bilateral Mandibular Lengthening
Posterior Body Osteotomy
This osteotomy is designed for mandibular deficiencies that present ideal occlusal planes. Even though most patients with a severe Class II show a steep curve of Spee with crowding, this secondary problem should be addressed by orthodontics, inferior-repositioning subapical osteotomy, or combining mandibular widening with advancement to correct the anterior crowding or transverse discrepancy. The treatment objective is to obtain an ideal canine and molar Class I occlusion relation with a flat occlusal plane.
The adequate positioning of the distraction is fundamental to achieve the correct distraction vector, and different variables are taken into consideration for adequate planning and fixation. Obviously, the option of changing the distraction vector after surgery is sometimes employed for an ideal functional-aesthetic outcome.
The orthodontist and surgeon should plan the positioning of the distraction appliance based on photographs, radiographs, dental models mounted in an articulator, and clinical examination, sometimes requiring a 3D model. The distractors need to be parallel to the occlusal plane to avoid developing a posterior or anterior open bite.
Additionally, as the mandible is transversely wider in the posterior and narrower in the anterior portion, the distractor appliances need to be adjusted by creating a step of 5 to 8 mm in the anterior fixation arms, allowing the distractor’s screw to be placed parallel to the axis of distraction to compensate for this important variation in mandibular width. If this is underestimated, the reciprocal forces exerted to the mandible by the appliance will advance the mandible, moving the proximal segment not only posteriorly (this could be overcome with the use of heavy Class II elastics) but also laterally and exerting detrimental forces to the temporomandibular joint (TMJ), causing pain, dysfunction, and damage to the joints, as well as lateral torque force against the condyle, which can loosen the screws and bend the appliance.
Mandibular advancement needs to be achieved by transporting the anterior segment anteriorly into an ideal Class I occlusion and eliminating the posterior reciprocal forces with heavy Class II elastics (8 to 12 ounces per side for 3 months).
Step 1:
Incision and Dissection
A 2.5-cm full-thickness incision is made over the external oblique line, extending inferiorly over the alveolar ridge to the position of the first molar. A subperiosteal tunneling dissection is performed to expose the alveolar ridge and the buccal cortex down to the inferior border of the mandible between the second and third molars, where a small channel retractor is placed to protect the soft tissues during the osteotomy. The periosteum, muscles, and soft tissues are minimally detached, maintaining the best blood supply possible to the area.
Step 2:
Osteotomy
A reciprocating saw is used to section the inferior border of the mandible bicortically at a 45-degree angle to increase the bony surfaces, up to 3 mm away from the inferior alveolar nerve and continuing on the lateral mandibular cortex superiorly. A periosteal elevator is placed between the lingual soft tissues and the mandible to guard against lingual nerve injuries while the alveolar area is sectioned bicortically from the top toward the inferior alveolar nerve area 3 or 4 mm away, with the saw upside down and at a 45-degree angle. Abundant irrigation is used throughout the osteotomy to avoid bone overheating.
Step 3:
Distractor Application
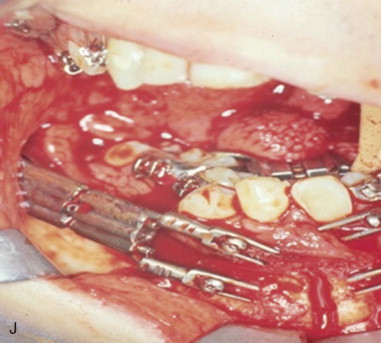
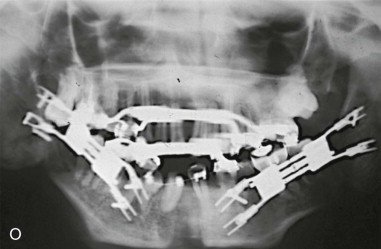
At this point, the uncut bone is just 6 mm around the mandibular nerve, the flaps are sutured, and the distraction appliance is fixed with transmucosal bicortical screws above and underneath the nerve; an interdental wire could be used to avoid the need for interdental screws. A small incision is left open so that a torque movement can be applied with a chisel to complete the mandibular osteotomy, and a single mattress suture is placed to close the remnant of the flap; this maneuver ensures primary closure over the osteotomy, eliminating distraction chamber contamination and offering periosteum integrity. When the operation involves both sides, final sectioning of the ramus is deferred until the osteotomy of the opposite side has been completed. A sagittal split osteotomy could also be used to obtain a broader bone surface if adequate bone width is present; this approach is beneficial in that it allows the surgeon to avoid pulling the mandibular nerve, especially in large advancements where the nerve is elongated 20% to 30% of its length, causing paresthesia ( Figure 35-2 ).


Stay updated, free dental videos. Join our Telegram channel
VIDEdental - Online dental courses


