Chapter 6
Quality Assurance in Panoramic Radiography
Aim
The aims of this chapter are to outline the principles of a quality assurance programme and to provide the practitioner with the knowledge to overcome many of the problems encountered when producing a DPR.
Outcome
At the end of this chapter, the reader should have a raised awareness of the steps required for a dedicated quality assurance programme in order to produce high-quality diagnostic images for the minimum patient radiation dose. Using this systematic approach to image production, the reader should have become familiar with the range of problems that can adversely affect panoramic image quality and have the necessary knowledge of how to rectify them.
Introduction
A high-quality DPR is produced by careful attention to the correct positioning of the patient, followed by optimum processing of the radiograph. Unfortunately, the many variables in the panoramic technique itself often conspire to lead to the production of a less than adequate final product. This can compromise or prevent diagnosis and, in the more extreme cases, negate the purpose for which the film was taken. The level of unacceptable films varies from 18.2% to 33%, with low density/low contrast films and incorrect positioning of the patient being the most common problems (Fig 6-1).
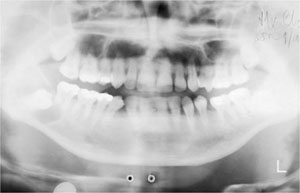
Fig 6-1 DPR with low density. The film illustrates the difficulty in diagnosis when relying on less than optimal image quality. There is a unilocular radiolucency in the right angle of the mandible overlying an unerupted third molar: a dentigerous cyst.
How to Overcome Problems of Poor-Quality Images
The necessity to produce a high-quality radiographic image requires a concerted effort by staff, along with the development of a dedicated Quality Assurance (QA) programme. Such a programme will ensure the production of a high quality diagnostic image with the minimum radiation dose to the patient and with limited cost to the health care provider. To achieve these ideals, a quality control programme is developed to selectively test the major components of the radiographic system on a regular basis, thereby ensuring optimum performance. The major components of any radiographic system are:
-
x-ray equipment
-
practical radiographic technique
-
image receptor (film/screen combinations, digital system)
-
darkroom
-
processing
-
image viewing.
The routine testing of each of these components is combined with monitoring and regular auditing of the quality of the final image. There are two methods to monitor film quality:
-
day-to-day surveillance
-
a retrospective criterion-based clinical audit.
Most dentists continuously monitor radiographic quality during patient management. This simple method of evaluation can be improved by comparing each film to a reference or ‘ideal’ film. This day-to-day surveillance rapidly alerts the clinician to major departures from ideal film quality.
Some film faults are, however, more subtle, resulting in a gradual deterioration in film quality that often goes unnoticed or is unrecognised. A criterion-based clinical audit allows the practitioner to effectively identify areas of poor practice by systematically assessing each stage of image production. The audit is effective in highlighting areas of poor practice, allowing the practitioner to rapidly instigate change to improve film quality. These may include the need for equipment maintenance, an improvement in radiographic technique or the need for improved staff training. The criterion-based audit requires a standard (Table 6-1) against which the adequacy of the film can be judged. Simply looking at ‘current practice’ and the identification of what is wrong without measuring it against ‘best practice’ will obviously achieve very little. In the United Kingdom, the need to implement a suitable QA programme for dental radiography is a legal requirement. The QA programme to ensure optimum image quality should include:
-
a daily film reject log
-
a routine image quality assessment at six monthly intervals or immediately if film quality suddenly deteriorates
|
A: Patient preparation/instruction to patient
B: No patient positioning errors
C: Correct anatomical coverage D: Good density and contrast E: No problems with cassette or intensifying screens
F: Adequate processing and darkroom techniques
|
A well-designed QA programme must be inexpensive to operate, both from a monetary standpoint and with regard to the staff time involved. It should be the responsibility of a named person. The QA programme should detail the frequency with which surveys and checks of the radiographic system are to be undertaken, and this information must be kept in a written log.
Identifying the Problem – A Reject Film Analysis
Using the criteria given in Table 6-1, the practitioner can then implement a ‘reject film analysis’, which is in essence a subjective evaluation of film quality. Poor-quality films tend to fall into several distinct categories according to the errors present:
-
poor positioning
-
unsharp image
-
too pale
-
too dark
-
low contrast.
With the exception of poor positioning, which is discussed later, each fault type, its cause(s) and the methods used for correction are detailed in Tables 6-2, 6-3, 6-4 and 6-5.
| Fault | Causes | How to remedy fault |
| Unsharp image | Patient movement (often occurs with younger and older patients) | Inform patient of length of exposure and the necessity to keep still. |
| Assess patient prior to examination as to their degree of cooperation. | ||
| Exclude patients with medical problems which result in uncoordinated movement (i.e., Parkinson’s disease, facial dyskinesias and dystonias). | ||
| Poor positioning | See stage 2: patient positioning | |
| Poor film/screen contact (cassette film) | Check hinges and catches of cassette for signs of damage. | |
| Check screens for signs of deterioration of screen backing support. | ||
| Depending on the problem, order either a new cassette or replacement screens. |
| Fault | Causes | How to remedy fault |
| Film too pale | Processing fault: | |
| Developer solution too dilute | [M]: Discard and mix new chemistry according to manufacturer’s instructions. [A]: Use solutions according to manufacturer’s instructions. |
|
| Developer too cold | [M]: Increase temperature of developer; use manufacturer’s time-temperature chart. [A]: Adjust temperature control; if no change in film quality, call in specialist to repair equipment. |
|
| Developer oxidised | [M] And [A]: Discard chemistry appropriately; replace with new chemistry. | |
| Developing time too short | [M]: Use manufacturer’s time-temperature chart. [A]: Increase cycle time if possible; otherwise call in specialist to rectify. |
|
| Developer contaminated by fixer | [M]: Ensure that chemicals are prepared in dedicated and labelled containers to prevent contamination [A]: Transport system contaminated. Clean immediately. Routine cleaning is recommended, follow manufacturer’s instructions. |
|
| Fixer time too long | [M]: Usually for twice the time required to develop the film. | |
| X-ray exposure: | ||
| Incorrect x-ray exposure set | Alter exposure time. | |
| Failure to keep switch depressed | Keep switch depressed. | |
| Equipment failure: | ||
| timer inaccurate, switch contact faulty, kV/mA inaccuracies | Take equipment out of service and call for engineer to service/repair equipment. | |
| Film cassette positioned back to front in film carriage or upside down | Care needed in correctly positioning cassette. |
| Fault | Causes | How to remedy fault |
| Film too dark | Processing fault: | |
| Developer concentration too high | [M] and [A]: Dilute or change chemicals. | |
| Development time too long | [M]: Use time-temperature chart. [A]: Transport system has slowed down; adjust cycle time if possible. If problem does not resolve, check for wear and corrosion in equipment especially in the transport system. Call in engineer to rectify. |
|
| Solution temperature too hot | [M]: Reduce temperature of developer; use manufacturer’s time-temperature chart. [A]: Adjust temperature control; if no change in film quality, call in specialist to repair equipment. |
|
| Contaminated solutions | Change chemistry following thorough cleaning of processor. | |
| Fogged film: | ||
| Light leak in darkroom | Check darkroom. | |
| Light leak in cassette | Check hinges, catches and outer casing (especially plastic cassettes) for damage. Either effect temporary repair or take out of service and replace. | |
| Faulty safelighting | Check safe light visually for filter crack; check for correct bulb wattage, correct filter and correct distance above work surface. Use coin test. | |
| Film outdated | Discard film. | |
| Poor film storage: | ||
| excessive temperature, excessive humidity | Discard film and designate new storage area. | |
| X-ray exposure: | ||
| Incorrect x-ray exposure set | Alter exposure time. | |
| Equipment failure: | ||
| timer inaccurate, switch contact faulty, kV/mA inaccuracies | Take equipment out of service and call for engineer to service/ repair equipment. |
| Fault | Causes | How to remedy fault |
| Low contrast film | Processing fault: | |
| Overdevelopment | See Table 6-4 | |
| Underdevelopment | See Table 6-3 | |
| Developer contaminated by fixer | Discard chemistry and start again. | |
| Inadequate fixation (films opaque with a milky sheen) | If processing manually it may be possible to retrieve the situation. Place film in container of fixer for 10 minutes, wash for 20 minutes and then dry. This works even if ‘under-fixed’ film had previously been dried. Ensure all films are fixed for the appropriate time. | |
| This appearance also occurs when fixer is exhausted, check date when chemistry changed. | ||
| Fogged film | See section on film fogging in Table 6-4 |
How can we Improve Panoramic Film Quality?
It is extremely important that dentists understand how their DPRs are produced so that they can ‘trouble-shoot’ the system. Often, film faults are unique to the individual dentist or practice and tend to recur regularly, the inference being that they are not recognised.
The aim of the next section is to alert the practitioner to the problems associated with creating a DPR. This takes you step by step through each stage of image production. This process commences by loading the cassette in the darkroom, preparing the patient, imaging the patient, processing the film, and finally viewing the film.
At each stage, attention will be drawn to possible problems and the method of correction. In addition, the necessary quality control tests and procedures needed to ensure continuing optimum performance will be detailed along with the frequency of their implementation.
Producing a DPR
Stage 1: The Darkroom
This section relates to those practitioners who are using cassettes with screen/film combinations followed by processing in a darkroom or desktop processor.
The energy carried by the emerging x-ray beam interacts with the inorganic salts (phosphors) in the screens, causing them to fluoresce. The light emitted has, as near as possible, the same energy information as recorded by the original x-ray beam. This light exposes the photosensitive film emulsion sandwiched between the contiguous screens.
As screen film is obviously extremely sensitive to light, routine checks should be made to ensure that the darkroom is light-tight and the safe lights are ‘safe’. Desktop units should be similarly checked for light tightness.
The dedicated dark r/>
Stay updated, free dental videos. Join our Telegram channel
VIDEdental - Online dental courses


