Chapter 3
Anatomy
Aim
The aim of this chapter is to outline those anatomical structures that may appear on a DPR. Sectional DPR images are used predominantly throughout this book to clarify the identification of salient features.
Outcome
After studying this chapter the reader should be able to recognize the main anatomical features that appear on dental panoramic radiographs.
Introduction
In order to interpret DPRs, it is essential to be able to recognise normal anatomical features. However, it should be remembered that:
-
not every anatomical structure will necessarily appear on each DPR.
-
there is variation between individuals
-
anatomical features change over time.
There are a large number of anatomical structures that appear on a DPR, so for clarity of presentation, these have been subdivided into:
-
hard tissues
-
soft tissues
-
air shadows
-
ghost shadows.
Hard Tissues
It is assumed that those reading this book are familiar with the anatomy of the teeth and so this is not described.
Mandible (Fig 3-1)
A standard DPR shows the whole mandible, although the head of the mandibular condyle is often obscured by superimposition from the skull base.
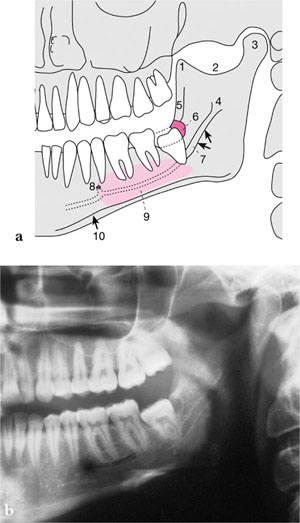
Fig 3-1 a) Diagram of half of the mandible showing the main anatomical features. b) The corresponding half of a DPR.
-
coronoid process
-
sigmoid notch
-
mandibular condyle
-
mandibular foramen
-
external oblique ridge
-
follicular space (around distal aspect of wisdom tooth)
-
inferior alveolar canal (arrows)
-
mental foramen
-
submandibular fossa (coloured pink)
-
cortical margin of the lower border of the mandible (arrowed)
Sometimes, anatomical features can resemble disease. For example, as shown in Fig 3-2, the mental foramen may be superimposed over the apex of the lower second premolar, mimicking a periapical inflammatory lesion. The submandibular fossa can occasionally appear so radiolucent (Fig 3-3) that it may be mistaken for an abnormality, e.g. odontogenic keratocyst.
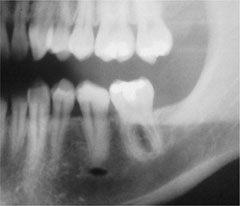
Fig 3-2 Mental foramen superimposed over the apex of the lower left second premolar.
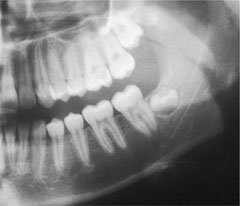
Fig 3-3 Radiolucent submandibular fossa.
Maxilla, Antrum, Nasal Skeleton, Zygoma and Temporal Bone
The focal trough passes through only part of the maxilla, maxillary antrum, nasal complex and zygoma. As a consequence, these structures are not fully depicted.
A DPR depicts both maxillary sinuses mainly in lateral profile. Fig 3-4 depicts the anatomical structures on one side of the upper jaw and associated structures. The floor and posterior walls are well shown and can usually be traced. Some panoramic machines have sinus programmes that place the focal trough in a more favourable position so that more of the maxillary sinuses are depicted.
Stay updated, free dental videos. Join our Telegram channel
VIDEdental - Online dental courses


