Semi-adjustable Articulators
Bill Sharpling
Principles
This chapter and the associated video aim to assist with understanding the procedure of mounting models into a semi-adjustable articulator, which takes place most often in the dental laboratory, following on from a facebow recording and intra-occlusal records being made.
Preparing the Bite Fork, Records and Models for Despatch to the Laboratory
The bite-fork assembly should have had all the locking screws checked for tightness prior to being removed from the facebow.
The dental technician mounting the models will need to be confident that the bite fork has remained in the same position during transportation. It can be helpful to place the bite-fork assembly in padded material such as bubblewrap prior to placing it in the laboratory workbox.
The bite fork and occlusal records should have been disinfected prior to passing them onto the laboratory. If the records have been tried on any working models, then the models should also be disinfected.
Procedures
The bite fork will be carefully removed from any packaging and a check will be made that the maxillary model to be mounted into the articulator sits in the bite-registration material in a stable manner. Bite-registration material is very accurate and will capture the occlusal anatomy in great detail. However, the occlusal surface of some study models produced from alginate impressions can show positive discrepancies such as small airblows. If so, these will be removed, as they can interfere with the fit into the registration material.
The registration material may also be trimmed to a minimal amount to check that the model is fully seated.
The bite-fork assembly is then secured in the bite-fork assembly holder. This holder is then placed in the lower member of the articulator in the same slot where the incisal table, which has previously been removed, is normally housed.
The bite fork will now be sitting centrally above the lower mounting plate and should be in the same position in relation to the condylar elements of the mandible as the occlusal plane is in the patient (see Figure 3.4.1).
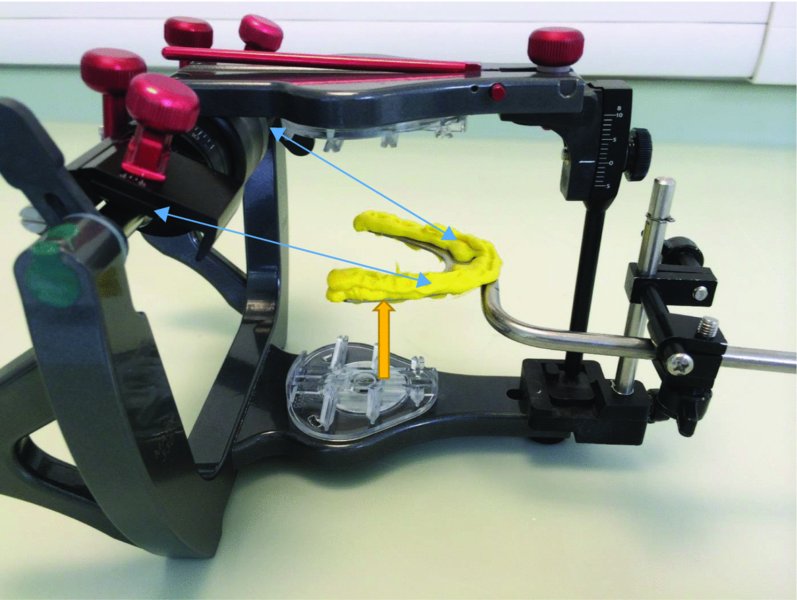
Figure 3.4.1 The relationship of the bite fork to the condylar head elements of the articulator, which relates the incisal edge of the maxillary teeth in the correct three-dimensional position to the condyles in the patient’s head
A bite-fork support is sometimes used (shown by the orange arrow in Figure 3.4.1) when a large and/or heavy upper model is being mounted, as this will ensure that the bite fork does not move/flex during the mounting procedure.
The maxillary model is then placed into the bite fork and is attached to the upper element of the articular via a mix of mounting plaster.
The lower model is then mounted against the upper model. If it is prescribed to have the models mounted in a retruded arc of closure, then the lower model will be mounted against the upper using the relevant intra-occlusal record supplied to the laboratory.
Setting the Articulator Controls
A semi-adjustable articulator will have certain programmable elements. Most commonly it will be the condylar guidance angle and Bennett angle that can be adjusted. These can be set to average value readings or can be customised by the use of intra-occlusal records.
Condylar Guidance Angle
If setting to average values (assuming a Denar articulator), the condylar guidance angle would be set at 30°.
Stay updated, free dental videos. Join our Telegram channel
VIDEdental - Online dental courses


