Chapter VIII
Precision Attachments for Metal-Ceramics
There are a number of prefabricated attachments which may be classified as follows:
- Intracoronal attachments.
- Extracoronal attachments.
- Stud attachments.
- Bar attachments.
- Auxiliary attachments, e.g. screws, friction devices, bolts, etc.
It is outside the scope of this book to consider precision attachments in detail and the reader is referred to the work by Preiskel (1979) for a more detailed treatise on how to use these retaining devices in dentistry.
Of the five types of attachment only the first two, intra- and extracoronal will be considered in relation to ceramic work.
Attachments Used in Metal-Ceramics
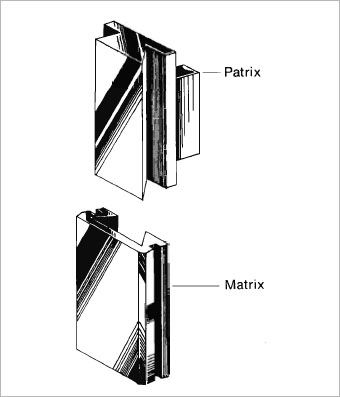
Intracoronal slide attachments for alignment and connection of fixed bridges. These attachments consist of two parts, a slot (matrix) and a flange (patrix). The flange is joined to one section of the prosthesis and the slot unit embedded in the metal-ceramic restoration.
There are several types of intracoronal attachment for connecting metal-ceramic bridgework:
1. Metaux Precieux No. 111 in Novostil (Matrix and Patrix)a
Description
Intracoronal non-adjustable slide attachment (friction grip).
The attachment is free-sliding with no base stop on the matrix. It is cylindrical in shape and has tagging down the complete length of the patrix.
Length 8 mm.
Outer matrix width 1.7 mm.
Available in Novostil for casting high temperature metals onto matrix and patrix.
Indications for Use
To align converging or diverging retainers or connect sections of bridgework. It is a small attachment and very useful for connecting anterior bridges and splints.
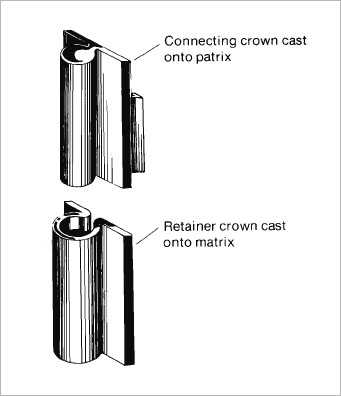
2. Cylindrical Slide CM Attachment No.21-01-2 Ceramicor-Ceramicorb
Description (Fig. 8-1)
Intracoronal non-adjustable slide attachment (friction grip).
The attachment has an interface on both matrix and patrix. Tagging extends 5 mm of its length from the base.
Length 7 mm.
Outer matrix width 1.5 mm.
Available in Ceramicor for casting onto matrix and patrix.
Indications for Use
To align converging or diverging retainers or to connect sections of bridgework. This attachment is particularly useful in anterior bridgework since it is possible to reduce Smallest the length and interfaces if required.
Slide Attachments. Dovetail Attachment Beyeler No. 21-03-2/3/7/8
Description (Fig. 8-2)
Intracoronal non-adjustable slide attachment (friction grip).
Available in Ceramicor metal. For direct casting onto matrix and patrix.
| Smallest | 21-03-2 | |
| Short-small | Length | 3.7 mm |
| Width | 2.7 mm | |
| Matrix depth | 1.2 mm | |
| Largest | 21-03-8 | |
| Long-wide | Length | 7.0 mm |
| Width | 3.0 mm | |
| Matrix depth | 1.3 mm |
Indication for Use of Beyeler Attachment
For use with converging or diverging retainers and the extension of bridges. These attachments are simple and robust and are particularly suitable for connecting segments of metal-ceramic bridgework in the posterior region. It is generally advisable to use these attachments distal to the canines since they are too wide for use in the anterior region.
Construction of Metaux Precieux III Attachment in Novostil
Cut the attachment to a suitable length so that it fits easily into the available occluso-gingival space. The tagging down the full length of the patrix will ensure of adequate attachment. Wax up abutment crown to full contour. Determine the final length of the attachment to fit the crown and cut both matrix and patrix to length with a fine saw-blade.
The matrix should be in alignment with the path of insertion for the retainer crown. The ideal position for any intracoronal “interlock” attachment should be as follows:
- The attachment must not alter the anatomical contour of the metal-ceramic crown.
- The metal surrounding the attachment must give full support to the porcelain.
- The attachment must be free-sliding and easy to insert without placing stresses upon the porcelain.
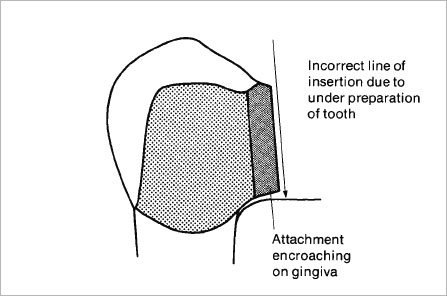
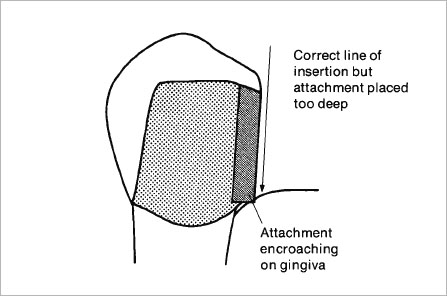
If the preparation does not allow sufficient intracoronal space for the attachment, the metal will extend either too far from the axial wall (Fig. 8-3a and b) or encroach into the gingival margin (Fig. 8-4).
Vertical Position
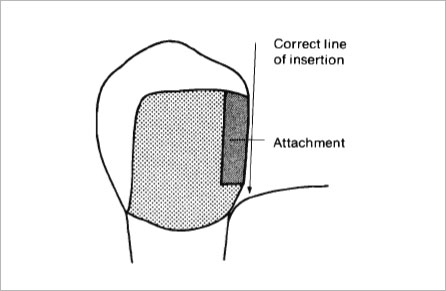
The attachment must be above the cervical shoulder and close to the axial wall (Fig. 8-5a).
Horizontal Position
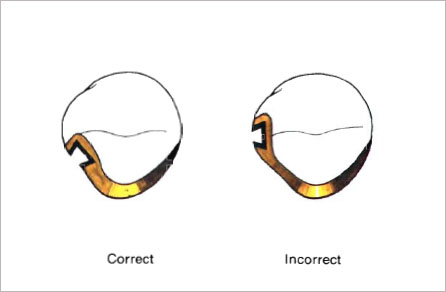
The matrix must not be placed too far labially, otherwise there will be insufficient space for porcelain and colour problems will arise (Fig. 8-5b). When the matrix is placed close to the axial wall and to the lingual aspect, the labial clearance for porcelain will maintain the enamel translucency (Fig. 8-5c).
Inserting Matrix into Wax Pattern
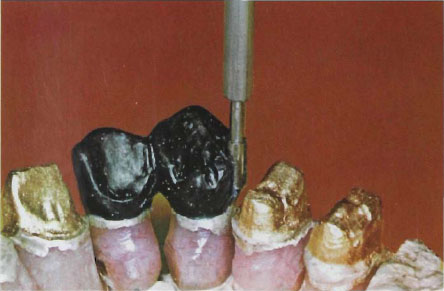
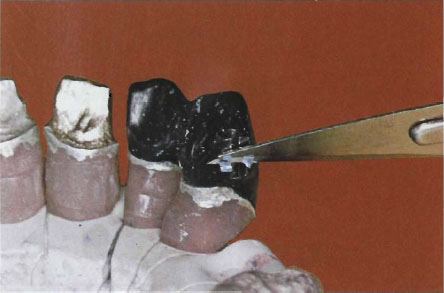
Carve a wax crown to the exact anatomical shape desired and cut back the wax in the matrix area with a sharp knife. Insert the matrix using a paralleling instrument and mandrel (Fig. 8-6). Wax the matrix to position with hard inlay wax and remove any excess wax from the external surfaces of the matrix with a sharp scalpel (Fig. 8-7).
Check the position of the matrix in relation to the occlusion and anatomical contour of the tooth.
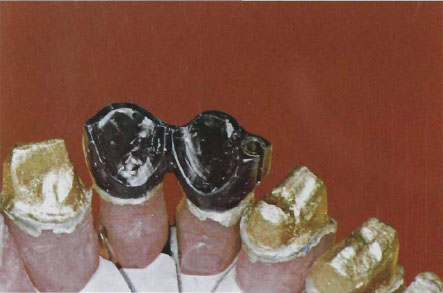
Carve the wax crown to form a classicallyshaped coping as shown in Figure 4-21 until a thickness of 0.5 mm is achieved, leaving the matrix surrounded with at least 0.3 mm of wax. The 0.3 mm thickness of wax will ensure that there is adequate metal support for the porcelain. Check that the lingual collar is of sufficient thickness to resist distortion by tensile stresses (Fig. 8-8).
Figure 8-3b
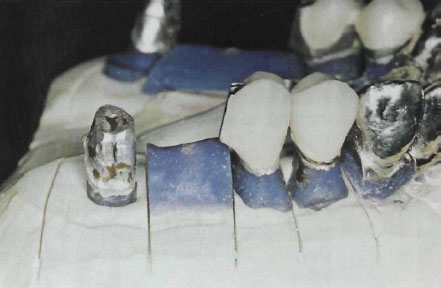
Fig. 8-3a and b (a) Attachment placed too far from the axial wall due to under-preparation of tooth, (b) Diagram showing incorrect placement of cylindrical slide attachment. The surrounding metal has encroached into the embrasure space and created a stagnation area at the gingival collar.
Figure 8-5c
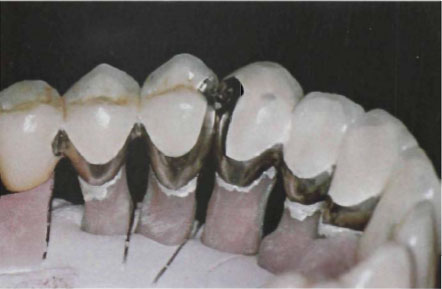
Fig. 8-5a to c (a) Correct position of slide attachment. (b) Incorrect position of slide attachment encroaching onto space that is required for the veneer porcelain compared with the correct position which is placed more lingually. (c) Clinical case illustrating the correct position of a cylindrical slide attachment in which there is adequate embrasure space and correct depth for porcelain on the facial surface. The canine teeth are within the contour of the originals and there is sufficient metal surrounding both matrix and patrix.
On completion of the coping form, use a scalpel to create a flat interface along the plane of the matrix. The width of the interface may be adjusted to suit each individual case. Ideally it should be wider on the lingual aspect and thinner on the facial aspect, leaving more room for porcelain. The wider lingual aspect will then improve the stability of the metal and the attachment during function (Fig. 8-8). The facial area of metal surrounding the attachment should be regarded as the “Buffer Zone” which prevents any stresses being placed upon the porcelain.
Check the wax-up for accuracy and polish the surface prior to spruing.
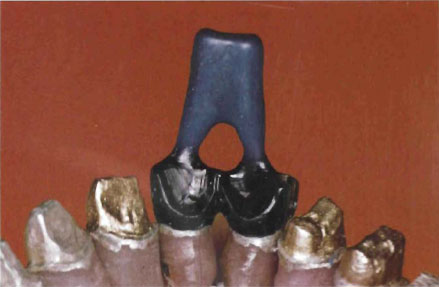
Use round sprues of 3.5 mm diameter and insert one in the anterior coping and one near to the attachment. Twin sprues will ensure adequate supply of metal into the mould (Fig. 8-9).
- Coat the pattern with a wetting agent, taking great care not to allow the liquid to flow into the matrix. If any liquid remains in the matrix it can result in a fine metal film being cast into the matrix.
- Wax the sprued coping in the former and check correct position (see page 228).
- Mix the phosphate bonded investment under vacuum as described in Chapter V, page 233.
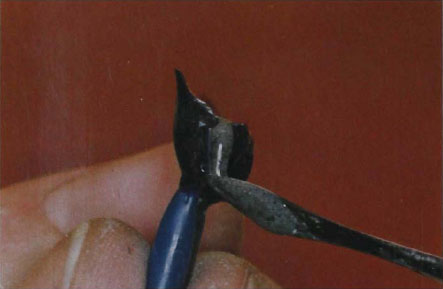
- Using the point of a metal instrument push the investment into the matrix making sure that no air is trapped (Fig. 8-10). Coat the internal surface of the coping using a fine sable brush and replace the casting ring onto the former and slowly pour investment into the ring.
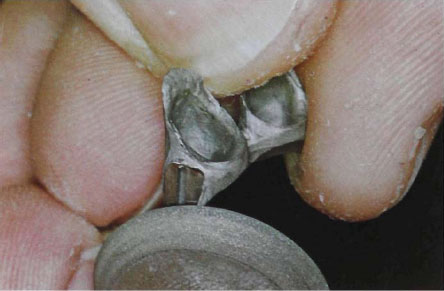
After casting the coping should be finished as described in Chapter V, page 238. The coping should be pickled in acidc in order to soften the hard investment trapped inside the matrix. Great care should be taken not to damage the internal surface and external edges of the matrix. A glass fibre pencil may be used for final cleaning. The coping should require very little shaping if waxed correctly and only the buffer zone on the facial aspect should need thinning at this stage. The interface should be lightly ground and polished to a high gloss (Fig. 8-11).
- Ensure patrix is fitting perfectly inside the matrix and is free-sliding.
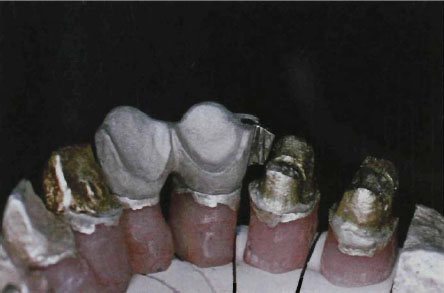
- Place matrix coping on die with patrix in position. Where teeth are being splinted the patrix tagging should be checked to see that it does not encroach onto the adjacent preparations. If it does, it should be ground to allow at least 0.3 mm of wax to flow round it (Fig. 8-12).
- Check the occlusal clearance of the tagging and that there is sufficient room for both metal and porcelain.
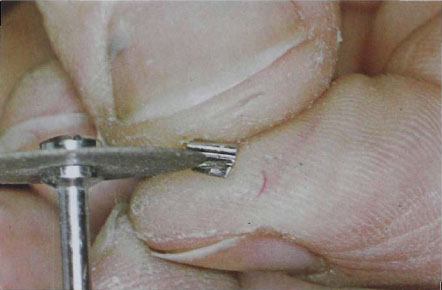
- To assist retention and bonding to the metal casting, cut some mechanical retention into tagging with a disc (Fig. 8-13).
- Lightly coat the interface with a separating medium and place patrix into position.
- Place coping on die and flow hard inlay wax onto interface and around the patrix tagging. (This is easily done with the die removed from cast.)
- Remove the patrix from the matrix by pushing from the base of the patrix with a blunt instrument. Check the patrix interface for any imperfections.
- Place patrix back into matrix and replace coping on die.
- Wax the pontic or coping, whichever is being attached, as previously described (Fig. 8-14).
- Where two copings adjoin as in fixed splinting, the path of insertion can be tight and difficult to determine. When withdrawing the patrix coping it is a common experience for the patrix to split away from the hard inlay wax. To overcome this the wax in the patrix and matrix area can be replaced with “Duralay”, thereby providing a more rigid and stronger joint.
- When a pontic adjoins the coping it is advantageous to use the `split pontic technique’ described in Chapter VII, page 354. The pontic should be split diagonally and the sprue for the section of the pontic containing the patrix placed horizontal to the patrix. The sprue will then act as a stabilizer during the soldering procedure.
Stay updated, free dental videos. Join our Telegram channel

VIDEdental - Online dental courses


