Chapter VI
Special Effects in Dental Porcelain
Colour may be divided into three main components:
Hue
The type of colour, e.g. red, orange, blue, etc.
Chroma
The strength or purity of a colour at any given Value level.
Value
The total reflectance or luminance. This property is related to brightness or lightness.
Clark (1933) in a study measuring natural tooth colours on the Munsell scale, showed a scattering of tooth shades predominantly in a small part of the light yellow area, relatively fewer in the band above, and no occurrence over more than 99 percent of the Munsell range. Natural teeth lie, therefore, in a very narrow band of colour, and this explains why matching shades in teeth is so difficult (Monograph III, McLean, 1979).
Human teeth vary considerably in texture, colour and form. When making porcelain crowns the ceramist is supplied with basic dentine and enamel porcelains with which to create the form and colour in the crown. If a crown is made with a body dentine and standard incisal overlay it will generally look very artificial in the mouth except in the very young patient.
In order to duplicate a natural tooth, the structural defects, degrees of calcification and varying thicknesses in enamel should be duplicated in the porcelain build-up. Porcelain colours must be built in depth and surface colourants applied judiciously in areas where natural staining occurs in the mouth. The root and cervical areas of the crown deserve special attention if they are to blend harmoniously with the gingival tissue.
“Special Effects” in dental porcelain are created with the use of supplementary colours of the basic dentine porcelain, translucent or colourless porcelain and concentrated colours made from the basic porcelain frit, into which metallic oxide pigments are fritted. The intensity of colour is controlled by dilution with uncoloured glass powder to form a concentrated colour or in the case of a stain the fritted powder may be used in its pure state.
Types of Special Effect (Fig. 6-1a)
- Neck or gingival effects simulating root dentine.
- Dentine effects. Faults in calcification or structural defects. Variations in the anatomy of the dentine core and thickness of overlaying enamel.
- Incisal effects. Defects in calcification, cracks, structural defects, internal staining.
- Surface stains. Stain which occurs naturally on teeth produced by tobacco, food, beverages, caries or other causes. A typical selection of glazed pigment stains is shown in Figure 6-1b.
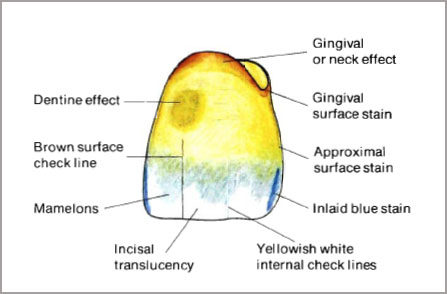
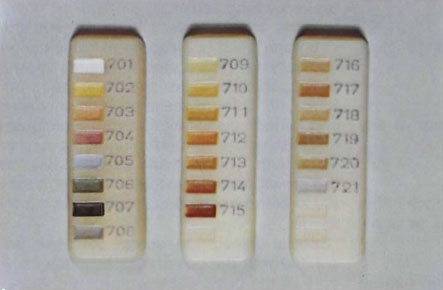
Figure 6-1b
Fig. 6-1a and b (a) Diagram of the various types of stain, concentrated colours and porcelains used to create special effects in a veneer crown. (b) Vitachrom L glazed stains.
Gingival effects are a most useful way for the ceramist to lap in colour at the cervical third of a restoration prior to the main porcelain build-up. The effect is usually created with highly colour saturated porcelain powders and manufacturers supply these separately. In the author’s opinion these concentrated colours are probably the most valuable materials with which to hide dark metal shadows or core porcelains since the ceramist is always fighting for space at the neck area. Applying surface stain over the neck area is never as effective in creating a natural-looking gingival colour. The application of gingival porcelain to the cervical third of the crown is normally required in most teeth. In young patients the enamel colour will increase slightly in chroma as it reached the neck because of the close approximation of the underlying dentine. In older patients some of the root area may be exposed and the root dentine must be duplicated in dental porcelain.
Special neck or gingival porcelains should be the first veneer porcelains to be applied to either core or opaque. The finished neck effect may be of varying thickness, depending on the result required. Once the gingival porcelain is in position the body dentine or enamel is placed in the usual way. It is often convenient to fire the neck effect porcelain into position to check the shade before commencing the veneer build-up. Effects powders may be used with either metal-ceramic or aluminous porcelains. For purposes of illustration an all-ceramic restoration using aluminous porcelain will be illustrated.
Gingival Effect Using Vitadur-N Effect Powders
A heavily colour-saturated porcelain is used to mask the core porcelain and is illustrated in the following example. The same principle applies to a metal-ceramic crown.
Vita Shade A.1 (no root exposed) (Figure 6-2)
Effect powder 380 N is applied thickly at the cervical margin (Fig. 6-2a). The neck effect is usually thinned out as it approaches the middle third of the tooth and body dentine porcelain brought down over the neck effect so that it almost reaches the cervical margin. The neck effect should be carried higher in the approximal areas. The enamel overlay will then complete the three-dimensional effect. The neck effect powder may be fired to position before completing the veneer porcelain build-up (Fig. 6-2b). A completed crown Shade A.1 using the neck effect powder is shown in Figure 6-6d.
Neck Effect Using Body Dentine Porcelain (Vitadur-N)
Where heavy masking of the metal-ceramic opaque or aluminous core porcelain is not required and a true natural root effect is desired, the use of a darker or more colour-saturated dentine powder is preferred.
Vita Shade A.3 (with root exposed) (Figure 6-3)
Dentine powder 354 N (Shade A.4) is used to create the natural root dentine (Fig. 6-3a) and then overlaid with powder 353 N (Shade A.3). The neck porcelain 354 N may be fired to position prior to placing the body dentine 353 N (Fig. 6-3b).
There can be many variations in neck effects. For example, the dilution of effect powders No. 380 with the basic dentine porcelain powder can produce a less intense and more subtle effect. Buttons of various mixes can be fired to produce a comprehensive range of gingival or neck effects. A completed case using Vitadur-N Shade A.4 dentine as a neck powder is shown in Figure 6-3c.
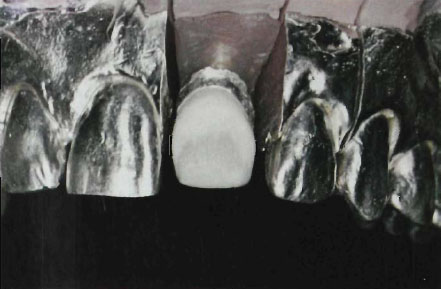
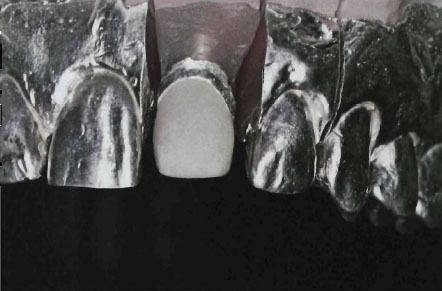
Figure 6-2b
Fig. 6-2a and b (a) Effect powder Vitadur 380 N applied thickly at the cervical margin. (b) Neck effect powder fired to position. Pre-firing of the neck effect powder prior to building the rest of the crown will allow the ceramist to check the shade.
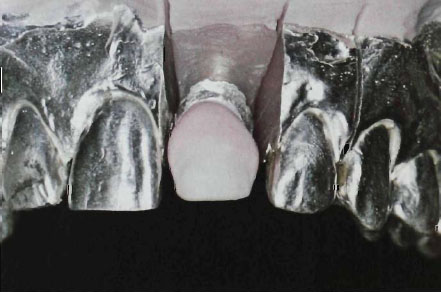
Figure 6-3a
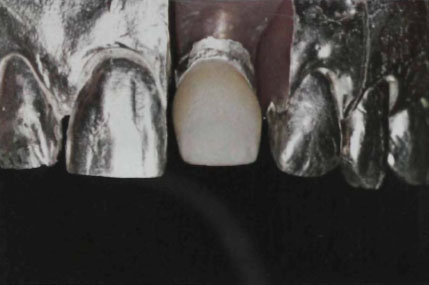
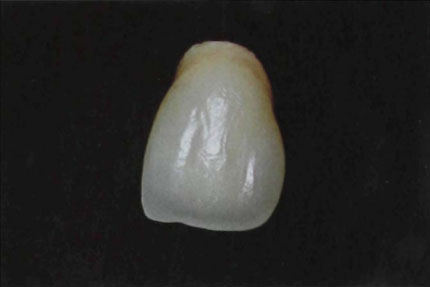
Figure 6-3c
Fig. 6-3a to c (a) Vita shade A.4 dentine applied to neck area to create a natural root effect. (b) Neck powder fired to position illustrating the ideal blend line. (c) Vitadur-N crown showing the use of the darker neck dentine powder.
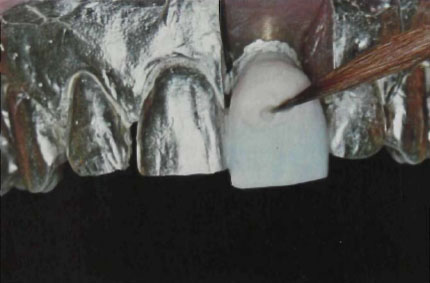
Fig. 6-4a Facial area of crown scraped away in area where intense colour is required and effect powder Vitadur 380 N laid in and covered with the body dentine powder 353 N.
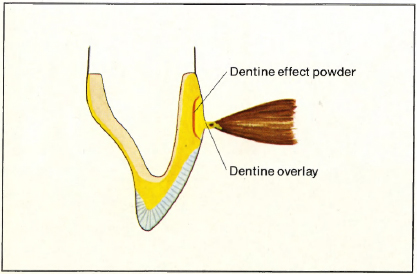
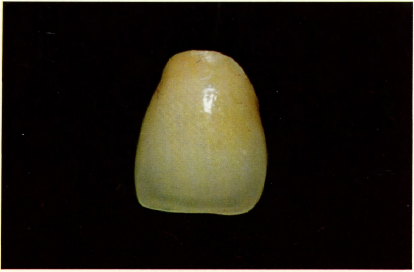
Fig. 6-4c Vitadur-N crown shade A.3. Facial surface characterised with 380 N effect powder.
Dentine effects cover a broad spectrum. Higher chroma dentines, or dentines of a different hue from the basic dentine chosen, may be used to alter or change the regular shade in part of or the entire facial area of the crown.
Vita Shade A.3 Vitadur-N (Fig. 6-4). Effect powder 380 N is used to produce an area of intense colour on the facial surface of the crown. On completion of the dentine and enamel build-up, the desired area of increase of colour is scraped away and the effect powder 380 N introduced and overlaid with 353 N dentine powder (Fig. 6-4a). It is important that the concentrated colour is tapered off at the sides before introducing the dentine overlay (Fig. 6-4b). In this case the dentine powder 354 N has been used to create the neck effect. A crown illustrating the use of the dentine effect powder is shown in Figure 6-4c.
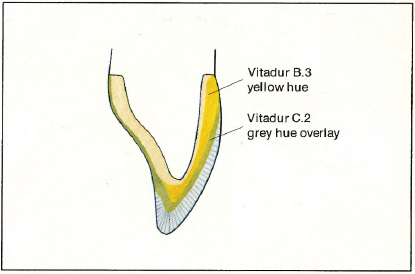
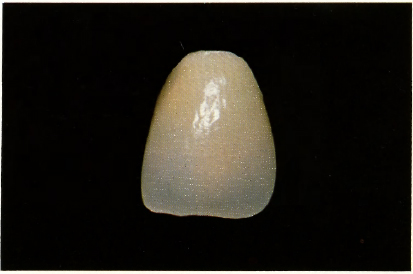
Figure 6-5b
Fig. 6-5a and b (a) Diagram showing the use of a yellowish neck powder to change the shade of a grey tooth, (b) Vitadur-N crown showing the use of a B.3 neck powder to alter the shade of the greyer C.2 dentine.
Changing Shade over Labiocervical Surface
Vita Shade C.2 Vitadur-N requiring a yellow hue to the grey hue of the normal C.2 neck. Dentine powder 356 N (B.3) is used as a gingival neck effect and overlaid with 359 N (C.2) (Fig. 6-5a). The change of colour may be accentuated by the length of chamfer given to the 356 N gingival porcelain and in some cases this can be extended the full length of the core porcelain. Overlaying colours will generally produce a more subtle effect than blending shades since the change in colour is gradual and will always be influenced by the overlaying dentine porcelain (Fig. 6-5b).
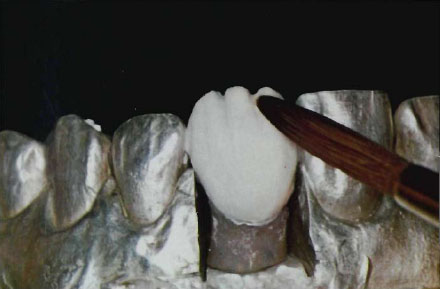
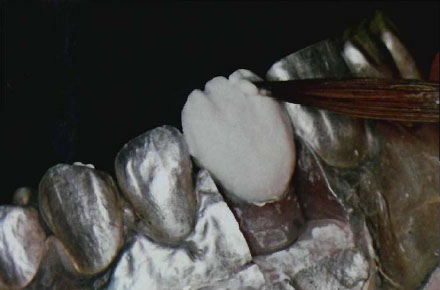
Figure 6-6b
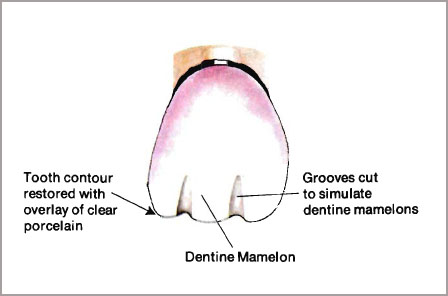
Figure 6-6c

Figure 6-6d
Fig. 6-6a to d (a) Grooves cut in incisal dentine to highlight the mamelons. (b) Grooves filled with colourless porcelain to create a three-dimensional effect, (c) Diagram illustrating the method of creating dentine mamelons. (d) Finished crown Vitadur-N Shade A. 1 with 380 N neck effect powder and dentine mamelons.
In many cases the incisal edge is delineated by three finger-like extensions of the dentine. These are the dentine lobes originating in the tooth during its development. In order to reproduce this effect, the crown is completely built up in dentine porcelain and two grooves cut in the incisal third of the dentine (Fig. 6-6a). The base of the groove is then filled with a little colourless porcelain which will highlight each groove and accentuate the dentine mamelons (Fig. 6-6b). The depth of groove will control the degree of translucency (Fig. 6-6c). The mamelons may be even further accentuated by applying stain to the edges of the groove cuts prior to overlaying with enamel porcelain. This will give the effect of the dentine continuing into the incisal and splitting the incisal blue-grey colour into pronounced mamelon formation. A porcelain veneer crown showing the effect of dentine mamelons is illustrated in Figure 6-6d.
Reproducing a Discoloured Filling
(Fig. 6-7)
These effects may often augment a finished restoration but should not be placed in facial areas subject to direct vision. The Class III filling is the obvious choice but it should only involve the approximal area.
On completion of the build-up of the crown the desired area for the filling is hollowed out and the wall of the cavity lightly coated with stain (e.g. Vitachrom 713 L, Fig. 6-7a). A core of neck effect powder (e.g. 382 Vitadur-N) is introduced over the stain, taking care not to displace it (Fig. 6-7b). Any leakage patterns or peripheral stain can then be picked out on the surface with a dark stain (e.g. No. 76 Biodent) applied with the tip of a small brush. The surface is then covered with a little colourless porcelain and the crown is ready for glazing. A completed crown showing this effect is illustrated in Figure 6-7c.
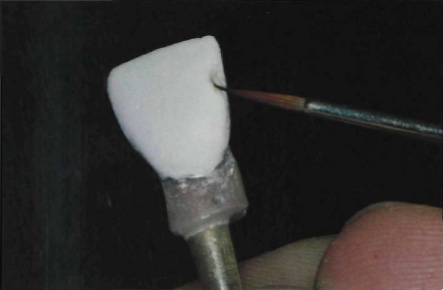
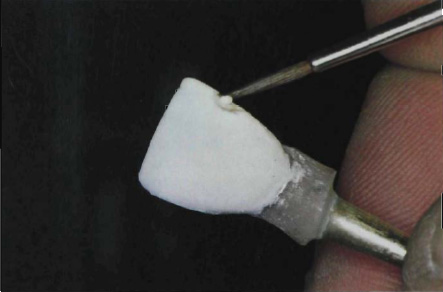
Figure 6-7b
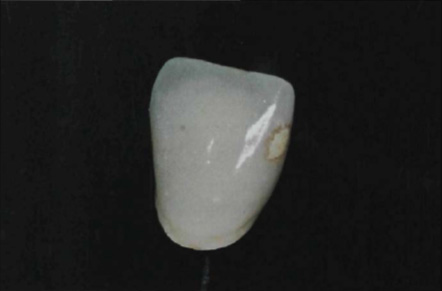
Figure 6-7c
Fig. 6-7a to c (a) Area for filling hollowed-out and stain applied to walls, (b) Stain overlaid with core of effect powder, (c) Glazed crown showing simulated filling on surface using Biodent No. 76 stain.
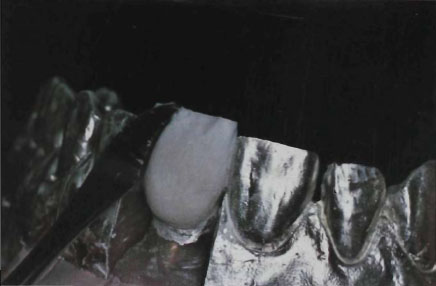
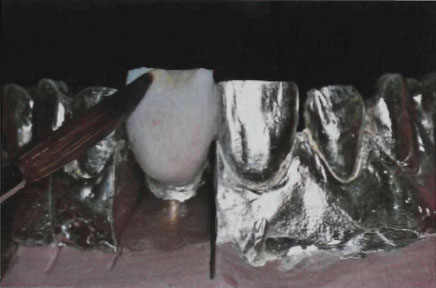
Fig. 6-8b Orange stain lightly painted over the enamel.
The use of concentrated colours and stains inlaid into the enamel porcelain can often transform an artificial-looking crown into one that immediately blends with the adjoining teeth. Incisal effects can improve dramatically a full mouth rehabilitation and avoid a “metal-ceramic” smile.
Incisal effects can range from fine yellow-white check lines to strong orange hues. These effects may be created with either porcelain powders or stain pigments. Experience has shown that where coloured effects, e.g. white, orange, grey and blue are required, the use of pigment stains as opposed to concentrated colours is to be preferred. The ceramist has far more control over the placement of stain and it gives a greater degree of consistency.
Some teeth exhibit an orange hue at the incisal which is just short of the actual edge of the tooth. The enamel outlines this orange effect almost like a halo. In order to reproduce the effect the following procedure may be adopted.
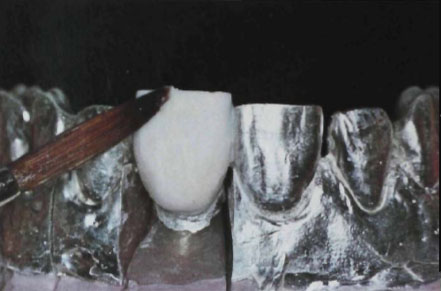
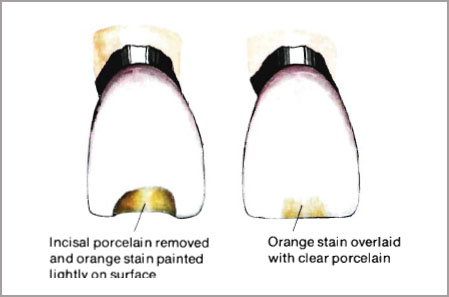
Fig. 6-8d Diagram of method of creating incisal orange hue.
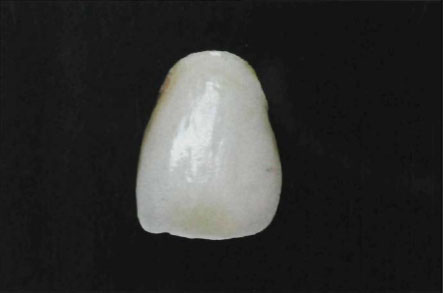
Fig. 6-8e Vitadur-N crown Shade B.3 with incisal orange effect.

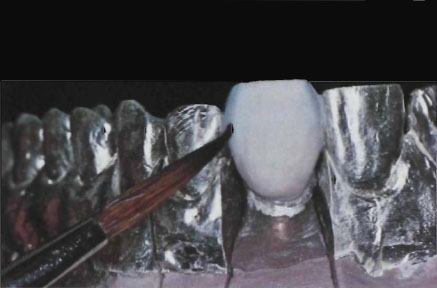
Fig. 6-9b Application of blue stain.
Enamel porcelain is removed from the facial surface of the incisal edge of the enamel to a depth of 0.2 to 0.5 mm (Fig. 6-8a) and Biodent or Vitachrom stain painted over the desired area (Fig. 6-8b). This stain should be very lightly applied and only just give a sensation of colour. The stain may be highlighted by covering with a thin layer of colourless porcelain (Fig. 6-8c and d). A crown illustrating the incisal orange hue is shown in Figure 6-8e and 6-28b.
Simulating Blue Translucency of Approximal Enamel
On completion of the dentine and enamel build-up, a little enamel porcelain is removed from the incisal end of the mesial and distal approximal surfaces to a depth of not more than 0.5 mm (Fig. 6-9a). Great care must be taken not to remove too much porcelain since the amount removed must be replaced with colourless porcelain. When too much colourless porcelain is applied there is a tendency for the enamel to become grey and the blue effect is almost lost. The blue stain (Vitachrom L 705) is applied with a light stroke of the brush (Fig. 6-9b) and then overlaid with colourless porcelain (Fig. 6-9c and d).
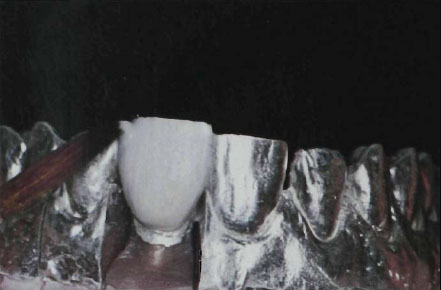
Fig. 6-9c Stain overlaid with colourless porcelain.
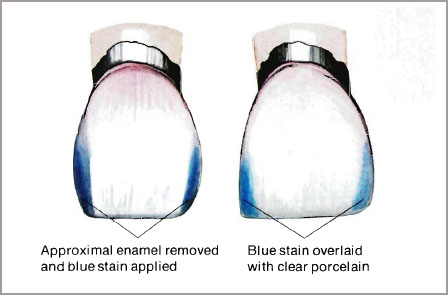
Fig. 6-9d Diagram of the highlighting of the approximal enamel with blue stain.

Fig. 6-9e Glazed crown showing approximal blue translucency.
The above principle of applying stain is relative to all inlaid stain techniques. Stain must be covered with only the thinnest layer of colourless porcelain and where light shades are being constructed the effect stain may be covered with one of the more translucent enamel porcelains as opposed to the colourless or translucent porcelains. A glazed porcelain veneer crown showing the increase in blue translucency using the approximal stain technique is illustrated in Figure 6-9e.
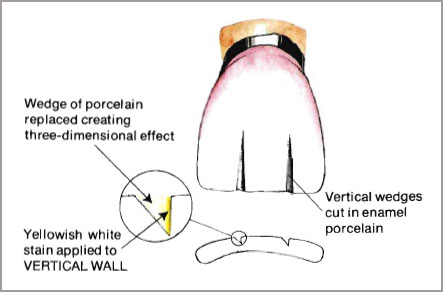
Simulating Enamel Check Lines The Wedge Technique
Most adult teeth will exhibit structural defects in the enamel and cracks are the most common. The enamel check line is probably the most difficult to reproduce in dental porcelain since to simulate the natural tooth it must be seen in depth.
On completion of the dentine and enamel build-up a vertical cut is made with a razor-blade in the enamel porcelain exactly where the check line is required. A second cut is then made at an angle and a wedge-shaped piece of porcelain removed. More than one check line can be done at a time (Fig. 6-10a). A fine yellowish-white check line can be reproduced by painting stain (Vitachrom L 701, 702 or Biodent 71) down the side of the wall of the vertical cut (Fig. 6-10b). This stain should be applied with one very light stroke and any excess on the facial surface removed with a clean brush. Under no circumstances should the stain be worked into the porcelain, otherwise a crude effect is produced.
The wedges of porcelain are now gently laid back into position and care must be taken to seal the cut by light tapping of the cast on the bench surface. Moisture will rise to the surface and bond the green porcelain wedges (Fig. 6-10c and d). Failure to seal the wedges can lead to fissure cracks during sintering.
It is possible to replace the V-shape cuts with fresh porcelain; however, this method is more likely to alter the position of the stain check line particularly near to the surface. A crown in which enamel check lines have been reproduced using the “wedge technique” is illustrated in Figure 6-10e.
White hypocalcified areas or striae are developmental defects that are often described as the simplest to duplicate in porcelain. The reverse is probably true. Many crowns, when finished, reveal a series of white dots which bear no resemblance to natural hypocalcification. The white stains are rather susceptible to bloating in the fired porcelain and often the white effect powders are to be preferred. White effects must be built into the porcelain in two or three layers for the best result (Fig. 6-11a).
For example, if a hypocalcified area is to be duplicated in the approximal region, the white powder 371 N is introduced in very small quantity and covered with enamel (Fig. 6-11b). A fine brush tip will pick up just the right quantity of white powder and if it is gently “rubbed” to place and covered with a thin layer of enamel porcelain, the area of white looks more natural. The next spot of white is placed with the tip of a brush and covered again with enamel (Fig. 6-11c). Finally the enamel is covered with colourless porcelain (Fig. 6-11d). A completed crown showing an area of hypocalcification is illustrated in Figure 6-11e.
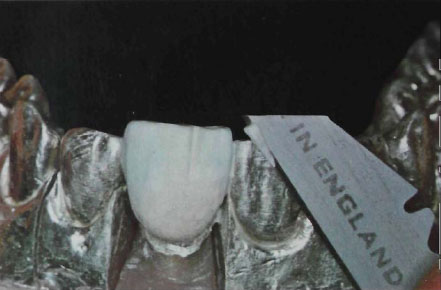
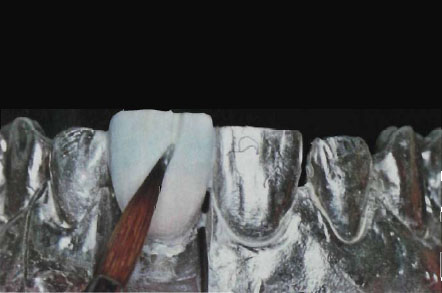
Figure 6-10b
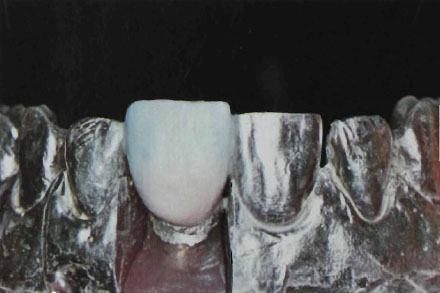
Figure 6-10c
Stay updated, free dental videos. Join our Telegram channel
VIDEdental - Online dental courses


