Chapter IX
Building Occlusion in Dental Porcelain
The problems of developing occlusion in dental porcelain have been presented in Monograph IV of this series (McLean, 1979). This book is more concerned with how to build occlusion rather than the physiological reasons. The ceramist will be presented with preparations and occlusal registrations which can vary greatly. A knowledge of some fundamental aspects of developing occlusion can assist him, whatever types of porcelain, articulators, or preparations are being used.
Two main objectives in building porcelain occlusions should be:
- Maintenance of periodontal health and masticatory function.
- The development of the most favourable occlusion to prevent fracture of the porcelain.
To achieve an occlusion that is favourable to a brittle material like porcelain, the ceramist must be able to place buccal and lingual cusps in their correct relationship with opposing fossae and develop the correct height and angle of cusps. In addition he must ensure that favourable anatomical contours are developed and that the height of contour of the teeth is in harmony with the gingiva if periodontal health is to be maintained. Prematurities and non-working side contacts should be avoided since they frequently can cause fractures in porcelain cusps or marginal ridges. An ideal occlusion is one in which maximum intercuspation coincides with centric relation.
Wherever possible, lower buccal cusps should never occlude on marginal ridges since fine edges of porcelain are easily broken (Fig. 9-1).
The original occlusal tables must not be widened since the surface area and potential flaws in the porcelain are increased. Fracture usually starts from microcracks produced by thermal stresses, grinding effects or porosity (Fig. 1-19).
The optimum type of occlusion which can reduce fractures in porcelain crowns is one that provides minimal tooth contact outside centric relation since stress between opposing porcelain cusps is minimised and therefore cannot deepen microcracks. This type of occlusion is usually developed by using the canine teeth as a discluding mechanism (so-called cuspid disclusion). The canine tooth, when built in porcelain, will be required to withstand all the lateral stresses, and providing its lingual inclines are in harmony with the border movements of the mandible then no damage can occur. However, an incorrect lingual contour will either cause loosening of the crowned tooth or, if there are natural mandibular canines opposing the porcelain crowns, then heavy wear of tooth enamel can be expected. An excellent account of the implications of developing “cuspid protected occlusions” has been given by Dawson (1974) in which he observed that in natural cuspid-protected occlusions, the pattern of function is rather vertical, so the mandible does not use lateral movements that would subject the canines to stress in that direction.
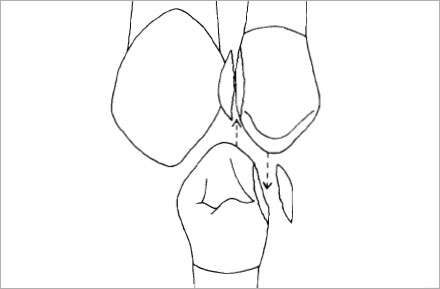
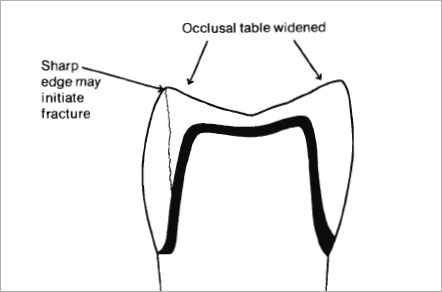
Fig. 9-2 Do not widen occlusal tables or leave sharp edges on the porcelain cusps since breakage is more likely.
In patients where posterior tooth contact is necessary for correct function, then it is essential not to widen the original occlusal tables and any sharp edges of porcelain should be rounded and glazed to prevent chipping (Fig. 9-2). It will be appreciated that in every porcelain crown a flaw (microcrack or pore) will be present that can act as the greatest stress concentrator, i.e. it causes a rapid deepening of a microcrack under low masticatory stress. If such a flaw is placed under repeated or prolonged loading during function, then fracture can occur suddenly. The chances of “finding” this flaw during function are increased if tooth-to-tooth contact is frequent. A “group function occlusion” is sometimes desirable or even necessary in many patients but it is still of greater potential danger to the integrity of the porcelain surfaces.
In determining the position of mandibular buccal cusps, attention should be paid to correct gnathological principles.
- A mandibular buccal cusp should be positioned so that its contact with the upper tooth directs stresses through the long axis of both teeth (Fig. 9-3a).
- Where possible the greatest stability will be achieved by ensuring that mandibular buccal cusps contact the fossae of upper teeth (Fig. 9-3b).
- Cusp to fossa relationship should ideally coincide with centric relation. However, with porcelain occlusions the so-called “long centric” is well tolerated.
- Maximum damage will be done, both to the porcelain and the periodontium, if premature contacts occur in the posterior teeth, and prevent the patient from returning to centric relation.
Further consideration should be given to the effect of excursion of the mandible on placement of cusps. The mesio-distalplacement of each lower buccal cusp should be determined by locating it in the fossa that permits excursions without interference (Dawson, 1974). This may be determined by selecting an appropriate fossa in the upper mounted cast and assessing the path of a potential mandibular cusp. The cusp will travel at right angles to the rotating condyle and by visualising a straight line from the rotating condyle to the selected contact point in the fossa, the path of the lower cusp may be determined in either working or non-working side excursions. This will have an effect on the decision as to where cusp tips should be placed since if contact is made on the distal maxillary fossae there is a greater chance of premature contact on the upper lingual cusps (Fig. 9-4).
Mandibular lingual cusps are usually regarded as non-functioning cusps and in the case of porcelain occlusions it is strongly advised that lingual contact be avoided. This area is very prone to fracture if prematurities are present (Fig. 9-5). Mandibular lingual cusp height should be at least 1 mm less than the buccal cusp.
The dimensions of a porcelain cusp tip will generally have to be greater than one made in gold alloy. This statement is obvious if we consider the mechanical properties of both materials. Very sharp porcelain cusps will easily break or chip and it is a bad principle to finish edges of porcelain to almost a knife-edge. Equally, gold cusp tips that are very sharp will soon wear due to point contact increasing stress. Generally speaking, the average porcelain cusp tip should have a contact area of about one millimetre diameter and present a smooth domed surface. The fossa will have to be larger and it is doubtful whether in a porcelain occlusion tripodism can be achieved by design as a regular procedure.
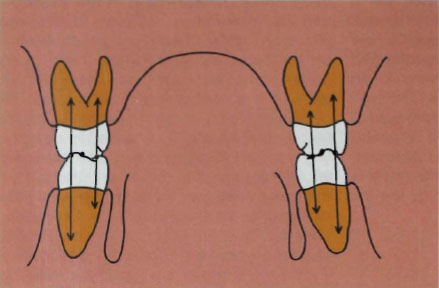
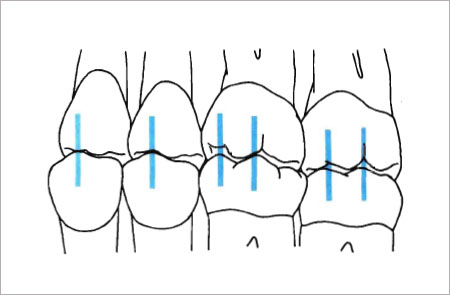
Figure 9-3b
Fig. 9-3a and b (a) Mandibular buccal cusps should be positioned so that occlusal stresses occur through the long axis of both teeth. (b) Greater stability is achieved in cusp-to-fossa relationship.
The most valuable record that the clinician can give to a ceramic technician is an accurate recording of centric relation. Ideally this should be taken at the time of setting up the study casts on an adjustable articulator. A diagnostic wax-up can be constructed and an assessment of the occlusion and types of preparation required for the case will enable a complete treatment plan to be made. Centric relation is more easily assessed during construction of the porcelain teeth if the split cast system is used.
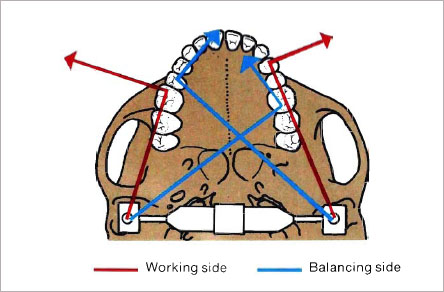
Fig. 9-4 When positioning cusps the path of egress from centric relation should be considered. The movement of mandibular cusps may be determined by visualizing the path as being at right angles to an imaginary line drawn from the rotating condyle to the cusp point. This line can be superimposed upon the maxillary fossae. Paths on the opposite side from the rotating condyle represent balancing excursions, while paths on the same side represent a working excursion. When mandibular premolar cusps are placed in the mesial fossae of the maxillary teeth, less interference occurs during excursion of the mandible. If the centric stop is placed in the distal fossa, the maxillary lingual cusp may cause interference.
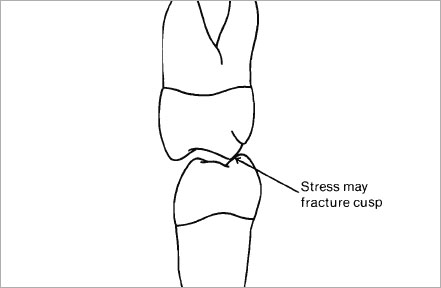
Fig. 9-5 When mandibular lingual cusps contact maxillary cusps there is a great risk of porcelain fracture during mastication since the lingual cusp is difficult to support with metal against lateral stresses.
Methods of Building Porcelain Cusps
There are several ways of building occlusion in porcelain and each method is directed towards correct placement and control of shrinkage of the cusps. It should be clearly understood that until the ceramist has mastered the art of building porcelain and judging the firing shrinkage correctly, then attempts to build full porcelain occlusions can be very frustrating. In our laboratory we have found that the use of sable brushes is still the best method of developing occlusion in porcelain and it is mandatory to build up to the desired cusp height and never to overbuild and carve back the fired porcelain. If porcelain is overbuilt and fired to a biscuit bake then it is impossible to carve occlusal surfaces, with any real form, by grinding. The teeth can look flat and square in appearance and any built-in enamel colour is often destroyed.
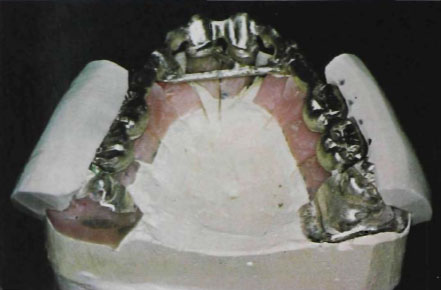
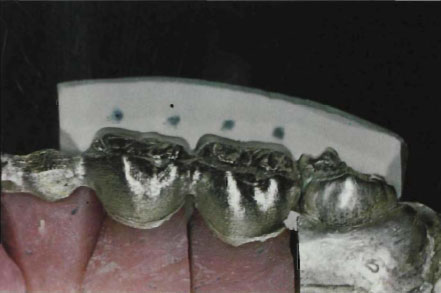
Figure 9-6b
Fig. 9-6a and b Full wax-up is made to determine the contour of the veneer porcelain. The silicone rubber key is trimmed on the buccal surface to the curve of each cusp and the space between the metal facing and the silicone rubber surface will determine the ideal area for coverage with veneer porcelain.
Three basic methods of developing occlusion have been used:
- Full wax-up with plaster or silicone rubber key.
- Brush additive technique.
- Porcelain cone technique built to a diagnostic wax-up.
Full Wax-Up with Plaster or Silicone Rubber Key
In this method the crowns are waxed-up on the dies to full contour and all cusps, marginal ridges and fossae developed to correct occlusion as described in the literature (Dawson, 1974; Thomas, 1976; Bauer and Gutowski, 1976; Huffman et al., 1969). A plaster or silicone rubber key is taken of the buccal surface and then space is provided for the porcelain by carving back the original wax pattern to allow for up to 1.5 mm depth of porcelain. The patterns are cast and reseated on the dies and, with a marking pencil, a dot is placed in the silicone key to indicate each tip of the buccal cusps. The silicone rubber key is trimmed on the buccal surface to the centre of each cusp (Fig. 9-6). This matrix will now act as a guide for the building of the buccal cusps.
The advantage claimed for this method is that the accuracy of the original wax-up can be as good as one in which the surfaces are being reproduced in gold. Unfortunately the method still requires considerable skill from the technician since he has to make a porcelain cusp, with a 40 per cent volume shrinkage, fit into a silicone mould. In addition, where full porcelain coverage is being used, the system is more time-consuming and expensive since the labour costs are high in building an occlusion in wax and then cutting it back to a classical coping shape. This is a double wax-up process and even more costly than developing standard gold occlusions. A further problem that can arise is in the carving of the coping form. Judging the correct thickness of remaining wax can present a problem when compared with the use of sheet wax of exact thickness.
This method relies on developing the porcelain occlusion using the wet porcelain/sable hair brush technique already described on page 48. There are at least two ways of controlling shrinkage with this technique:
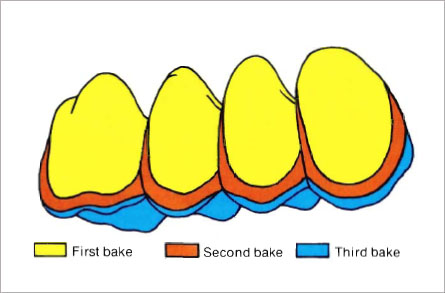
- Building porcelain cusps in two or three bakes to full occlusion with the articulator fully closed.
- Building porcelain cusps to full occlusion in one bake with the articulator pin opened by one to two millimetres to compensate for shrinkage.
Method one generally involves two further additions of porcelain since shrinkage will reduce the height of the cusps. However, it is possible to use this shrinkage to advantage since colour can be built in depth by applying and firing stain or effect colours to position after the first bake. In addition the second and third applications of porcelain allow the ceramist to make any minor corrections in anatomy, particularly where cusps have to be warped or occlusal tables altered in shape. Building porcelain up to occlusion also ensures that minimal grinding of the fired material is required which results in clearer colours and very detailed anatomy. Providing the second and third bakes are not fired at high temperatures, this method has proved the most successful in our laboratory.
Method two, in which the articulator pin is opened, has an appeal in that compensation for shrinkage can be made at the first bake by overbuilding the porcelain according to the opening on the articulator pin. It is a useful method to use where the porcelain is built against an opposing diagnostic wax-up. The only disadvantage is that it does not allow the firing of colours internally unless they are placed in the wet porcelain and, secondly, it can involve more than one bake if the occlusion is short, or else grinding of the occlusal surfaces if they are too high. Extreme accuracy with this method is vital. The control of firing shrinkage is very difficult in bulk porcelain and if marginal ridges, cusps and grooves are to be positioned with delicacy, it is more accurate to introduce this refinement with minor additions of porcelain, as well as being an easier way for the beginner to improve his art.
A case illustrating a three-bake technique is shown in Figures 9-7 to 9-12. The gold framework was constructed using the design described on page 339 and it is shown in the mouth in Figure 9-7. The preparations on 16 and 13 allow a full buccal shoulder fitwith copings finished toa knife-edge. Embrasures are correctly placed, leaving ample room for porcelain. The opaque porcelain is applied and fired to position (Fig. 9-8).
Figs.9-7 to 9-12 Metal-ceramic bridge construction using the brush-additive technique.
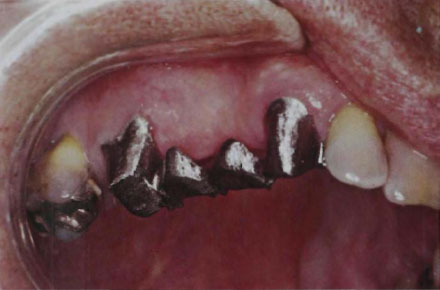
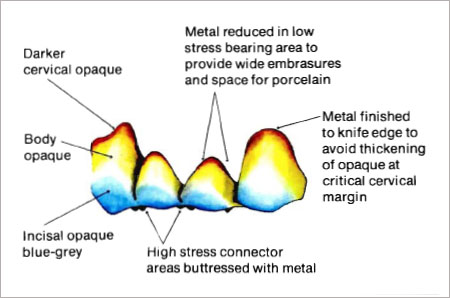
Fig. 9-8 Diagram of the use of multi-blended paint-on-opaques applied and fired in two bakes.
Enamel and Dentine Application
The dentine and enamel porcelains are applied using the incremental brush technique. The pontic area on the cast should be varnished or, if necessary, cigarette paper applied over the ridge. The teeth are built up in lobe formation so that each cusp is correctly placed in relation to the opposing teeth. The first application of porcelain should be in contact with the opposing teeth with all embrasures open and the dentine porcelain finished accurately to the cervical area. Where possible, pontics should exactly duplicate the original teeth and the labial finishing line should correspond with the gingival margins of the abutment crowns (Fig. 9-9). After the first biscuit firing the porcelain will shrink by about 40 per cent of its original volume but it should retain the position of the cups and marginal ridges in relation to the opposing teeth. At this stage grey, blue or white stains may be applied over the fired enamel porcelain to create any built-in colour effects. This stain is lightly fired to position (Fig. 9-10).

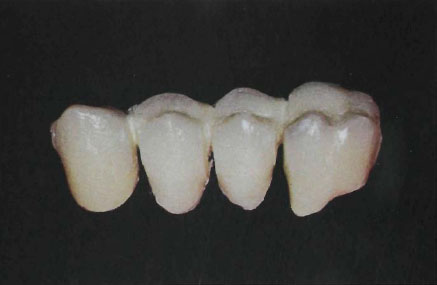
Fig. 9-10 Blue and white stain applied to incisal porcelain after first biscuit firing to highlight the enamel cusp. This stain may be fired to position or covered with enamel porcelain and then fired. (The fixed stain technique.)

Fig. 9-11 Third application of veneer porcelain allows the ceramist to refine the anatomy even further, as well as reducing shrinkage and increasing accuracy.

Figure 9-12a
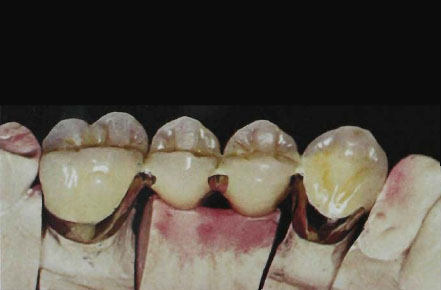
Figure 9-12b
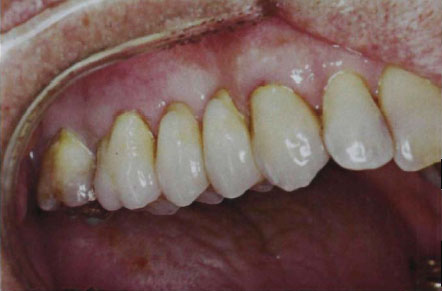
Figure 9-12c
Fig. 9-12a to c Completed bridge after staining and glazing, showing correct adaptation of the ridge lap pontics and open embrasures, (a) Buccal view, (b) Lingual view, (c) After six years’ service in the mouth. The pontics harmonize with the tissues and the adjoining teeth.
The second application of porcelain will generally involve enamel only. The cusps are rebuilt to occlusion taking care not to lose the lobe formation that will give character to the tooth. Each cusp should be clearly outlined and all marginal ridges delineated. The occlusal tables are now completed and checked for any interferences on the articulator. The lingual contour of the canine should allow the lower teeth to move in the desired excursion according to the requirements of the case (e.g. canine disclusion, group function, etc.). The lingual surface of the pontic is contoured to fit the ridge and all porcelain removed from the lingual slope to create a ridge lap pontic. After the second firing there may still be further shrinkage and a third application of porcelain enamel should now be made (Fig. 9-11). Although this involves another firing, it also avoids excessive grinding of porcelain when the cusps are overbuilt. Clearer colours and translucency will always be obtained by minimising the grinding of the porcelain. Providing high temperatures and quick firing are avoided the third biscuit bake will not affect colour. The third application of porcelain will involve only a very thin layer and it is in this layer that the final occlusion can be developed and provide the delicate anatomy required in the occlusal surface (Fig. 9-13). After the final bake only minimal touching in of the surface with stones will be required prior to surface staining and final glazing (Fig. 9-12a and b).
The completed case is shown in the mouth after 6 years (Fig. 9-12c). The contour of the pontics has assisted in maintaining a healthy gingiva and the built-in colour has produced a very natural enamel effect.
It may be seen from this brief description of building occlusion in a bridge that there are certain basic principles to follow:
- Always build up to occlusion. Never overbuild and cut back the fired porcelain.
- Shrinkage may be controlled and cusp tips accurately maintained by further applications of porcelain. The original fired porcelain cusps will then act like occlusal cones in determining the final position and height of the cusp (Fig. 9-13).
- Always build in lobe formation. Each tooth has at least four developmental lobes. Maintaining this form will ensure that cusp tips are correctly placed and more easily controlled during the building of occlusion.
- Incremental brush build-up of cusps will always give better form than attempts to grind to shape. Grinding will tend to flatten cusps and lose the convexity of cusp slopes and marginal ridges.
It is now possible to describe in greater detail the development of full porcelain occlusion where both upper and lower teeth have to be built with porcelain occlusal surfaces.
Brush Additive Technique with Articulator Pin Set at Correct Vertical Height
The construction of anterior bridgework has already been shown (Fig. 7-75) and the same case will be used to illustrate the development of occlusion in the posterior bridges. Fixed bridges in VMK 68 porcelain and gold-platinum-palladium alloy are to be constructed with pontics replacing 26, 36, 46 and retainer crowns in metal-ceramic on 24, 25, 27, 35, 37, 45, 47. Anterior maxillary teeth have to be restored with pontics on 12 and 22. The patient has a natural “canine protected occlusion” with some wear on the canine teeth.
Building the Mandibular Porcelain Cusps
Where natural maxillary teeth are opposing the lower porcelain teeth it is advantageous to place the mandibular buccal cusp against a selected fossa in the upper tooth. These fossae can be marked on the cast.
Stay updated, free dental videos. Join our Telegram channel
VIDEdental - Online dental courses


