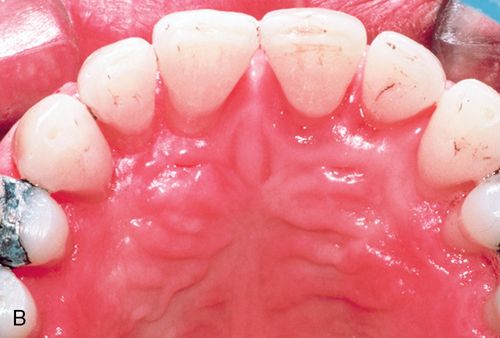
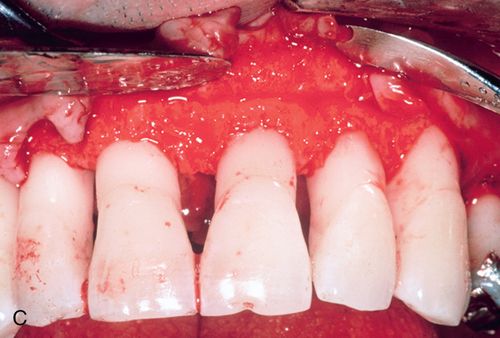
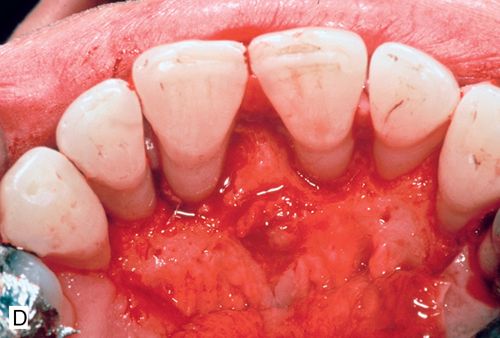

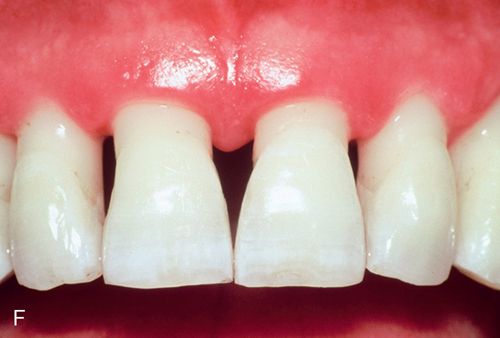
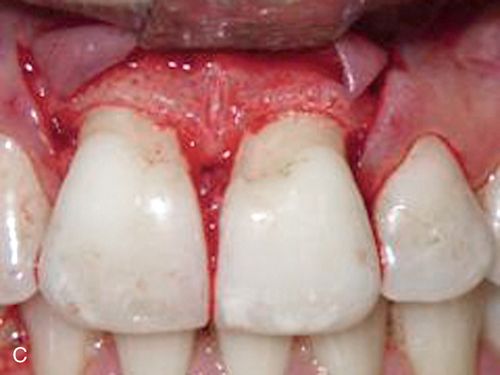
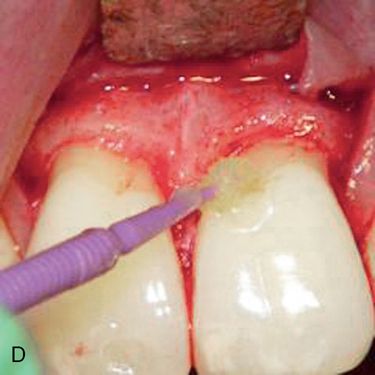
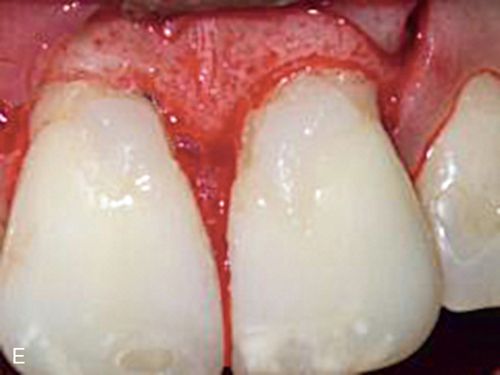
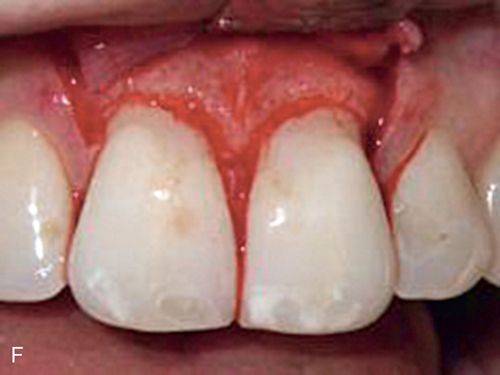
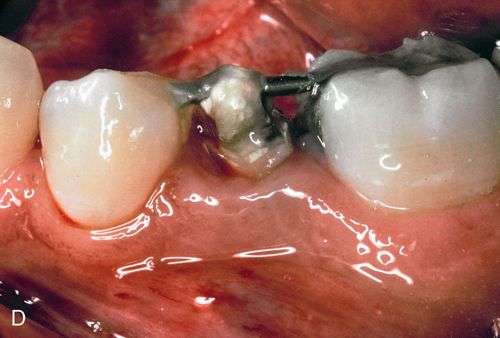
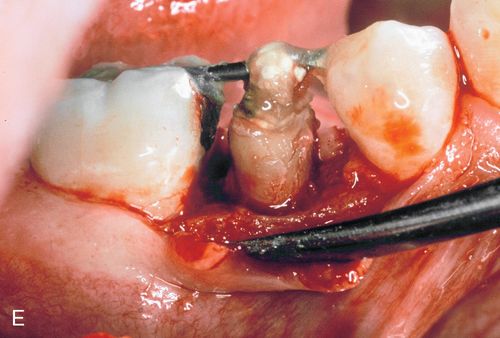
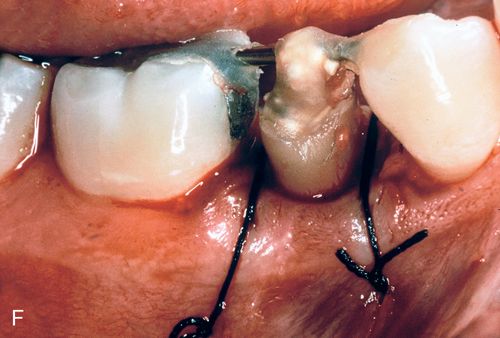
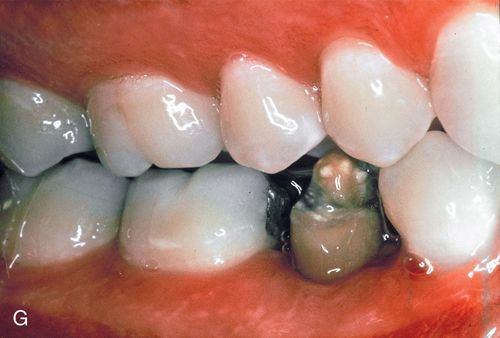
His medical history was noncontributory. A full-thickness flap procedure was performed using the retained papilla technique (Fig. 14-1 C,D). The interproximal tissues were kept in the buccal flap. After thorough debridement of the defects, the papillae were reattached with sutures through the tissue, not over the interproximal space (Fig. 14-1 E). Healing resulted in pocket reduction with maintenance of the gingival margin (Fig. 14-1 F).
Inadequate tooth structure for restoration
Differential etiology
1. Caries. Many patients are unaware of subgingival caries because the lesion is hidden under the gingiva and therefore they do not present for treatment until significant amounts of tooth structure have been destroyed.
2. Trauma. With traumatic injuries the patient is keenly aware of the problem. Teeth can be obliquely sheared, leaving margins below the alveolar crest. When the root fracture is horizontal or oblique, the longer the apical segment is, the better the prognosis. Vertical fracture usually requires extraction.
Biologic width.
Proper margin placement of any type of restoration requires respect for the physiologic principle of biologic width: 1 mm of supracrestal connective tissue, 1 mm of junctional epithelium, and 1 to 2 mm of healthy sulcus. When a restoration is placed on a tooth in violation of this principle, a chronic inflammatory response occurs. The body is attempting to restore the dimensions required for periodontal health in the supracrestal attachment and sulcus. Histologically, crestal resorption is seen with apical migration of the connective tissue and junctional epithelium. Clinically, gingival redness, swelling, bleeding, and discomfort are present. Even the most natural-looking restoration will fall short of the desired esthetic goals with such a gingival appearance. The inflammatory response will cease only when the biologic width has been re-established, a process that may take years. This inflammation is not bacterial in origin and will not respond to periodontal scaling or antibiotic therapy. Attempting to subgingivally “bury” a restoration margin in the hope of avoiding further treatment will only result in failure.
Treatment options
Surgical crown lengthening.
Surgical crown lengthening involves apical flap positioning with ostectomy around the involved tooth and the adjacent teeth. At least 3 to 4 mm of sound root structure must be exposed below the most apical extent of the proposed restoration. In addition, the alveolar crest of the adjacent teeth must be blended in with the involved tooth; otherwise an uneven, unesthetic gingival profile will result.
Forced eruption with fiberotomy.
When ostectomy will result in extremely long clinical crowns and significantly weakened periodontal support (as with oblique fractures significantly apical to the alveolar crest), or when a surgical procedure is medically contraindicated, orthodontic forced eruption with a sulcular fiberotomy may be performed. Orthodontic force is applied to the involved tooth in an occlusal direction, whereas the supracrestal connective tissue fibers are severed with fiberotomies every 4 days. The periodontal ligament fibers dictate alveolar bone formation and position. Therefore severing these fibers as the tooth rapidly erupts out of the socket results in the exposure of sound tooth structure without changing the position of the alveolar crest or free gingival margin. The crown-to-root ratio of the adjacent teeth remains intact, whereas the crown-to-root ratio of the erupted tooth slightly increases, thus improving the long-term periodontal prognosis compared with performing surgical crown lengthening with bone removal.
To effect the desired movement, a stainless steel eyelet (made from 0.036” orthodontic wire) is cemented into the canal of the tooth and an elastic cord is tied to the eyelet. Because these teeth will eventually require a post and core, the post preparation must be thinner than the definitive post size and the eyelet must be retrievable without causing damage to the tooth structure. Conservative removal of the gutta percha to provide only sufficient retention for the eyelet to function and the choice of cement used to secure the eyelet should be based on these requirements.
Armamentarium
• Orthodontic brackets (optional), stainless steel, or clear plastic edgewise brackets (3M Unitek, 3M ESPE)
• 0.036-inch orthodontic wire to fabricate the eyelet (3M Unitek, 3M ESPE)
• 0.20-inch rectangular arch wire
• Polycarboxylate cement (e.g., Durelon, 3M ESPE)
• Medium- or heavy-gauge orthodontic elastic or thread (3M Unitek Corp.)
Clinical technique
1. Prepare a post preparation in the canal just wide enough to accept the wire eyelet using the Gates Glidden bur in a low speed handpiece to remove the gutta percha from the canal. The preparation should not be as wide or as long as the eventual post preparation for the core build-up but provide just enough retention for the eyelet to be secured.
2. Cement a 0.036-inch wire with an eyelet (made using the orthodontic pliers) into the preparation (see Fig. 14-4 A).
3. When using orthodontic brackets, etch the teeth to be bracketed and apply orthodontic bonding resin to the bracket pad. Place the bracket on the tooth. When using bonded arch wire (without brackets), bond a heavy gauge wire (0.030- to 0.040-inch) across a portion of the facial surface near the incisal edges of the anterior teeth or occlusal surface of the posterior teeth.
For posterior amalgam restorations, prepare the occlusal slots as for intracoronal splints (A-splint) and bond the wire in the slots. The arch wire must be positioned directly over the root to be extruded.
4. Adapt a heavy (0.020-inch) rectangular arch wire in the bracket slots and across the root to be erupted and position it directly over the root to be extruded (see Fig. 14-4 C,D).
5. Thread a medium or heavy elastic through the eyelet and wrap it around the anchoring wire. Activate the elastic by pulling it taut and tying it (see Fig. 14-4 C,D).
6. Perform an initial fiberotomy with a No. 15 scalpel blade (see Fig. 14-4 C).
b. Run the scalpel circumferentially in the sulcus around the root. This severs the supracrestal connective tissue fiber attachment.
7. Repeat the fiberotomy every 4 days to prevent the connective tissue fibers from reforming and to prevent coronal reformation of the alveolar bone. Generally eruption is accomplished at a rate of 0.5 to 1.0 mm per week. However, movement as slow as 1.0 mm per month may be observed.
8. When the desired eruption is accomplished, stabilize the tooth for 2 to 3 months before fabricating the definitive restoration (see Fig. 14-4).
Clinical case: Surgical crown lengthening
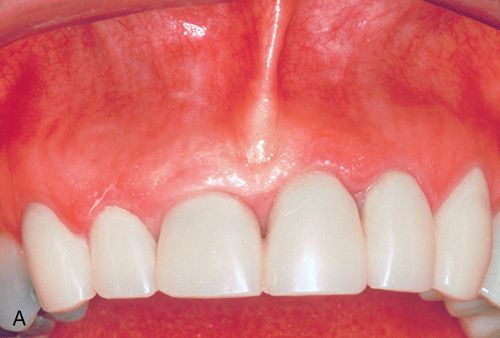
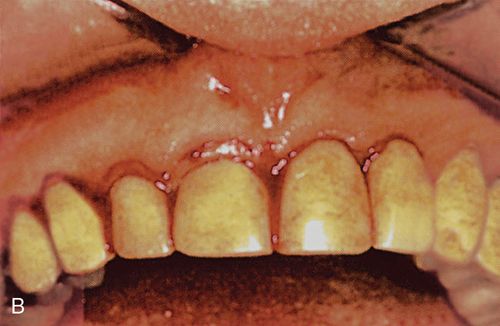
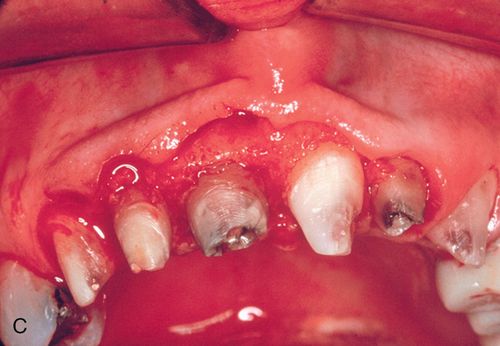
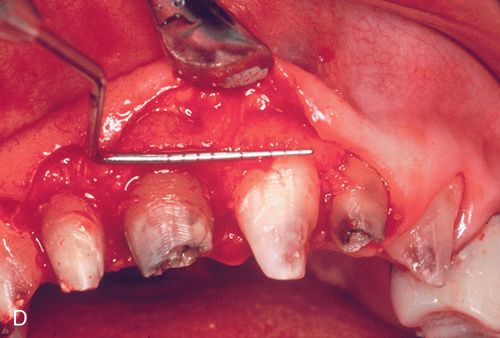
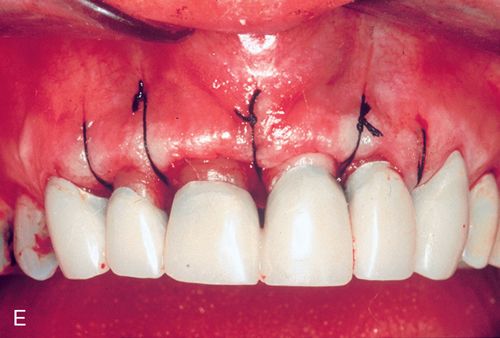
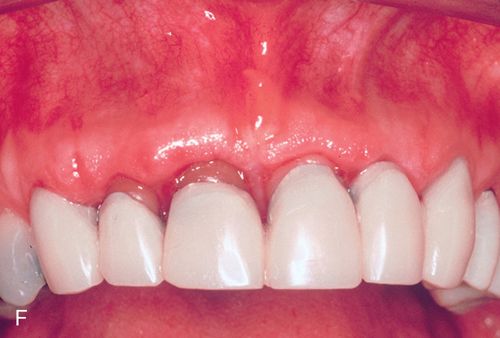
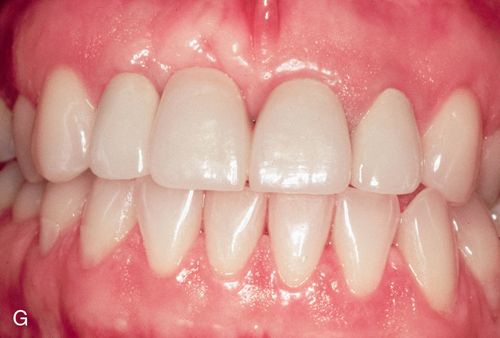
A 42-year-old woman presented with a provisional restoration from the maxillary right canine to the maxillary left canine. Her medical history was noncontributory. Although the restoration was physiologically acceptable, the varied heights of the restored teeth were esthetically unacceptable (Fig. 14-2 A). Surgical crown lengthening was performed to correct this situation. A submarginal incision was made at the desired height of the gingival margin (Fig. 14-2 B) and a full-thickness flap reflected (Fig. 14-2 C). The disparity in the abutment crown length could be seen after reflection. Following the removal of some supporting bone, a more symmetric appearance was achieved (Fig. 14-2 D). The flaps were apically positioned and sutured into place (Fig. 14-2 E). This symmetry is reflected by the gingival margins of the definitive restoration (Figs. 14-2 F,G).
Clinical case: Developmental defect
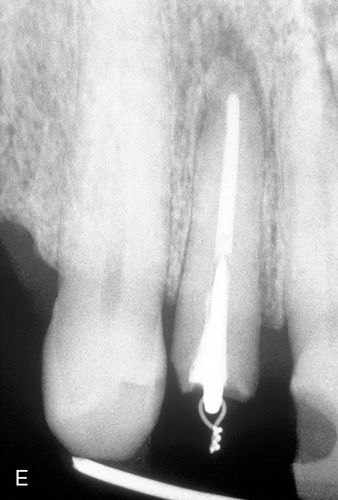
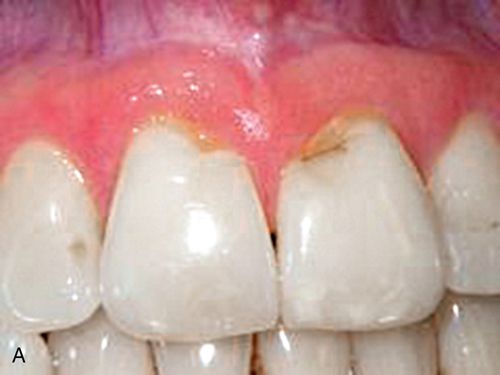
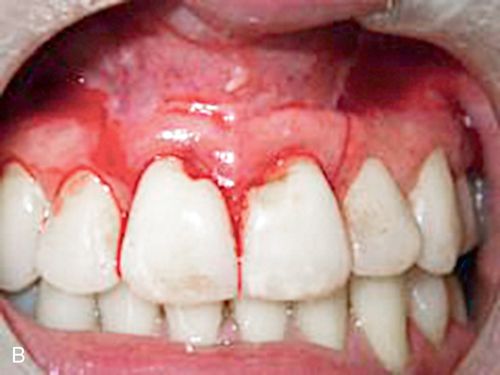
A 43-year-old female was referred for crown lengthening and presented with asymptomatic subgingival caries on both maxillary central incisors (Fig. 14-3 A). Her medical history was non-contributory. A full-thickness flap was reflected using bilateral vertical incisions to avoid involvement of the adjacent papilla. The gingival margin discrepancies at the mesial line angles of the central incisors were corrected using a slight submarginal incision (Fig. 14-3 B).
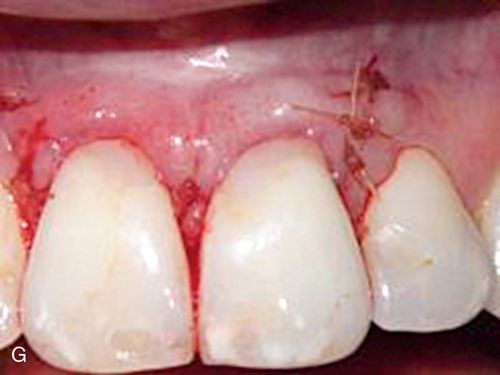
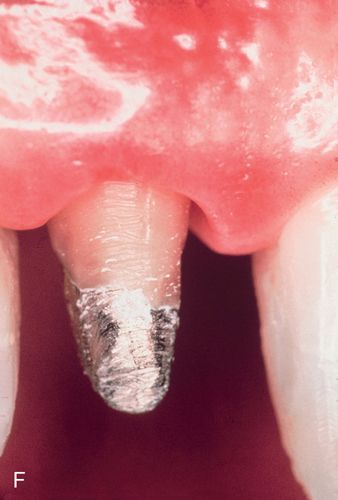
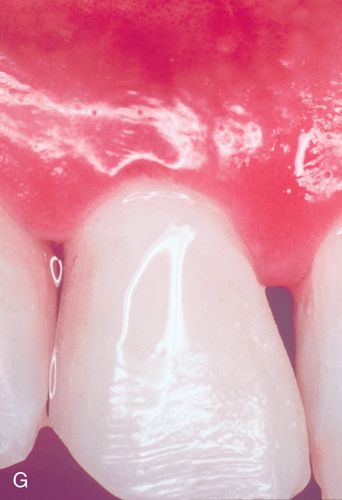
Minor ostectomy was performed to expose the lesions (Fig. 14-3 C). However, after some removal of bone, developmental defects (pronounced grooves in the dentin at the mesiofacial line angles) were noted on the root surfaces of both incisors extending apically. The caries at the cementoenamel junction of both teeth was apparently a result of the defects. Since the root/bone interface on the direct facial aspect of both teeth was healthy and intact, a direct restoration of the lesions was performed. A self-etching primer (Transbond Plus Self Etching Primer, 3M Unitek) was applied (preferable in areas more difficult to isolate) and a hybrid ionomer composite resin (Geristore dual-cure, hydrophilic Bis-GMA, DenMat) was used to restore the cavity and defects (Figs. 14-3 D,E). The self-etch primer was chosen for its ease of application and its ability to be used in wet conditions; isolation and moisture control in a surgical field can be difficult to achieve. The restorative material was chosen because of its ability to adhere to enamel, dentin, and cementum and its biocompatibility in a subgingival environment. The restoration was contoured to create a featheredged margin apically (Fig. 14-3 F). Approximately 2 mm of apical root surface was not restored to preserve the biological width and allow for proper gingival healing. The flap was repositioned and secured with a small diameter resorbable suture (Fig. 14-3 G). A small diameter non-resorbable suture could also have been used in this situation (5° Vicrylm Ethicon, Inc., or 4° Cytoplast, Osteogenics Biomedical, Inc.) with the choice being based on the preference of the surgeon as well as the desires of the patient (avoiding suture removal, if possible).
Clinical case: Forced eruption with fiberotomy
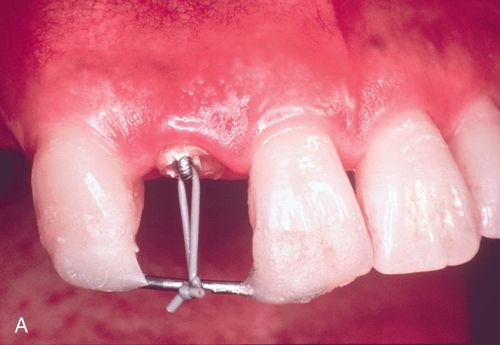
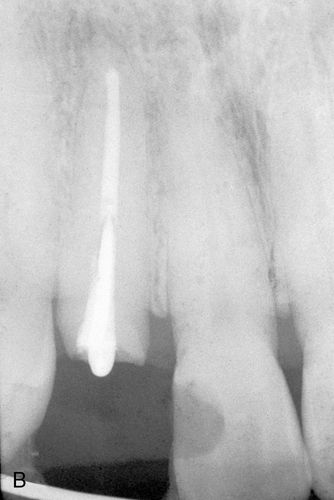
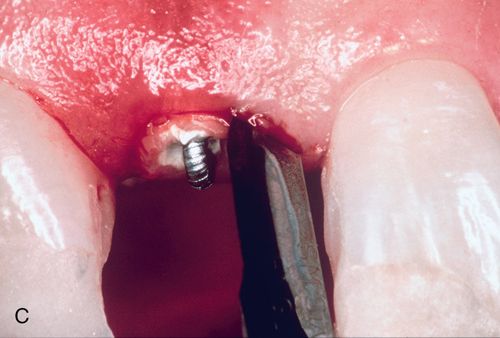
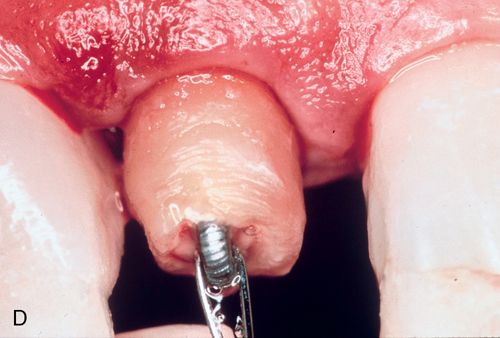
A 57-year-old man presented with a maxillary right lateral incisor root that had fractured at the gingival margin as a result of cervical caries. His medical history was noncontributory. The patient desired a tooth replacement but did not wish to have the root extracted. A post preparation was made in the root, and a 0.036-inch wire with an eyelet was cemented into the preparation with polycarboxylate cement. A 0.040-inch orthodontic wire was bonded to the incisal edges of the canine and central incisor over the root to be erupted. This device was then engaged to the arch wire using a heavy elastic tie (Fig. 14-4 A,B). A sulcular fiberotomy was performed at the time of activation and every 4 days throughout the time of tooth movement (Fig. 14-4 C). The desired eruption was achieved within 3 weeks (Fig. 14-4 D,E), at which time a cast post and core was fabricated (Fig. 14-4 F) and a provisional restoration was made. This technique produced an excellent esthetic result (Fig. 14-4 G).
Clinical case: Forced eruption with surgical crown lengthening
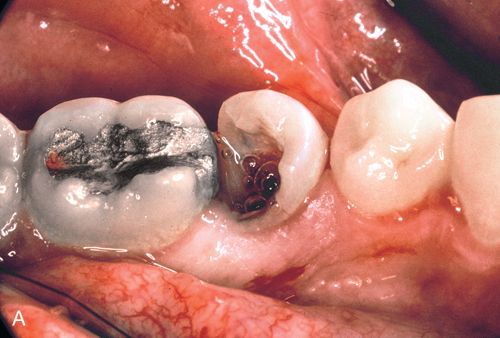
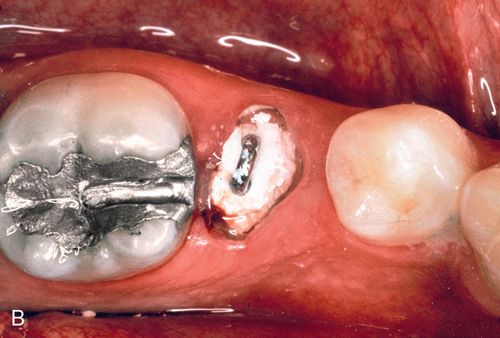
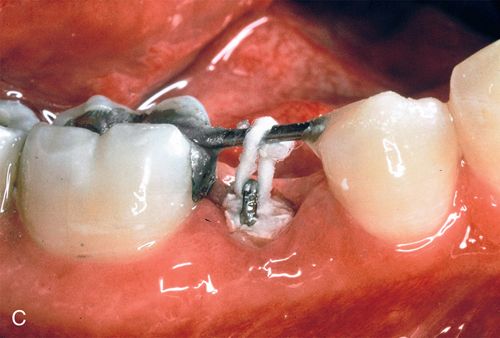
A 23-year-old man presented with subgingival caries on his mandibular right second premolar (Fig. 14-5 A). His medical history was noncontributory. After caries removal and endodontic therapy a 0.036-inch orthodontic wire was formed into a loop and cemented into the post preparation (Fig. 14-5 B). A straight 0.040-inch orthodontic wire was bonded from the mandibular right first premolar to an occlusal slot prepared in the amalgam of the mandibular right first molar. An elastic thread was used to pull the tooth occlusally (Fig. 14-5 C).
Because the patient could come to the office only twice a month, repeated fiberotomy was not possible. As a result, the gingival margin and the underlying attachment moved coronally with the root (Fig. 14-5 D). After adequate eruption, apical positioning of the tissues was performed (Fig. 14-5 E,F), resulting in adequate tooth structure and an even gingival margin (Fig. 14-5 G). Surgery without eruption would have resulted in an uneven gingival margin.
Recession
Gingival recession is defined by the American Academy of Periodontology as occurring when the level of the free gingival margin is apical to the cementoenamel junction. Exposure of the root surfaces occurs because there is a loss or lack of facial bone on the tooth root with concomitant apical migration of the soft tissue margin. Different factors may cause recession and the underlying etiology should be identified before determining a course of treatment.
Differential etiology
a. The most common mechanical factor is tooth brush abrasion. Overzealous brushing (even with a soft nylon toothbrush) is the predominant cause of mechanically abraded gingiva on a healthy dentogingival complex. The self-diagnosis of “receding gums” is usually made by a patient before presenting to the practitioner. The esthetic imbalance, particularly in the anterior sextants, is a common patient concern.
b. Intraoral trauma can result in severe defects, depending on the nature of the injury.
c. Less-frequent mechanical causes of recession include the use of an abrasive dentifrice, iatrogenic flossing, improper use of electric rotary toothbrushes at the highest setting, and intraoral foreign object habits.
a. Periodontal disease and acute periodontal abscesses often destroy buccal attachment, resulting in recession.
b. Poor oral hygiene also plays a role in recession. Besides leading to inflammatory periodontal breakdown, the progressive accumulation of calcified deposits on the facial surfaces of teeth can directly lead to tissue loss.
c. Restorations with overhanging or open margins can cause attachment loss and subsequent recession.
d. Subgingival caries can often result in crestal bone resorption with concomitant recession.
Two additional parameters that must be assessed when recession involves the mucogingival junction are the zone of keratinized tissue and the amount of attached gingiva. These two terms are often incorrectly considered synonymous. The zone of gingiva on a tooth is the measurement from the free gingival margin to the mucogingival junction. This describes the amount of keratinized tissue present (alternatively termed masticatory mucosa) and is a measure of the amount of gingiva present. An inadequate zone of gingiva or a complete lack of gingiva occurs when there is insufficient or no keratinized tissue present, regardless of whether or not this gingival is attached to the underlying bone and root structure. This situation can contribute to potential recession as described previously.
Attached gingiva refers to the amount of the keratinized tissue that is bound down to the underlying bone and root structure. This measurement is arrived at by subtracting the probe depth reading from the amount of keratinized tissue present. For example, a site that has a 5-mm zone of keratinized tissue with a 3-mm probe reading would have 2 mm of attached gingiva. When probing extends beyond the mucogingival junction into the alveolar mucosa, the diagnosis is mucogingival involvement with a lack of attached gingiva. This can occur regardless of the amount of keratinized tissue present.
Once all the parameters are recorded, a diagnosis can be determined. When both conditions exist, the diagnosis is insufficiency of the gingiva and a lack of attached gingiva. However, if an adequate zone of keratinized tissue is present with mucogingival involvement, then the diagnosis would only be a lack of attached gingiva. Although the difference between the two may seem subtle, it plays a role in determining appropriate treatment options.
Before deciding on what treatment option would be best used in any particular situation, it is important to identify the goal of the procedure. This is best arrived upon through a combination of thorough examination and detailed patient interview. Assessment of the physiologic needs of the situation coupled with the esthetic expectations of the patient gives us the best chance for a successful outcome.
Treatment options
Three different grafting procedures are discussed for mucogingival reconstruction and esthetic correction: free gingival, lateral pedicle, and connective tissue.
Free gingival grafts.
Free gingival grafting (FGG) techniques have been used for more than four decades for augmenting the zone of keratinized tissue as well as for root coverage. This technique is highly predictable for the former, but success in covering exposed root surfaces is less predictable and dependent on several factors:
Grafts receive their primary nutrient supply from the underlying connective tissue and periosteum of the recipient site, and donor tissue placed over the avascular root surface is fed solely by lateral circulation from the connective tissue bed. Because lateral circulation can maintain the viability of the donor tissue for only a limited distance, areas of narrow recession have better root coverage potential than deeper, wider areas of recession. Some areas that appear to be narrow actually have significant lateral probing depths and therefore have poorer root coverage potential than truly narrow areas.
In addition, teeth that are prominent in the arch may have little or no buccal bone present, with an underlying dehiscence presenting a major problem. Multiple procedures may be required for optimal results in these situations; however, performing multiple procedures does not guarantee total root coverage. In situations of very wide and deep recession, the purpose of multiple procedures is to achieve as much root coverage as possible. Tooth position and lateral bone support are two factors that could adversely affect the percentage of root coverage achieved.
Free gingival grafting involves three steps:
A well-vascularized connective tissue bed must be prepared around the graft site. If the goal is to only augment the zone of keratinized tissue, an incision is made at the mucogingival junction allowing for a partial thickness dissection apically to prepare the recipient bed. This will maintain the existing free gingival margin, preventing possible postsurgical recession and providing a secure coronal border to affix the graft. However, if root coverage is desired, the surface epithelium also needs to be removed peripherally around the area of recession to create a connective tissue bed over which the graft is placed. Laterally the recipient site should extend a distance of at least the width of the area of root to be covered. Apical dissection should be at least 4 to 5 mm. Coronally the existing gingiva must be denuded to a level of the CEJ, minimally. This will provide an adequate blood supply for the donor tissue. If a frenum is present, it is dissected and repositioned at the apical border of the graft bed.
Donor tissue is harvested from the palate. The anterior rugae must not be included in the graft, because they will be visible at the recipient site. A 1- to 2-mm zone of marginal gingiva should be maintained at the donor site to prevent recession. The graft must include the surface epithelium and at least 1.5 mm of underlying connective tissue. A surgical guide should be made for the recipient site and transferred to the palate, thus minimizing and customizing the amount of tissue removed. Once the graft is harvested, a hemostatic dressing is placed in the donor site and a clear acrylic surgical guide is inserted. The surgical guide applies constant pressure for hemostasis and covers the raw palatal tissue during healing to increase patient comfort. The donor tissue is sutured firmly to the recipient bed. Surgical dressing is applied to protect the recipient site. Postoperatively a chlorhexidine rinse may be used for 3 to 4 weeks until proper oral hygiene can be performed without damaging the grafted site. A minimum of 6 weeks of healing is required before resuming or beginning any prosthetic work.
Lateral pedicle grafts
Several factors must be considered when a pedicle graft is contemplated:
1. The amount of keratinized tissue adjacent to the recipient site
2. The existence of an adjacent edentulous ridge
3. The existence of frena that could cause excessive pull
4. The width of the recipient root surface
5. The proximity of the apical extent of the defect to the vestibule
When using lateral pedicle grafts, a well-keratinized edentulous ridge or a wide zone of keratinized tissue adjacent to the graft site is ideal. However, if the recipient area to be grafted is wide mesiodistally, excessive pull may occur on the donor tissue, causing strangulation and eventual failure. Bed preparation for lateral grafts is slightly different than for the free graft technique. The recipient site adjacent to the donor site is prepared by creating a 2- to 3-mm band of epithelial denudation. A partial thickness flap of the donor site is elevated into the alveolar mucosa and a single vertical incision is made to release the tension of the flap, allowing for lateral positioning. The primary difference between this procedure and the free gingival graft is that the lateral graft remains attached at its base, which provides additional blood supply. If necessary, a small oblique releasing incision in the alveolar mucosa will eliminate tension of the donor tissue when moved laterally. The flap must be wide enough to cover the root and prepared bed. The graft is then positioned over the root and sutured. The donor area heals by granulation formation.
With the double papilla procedure, a variation of the lateral pedicle procedure, both adjacent papilla are split-thickness dissected and make up the pedicle. Again, the donor site heals by granulation formation. As was the case with free gingival grafts, surgical dressing is placed over the surgical site, although no surgical guide is needed because no palatal tissue is involved. Postoperative care is similar for pedicle graft procedures. A minimum of 6 weeks of healing is needed before prosthetic work can begin.
Subepithelial connective tissue graft.
Subepithelial connective tissue grafting (SECT) is indicated when multiple teeth require grafting, although it can also be used for single tooth sites. Similar to a pedicle graft, a partial thickness flap is performed beyond the mucogingival junction overlying the area with placement of a strip of connective tissue (without any surface epithelium) harvested from the palate and placed between the flap and the underlying bed.
The recipient site is prepared using a sulcular incision design with a split-thickness dissection beyond the mucogingival junction; this allows for retention of the epithelium in the flap as well as providing adequate mobility to allow the flap to be advanced coronally. The lateral extension of the flap must be at least one tooth length in either direction to provide for tension-free suturing. An envelope procedure is performed on the palate to obtain the connective tissue. Two parallel horizontal incisions (the length of the site to be grafted) are made 2 to 3 mm apart near the palatal free gingival margin. Sharp dissection is performed vertically in the connective tissue to remove a strip of tissue similar in dimension to the graft site (both in height and width). A hemostatic material (e.g., Collagen Foam, Ace Surgical Supply Co., Inc.) can be placed into the donor site and sutured on the surface.
Stay updated, free dental videos. Join our Telegram channel
VIDEdental - Online dental courses


