Shutter.
The shutter is a device inside the digital camera body that controls the flow of light into the camera, allowing it to strike the digital sensor (where the digital image is created) for a defined period of time (the shutter speed). Each shutter speed setting is exactly one-half the speed of the next highest setting. When a flash unit is attached to the camera, the digital camera’s programming will usually calculate the precise amount of additional light required, and time the flash with the shutter speed to create an optimum image. A flash is usually needed to produce additional light. Macro images, which are a significant component of dental photography, require precise flash timing and proper shutter speed. DSLR cameras will automatically calculate the correct aperture setting (see the following section on Aperture.) when the user selects a specific shutter speed if the camera is set in shutter priority mode. Macro flashes typically require a 1/125th second shutter speed.
Aperture.
The aperture is the opening inside the lens that controls the amount of light that strikes the digital sensor. The terms “aperture setting,” “aperture size,” and “f-stop” are synonymous. The terms refer to the size of the opening of the aperture selected by the operator (or the camera when it is in a fully automatic setting) (Fig. 22-2).
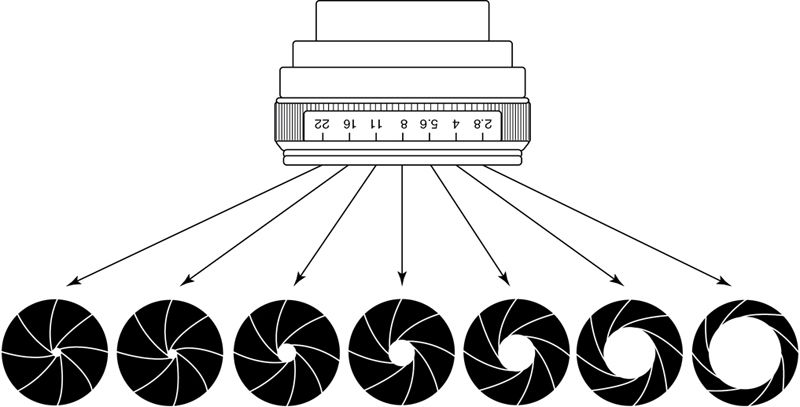
The various aperture settings are indicated on a dial of the lens, in the viewfinder, or both. The aperture is set before the image is captured and indicates the amount of opening of the lens. Each successive increase in aperture size allows exactly one-half the amount of light to reach the sensor. However, the larger the aperture, the smaller the corresponding f-stop number. If the camera is set in aperture priority mode, DSLR cameras will automatically calculate the correct shutter speed setting (see earlier) when the user selects a specific aperture setting. The smaller the aperture, the greater the depth of field.
Dentistry uses two significantly different aperture settings. Portrait style images showing the full-face and smile usually require an f-11 setting. For intraoral images, more depth of field is necessary, which is compensated for by changing to an f-16 or f-22 setting.
If not, it may be necessary to switch the camera to either an aperture priority mode or manual mode (both the aperture and shutter speed are set by the user) and manually change the aperture to f-22. A ring flash attached to the front of the lens and synchronized automatically with the digital camera may be necessary to provide enough light to properly expose intraoral images.
Focus.
Focusing refers to the degree of clarity of the image. This clarity is controlled by viewing the object being photographed in the view finder or LCD screen and either moving the entire camera toward or away from the object until it becomes focused. The lens controls the magnification of the object being photographed in addition to the f-stop. The lens barrel can be moved to change the magnification by rotating the focusing ring of the lens toward the object to increase the magnification or away to decrease magnification. Often, changing the magnification will require refocusing.
If the dentist desires to create before and after images of an esthetic case, the lens should be focused at a fixed distance. This is done by setting the focal length of the lens at 3 feet and then moving the camera toward and away from the object until it is properly focused. By maintaining the same focal length for a series of images, their magnification will be identical and the resulting images will be the same size. These images serve as effective and attractive marketing materials.
In aperture priority setting, f 5.6 is usually a good starting point for full-face images and f 22 for intraoral images. In aperture priority, setting the camera will automatically synchronize the flash so that the correct amount of flash filled lighting is added to optimize the image. Because of the depth of field issues in taking intraoral images, it may be necessary to manually increase the flash exposure time one setting for proper expose, especially when taking images of molars. Because of the depth of field issues in taking intraoral images, it may be necessary to manually increase the flash exposure time one setting for proper exposure, especially when taking images of molars.
Image capture speed (ISO/ASA) setting
In film photography, ISO/ASA was a measurement of how sensitive the film was to light. Film with lower light sensitivity had a lower ISO/ASA number but produced images with less graininess; therefore the quality of the image was not decreased when it was greatly enlarged. The principal is identical in digital photography wherein the ISO/ASA controls the sensitivity of the image sensor. Higher ISO/ASA settings increase light sensitivity but also increase digital “noise.” Modern digital cameras have been automatically programmed to set the ISO/ASA. If the dentist chooses to override the automatic setting of this parameter, a setting similar to the normal daylight setting of ISO/ASA 100 is recommended. Because dental macro photography is always performed with a macro flash, the lack of optimal lighting conditions is rarely an issue. However, the ISO/ASA may need to be increased if the aperture cannot be set to F16 to allow for adequate depth of field.
Light source.
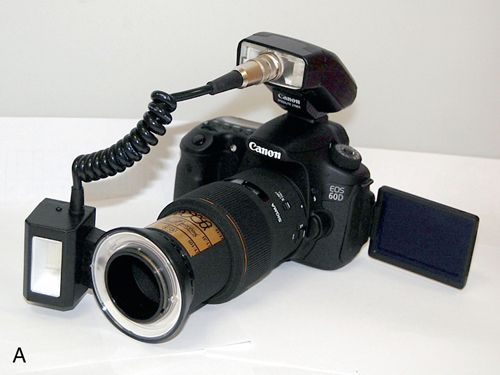
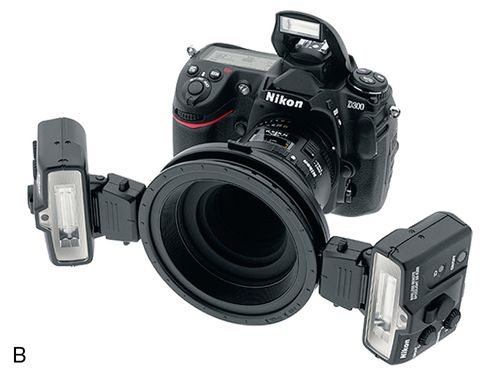
In macro photography, the usual light source is either a single or dual point flash or ring light flash (Fig. 22-3).
By connecting the flash unit to the camera, either by cable or wirelessly, the camera’s settings for the exposure will be transmitted to the flash unit and the exact amount of additional light necessary from the flash to properly create the image will be produced.
Depth of field.
The depth of field is the range of distance from the lens within which objects appear in focus (Fig. 22-4).
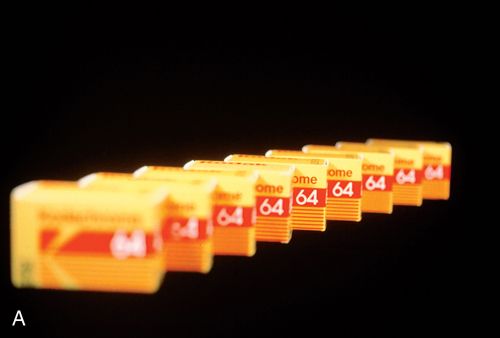
In dental photography, the more depth of field achieved, the sharper the image in front of and behind the specific object being focused on. In flash photography, the two variables that control depth of field are the aperture size and the distance from the focused image. A smaller aperture (i.e., a larger f-stop) and a larger distance from the image will increase the available depth of field. Therefore macro photography requires more light because smaller aperture openings are used in order to maximize the depth of field. As the camera is moved farther away from the subject for full-face images, the lighting requirements demand a larger aperture size. This greater distance from the object helps compensate for the larger aperture opening, thus maintaining good depth of field. To achieve the maximum depth of field, the photographer should focus one-third the distance into the desired depth of field (see clinical tips following).
Magnification.
Magnification indicates the relationship between the size of the object captured by the sensor and the size of the actual object. These relationships are expressed as ratios. If the size of the object captured on the sensor is exactly the same size as the actual object, the magnification is 1:1. A magnification of 1:2 means the object captured on the sensor is one-half the actual size of the object. Most macro photographs are taken at approximately 1:1.2 or 1: 1.5. Full-face views are usually taken in the 1:8 or 1:10 range. Uniform magnification should be used when documenting various stages of a dental case because this produces images of identical sizes. In dental esthetic cases, with uniform magnification, the before, during, and after images will all be the same size and thus be easier to compare when viewing.
Composition.
The term composition simply refers to the content of the photograph. The image should contain only those items intended for viewing. Often magnification is the only variable that needs to be changed to achieve proper composition. Superfluous objects in images are very distracting.
Bracketing.
Bracketing is the process of creating a series of images from slightly underexposed to slightly overexposed. The photographer can then select the preferred image. Many DSLR cameras (and some more advanced compact cameras) have a feature called automatic exposure bracketing that can automatically create these images.
Digital cameras fundamentals
Camera sensor
Sensor type.
The two main digital image sensors used today, the charged coupled device (CCD) and complementary metal oxide semiconductor (CMOS), were invented in the late 1960s and early 1970s. CCDs are based on analog capacitive technology, which converts incoming light into electron charges that are then converted to a digital signal.8, 9 The CMOS image capture devices are composed of arrays of tiny sensors that capture the light energy and transfer it to a voltage converter as an analog signal that the image sensor’s algorithm converts to a digital image. CMOS sensors consume less power and are less expensive to manufacture than CCD sensors.10
Because all the energy of the photodiodes on the CCD chip is dedicated to image capture, CCD image quality is more uniform (better) than CMOS. One tradeoff is that CCD image processing takes more energy to create the image than CMOS, which slows the image capture (images per second). This difference in burst rate can be a problem when taking images in a continuous image capture camera mode.
Some modified CCD cameras use three separate CCDs, one each for red, blue, and green light, to capture the light energy that composes the image. “Light coming into the camera lens is split by a trichroic prism assembly, which directs the appropriate wavelength ranges of light to their respective CCDs.”11 Because these cameras use a separate CCD for red, blue, and green light, there is no Bayer filter and they achieve much better precision than single CCD cameras.12 These cameras are referred to as three-CCD or 3CCD cameras and are more expensive than single CCD cameras.
CMOS sensors capture light in the same manner as CCD sensors with one major difference. Each pixel on the CMOS chip “ . . . has its own charge-to-voltage conversion, and the sensor often also includes amplifiers, noise-correction, and digitization circuits, so that the chip outputs digital bits . . . With each pixel doing its own conversion, uniformity is lower”13 when all the pixels are assembled to create the image. Therefore, compared with CCD images, CMOS image quality is not as good. Generally CMOS-based cameras use less energy and are usually less expensive than comparable CCD cameras. Most manufacturers produce CCD-based cameras because of their superior image quality, although the CMOS cameras are improving. Either sensor type is perfectly acceptable for dental digital photography.
Sensor resolution.
Resolution is measure of the number of pixels (the smallest resolvable area) of an image. Sensors are also available in different sizes; the larger the size, the greater the number of pixels. Both sensor size and resolution have a direct bearing on the quality of the image produced. Traditionally, resolution was used as the single metric to define image quality, although this is no longer the case. The number of pixels was approximated by multiplying the number of horizontal pixels by the number of vertical pixels (typically measured in megapixels, or million, pixels). As sensor size increased the number of pixels became less significant, with low-end cameras capable of resolving the same number of pixels as more expensive DSLR cameras. For dental photography, a resolution of 12 megapixels is considered acceptable.
Sensor size.
A more important sensor metric is its actual size. Sensor sizes are often measured by aspect ratio (width: height), typically 4:3, as well as the diameter measured in mm. The sensor size was typically considered the usable area of this as approximately two thirds of the designated size (Fig. 22-5).
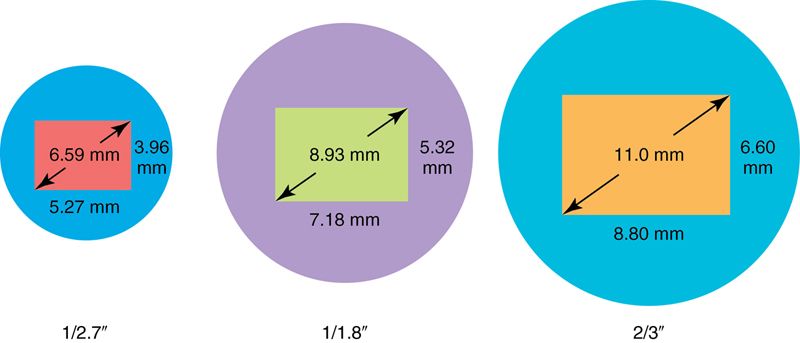
Point-and-shoot cameras and mobile phones have very small sensors, whereas DSLR cameras and MILCs have larger sensors. Sensor size is also measured by name such as, Full Frame, APS-C, Micro Four Thirds, and Four Thirds (Box 22-1).
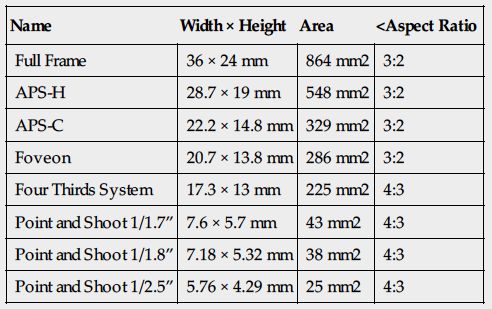
Box 22-1
Approximate Sensor Size of Common Sensor Formats
| Name | Width × Height | Area | <Aspect Ratio |
| Full Frame | 36 × 24 mm | 864 mm2 | 3:2 |
| APS-H | 28.7 × 19 mm | 548 mm2 | 3:2 |
| APS-C | 22.2 × 14.8 mm | 329 mm2 | 3:2 |
| Foveon | 20.7 × 13.8 mm | 286 mm2 | 3:2 |
| Four Thirds System | 17.3 × 13 mm | 225 mm2 | 4:3 |
| Point and Shoot 1/1.7” | 7.6 × 5.7 mm | 43 mm2 | 4:3 |
| Point and Shoot 1/1.8” | 7.18 × 5.32 mm | 38 mm2 | 4:3 |
| Point and Shoot 1/2.5” | 5.76 × 4.29 mm | 25 mm2 | 4:3 |
Pixel density
Pixel density is simply the measurement of the number of individual photoreceptors (pixels) or dots per inch (dpi). The more dpi a sensor has the higher the pixel density. Cameras often have the same resolution but one camera may have a smaller sensor and thus a higher pixel density. Higher pixel densities increase the amount of random digital noise (random distortion in brightness and/or color) as well as decrease the dynamic range (the range of tones from black to white). In addition, higher densities decrease the maximum number of f-stops the camera sensor can capture and thus limit the depth of field capabilities of the camera. Unfortunately, manufactures rarely report a cameras pixel density and it must be calculated based on image resolution and sensor size.
DSLR sensors size
DSLR sensors are much larger those found in compact cameras and have lower pixel densities. Therefore DSLR cameras are preferred for dental photographs because they are better able to produce quality photographs in lower light clinical situations, with less noise. Low light sensitivity also allows smaller aperture openings to be used, producing greater depth of field.
Higher-end DSLR cameras use full frame sensors that are the size of traditional 35-mm film (1.7 inches measured diagonally or 864 mm2). Less expensive DSLR cameras use APS size sensors and half the surface area of a full sensor (1.18 inches measured diagonally or 329 mm2). Another common type is Four-Thirds (0.85 inches diagonal or 225 mm2), which has an even smaller surface area.
Digital image capture
When an image is captured by a digital camera, the light energy that the camera’s sensor (either CCD or CMOS) captures is then converted to digital electric energy. This directed digital energy is then collected and processed so that the image is created and can be viewed. Because manufacturers produce their own unique processing algorithm, uniform standard digital image file formats have been created. Most digital camera systems produce final images using one of two (or sometimes both) of the most widely recognized standard file formats: raw image files and Joint Photographic Experts Group (JPEG).
Image file types
Raw image files.
Raw image files are usually proprietary to the individual camera manufacturer. Only the computer program supplied by the camera manufacturer (and a few stand-alone programs such as Adobe Photoshop) can read, open, and view the files. Raw data files for digital photographs are uncompressed and contain all the information for that particular image file. Consequently, these files are usually large.
In addition, transferring raw image files over the internet can be time consuming and cumbersome because of their large size. If a dentist wishes to send several raw images to share with a specialist or dental laboratory, the images may have to be compressed using an additional program (for example a “zip” file) before they can be sent electronically. The recipient must then have the ability to uncompress (reopen or “unzip”) the files before the individual images can be viewed. It is also possible to share large files using web hosting and “cloud” technology such as www.DropBox.com or www.DropSend.com.
JPEG files.
JPEG files have built in compression, usually at a ratio of 10:1, with very little perceptible loss of image quality. Because JPEG files are smaller than raw image files, they require less storage space and can be easily emailed. JPEG files are the most commonly used file format for digital images and can be used by virtually any digital imaging software, including many free packages in the public domain.
JPEG files can be altered and resaved with the original file name. Therefore it is impossible to verify and authenticate if a photograph is the original image captured by the camera or if it has been altered.
Whenever any file is altered and saved with the original name, the already compressed file is recompressed, which can affect the image quality. Digital image specialists recommend only opening the original JPEG file but not re-saving it with the same name if any changes are made. If the file with changes (enhancements) is saved, the “save as” choice in the computer drop down box should be used and the files should be renamed. The original JPEG file should remain unaltered.
Some higher quality digital cameras allow for the creation of both raw and JPEG files, simultaneously, when the images are created. This feature allows the ease of opening and electronically sharing the JPEG files while the security and image details of the digital file are preserved with the raw file format.
Memory cards
Memory cards, removable storage cards, or flash drives are different names for an electronic data storage device used by digital cameras to store the recorded images on a temporary basis. They are capable of retaining images without the need for power and can be used multiple times.
Memory cards vary in storage capacity and speed. Before use these cards must be prepared (formatted) in order to receive and store the data. The amount of information a memory card can hold (capacity) varies with the resolution setting of the camera, the quality of the image being stored, and the file type (i.e., raw or JPEG) of the image.
Bundled software
Manufacturers supply an installation and setup program disk with a digital camera to facilitate the use of an individual digital camera and the digital image files it creates. The camera is connected to the computer with a physical cable or wirelessly after the program disk installation is completed as part of the camera setup process. This final setup step verifies the camera is recognized by the computer so the images created by the camera can be uploaded (sent) to the computer.
Digital image storage
Digital imaging requires devices to store the captured images. Many DSLR cameras have extremely limited or no built-in memory to store the digital photographs, therefore another means to store the captured images is required. This storage is managed with two different methods: direct image storage and indirect image storage.
Direct storage.
The direct method of image storage allows the camera to send images electronically to a computer or stand-alone storage device, either wirelessly using Bluetooth or with Wi-Fi technology.
Indirect storage.
A DSLR camera stores images on a media storage card that can be removed from the camera and placed in a computer’s digital card reader. The camera can also be physically connected to the computer via a Universal Series Bus (USB) or Firewire cable, and the images can be copied to a specified folder on the computer.
Storage and archiving digital images
After the digital photographs are transferred, the images must be protected from inadvertent, unexpected, catastrophic, and unrecoverable loss from computer or hard drive “crashes” (when a computer or hard drive permanently fails to operate), computer virus or malware infections, flooding, fire, or computer theft, to name a few. Storing and preserving the digital images requires a standardized technique to ensure that the digital image files are redundantly and repeatedly backed up.
Most digital photographers create files on their computer that collect and store all the digital photographs associated with that particular event. Once these files are uploaded (copied) to the computer, they are erased from the camera’s digital storage card and the only copy that exists is the single copy on the host computer. To protect against a corruption or loss of the file, the files stored on the host computer must then be backed up so they are protected. There are many ways to create identical digital copies of these files.
The first line of a protection against data loss is an automated, stand-alone, routine backup program. Alternatively, the dentist should manually copy all digital image data to a dedicated stand-alone onsite storage device, such as a computer, on a weekly basis. Additionally, weekly, or more frequent, data backup to a removable hard drive, which is then stored off site (out of the office) to protect it from an electrical surge, fire, or other disaster that could destroy the onsite backup, is also prudent.
The host computer can also suffer from computer or hard disk drive failure. In a dental office the host computer is often a server (a computer that manages software and storage for a group of networked computers). The server can be configured with an automatic redundancy file replication and storage system known as a Redundant Array of Independent Disks (RAID) array. The dental photographer should consult with an information technologist for more information about using a RAID array to protect against data loss.
With the expansion of the uses for the Internet, the use of cloud data transfer and storage can be automatically done via the Internet. Companies that operate cloud data storage systems can be contracted by the dental photographer to automatically copy all the digital image data (and any other data stored on the office computers) every night at a specified time. This method of data backup and storage can be quite cost effective and simple to implement and use. Although most cloud data backup involves some form of data encryption (a protection against the unauthorized viewing of that data), there have been instances of data from cloud storage systems having been accessed illegally and altered, copied, or destroyed. Once the data is uploaded to the cloud of a given vendor, the photographer is no longer in complete control of who can actually ever see access or otherwise use the stored data.
The best solution for the storage and archival preservation of digital photographs is a combination of on-site, off-site, and cloud data storage. This combined approach should provide adequate backup protection. The protocol would include nightly automatic cloud and on-site backups and at least weekly data backup on a removable hard drive that is stored off site.
Basic armamentarium
The basic equipment required for proper dental photography is a digital camera, a macro lens, a flash unit, accessories such as mirrors and lip retractors, and the memory card.
Digital camera body
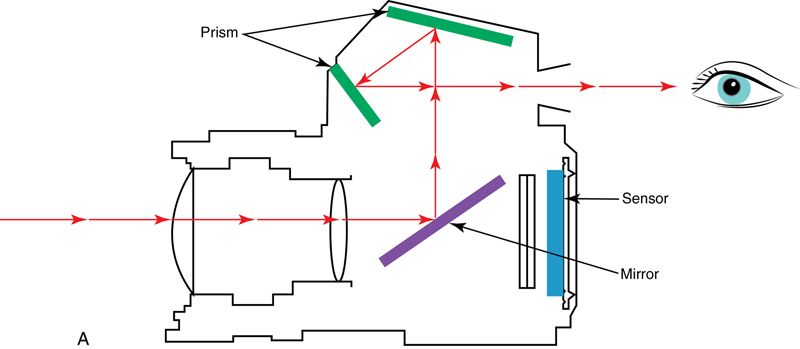
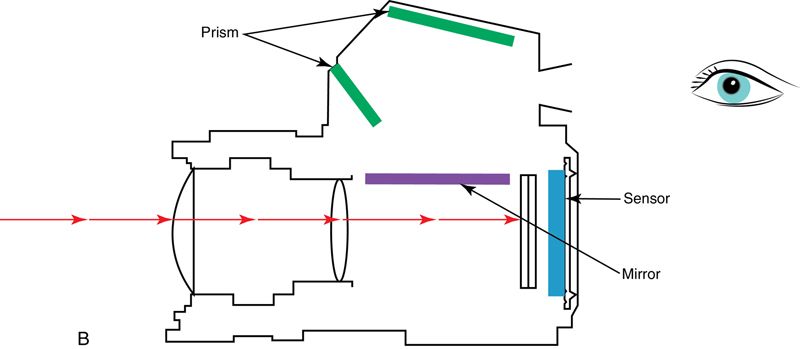
A DSLR camera with a minimum image resolution of 12 megapixels should be used. High quality need not be expensive. The most common manufacturers of quality camera bodies are Nikon, Fuji, Cannon, and Sony. A DSLR camera body is a minimum requirement for high-quality esthetic images. A mirror and prisms displays an image through the viewfinder (or on the LCD display), which precisely duplicates the image that the camera will produce. This is referred to as “through the lens” (TTL) viewing (Fig. 22-6 A). The mirror is repositioned when the “picture” is “taken” to allow the image to be exposed on the sensor (Fig. 22-6 B).
Most DSLR camera bodies allow for automatic exposure settings; the programming in the camera automatically adjusts the f-stop, exposure time, and supplemental flash-delivered light for a host of manual settings selected by the photographer. However, using automatic settings will, more often than not, result in an inferior image, especially in macro photography. It is preferable to select a manual setting and bracket image exposures by altering either the exposure time and/or the aperture setting to compensate for issues such as depth of field, focal length, and the amount of light.
Higher quality digital cameras will record date and time information as a permanent part of the image. This data can be important and useful in documenting “before” and “after” images of an esthetic case as well as authenticating the image in a legal proceeding.
Macro lens
Macro refers to the close-up focusing capability of the lenses. Several reliable macro lenses are on the market that perform well in dentistry. High quality glass lenses allow sharp focus in the entire range of magnification as well as nearly perfect transmission of the light to the digital sensor of the camera, rendering an extremely high-quality image.
With a higher quality DSLR camera, lenses will often be interchangeable (one can be removed and another lens can then be attached to the same camera body). The lens magnifies, focuses, and projects the images onto the camera’s sensor. It is perhaps the most important part of the esthetic image capture process. Better lenses are constructed with high quality glass, which provide sharper optics, better light conduction to the camera’s capture device, and magnification that is more precise. This should be seriously considered when purchasing camera components. One crucial feature of the lens is the ability to change its optical properties from a standard exposure setting to a macro setting. Macro images are a critical part of esthetic dentistry because they capture discriminate details that would be overlooked when using lenses that do not have a macro setting. Some macro lenses actually create images greater than life-sized when working at their maximum magnification.
Stay updated, free dental videos. Join our Telegram channel
VIDEdental - Online dental courses


