
If the dentin bond is not instantaneous and not stronger than the composite resin shrinkage, a contraction gap forms at the gingival margin and the restoration will probably leak at that location. The amount of stress development can be controlled to some extent by the configuration factor (or C-factor—the ratio of bound to unbound surfaces of adhesive restorations); the use of bases; the size, shape, and position of increments placed in the cavity; and the type of resin curing (i.e., light polymerized or chemically polymerized). Studies have found no significant difference in marginal integrity using a self-polymerized composite resin (P-10) and a light-polymerized composite resin (Z-100).64 Ideally, the C-factor should be kept as low as possible by the use of chemically polymerized resin and low-modulus liners.65 Reestablishment of marginal seals may occur as a result of gradual expansion of the composite resin as a result of water sorption; however, this depends on the configuration of the cavity and the resin volume. Polymerization is rapid, whereas this process is slower and allows bacterial invasion to occur. Water sorption may cause erosion of the filler and matrix, possibly resulting in a reduction in strength stiffness and wear resistance.66
A linear relationship between light intensity and polymerization contraction has been demonstrated. Reduced rates of polymerization during the maturation of the bond between the tooth structure and the composite resin may allow for increased flow of material and less stress formation, which may disrupt the bond between the tooth and restoration.67–71 Some reports state that even thin layers of composite resin, such as those produced under porcelain inlays, can produce shrinkage stress that challenges the dentin fond.72
Liners and bases
Traditionally, liners and bases have been used under restorations. However, new developments in liners and bases and an increased understanding of pulp biology have changed the indications for use of these materials.
The current generation of dentin bonding agents has significantly reduced the need for protective liners and bases. However, despite dramatic improvements since their introduction, modern dentin bonding agents leak immediately when bonded to superficial dentin. Nearly all dentin bonding agents show significant loss of bond strength when bonding to deep rather than superficial dentin.73, 74 This difference is a result of the amount of intertubular and peritubular dentin found at different dentinal depths. Deep dentin has more peritubular dentin and more surface moisture.
In some specific instances, placement of a liner may be warranted. Calcium hydroxide is still useful for direct pulp capping as a stimulus for reparative dentin formation, despite its inability to provide a permanent seal against bacterial invasion. This inability to form a permanent seal may be caused by tunnel defects that form in reparative dentin and the eventual dissolution of the calcium hydroxide after long-term placement.75, 76 Tunnels in a dentin- bridge are inactive vascular channels that were once active. The number and sizes of vessels injured by exposure determine the number of tunnels formed during the healing process.
Marginal bevels
Enamel margins of composite resin restoration are beveled in most situations. Beveling enamel provides an increased surface area for etching, resulting in increased retention and reduced microleakage. The beveling exposes the ends of enamel rods, which is optimal for acid etching.82 Bevels should be prepared with a medium grit diamond bur.
Beveling provides a gradual transition between the composite resin restoration and the tooth. Bevels of 45 degrees and 1 to 2 mm wide are used in facial areas, whereas a smaller (0.5-mm) bevel is used in other areas. (A wider bevel is placed on the facial surface to achieve better blending in the esthetic zone.)
Bevels (on the occlusal surface) should be avoided in Class I and Class II restorations because thin composite resin margins are subject to fracturing. Widening the preparation to allow a bevel may extend the restoration into areas of occlusal function and possibly increase wear.
Areas at the cervical margin with only a thin layer of enamel should not be beveled because thin areas of enamel may be removed. It is always desirable to terminate the restoration on enamel rather than cementum or dentin.50, 84
Finishing
Finishing involves margination, contouring, and polishing. The primary goals are good contour, occlusion, smoothness, and appropriate embrasure form.5
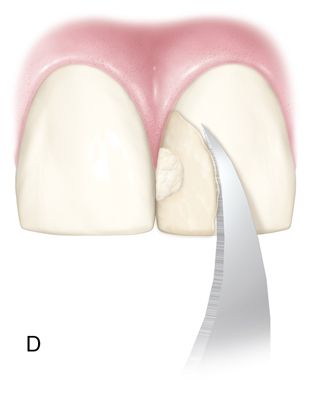
The bonding agent should cover all etched enamel surfaces. Etched enamel that is not covered with resin may take as long as 2 to 3 months to remineralize, leaving the tooth surface vulnerable to discoloration. Running a composite resin knife, a number 12 Bard Parker blade, or a gold foil finishing instrument from the enamel to the composite resin will remove all unattached bonding agent. (These instruments are also excellent for removing small proximal overhangs in Class II restorations before finishing with aluminum oxide strips [see Fig. 5-5 D].) This will leave a small step, which can be finished with composite resin finishing diamonds or disks. The restoration can have a lifelike appearance. Finishing burs, diamonds, rubber points, and disks can be used to create lobes, ridges, and surface texture. To produce a textured surface, a slight excess of composite resin is left after finishing. A micron diamond can be used to produce the desired texture. A polishing cup and polishing paste are then used to bring out the luster, although care should be taken not to destroy the created texture.

The restoration is smoothed with discs or rubber polishing instruments for the anterior surface and points, cups, and brushes for the posterior surface. Metal or plastic finishing strips can be used interproximally. Some controversy surrounds whether burs or diamonds are best for finishing composite resins. Diamonds are usually preferred because finishing burs are more damaging to the surface, causing more plucking of filler particles. These defects result in staining or loss of surface luster. Micron diamonds at slow speeds (with water spray to prevent clogging of the diamonds) can be used for excess removal and contouring and to provide a smooth surface with minimal resin damage. A variety of shapes, sizes, and degrees of fineness are available. White and green stones can loosen the fillers from the resin matrix and need to be used with copious amounts of water to prevent heat buildup.
Polishing
Achievement and maintenance of a smooth surface on a restoration will improve esthetics and in addition reduce plaque and stain formation.85
Several studies have suggested certain techniques may be suitable for specific materials.86 Differences in surface smoothness has been demonstrated using identical finishing systems with different composite resins.87
Microfilled composite resins can be polished with disks. The tooth surface should be wet when using coarse disks and dry when using superfine disks. The heat from the dry disk procedure produces a durable, highly polymerized smear layer of resin over the microfill. However, aggressive use of disks may destroy the previously created texture. A composite resin polishing paste (Prisma Gloss, Dentsply Caulk; Enamelize, Cosmedent, Inc.; HiLuster PLUS Polishing System, Kerr Corp.) can be used if necessary for 15 to 30 seconds using a rubber cup moistened with water. Small particle hybrids are polished with fine diamonds, flexible disks, and a very fine polishing paste (e.g., Luminescence, Premier, or Nano/Microhybrid Diamond Polishing, Cosmedent, Inc.).
Techniques and materials
Class I composite resin restorations
Armamentarium.
• Burs: carbide (e.g., #557, #330, #4, S.S. White Technologies, Inc.)
• Diamond: coarse and medium grit (e.g., Brassler USA, Axis Dental, Premier Dental Products, Inc., Komet USA)
• Placement and carving instruments (e.g., instruments by Hu-Friedy Mfg., Co; Cosmedent, Inc.; Coltene/Whaledent, Inc.; Premier Dental Products, Inc.; Almore International)
• Suitable liner (if necessary) (e.g., Vitrebond Plus, 3M ESPE, Vivaglass Liner, Ivoclar Vivadent; Fuji Lining LC, GC America Inc., Ionosit, DMG America)
• Suitable base (if necessary) (e.g., Vitromer Cement, 3M ESPE, Fuji II LC, GC America, Inc.)
• Articulating paper or wax (e.g., Bausch BK 01, Bausch, Inc.; Accufilm II, Parkell, Inc.)
• Radiopaque composite resin or microfilled resin designed for posterior use (e.g., Surefil, Caulk/Dentsply; Z-100, Paradigm Nano Hybrid, Filtek Supreme Ultra Nano composite resin, 3M EPSE; Herculite XRV Microhybrid, Herculite Ultra Nanohybrid, Kerr Corp.; Heliomolar and Tetric N-Ceram, Ivoclar Vivadent)
• Oil-free pumice (Moyco Technologies, Inc.)
• Cavity disinfectant (e.g., Tubulicid Red, Temrex Corp.; Consepsis, Ultradent, Inc.)
• Composite resin placement syringe (e.g., Centrix Syringe, Centrix, Inc.)
• Glycerin gel (e.g., Liquid Strip, Ivoclar/Vivadent, Inc.)
• Finishing instruments (e.g., Esthetic Trimming Kit, Brasseler, USA; Raptor System, Bisco, Inc.; Two Striper MPS Kit, Premier Dental Products, Inc.)
• Polishing instruments (D*Fine, Clinicians Choice; Diacomp II, Brasseler; Flexi [points, cups, and wheels], Cosmedent, Inc.; Composite resin Technique Kit, Shofu, Inc.; Diagloss, Axis Dental; Composite Resin Polishing System, Komet USA)
• Polishing paste materials (e.g., Luminescence, Premier Dental Products, Inc., Prisma Gloss, Dentsply Caulk, Inc.; Diamond Polishing Paste, Shofu, Dental Corp.)
Clinical technique.
1. Cleanse the tooth with pumice.
2. Evaluate the shade of the tooth before isolation (from the middle third of tooth).
3. Use articulating paper to determine the location of occlusal contacts so that they can be avoided, if possible, during preparation.
6. Place an appropriate liner or base if necessary. See section on Liners and Bases in this chapter.
7. Etch the enamel for 15 seconds and the dentin for 10 seconds. See the section on Acid Etching.
8. Wash with water and/or water/air spray for a minimum of 10 seconds for gel or liquid etchants. See the section on Acid Etching.
9. Air dry the enamel and blot the dentin, leaving it slightly moist. The cavity preparation can be disinfected with a cavity disinfectant and the excess blown off and blotted with a cotton pellet. However, in some systems the smear layer is not removed but only modified, and bond strengths may decrease as a result of disinfection.92, 93
10. Repeat the procedure if the enamel does not have a frosted white appearance after air drying. If the dentin is dry, moisten the dentin again with a cotton pellet moistened with water.
11. Place the dentin-enamel bonding agent according to the manufacturer’s instructions.
12. With a syringe, place an increment of a dentin shade posterior composite resin against the pulpal floor and against one of the buccal cusps. Light polymerize for 40 seconds through the cusp. Build up the other buccal cusp and subsequently the lingual cusps in a similar manner. This creates appropriate fissure position and depth.
13. Place tints and opaques to achieve a natural appearance. Place brown and ochre tints into pits and fissure and white or colored opaques at the crest of triangular ridges (e.g., Kolor+, Kerr Corp.; Creative Color, Cosmedent, Inc.).
14. Place a layer of an enamel/incisal composite resin to build up the definitive contour. This anatomic layering technique reduces stress within the adhesive interface.
15. Place glycerin to reduce the air-inhibited layer. Light polymerize for 40 seconds.
16. Finish the restoration. See the section on Finishing.95
17. Polish the restoration. See the section on Polishing.
Class II composite resin restorations
Improved clinical performance has been a result of more durable dentin bonding96–98 and improvement in composite resins.99–101 However, despite these resin improvements, composite resins remain technique sensitive.102 Failures often involve inadequate proximal contours and contacts, microleakage, secondary caries, postoperative sensitivity, occlusal wear, marginal degradation, and bulk fracture of the material.103
Occlusal wear.
In the 1960s, high wear rates made the composite resins unacceptable for restoring occlusal surfaces.104 However, recent formulations have reduced the wear rate for many materials to 7 to 10 μm per year. The composite resins have been made radiopaque, allowing the detection of excess material and recurrent decay.105 The addition of ytterbium trifluoride provides an element of fluoride release (e.g., Heliomolar).
Postoperative sensitivity.
Postoperative sensitivity was initially attributed to inadvertent acid etching of the dentin.106 However, recent research has shown that pulp inflammation is primarily caused by bacterial microleakage resulting from a breakdown of marginal integrity of the restoration.107
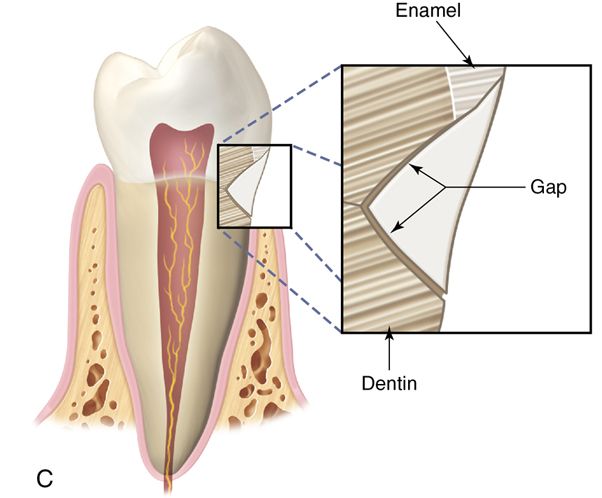
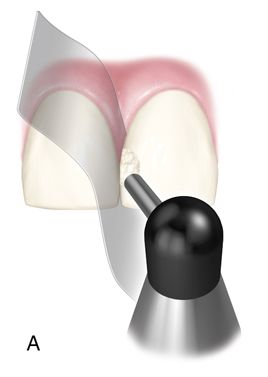
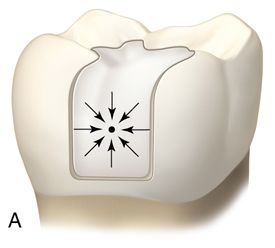
Light-polymerized composite resins are generally used for posterior restorations because they are more resistant to occlusal wear. Unlike chemically polymerized resins, which contract toward the geometric center (Fig. 5-2 A), light-polymerized resins shrink toward the light source (Fig. 5-2 B).
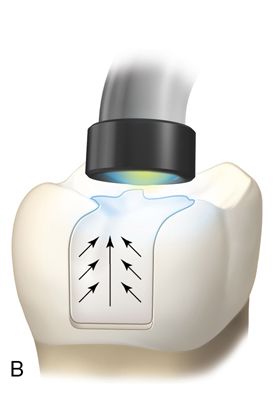
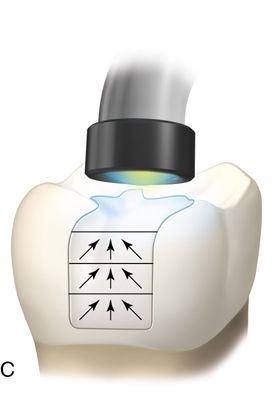

The portion of the composite resin closest in proximity to the light hardens first, pulling the composite resin away from the gingival margin. However, it is now believed composite resins polymerize toward the bonded surface (see the discussion [Versluis] in the conclusion at the end of this chapter). This process results in leakage, especially if the restoration terminates on dentin or cementum.108–111
When present, cervical enamel bonds poorly compared with occlusal enamel. Sometimes enamel prisms can actually be torn during shrinkage toward the occlusal surface.
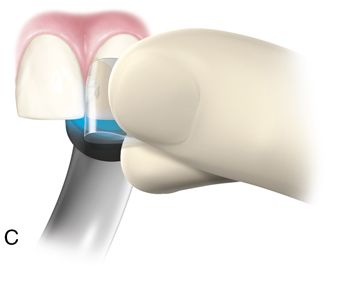
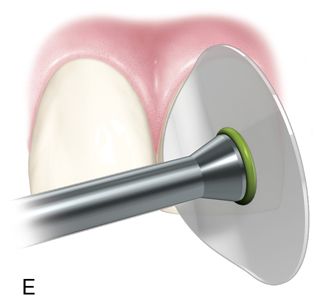
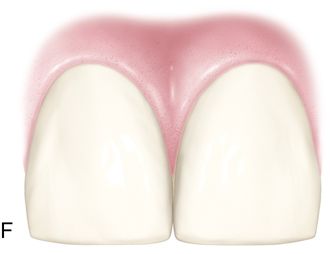
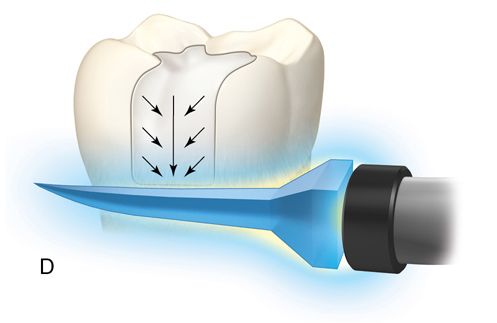
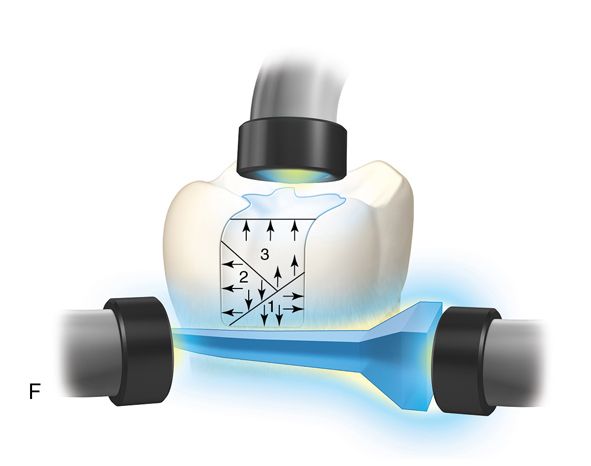
Incremental curing reduces but does not eliminate the gingival shrinkage (Fig. 5-2 C). A plastic wedge acting as a fiberoptic guide can further reduce the gap112 (Fig. 5-2 D), especially in combination with incremental placement of resins113 (Fig. 5-2 E, F). However, the plastic wedges do not adapt to varying tooth morphology and may loosen during manipulations of the restorative material. There is a difference in opinion as to whether or not wedges with a reflecting core are more effective in producing better polymerization than clear wedges. It has been stated that light reflecting wedges with a reflecting core to be more effective in producing better polymerization than clear wedges.114
Cure-Thru Wedges, Premier Dental Products, Inc. or (Cure Through G-Wedge, Garrison Dental Solutions) reversed the shrinkage vectors 180 degrees (by directing them toward the enamel margins).115 Use of retention cuts has been recommended to reduce gingival margin microleakage.115 However, this cuts were no benefit with an incremental technique. In general the clinician should minimize the size of the cavity preparation so that only carious areas are encompassed. Extension of the gingival floor or embrasure area or extension into other cuts on the occlusal surface is unwarranted. The pulpal floor need only be as deep as the dimension of the lesion because composite resin has a relatively low elastic modulus, and incorporation of the energy-absorbing properties of dentin is not needed.116 Evidence suggests that shrinkage can pull cusps together, creating postoperative sensitivity. If this occurs, bisecting the restoration (from mesial to distal) to the occlusal floor permits the cusps to spring back and eliminates the sensitivity.
Research suggests that a layering procedure can minimize cusp contraction. Buildup of individual cusps prevents the cusps from being pulled together. Although many clinicians advocate a layering buildup of the composite resin to minimize the amount of polymerization shrinkage and reduce the possibility of enamel fracturing, several studies advocate bulk placement of composite resin in Class II preparations.117, 118 Two of these studies used a dual-polymerized material (Marathon, Den-Mat Corp). It was theorized that shrinkage occurs toward the center of its mass, and the slightly warmer surface of the tooth may initiate polymerization at the junction between the wall of the preparation and the composite resin.119, 120 However, further research is necessary to validate this concept.
The advent of bulk placement is evidenced by the recent introduction of several new materials such as Quixx (which is very translucent) and Surefil SDR flow (Dentsply/Caulk),121, 122 Venus Bulk Fill (Heraeus Kulzer), SonicFill (Kerr Corp.), X-tra fil (Voco GmbH), Tetric Evoceram bulk fill (Ivoclar/Vivadent), and Filtek Bulk Fill Flowable Restorative (3M ESPE).
SureFil stress decreasing resin (SDR) achieves stress reduction by inserting a polymerization modulator into the polymerizable resin. This has been found to act in conjunction with the camphoquinone photoinitiator to slow modulus development. This results in less stress but no decrease in polymerization rate or conversion. There is more linear/branching chain propagation and minimal cross-linking creating a decreased rate of modulus development.
One of the controversies surrounding the bulk fill technique is the depth of polymerization (DOC). It has been suggested that changing the definition of DOC may be appropriate by taking into account the transition between glassy and rubbery states of the resin matrix.123 The authors felt that current methods such as microhardness, degree of conversion, and scraping methods do not detect this transition and may have the consequence of overestimation of the DOC. If the organic matrix is not vitrified but exists in a gel state, flow will lead to reduced stress on the existing tooth structure. The depth of polymerization may not properly evaluate the quality of the polymerization and the degree of cross-linking has to be considered.123 In addition, Flury et al. demonstrated the current ISO 4049 method overestimated DOC as compared with DOC as extrapolated from Vickers hardness.124 Frauscher and Ilie found “curing time” and “material” demonstrated the greatest effect on depth of polymerization (DOC) with newer materials such as N’Durance and Venus Diamond, showing the lowest decrease of conversion with increased depth and the best DOC.125
Tight proximal contacts.
Placement of the posterior composite resins depends on the matrix for correct interproximal contour. Unlike an amalgam restoration, a circumferential band is not necessary and a contoured segmental matrix may be preferred. In a mesial-occlusal-distal (MOD) composite resin restoration, the wedge and matrix initially should be placed on the distal side only, which displaces the tooth slightly in a mesial direction. (Placing a wedge and matrix simultaneously on the mesial surface would interfere with and prevent some of this mesial displacement and increase the chance of an open, or “light,” contact.) Similarly, when the mesial surface is filled, no wedge or matrix should be present at the distal surface.
Strengthening cusps.
A dentist may think that a strong dentin-enamel bond and high composite resin tensile strength can tie the buccal and lingual cusps together to strengthen the tooth. However, research on this topic is equivocal. One study has shown that this method causes less reinforcement because of thermal cycling.132
Contact forming devices.
Various devices and instruments have been manufactured to aid in achieving a tight contact (e.g., Contact Pro 2, CEJ Dental, Inc.; Belvedere Contact Former, American Eagle Dental Instruments; Composite resin Contact Instrument, Premier; Light-Tip, Denbur;133–135 Trimax, AdDent, Inc., PerForm Proximal Contact Instrument, Garrison Dental Solutions). These instruments are made of a wide variety of materials and shapes, and they all have a range of advantages and disadvantages.
Most of the instruments reduce the bulk of composite resin, thereby reducing polymerization shrinkage. They also expedite contact formation. However, the contact formed is not always at the correct height, dimension, and position.126, 127 Devices such as the Light Tip permit curing at the critical gingival area.136
Multiple-step buildup technique.
Armamentarium.
Use the same dental setup as for Class I restorations with the following exceptions:
Stay updated, free dental videos. Join our Telegram channel
VIDEdental - Online dental courses


