Ceramic Inlays
For decades, attempts have been made to use ceramics as an inlay material. However, it was only a few years ago that technologies became available that could be used successfully in dental practices. Two crucial developments have contributed to this success:
—Adhesive technology enables a lasting connection between the inlay and the tooth.
—The dental industry has over the past few years developed a multiplicity of systems that enable well-fitting inlays to be fabricated.
Ceramics are stabe as far as form and color are concerned and are resistant to abrasion and erosion as well as being biocompatible. Their coefficients of thermal expansion are similar to that of enamel. Unfortunately, the methods of manufacturing ceramic inlays are still very complex, which leads to high laboratory costs. Ceramic inlays are the aesthetic alternative to gold inlays. In a few years, long-term studies will be available to determine which restoration is better. Ceramic restorations are undoubtedly the most aesthetic alternative, but also the most expensive.
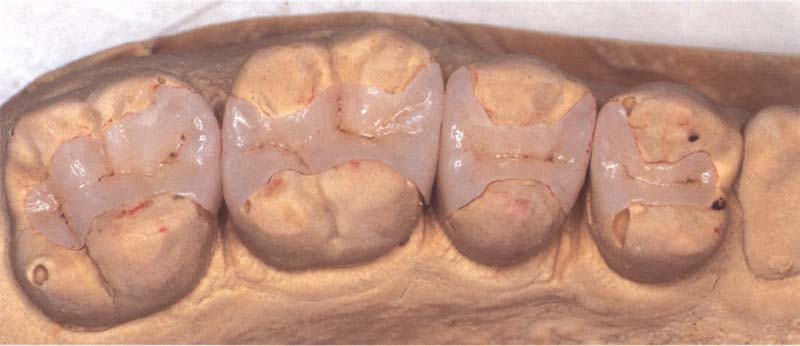
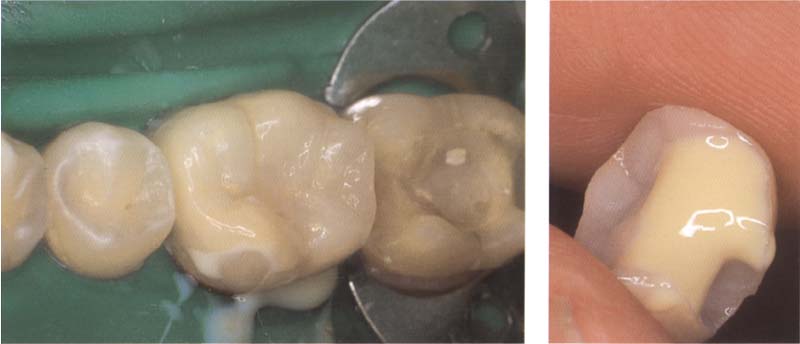
383 Layered inlays made on refractory dies shown on the model
Ceramic inlays can be sintered, pressed, cast, or machined from prefabricated blocks. If a patient wishes to receive virtually invisible restorations, such restorations can be made using sintered ceramics. However, with this approach one should know that the produced inlays have less favorable physical properties. Moreover, making sintered inlays is still a very demanding dental technical process.
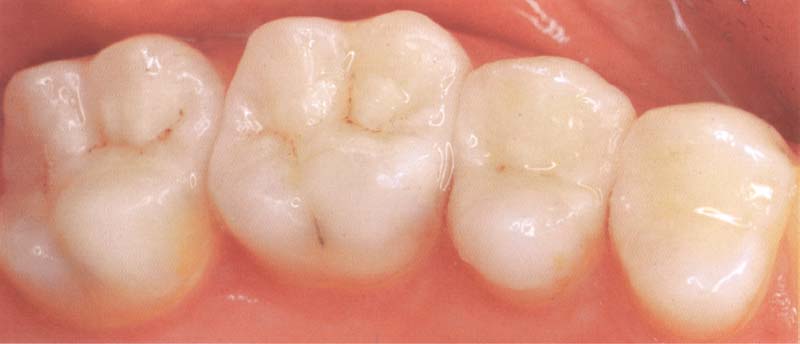
384 Sintered inlays that have been bonded in the mouth
The all-ceramic inlays shown in Fig. 383 have been bonded adhesively. All-ceramic inlays must be bonded with resin cements and suitable adhesive systems. Mistakes made during cementation lead to fractures of the inlays.
Overview
Porcelain inlays were already being produced in the 19th century. Unfortunately, both fit and cementation were very unsatisfactory. In 1908, the tooth-colored silicate cement was introduced that would become the most widely used anterior filling material for many years. After 1946, silicate restorations were slowly replaced by resin restorations.
Since the 1980s, tooth-colored materials have become available for use in the posterior regions. However, it is only since the ceramics and composites can be firmly bonded to the tooth that tooth-colored posterior restorations have worked with direct or indirect methods.
For the treatment of posterior teeth, numerous tooth-colored filling materials are available today:
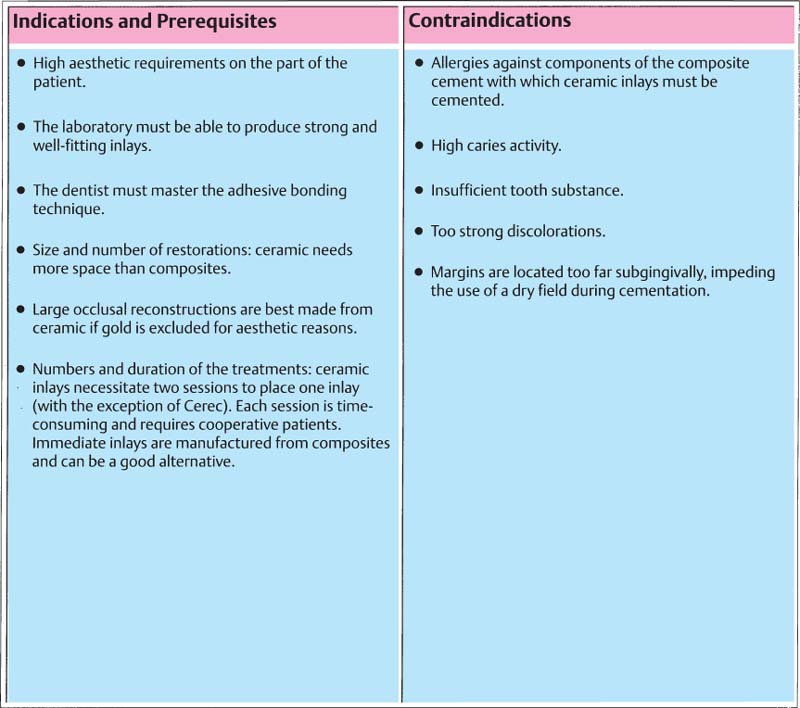
385 Prerequisites, indications, and contraindications for all-ceramic inlays
The classic glass ionomer fillings were replaced by the resin-modified glass ionomers (e.g., Fuji II LCS, Vitremer, etc.). The indication for compomer fillings is limited to pedodontics and cervical cavities in active caries dentitions. The direct composite filling is the ideal restoration for small, incipient carious lesions. If existing extensive amalgam fillings are to be substituted, indirect methods are still preferred.
Ceramic inlay techniques are described in the following sections. The details concerning preparation, cementation, and finishing are not extensive because these topics have already been dealt with extensively in context of composite inlays (p. 152 ff.). However, differences in placing them will be accentuated.
Principles of Preparation
Ceramic inlays require a large amount of space. The material should not be less than 1–1.5 mm thick. If the dental technician has less than 1.5 mm space for manufacturing an inlay, it would be difficult to make a well-fitting inlay that does not break during manufacturing in the laboratory. Also, the risk of fracturing an inlay during cementation should not be underestimated, particularly when thin inlays are cemented.
The typical preparation of a gold inlay and that of a ceramic inlay differ as follows:
—The ceramic inlay should have no feather edges, since these will break off.
—It should be prepared with a divergence greater than the gold inlay (approx. 6°) in order to facilitate sealing the inlay.
—The ceramic inlay should have no sharp internal angles. If this is, nevertheless, the case, they can easily be blocked by the dental technician with the die-spacer.
—With onlays, the cusps should not be embraced as is the case with gold inlays, but only beveled.
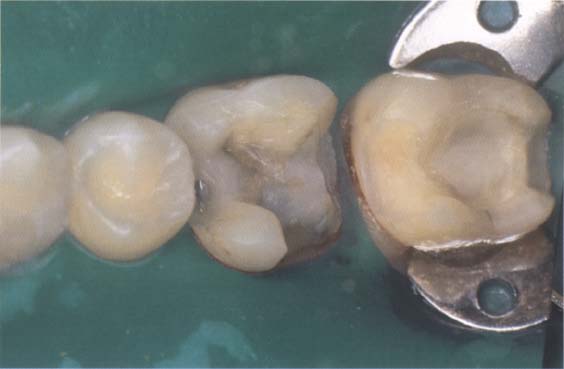
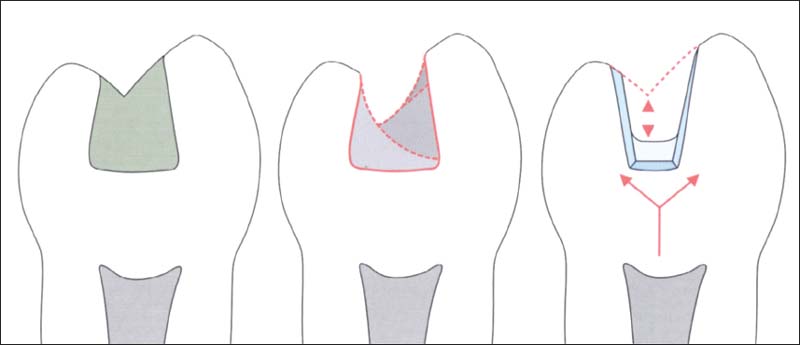
386 Principles of preparation
The preparation should have no undercuts and be more diverging than gold inlays. Cusps should not be embraced.
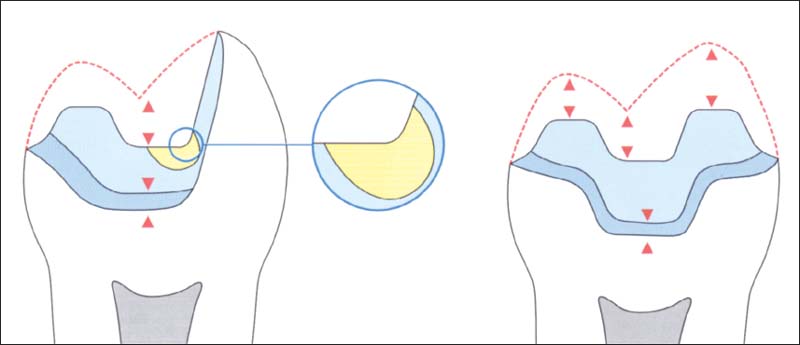
387 Importance of build-up and base
Left: After removing the old restoration, a large defect is usually present.
Middle: A preparation is chosen that does not have regions with large undercuts, because this usually leads to extensive restorations.
Right: Build-up and base filling serve to conserve tooth structure during preparation and to protect the dentin and the pulp.
388 Preparation of all-ceramic inlays and onlays
One should make sure that 1.5–2-mm space exists in all planes. Sharp inside line angles and small undercuts are not desirable and can be blocked by the dental technician with some die spacer. Large undercuts should be blocked before the impression is made with a buildup filling.
Color Selection, Impression, and Temporary Restoration
Color Selection
Colors should be selected before the rubber dam is placed. Discolorations that shine through a great deal from old restoration and carious lesions are to be removed with the rubber dam in place. Color selection can take place before the temporary restoration is placed.
The fact that the tooth color can change significantly during the treatment because of dehydration should be taken into account.
Depending on the technique used, patients are reminded that they will receive a tooth-colored inlay. A difference in color between inlay and the patient’s own tooth is possible. Inlays made from IPS Empress, OPC, Celay, and Cerec techniques are produced from monochrome blocks and are subsequently painted. The colors are not always perfectly matched. In the case of onlays, a perfect color match is often difficult on the buccal surface of the onlay. It is, therefore, important to remember that this is where finishing and polishing is done. A line layer of color is often lost if care is not taken.
389 Selecting the suitable color of the cement
Left: Adapt the inlay on the tooth. Small corrections to the color, particularly at the buccal transition of onlays, are thus possible.
Right: The inlay is coated with the try-in paste.

390 Impression
The impression can be made with any addition-polymerized silicone or polyether impression material. A combination of hydrocolloide and alginate is also possible. The picture shows a combined hydrocolloid/alginate impression.
Surprisingly, with many inlay techniques it is not so important to select the exact color and color stratification. Through the chameleon effect of a transparent ceramic and the translucency of the cement, the margins are more often invisible with inlays than with onlays. Patients should already know this before starting the treatment plan. If they desire an invisible inlay, sintered ceramic is the best alternative. Then one must take the higher laboratory costs and the higher dental fees into account during the treatment planning.
However, the patient must also be informed that the physical properties of the sintered ceramic inlay are not as good as most other materials.
Making a Dental Impression
Usually, the impression is made with an addition silicone or a polyether impression material. Also, the classic hydrocolloid impression material (two impressions are required) is suitable for this. The dental technician should always make two working models. The contact points are adjusted after completion of the inlays on an uncut model. This makes it much easier to insert the inlays.
Temporary Restoration
Page 156 (Composite Inlays) describes a simple technique for making temporary restorations. The technique is also used here. If c/>
Stay updated, free dental videos. Join our Telegram channel
VIDEdental - Online dental courses


