Photography
Photography is just as indispensable for aesthetic dentistry as radiography is for traditional restorative dentistry. Today, in a modern dental office, photography is routinely used for documentation, for marketing, and as a communication tool to explain different procedures to patients. If one has access to the right equipment and follows some general rules, the use of photography in dentistry is simpler now than ever before.
The first system cameras that made it possible to take intraoral photographs were introduced during the early 1960s. Until recently only the conventional single-lens reflex (SLR) cameras were available to dentists. However, today’s computer technology has also penetrated into the dentist’s treatment room: new digital camera systems. Today patients can be shown the state of their oral health directly on screen during treatment. In addition, the treatment goal can immediately be shown with the help of computer simulations and printouts.

24 Producing a photographic status report
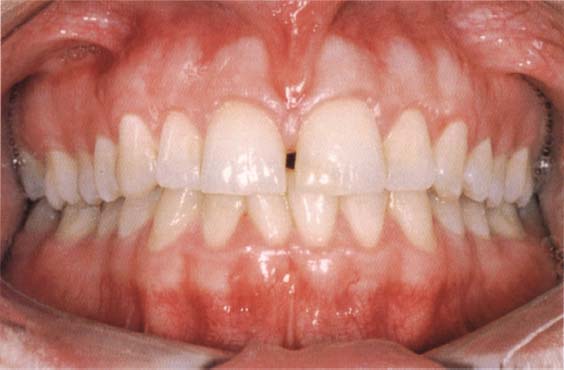
In aesthetic dentistry, case documentation is very important (both before and after treatment) for patient information, communication with the laboratory, and also for general quality control.
Why take Photos?
There are various reasons for taking photos in the dental office:
—Having photographic documentation of the initial condition, the individual treatment steps, and the final result is very important.
—Dentists document their work and monitor their skills. Good recording is a part of the quality control system and offers dentists a wealth of information from, for example, the gingival condition of the patient to color differences of veneer.
—Photographs simplify communication between the dentist and the dental laboratory. Accompanying photographs greatly facilitate the work of the dental technician. The needs of both dentist and patient can be better presented and consequently the result is more satisfactory. There is hardly a bigger challenge for a dental technician than fabricating a single anterior veneer or crown. A good illustration of the situation helps the technician to succeed.
—Photographs are very helpful when used for both patient motivation and education. Photographs document what can be achieved with modern dentistry.
—“Before and after” recordings can be used as an excellent marketing tool. They make it possiblbe to demonstrate a planned treatment to the patient. It is particularly convincing when dentists presents their own treatment cases during these sessions (“J did that, and J can do that for you too!”).
—After treatment is completed, give patients “before and after” photographs that are mounted in a little album and which they can take home. A satisfied patient will recruit new patients. Excellence is and will remain the best advertisement for your practice. What, after all, is marketing? The answer is: perform well and make sure others talk about it.
—Photographs are also helpful in communicating with health providers and insurance companies. But it can also be extremely helpful to have good photographs in cases involving legal disputes.
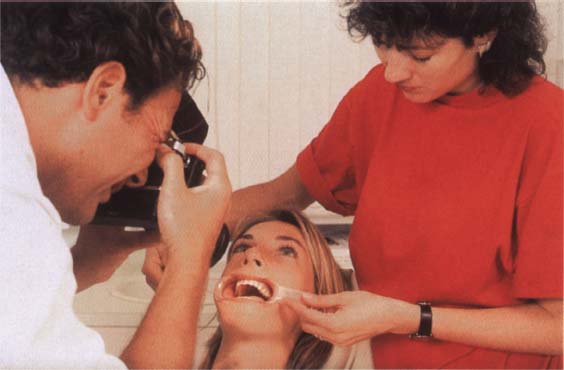
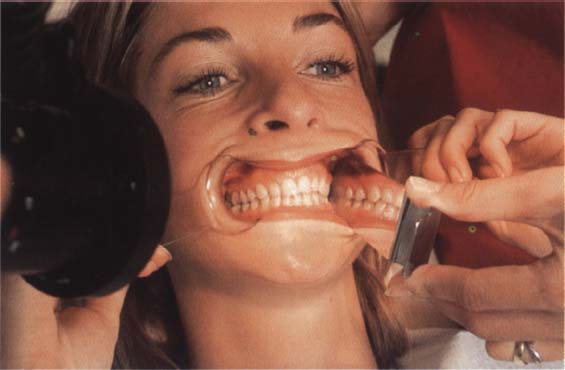
25 Photograph of the anterior teeth
When a frontal shot of the anterior teeth is taken, the patient’s lips are retracted with two cheek retractors. The photographer stands in front of the patient.
26 Photograph of posterior teeth with occluded tooth arches
The lips are here also retracted with cheek retractors. A long, slightly conical mirror makes it possible to photograph the posterior teeth with occluded mandibular and maxillary teeth.
Basics of Photography
Modern 35-mm cameras are constructed so that very limited technical knowledge is needed for their use. Most of these cameras have automatic film-speed detection, auto-focus, automatic exposure control with a synchronized flash which senses poor light conditions, and automatic film rewinding. Nevertheless, some basic photographic knowledge is indispensable.
Exposure Time and Aperture
Exposure time and aperture size restrict the amount of light to which the film is exposed. The photographer should set the size of the aperture. A small aperture (large f-number) enables a large depth of field. Therefore, the aperture should be as small as possible in macro photography. However, this necessitates a sufficiently strong light source. As long as one works within a reasonable range of magnification (1:2 to 1:1), the amount of light is usually sufficient.
Resolution
The dentist chooses the desired magnification (for example 1:2 or 1:1) and then moves the camera slowly toward the object until position and sharpness are correct. The photograph is then taken.
Lenses
For intraoral photography the dentist uses a macro lens with a focal length of 90–120 mm. Such lenses produce a 1:1 image.
Type of Film
One can select between slide or negative films. Slides can be used for lectures; prints are suitable for patient education and communicating with laboratories.
Film Speed
The film speed is given in ASA, ISO, or DIN. The recommended film speed for the case under discussion is 100 ASA.
Light Sources
Ring flashes are commonly used in intraoral photography.
27 Frontal view
When only teeth are being photographed, a magnification of 1:2 to 1:1 is suitable.
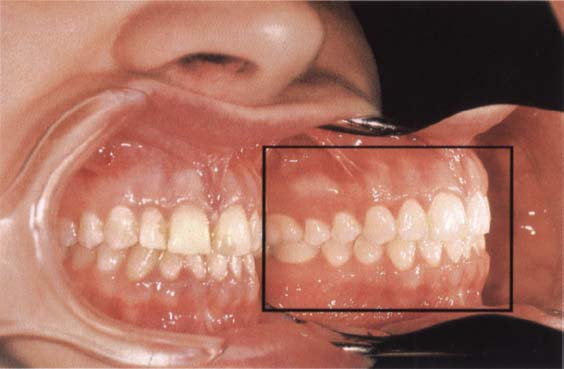
28 Lateral view using a mirror
A magnification of 1:2 (35-mm format) should be chosen.
Camera Systems
In principle, the dentist must choose between two camera systems: conventional film systems or digital storage media. Digital cameras are discussed on page 22. In the case of conventional film systems, the choice is between:
Stay updated, free dental videos. Join our Telegram channel
VIDEdental - Online dental courses


