General considerations
The efficacy of bleaching teeth with heat and hydrogen peroxide is well documented.9, 61–65 Goldstein observed no known loss of tooth vitality after 30 years of bleaching more than 30,000 vital teeth.66 Although mild thermal sensitivity is a common sequela of bleaching, clinical studies have failed to demonstrate long-term irreversible pulpal effects.67
Treatment methods
Office treatment (power bleaching) methods generally involve the use of 35% or greater hydrogen peroxide in either liquid or gel form. In the thermocatalytic technique, the chemical is heated (see the section on Temperature). High intensity light or laser ( photocatalytic technique) sometimes combined with heat ( thermophotocatalytic technique) can also be used to accelerate the chemical reaction.
Power bleaching is also used in combination with home bleaching.66, 67 It has been proposed that a certain segment of the population whose lifestyles are not amenable to home treatment can be treated exclusively by in-office power bleaching.66
Restorative implications
In some cases, discoloration has returned after initial successful or partly successful treatment. Subsequently placed porcelain or composite resin laminate veneers, or any restoration in which the color of the tooth structure will affect the color of the restoration, may not prevent color regression of the underlying tooth structure and the restorative materials may not completely mask the visual display of any such changes. The esthetic effects of such color regression depend on the amount of regression and the degree of translucency of the overlying restoration. This must be considered if discoloration removal therapy is followed by restorative treatment of any kind.
It also has been demonstrated that applying hydrogen peroxide to bovine tooth structure diminishes the bond strength between unfilled resin and acid-etched enamel.68 –70 Presumably oxygen inhibition of resin polymerization and the creation of voids in the resin tags may be caused by residual hydrogen peroxide or peroxide-related substances in the interprismatic enamel areas after bleaching.69, 70 This residual substance apparently is not removed either by a 1-minute water rinse or by thoroughly drying the surface.70 However, the changes within the tooth structure that cause the diminished bond strength seem to be reversible.68 The most common recommendation is to postpone placing bonded restorations for 2 to 3 weeks after bleaching.71–73
Types of discoloration: Mechanism, appearance, and treatment
Tetracycline staining
The broad-spectrum tetracycline group of antibiotics was first introduced in 1948 for use in the treatment of respiratory illnesses. However, tooth discoloration caused by incorporation of systemic tetracycline into tooth structure was not reported until 1956.74
Mechanism.
The exact mechanism of tetracycline staining is not completely understood. It is hypothesized to occur by the joining of the tetracycline molecule with calcium through a chelation process and a subsequent incorporation into the hydroxylapatite crystal of the tooth during the stage of development.75–78 A second theory maintains that the discoloration involves a binding of the tetracycline to tooth structure by a metal-organic matrix combination of the tetracycline complex.79, 80 Although some tetracycline accumulates within the enamel, it is primarily deposited in the dentin81 because of the large surface area of the dentin apatite crystals compared with enamel apatite crystals;82 however, enamel hypoplasia also can result.83
Mode of action.
Extracted tetracycline-stained rat,84 dog,85 and primary human teeth86 darkened when exposed to sunlight. Interestingly, further exposure to various light sources (sunlight, or incandescent or ultraviolet lights) produces a subsequent lightening of the tetracycline stain.77, 84–89 It has been postulated that tetracycline incorporated into hydroxylapatite, when oxidized by ligh t (photo-oxidation), produces the red quinone product 4-α, 12-α anhydro-4-oxo-4-dedimethylaminotetracycline (AODTC).13, 90 Continued photo-oxidation of AODTC photolyzes, or bleaches, the red quinone.13 Addition of diluted hydrogen peroxide yields an irreversible bleaching of the red quinone as well.13
Appearance.
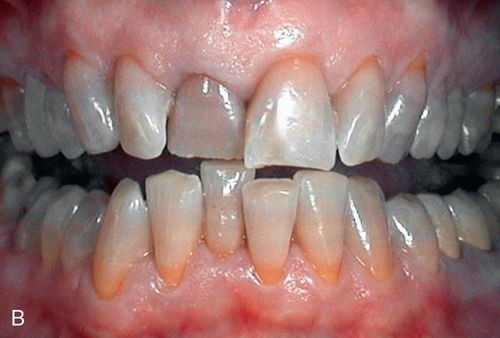
Tetracycline discoloration may be yellow, yellow-brown, brown, gray, or blue. The intensity of the staining varies widely. Distribution of discoloration usually is diffuse, and severe cases may exhibit banding. The staining usually is bilateral and affects multiple teeth in both arches.
The hue and severity of tooth discoloration depend on four factors associated with tetracycline administration:
1. Age at the time of administration: Anterior primary teeth are susceptible to discoloration by systemic tetracycline from 4 months in utero through 9 months postpartum. Anterior permanent teeth are susceptible from 3 months postpartum through age 7 years.91
2. Duration of administration: The severity of the staining is directly proportional to the length of time the medication was administered.92, 93
3. Dosage: The severity of the staining is directly proportional to the administered dosage.91, 94, 95
4. Type of tetracycline: Coloration has been correlated with the specific type of tetracycline administered.96
Yellow tetracycline staining slowly darkens to brown or gray-brown when exposed to sunlight. Therefore, the anterior teeth of children often darken first, whereas the posterior teeth, because of reduced exposure to sunlight, darken more slowly.10 In adults, however, natural photobleaching of the anterior teeth (see the preceding section on Mechanism section under Tetracycline Staining) has been observed, particularly in individuals whose teeth are excessively exposed to sunlight because of maxillary lip insufficiency.87 Hypocalcified white areas of varying opacity, size, and distribution also may be present.
Tetracycline staining categories
A number of different classifications of degrees of tetracycline staining have been suggested.61 Bleaching success is dependent on the severity and color of the staining. Yellow-brown to brown staining generally responds better to bleaching than blue to blue-gray staining.
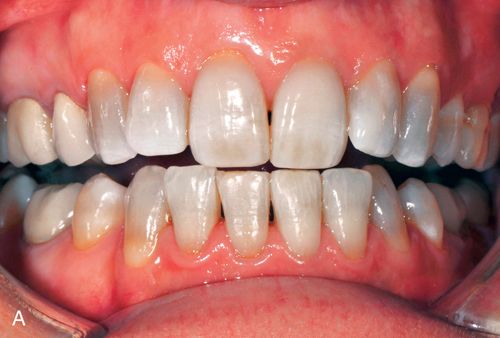
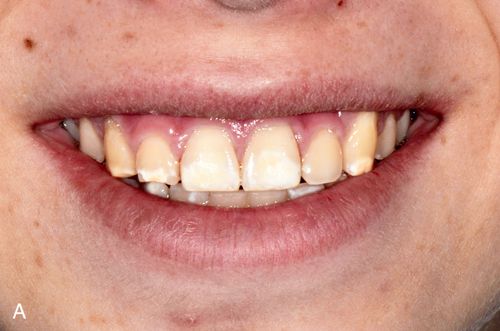
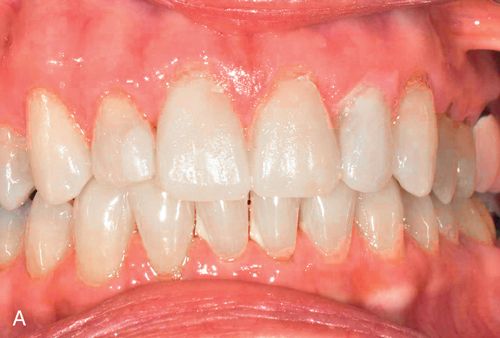
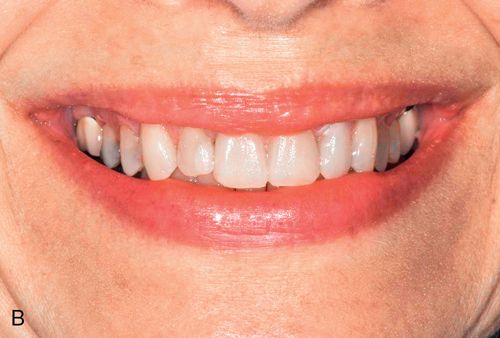
1. Mild tetracycline staining. Mild staining can be light yellow, light brown, or light gray and staining is uniform throughout the clinical crown. No banding is present (Fig. 13-2 A).
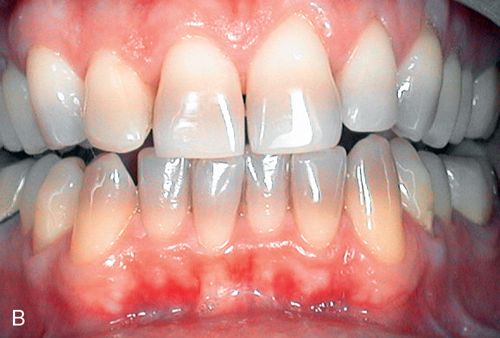
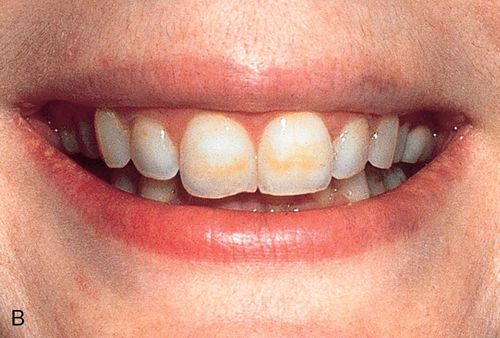
2. Moderate tetracycline staining. Moderate staining is more intense than mild staining (Fig. 13-2 B).
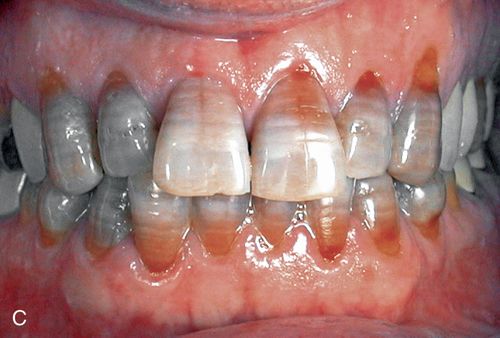
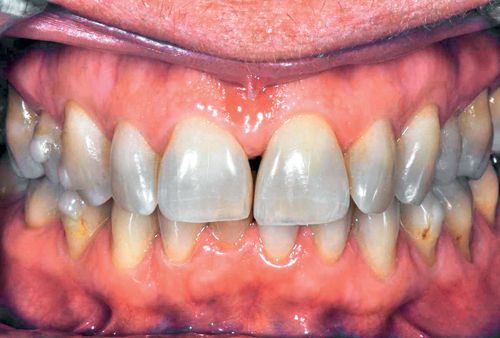
3. Severe tetracycline staining. Severe tetracycline staining is intense, and the clinical crown may exhibit horizontal color banding (Fig. 13-2 C). Bleaching generally is not performed because of the time involved and the poor prognosis. However, although less than ideal results are to be expected, the outcome may be esthetically satisfactory to the patient. The yellow-brown to brown component generally responds better than the blue to blue-gray component.
Treatment considerations.
Acid/abrasion techniques are not indicated for the removal of tetracycline stains because the discoloration primarily resides in the dentin. In general the results of bleaching yellow, yellow-brown, and brown stains are more favorable than those with blue-gray to gray stains. When teeth show any combination of yellow, brown, blue, or gray stains, the blue and gray components may remain to some degree despite a more favorable bleaching of the yellow and brown components. In addition, less intense stains have a better prognosis and usually bleach more quickly. Teeth with diffuse staining generally respond better than those with banding.
Ultraviolet photooxidation.
Laboratory evidence that photooxidation is both the cause of and a “cure” for tetracycline staining suggests that light alone is potentially a viable treatment for some tooth discolorations. In vitro ultraviolet (UV) irradiation of tetracycline-stained rat dentin produced complete stain removal after 24 hours of exposure.87 However, UV light does not penetrate enamel easily. Other sources of higher intensity UV light, such as deuterium arc sources or UV lasers, may overcome this obstacle, but problems such as high temperature generation, skin and mucosal burns, eye damage, potential carcinogenicity, and structural damage to enamel and dentin have not yet been suitably addressed, making this an unacceptable alternative at this time.87
Fluorosis
Mechanism.
Endemic fluorosis, or mottling, is caused by the presence of excessive systemic fluoride during enamel matrix formation and calcification.97, 98 Fluorosis is actually a form of enamel hypoplasia,97 hence the white spotting. Darker discoloration occurs through extrinsic staining of the hypoplastic enamel. Thus, the darker stains occur only after tooth eruption.98 A fluoride concentration of 0.7 to 1.2 parts per million (ppm) in the municipal water supply maximizes the caries-preventive benefits of fluoride while minimizing the likelihood of mild dental fluorosis.99
Appearance.
Staining usually is bilateral and affects multiple teeth in both arches. Fluorosis presents as mild, intermittent white spotting, chalky or opaque areas, yellow or brown staining of varying degrees (Fig. 13-3) and, in the severest cases, surface pitting of the enamel.99, 100

Treatment considerations.
It has been suggested that bleaching and acid/abrasion systems are effective for treating superficial fluorosis stains.10, 101 It has been proposed that a more conservative approach may be to attempt home bleaching first, followed by selective acid/abrasion if that is still required.100 It also has been reasoned that treatment time, financial considerations, and the patient’s lifestyle may indicate the use of acid/abrasion as the initial treatment, followed by bleaching.102 (See the section on White Spot Lesions later in this chapter.)
Extrinsic environmental stains
Mechanism.
Essentially limited to enamel, extrinsic environmental staining is caused by a variety of factors, including food, beverages, and tobacco products.
Appearance.
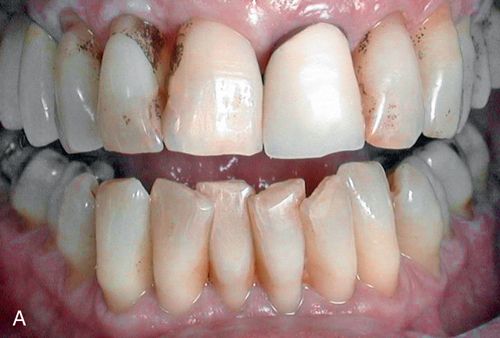
Environmental staining affects multiple teeth and appears as yellow or brown stains of varying intensities (Fig. 13-4 A). The staining can be diffuse, but protected areas of the teeth, pits, and other enamel defects may be more intensely stained because of inadequate oral hygiene procedures on these “protected” surfaces
Treatment considerations.
Superficial extrinsic staining often can be removed by proper home care or with routine professional prophylaxis (Fig. 13-4 B; see also Fig. 13-4 A).
Staining of pulpal etiology: Trauma or necrosis
Mechanism.
Intrinsic staining results from the deposition of hemorrhagic by-products into the dentinal tubules after pulpal trauma103-105 or necrosis.105
Appearance.
Discoloration of pulpal origin can be red, yellow, yellow-brown, brown, gray, or black. Obviously, discoloration is limited to the pulpally involved tooth or teeth (Fig. 13-4 C).
Treatment considerations.
Acid/abrasion techniques are not indicated for stains of pulpal etiology.
Staining after endodontic therapy
Mechanism.
Staining that occurs after endodontic therapy can be caused by excessive hemorrhaging during pulp removal or by decomposition of pulpal tissue following incomplete extirpation.103, 106
Various endodontic medicaments and sealers containing barium, iodine, or silver also may cause discoloration, as can gutta-percha.103, 107–109
Appearance.
Discoloration of pulpal origin can appear red, yellow, yellow-brown, brown, gray, or black. Discoloration from endodontic medicaments and sealers ranges from orange-red to dark red, or gray to black.106, 107 Discoloration obviously is limited to the endodontically treated tooth or teeth (Fig. 13-5 B).
Treatment considerations.
Acid/abrasion techniques are not indicated for stains of pulpal etiology. The absence of pulp tissue allows for placement of bleaching agents directly into the pulp cavity. Staining caused by medications, sealers, and filling materials generally is less amenable to bleaching than staining resulting from biologic causes.110 In an in vitro, intracoronal bleaching study in which a combination of sodium perborate and hydrogen peroxide was used in teeth stained with one of seven different sealers, the teeth were markedly improved after bleaching, although some color regression occurred after 6 months.106
Staining from pre-eruption trauma: Direct and indirect
Mechanism.
Discoloration of a permanent tooth may occur after trauma to its primary counterpart.111 Blood breakdown products from the traumatized site can infiltrate the developing enamel during the calcification stage.98 Also, the apex of the primary tooth may directly traumatize the ameloblasts or the enamel matrix. Discoloration of a permanent tooth also may result from jaw fractures associated with the developing dentition, periapical inflammation of a primary tooth, or other infections in the area of a developing tooth bud.98
Appearance.
Discoloration usually is white or yellow-brown and often sharply demarcated or spotty rather than diffuse.111 This discoloration can closely mimic that caused by endemic fluorosis or tetracycline ingestion; however, it usually is limited to the facial enamel surface of one or two teeth, usually the maxillary incisors.112 Enamel defects also may be present if the ameloblasts or the enamel matrix was disturbed.98
Treatment considerations.
A normal response to pulp vitality testing can aid in distinguishing between staining induced by developmental trauma and that arising from pulpal etiology.
White spot lesions
Mechanism.
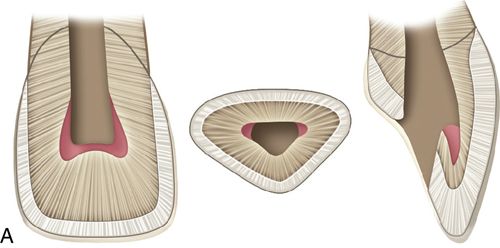
White spot enamel lesions can be developmental, acquired, or a combination of the two. Developmental lesions result from alterations that occur during the matrix formation or calcification stages of tooth development resulting in surface and subsurface porosities113 and subsequent optical and physical changes. Endemic fluorosis and trauma are two of the most common causes, but developmental disturbances during this period caused by genetic disorders, febrile and other illnesses, and unknown factors also occur. The same demineralization process can also occur as an adverse side effect of adhesively bonded orthodontic brackets,114, 115 especially in the presence of poor oral hygiene.112 The term dysmineralization has been proposed to refer to these lesions because of the difficulty often encountered in determining the precise nature of these mineralization abnormalities.116 It has been hypothesized that hypomineralization occurs because of acid production which leads to a loss of calcium ions (Ca+) and phosphate ions PO4− from the tooth enamel.117 Hypomineralization results in a loss of translucency at the incisal border of the anterior teeth, with concurrent poorly delineated white opacities.118 Traumatic dental injuries to the developing tooth bud can also cause hypomineralization.119, 120 These areas of hypomineralization are called Striae of Retzius, Hunter Shreger Bands or incremental lines of von Ebner.121 When they occur in dentin, they are called contour lines of Owen.115
Appearance.
White spot lesions manifest as discrete areas that are lighter than the surrounding normocalcified enamel (Fig. 13-6 A). The intensity of the lesion varies from mildly decreased chroma to opaque chalky white. Size, distribution patterns, and penetration depth vary greatly.

Treatment considerations.
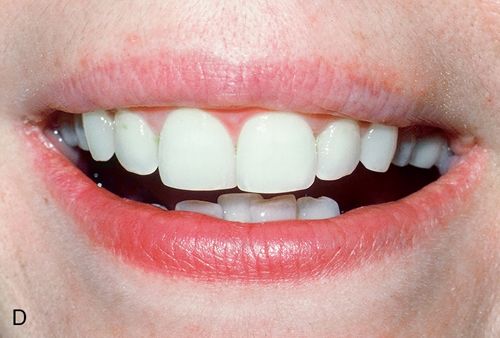
For treatment planning purposes, a tooth with localized white spot lesions can often be considered a mosaic of light areas on a background of normocalcified tooth structure. If the background tooth structure is a desirable color, acid/abrasion techniques may be considered. (See the section on Acid Microabrasion Combined with Resin Infiltration Therapy later in this chapter.) However, if the background color is undesirable, a bleaching system may be appropriate. In this situation, the contrasting white spot lesions may become significantly less noticeable and esthetically more acceptable after a successful bleaching of the normocalcified background area (Fig. 13-6, B-D).
(See the general considerations section under Acid Microabrasion Combined with Resin Infiltration Therapy later in this chapter.)
Staining from silver amalgam
Mechanism.
Tooth discoloration from silver amalgam is caused primarily by the visibility of a restoration through relatively translucent tooth structure. To varying degrees, it also may be caused by direct staining of the tooth structure by the reaction products of intraoral sulfides and the copper or silver ions of the amalgam.
Appearance.
Tooth discoloration from silver amalgam is gray to black.
Treatment considerations.
Tooth discoloration from silver amalgam is not routinely amenable to bleaching. Restorative treatment is the usual solution.
Other discolorations
Numerous other types of discoloration can result from a plethora of causes. Some chromogenic bacteria may cause yellow, orange, brown-black, or green stains.122, 123 Salivary components can cause brown stains.99 Sulfmethemoglobin, a blood pigment breakdown product, can cause a green coloration to remnants of Nasmyth’s membrane.96, 122 Chlorophyll in dental plaque also may cause green stains.96 The deposition of porphyrin into developing dentin in patients with erythropoietic porphyria, an inborn error of metabolism, may result in a red, purplish brown, or brownish discoloration.33, 124 Phenylketonuria, another inborn error of metabolism, can produce brown discolorations.96 Erythroblastosis fetalis, a syndrome resulting from Rh incompatibility in an infant, is characterized by the hemolysis and breakdown of the infant’s blood, producing jaundice. These pigments may produce an intrinsic blue, brown, or green discoloration.122 Thalassemia and sickle cell anemia may cause similar discolorations.96 Amelogenesis imperfecta may result in yellow or brown stains.122 Dentinogenesis imperfecta can cause brownish violet, yellowish, or gray discolorations.122 Generalized yellow or gray coloration may not result from a pathologic entity but may simply be a variant within the normal range of tooth shade (Fig. 13-7). Some discolorations are of unknown origin.
Discolorations of unknown origin
Treatment considerations.
The precise etiology of many stains is not always discernible. This may complicate the generation of a reasonable treatment plan and prognosis. Some discolorations may be treated with routine prophylaxis. Stains resulting from erythropoietic porphyria and erythroblastosis fetalis sometimes can be treated successfully with bleaching agents.125, 126 Treatment of discoloration resulting from amelogenesis imperfecta and other etiologies that interfere with normal matrix formation or calcification of enamel often is less effective.126 Also treatment often is contraindicated if the current structural integrity of the tooth is sufficiently compromised. The prognosis for the treatment of generalized coloration of nonpathologic origin is highly unpredictable.
Treatment modalities
As with any therapeutic treatment, proper diagnosis should be attempted before a course of treatment is promulgated. Although the etiology of a specific tooth discoloration may be difficult to discern, an accurate history and evaluation of the factors discussed earlier (see the section on Discolorations: Mechanism, Appearance, and Treatment Considerations later in this chapter) help in establishing a differential diagnosis. The presence or absence of pulp tissue is also a treatment planning factor. Even with a definitive diagnosis, however, the ultimate outcome can be unpredictable.
Currently, only four methods of stain removal are available:
• Acid application with mechanical abrasion (acid/abrasion) with or without resin infiltration: Acid/abrasion techniques are enticingly efficient because of the short treatment times. However, because it involves the removal of enamel its application is limited to the most superficial discolorations.
• Resin infiltration therapy: This too involves the use of hydrochloric acid but includes the addition of resin impregnation, which has been successfully used for proximal caries treatment,127 and has also shown promise for treatment of white spot lesions.128 It is believed that the resin alters the light refraction behavior of the infiltrated enamel to mimic the surrounding healthy enamel.129–131
• Bleaching systems: Bleaching systems can also be used to treat superficial staining and are the only technique available for deeper enamel stains and for staining of the dentin. Repeated treatment applications often are necessary. Vital bleaching is accomplished either completely in the dental office (office or “power” bleaching) or outside of the dental office (home bleaching). (See the sections on Office Bleaching [“Power” Bleaching] and Dentist-Prescribed at Home Bleaching later in this chapter.) Nonvital teeth can be bleached with an intracoronal technique. (See the section on Nonvital Bleaching later in this chapter.)
• Combination therapy: The use of bleaching techniques and acid application/mechanical abrasion consecutively may provide the desired clinical result in some cases. (See the General Considerations section under Acid Application with Mechanical Abrasion [Acid/Abrasion] later in this chapter.)
General considerations
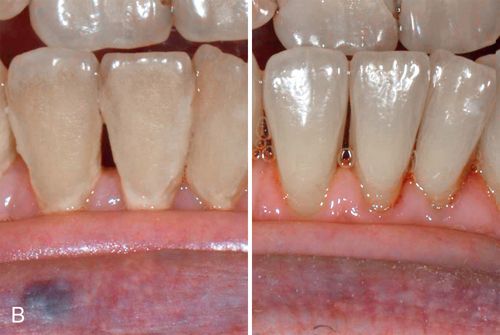
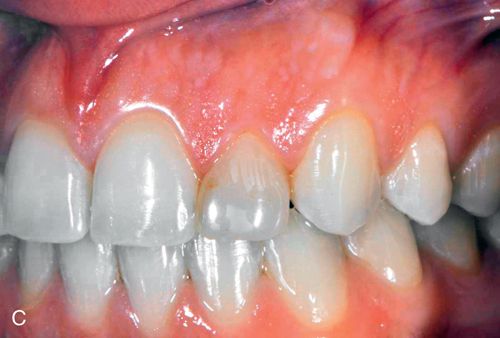
If the mandibular and maxillary arches are similarly discolored, it may not be necessary to treat the discoloration of the mandibular teeth. In some cases, the lower lip completely hides the mandibular arch during normal function (Fig. 13-8 A).
During function, the coloration of the mandibular arch often is obscured because of shadowing from the upper lip, particularly in Angle Class I and Class II horizontal overjet relationships (Fig. 13-8 B). The visual perception of the mandibular teeth is further reduced by the continuous motion of the mandible during speaking; the maxillary arch remains relatively stable in space during function. These factors may permit an esthetically acceptable result despite significantly contrasting shades between the maxillary and mandibular arches.
Clinical techniques
Acid application with mechanical abrasion (Acid/abrasion)
Acid/abrasion is a relatively simple procedure that removes tooth structure and stain simultaneously. Techniques vary and include at least one commercially produced set of armamentarium.
Hydrochloric acid.
Although hydrochloric acid is not a true bleaching agent, its applications warrant inclusion in any discussion of tooth discoloration treatments.
Hydrochloric acid is a potent decalcification agent. Nonselective in nature, it decalcifies both the tooth structure and the accompanying stains. When hydrochloric acid is used in con junction with abrasive agents, the affected enamel is completely removed, along with the stain.
In one study, five repetitions of a 5-second acid/pumice application with a wooden stick in vitro removed 112 μm of tooth structure.132 This resulted in an 11% loss of enamel thickness, assuming a permanent incisor midlabial enamel thickness of approximately 1 mm.133 It has been suggested that enamel losses of 25%57 and 30%134 are clinically acceptable.
It has been postulated that hydrochloric acid applied to the enamel surface does not penetrate the pulpal tissue.135, 136 The acid may form a calcium or phosphorus salt precipitate that limits further penetration of the acid into the dentin. In addition, these salts may further neutralize the acid.113
Scanning electron microscopy performed after in vitro treatment with 18% hydrochloric acid and Italian ground pumice revealed a “smeared” enamel surface with tooth structure loss from both chemical erosion and mechanical abrasion.137 Qualitative elemental analysis of this same enamel surface demonstrated a chemical pattern similar to unetched enamel and an absence of any foreign residue.115
General considerations.
Safety considerations include patient cooperation, careful gingival isolation, minimal duration of exposure of the tooth structure to the acid, minimal mechanical abrasion, and meticulous protection of the dentist, patient, and personnel from the acid.
The preponderance of the early literature deals with the use of acid and acid/abrasion techniques for the treatment of superficial brown fluorosis staining.6, 8, 112, 138–146 Treatment with a commercially available proprietary product has been used for these stains and for white spots and streaks associated with fluorosis, superficial white demineralizations, and many white decalcifications associated with chronic stasis of dental plaque (such as those following orthodontic banding in patients with poor oral hygiene).147
Hydrochloric acid treatment of superficial enamel stains resulting from developmental disturbances of the enamel has been suggested,148 although not for most amelogenesis imperfecta defects.125 Acid/abrasion techniques are not indicated for stains or discolorations that reside deeper in the enamel or in dentin, for those acquired from food, beverages, or tobacco, or for caries underlying a decalcified region.125
If white spot lesions cover significant areas of the labial surface, patients may mistakenly consider the darker, normocalcified areas to be the discoloration, rather than the white spot lesions. Successful removal of these white spot lesions may result in a darker overall result.125 It is also possible that deep enamel may be unpredictably removed in areas of hypocalcification.126 This may necessitate the use of composite resin to restore lost surface contour or to protect exposed dentin. It has been estimated that 50% to 75% of white enamel defects are superficial enough to be removed successfully with acid/abrasion.125
It has been proposed that a more conservative approach to the removal of yellow-brown fluorosis staining may be to attempt home bleaching first, followed by selective acid/abrasion if that is still required.100 It also has been reasoned that treatment time, financial considerations, and the patient’s lifestyle may indicate the use of acid/abrasion as the initial treatment, followed by bleaching.102 (See the section on White Spot Lesions earlier in this chapter.)
Other abrasion techniques.
Mechanical abrasion using rotary instrumentation without acid and pumice is an alternative approach.149 However, special care must be taken with this technique to avoid ditching, alteration of labial contours, and excessive enamel reduction.
Acid abrasion150
Armamentarium
• Tinted protective eye glasses with side shields (for patient and operator) (available from dental supply company)
• Shade guide to record shade (e.g., VITA Classic Shade Guide or VITA Easyshade Compact Electronic Shade Guide, (Vident [optional])
• Rubber Dam Setup (see Appendix B for the complete Armamentarium), including:
• 6 × 6-inch rubber dam, medium gauge (e.g., Hygienic Flexi Dam Rubber Dam, Non Latex 6X6 Med, Coltene/Whaledent)
• 6 × 6-inch plastic U-shaped rubber dam frame (e.g., Hygienic Rubber Dam Frame, 6” [Plastic], Coltene/Whaledent)
• Copal varnish (e.g., Copalite, Cooley & Cooley, Ltd.)
• 36% Hydrochloric acid USP (available from chemical supply house)
• Two glass dappen dishes (available from dental supply company)
• Distilled water (available from pharmacy)
• Flour of pumice (available from dental supply company)
• Prophylaxis Cup (Densco Ribbed and Webbed, RA [Latch] Soft Blue Rubber, Water Pik, Inc.)
• Sodium bicarbonate powder USP (available from dental supply company)
• Tongue blade (available from dental supply company)
• Cotton-tipped applicator (available from dental supply company)
• 1.1% neutral sodium fluoride (e.g., PreviDent, Colgate-Palmolive Company)
• Fine fluoridated prophylaxis paste (Nupro-Prophy Pastes, Dentsply Professional)
• Superfine aluminum oxide polishing disc (e.g., Sof-Lex, 3M ESPE)
Clinical technique
1. Apply a heavy rubber dam to the teeth to be bleached.
2. Seal the labial and lingual (or palatal) rubber dam margins with copal varnish.
3. Prepare an 18% hydrochloric acid solution by mixing equal volumes of 36% hydrochloric acid and distilled water in a dappen dish.
5. Prepare a thick paste of sodium bicarbonate and water.
6. Place sodium bicarbonate paste on the rubber dam to help neutralize any splashed acid.
7. Apply the acid/pumice mixture to the labial enamel with a wooden tongue blade. Simultaneously use a cotton-tipped applicator to absorb any excess solution.
9. Rinse carefully and thoroughly with water for 10 seconds while carefully evacuating with the high-powered suction.
10. Evaluate for excessive enamel wear by viewing, with a mirror, the labial surface from an incisal direction.
11. Wet the tooth with saliva and evaluate for appropriate color change.
Resin infiltration therapy
Recently minimum intervention techniques have been advocated to treat incipient caries.151 These techniques involved the use the use of phosphoric and hydrochloric acid gels to increase the porosity of the enamel to promote the penetration of a resin infiltration.151 One of the results of this technique is an alteration of the optical qualities of the infiltrated enamel by the resin which may mask hypocalcified white color.152, 153 Manufacturers (Icon, DMG America) have released a specialized product for performing this technique. Studies on small groups of patients demonstrated complete masking in 22% to 25% of the enamel developmental defect cases,154, 155 and partially masking in 35% of the enamel developmental defect.152 However, for post-orthodontic decalcification cases 61% were completely masked152 and 33% were partially masked.152 The masking remained unchanged after 6 months and 1 year.152
Armamentarium
• Tinted protective eye glasses with side shields (for patient and operator) (available from dental supply company)
• Shade guide to record shade (e.g., VITA Classic Shade Guide or VITA Easyshade Compact Electronic Shade Guide , Vident [optional])
• Rubber Dam Setup (See Appendix B for the complete Armamentarium), including:
• Flour of pumice (available from dental supply company)
• Prophylaxis cup (Densco Ribbed and Webbed, RA [Latch] Soft Blue Rubber, Water Pik, Inc.)
• Etching material (e.g., hydrochloric acid, pyrogenic silicic acid, surface-active substance, Icon-Etch, DMG America)
• Drying agent (99% ethanol, e.g., Icon-Dry, DMG America)
• Infiltrating resin (methacrylate-based resin matrix, initiators, additives, e.g., Icon-Infiltrant, DMG America)
• Polishing disks (e.g., EP Esthetic Polishing System, Brassler USA)
Clinical technique
Stay updated, free dental videos. Join our Telegram channel
VIDEdental - Online dental courses


