Fig. 9.1
Showing treatment options for the management of immature permanent teeth according to stage of root development (i.e., complete or incomplete)
Apexification is defined as a ‘method to induce calcified barrier in a root with an open apex or the continued apical development of an incomplete root in teeth with necrotic pulps’ [5].
Traditionally the clinical protocol for ‘apexification’ involved the placement of calcium hydroxide as an intra-canal medicament to eliminate intra-radicular infection and induce an apical barrier requiring multiple visits and a protracted treatment, which could take several months [3, 6]. Recently, an alternative one-visit apexification protocol involving the use of mineral trioxide aggregate has gained popularity as a means of creating an artificial barrier at the open apex to which a hard tissue barrier can readily form with similar outcomes to using calcium hydroxide. In the apical barrier technique, a biocompatible barrier material is placed at the apex to facilitate obturation. Mineral trioxide aggregate is the material of choice due to its optimal sealing ability, biocompatibility and ability to induce hard tissue and set in a moist environment. The advantage of using this technique is that the treatment time is reduced to one or two appointments with significant expedition of treatment with similar outcomes and prognosis [7–12]. The disadvantage of using either calcium hydroxide or mineral trioxide aggregate has been the inconsistency of achieving continued root maturation. Teeth treated with either techniques are at greater risk to root fracture as a consequence of thin dentinal walls resulting in the premature loss of the tooth [13–16].
Revascularization of avulsed and replanted immature teeth with open apices is well established and achievable provided optimal replantation techniques are used. Prompt replantation with minimal extra-oral dry periods and ideal root development stage (open apices of greater than 1.1 mm) are the prerequisites for revascularization [17]. Regeneration (revitalization) of infected necrotic pulp tissue has been an important issue in endodontics for more than a decade. Regenerative endodontics has been defined as ‘biologically-based procedures designed to physiologically replace damaged tooth structures, including dentine and root structures, as well as cells of the pulp-dentine complex’ [5]. Based on a series of case reports, there appears to be evidence that new soft tissue can enter the root canal with the potential for subsequent hard tissue deposition resulting in continued root maturation [18]. Current approaches for treating the traumatized immature tooth with pulpal necrosis do not reliably achieve the desired clinical outcomes, consisting of healing of apical periodontitis, promotion of continued root development and restoration of the functional competence of pulpal tissue. An optimal approach for treating the immature permanent tooth with a necrotic pulp would be to regenerate functional pulpal tissue [19, 20].
Over the last decade, a number of case reports have been reported in the literature demonstrating this new revitalization approach in achieving tissue generation and regeneration. Continued root development has been demonstrated in cases that presented as infected and necrotic with occasional draining sinuses. As a result, it may be predicted that traditional apexification methods employed may become of historical interest only [21, 22]. These case reports advocate the use of a triple antibiotic paste to eliminate the intra-radicular infection, a prerequisite for setting the conditions to allow for subsequent revascularization [23–29]. The triple antibiotic paste in these cases consists of a combination of ciprofloxacin, metronidazole and minocycline, which has been shown to reliably disinfect the root canal system. The disinfection of the root canal is carried out without any mechanical debridement. Irrigation using sodium hypochlorite is used and then the antibiotic paste placed for a period of time. At the second appointment, a blood clot is produced to the level of the cemento-enamel junction to provide a scaffold for the ingrowth of new tissue. The cervical portion of the tooth is sealed with MTA and a bonded resin composite restoration [30]. The formation of a blood clot is the key to success, and this crucial step, which is essential for the stimulation of revascularization, is unpredictable. Currently research strategies are underway in order to understand fully the true nature of this ‘regenerated tissue’ and provide future potential synthetic matrices, which will act as more predictable scaffolds [31].
Although regenerative endodontic treatment causes root development, there are several drawbacks and unfavourable outcomes that can occur [32]. Tooth discolouration has been cited and is related to the use of either minocycline in the triple antibiotic paste or MTA coronally [33, 34]. Ideal root development is not achieved in all cases, suboptimal barrier placement has been an issue, and there has been failure to induce bleeding in some reports [34, 35].
In summary, the question is no longer ‘can regenerative endodontic procedures be successful?’ Instead, the important question facing us is ‘what are the issues that must be addressed to develop a safe, effective, and consistent method for regenerating a functional pulp-dentine complex in our patients?’ [36]. Additional translational studies and clinical trials evaluating the different aspects of this procedure are required in order to understand the many interrelated aspects that could result in better and more predictable outcomes [37]. The idea of replacing severely compromised teeth or missing teeth in the future using stem cells as a precursor may well be on the horizon making dentures and dental implants obsolete [38].
9.2 Apexification with Calcium Hydroxide
The formation of a hard tissue barrier at the open apex of an immature permanent tooth has traditionally been performed using long-term calcium hydroxide dressings and has been an accepted endodontic procedure with a high degree of success. The calcium hydroxide is placed in the root canal to stimulate a hard tissue (cementoid or osteoid) barrier across the wide-open apex prior to placement of a permanent root filling. The barrier formation prevents overextension of root filling material into the surrounding peri-apical tissues. Studies have demonstrated that repeated dressing changes initially at 1 month, and then 3-month intervals thereafter can result in barrier formation anywhere from 4 to 9 months. The calcium hydroxide acts as a mild inflammatory stimulant that initially causes necrosis of the tissue surface with calcification over time. Calcium hydroxide is antibacterial due to its inherent high pH (12.2), which creates an environment that is not conducive for the survival of bacteria. Calcium hydroxide pastes release hydroxyl (OH-) ions readily, which is essential for barrier formation. Several commercial calcium hydroxide pastes are available including those made with saline (EndoCal and Calasept) or methylcellulose (Pulpdent and TempCanal). The latter are less soluble with a creamier consistency ideal for placement within the canal with less extrusion and dissolution over time. The wider the opening at the apex, the greater the chance of dissolution making the saline-based products more susceptible to being washed out. The clinical steps when using calcium hydroxide include:
- 1.
Treatment is carried out under local anaesthesia and rubber dam isolation utilizing a dental operating microscope.
- 2.
Straight-line access is established. Direct visualization of the apical foramen should be attempted using the dental operating microscope.
- 3.
The root canal is chemomechanically debrided with copious irrigation using sodium hypochlorite solution (this can be delivered ultrasonically or using sonic activation such as the EndoActivator).
- 4.
Minimal shaping is required due to thin dentinal walls. Working length is determined using electronic apex locators, paper points and radiographs.
- 5.
An interim dressing of Ledermix paste or 50:50 mix of Ledermix and Pulpdent paste is placed to control any infection and prevent any inflammatory resorption that may be present. A double seal temporary restoration of Cavit and glass ionomer cement is then placed.
- 6.
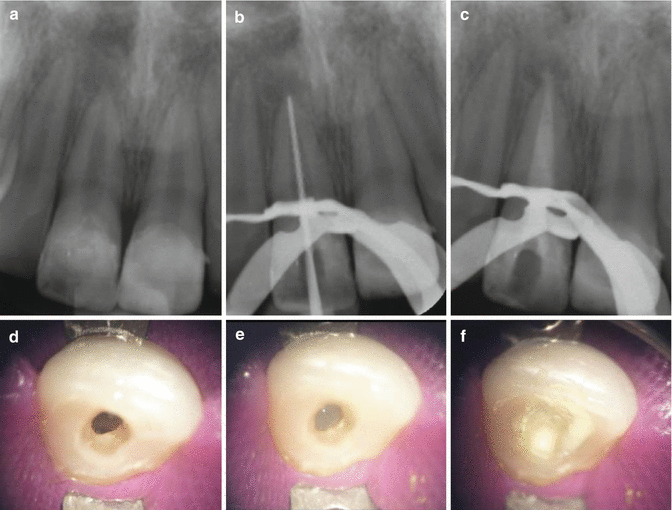
At the second appointment, the canal is re-irrigated, dried and dressed with a suitable calcium hydroxide paste. The calcium hydroxide can be packed at the apex using either pluggers or thick paper points. The canal is then backfilled with calcium hydroxide to ensure that reinfection does not occur during the interim period. Radiographs are taken to check that the apical level of calcium hydroxide is satisfactory and to ensure that an overfill has not occurred. The canal should appear radiopaque indicating that the entire canal has been filled with calcium hydroxide. A well-sealing temporary restoration is then replaced to the level of the root orifice (Fig. 9.2).
 Fig. 9.2Clinical radiographs and photographs showing (a) pre-operative radiograph, (b) MAF radiograph confirmed using #100K file, (c) calcium hydroxide dressing, (d) access preparation, (e) chemo-mechanical preparation using 1 % sodium hypochlorite solution, and (f) calcium hydroxide dressing placed using a lentilo spiral filler to ensure a homogenous dressing was placed
 - 7.
The patient is reviewed at 3-month intervals, and a further radiograph can be taken to assess whether an apical barrier has formed and whether the calcium hydroxide dressing has been washed out. If no washout is evident, then the dressing need not be replaced. Where evidence of washout is clear, indicated by the absence of radiopaque material within the canal, then the dressings can be replaced. The progress of barrier formation can be assessed using paper points. A large paper point is selected to check for the presence of an apical barrier by gently pressing at the apex and checking whether any evidence of blood/exudate is present and whether the paper point can be introduced beyond the apex easily. If no barrier is confirmed, then a further dressing is introduced to the level of the apex where barrier formation is desired.
- 8.
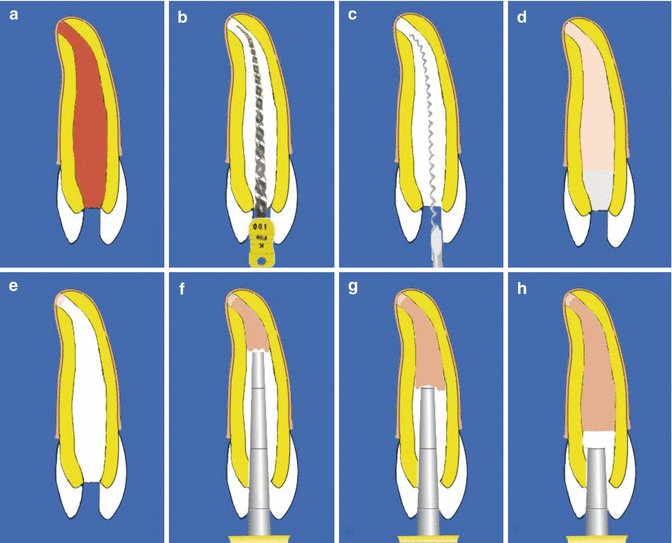
Once a barrier has been confirmed, a final root filling is placed using either a cold lateral chloroform dip technique or warm vertical compaction technique after a further 3-month period. On completion the access cavity is permanently restored accordingly (Fig. 9.3).
 Fig. 9.3Diagrams showing clinical steps for achieving apexification using calcium hydroxide. Note (a) preoperative view of immature permanent tooth with large apical foramen, (b) MAF greater than #100 K-file, (c) placement of calcium hydroxide using Lentulo spiral filler, (d) interim calcium hydroxide changed every 3 months until (e) apical hard tissue barrier formation complete, and (f–h) obturation completed with gutta-percha root filling material. Note apical closure complete but root development remains incomplete
9.3 One-Step Apexification with MTA
Despite the demonstrated clinical success associated with calcium hydroxide apexification, there are a number of drawbacks. The unpredictability of an apical hard tissue barrier formation, lengthy procedures often requiring several visits and the associated increased risks of cervical root fracture have led clinicians to adopt a one-step apexification procedure. Studies have demonstrated that using mineral trioxide aggregate as an apical matrix, single-appointment obturation of the canal can be achieved with high success rates. MTA has been shown to induce apical hard tissue formation without an inflammatory response owing to its excellent biocompatibility. Furthermore, newly formed bone, cementum and periodontal ligament have been shown to attach to the MTA layer providing an excellent seal. The wet environment, as a consequence of wide-open apices, means that a suitable hydrophilic material such as MTA is ideal in terms of setting ability without the risk of being washed away. The only disadvantage when using MTA is related to its handling and manipulation, which, like any technique, requires careful practice, skills and knowledge developed before appropriate use. As a result, MTA should be considered the material of choice when considering one-step apexification procedures in cases of immature developing teeth with wide-open apices:
- 1.
Appropriate anaesthesia, rubber dam application and adequate straight-line access are achieved utilizing a dental operating microscope to visualize the peri-apex and apical tissues beyond.
- 2.
The root canal system is chemomechanically debrided using appropriate disinfectants (sodium hypochlorite) with minimal shaping. Ultrasonic or sonic activation is desirable to ensure a bacteria-free environment is created.
- 3.
The canal is dried with paper points ensuring that any remnants of calcium hydroxide have been thoroughly removed.
- 4.
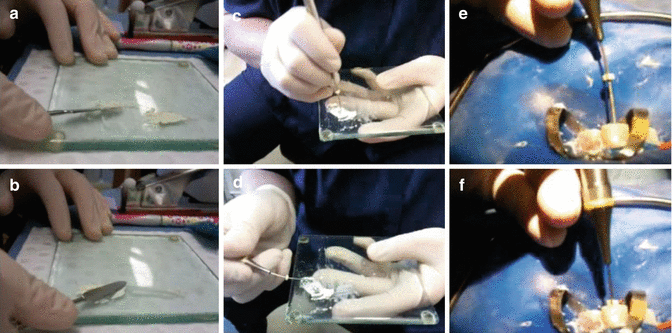
The MTA powder is mixed with sterile saline to create a thick creamy paste according to manufacturer’s recommendations (Fig. 9.4).
- 5.
The MTA is then deposited 1 mm short of the working length using an appropriate carrier and further condensed with minimal pressure using appropriate-sized paper points. The paper points will reduce the chances of apical extrusion of material as well as controlling the moisture present in the MTA mix, readily absorbing or imparting moisture as necessary. A resorbable matrix can be introduced to the apex prior to placement of MTA to further prevent extrusion of material. Preselected Schilder pluggers as well as paper points can be used to introduce the apical barrier (Fig. 9.4 and 9.5).
 Fig. 9.4Clinical photographs showing (a, b) mixing of MTA with sterile water (c, d) the use of MAP system to carry MTA and (e, f) placement of MTA inside root canal using suitable carrier
 - 6.
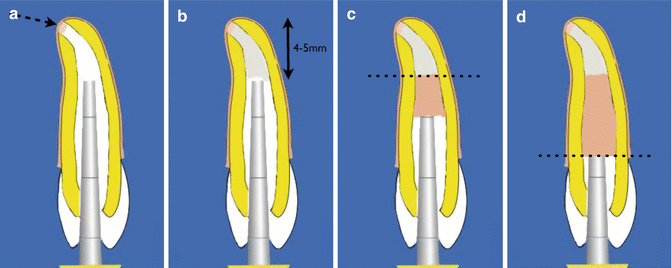
The MTA plug placement is verified with a radiograph ensuring a thickness of at least 4–5 mm is achieved. Further adaptation, to avoid voids, is achieved using ultrasonics. This can be carried out, by touching the plugger used to place the MTA, with an ultrasonic tip, creating enough vibration to further compact the material. If the radiograph demonstrates that the apical plug is not satisfactory, then the MTA can be removed using saline irrigation allowing the filling procedure to be repeated (Fig. 9.5).
 Fig. 9.5Clinical diagrams showing (a) placement of apical barrier (dotted arrow), (b) MTA plug 4–5 mm, (c) introduction of heated gutta-percha using Obtura, and (d) backfill to level of cementoenamel junction. Note the coronal access cavity is restored with a resin composite restoration to reinforce the root
 - 7.
A wet cotton wool pledget can be placed against the MTA and left for at least 24 h to allow complete setting of the cement. At the second appointment, following removal of the cotton wool pledget, the entire canal can be filled with gutta-percha filling material. A softened thermoplasticized technique using Obtura is preferred to cold/warm lateral compaction and the use of finger spreaders. The latter can create wedging forces within the root canal increasing risk of root fractures (Fig. 9.5).
- 8.
The cervical canal space is then reinforced with composite resin to below the to cemento-enamel junction in order to further strengthen the tooth and increase the resistance to fracture.
- 9.
Routine recall (1 month, 6 months and 12 months) should be carried out to determine the success of treatment and ensure that apical periodontitis does not persist.
9.4 Apexogenesis Procedures
Vital pulp therapies aimed to treat reversible pulpal injuries include indirect pulp-capping procedures following deep caries removal or direct pulp-capping and pulpotomy procedures following pulpal exposure. Apexogenesis is a therapeutic procedure aimed at amputating the coronal necrotic and possibly infected pulp. This creates an environment that is conducive to continued radicular pulp preservation. The premise is to avoid the inherent clinical problems that are associated with nonvital immature developing teeth with wide-open apices, reversed tapered canals (blunderbuss) and thin dentinal walls.
Stay updated, free dental videos. Join our Telegram channel

VIDEdental - Online dental courses


