

PATIENT POSITIONING
The dental chair is adjusted in such a manner which is comfortable for the patient and at the same time enables the operator and the assistant to have a clear view of the surgical site (Fig. 8.1). Generally, for operative procedures in mandible the occlusal plane of lower teeth should be parallel to the floor and for the maxillary teeth the occlusal plane of the upper teeth at 450 angles to the floor.
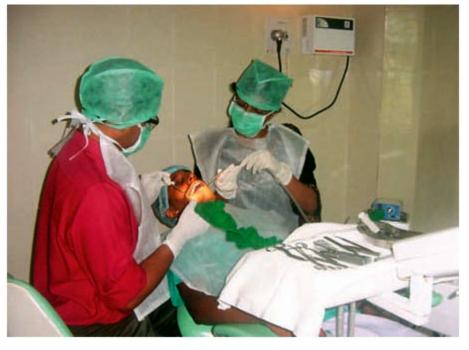
Fig. 8.1: Patient seated in dental chair and draped. Note the position of the surgeon and the assistant
The instruments are arranged in a rational order of their intended use (not cluttered) on a sterile towel placed over the instrument tray of the dental chair or more preferably on a separate instrument trolley (Figs 8.2 and 8.3).
If there is delay in starting the surgery, the instruments should be covered with another towel to avoid contamination and to maintain the sterility of the instruments.
The surgeon and the assistant then wear cap and face mask. This is followed by scrubbing the hands up to the elbow level. Rings, watches, bangles and bracelets harbor microorganisms causing infection and hence they are removed before starting the scrubbing. A scrubbing time of three to five minutes is ideal. After scrubbing it is best to wear a sterile gown by the surgeon and the assistant or at least the front portion of the dress is covered by a sterile towel fixed at the level of the shoulder by two towel clips (Fig.8.1). This followed by donning of sterile gloves.
Draping the patient: Ideally the head and the front part of the body of the patient should be draped, thus exposing only the face. For this the patient’s head is covered with a sterile towel, the edge of which is brought under the chin and fixed with towel clip. This ensures that the head, neck and shoulders are covered and only the face is exposed. Some authors compare this draping to that of a nun’s veil or coif. Another easier and less cumbersome alternative is to cover the head of the patient with a disposable cap (as worn by the surgeon). Another sterile towel is used to cover the patient’s chest, arms and lap. This towel is secured with two towel clips at the level of the shoulder clipped to patients clothing or fastened around the neck with a towel clip.
Preparation of the surgical site: Before preparing the intraoral surgical site it is always desirable to wipe the patient’s face with an antiseptic solution like povidoneiodine (Betadine). The third molar area is then swabbed with 0.5% solution of chlorhexidine or betadine. Alternatively the patient can be given a mouth wash of the above antiseptic. This is followed by the administration of local anesthetic injection.
Fig. 8.2: Instruments arranged on an instrument trolley
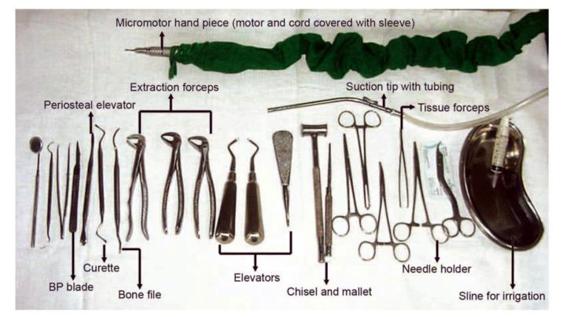
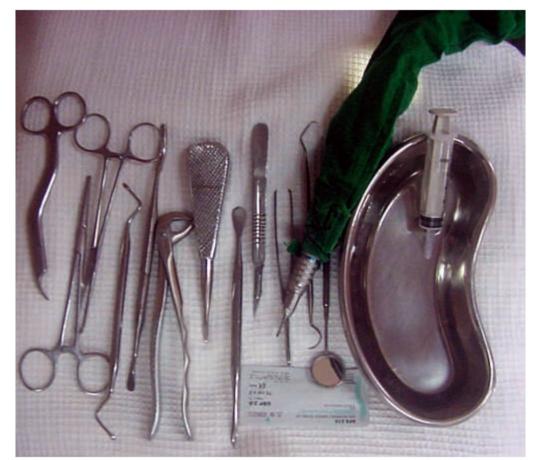
Fig. 8.3: Bare minimum instruments required for impaction surgery arranged over the instrument tray of the dental chair. No surgery should be undertaken without these instruments
Choice of Anesthesia
Methods of anesthesia for the surgical removal of impacted tooth include local anesthesia, local anesthesia with intravenous sedation, and general anesthesia. In general dental practice, the former two methods are considered appropriate. Adequate training and facilities should be available while using intravenous sedation. General anesthesia may be needed for complex and lengthy procedures as well as for apprehensive and uncooperative patients. But it must be recognized that general anesthesia carries greater risk compared to local anesthesia.
Palpation of Anatomical Landmarks
Before starting the surgical procedure, palpation of the region and locating the anatomical landmarks is essential. The pterygomandibular fold covering the pterygomandibular raphe is usually very prominent when the mouth is opened wide. The external oblique ridge is then located. Next, the anterior part of the ramus with the coronoid notch and medially the retromolar fossa should be identified followed by the medial tendon of temporalis. The lingual shelf is palpated. Locating the anatomical landmarks will give information regarding the underlying bone and will help the operator as to where the incision is to be given.
The standard operative plan can be divided into the following stages:
1. Incision to gain access to the area
2. Removal of adequate amount of bone
3. Sectioning and delivery of tooth from the socket
4. Debridement
5. Closure of the incision
1. Incision and Designing the Flap
The first step in removing the impacted tooth is to reflect a mucoperiosteal flap. The flap should be of adequate size to permit access, allow adequate visibility and to ensure unhindered healing without periodontal pocket formation distal to second molar. It is needless to point out that all the basic surgical principles involved in designing a flap should be observed here also. The most important factor in designing the flap is the position of the third molar which in turn dictates the amount of bone removal required and the need for tooth sectioning. As a general rule, the deeper the third molar, the more extensive is the bone removal required and the necessity for tooth sectioning. In such instances, flaps with vestibular extensions are recommended. More over, due consideration should be given for the lingual nerve, buccinator muscle and the periodontium distal to second molar while designing the flap.
The most commonly used flap is the envelope flap (Fig. 8.4), which extends from just posterior to the position of the impacted tooth anteriorly to the level of the first molar. The posterior end of the incision is directed buccally along the external oblique ridge.
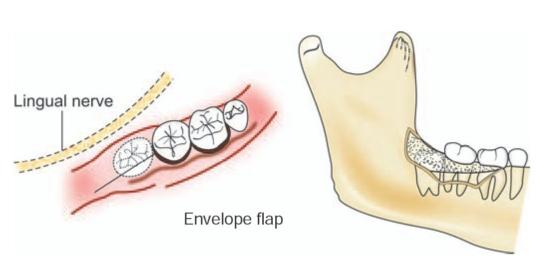
Fig. 8.4: Envelope flap design. Note the position of lingual nerve
If greater access is required to remove a deeply impacted tooth, the envelope flap may not be sufficient. In such cases, a release incision is given on the anterior aspect of the incision, creating a triangular flap (Fig.8.5). This incision is started from a point approximately 6 mm down in the buccal sulcus and then extended obliquely upwards to the gingival margin to a point at the junction of the posterior and middle thirds of the second molar (Fig. 8.5).
Fig. 8.5: Standard triangular flap with a release incision in the anterior aspect. Note that the incision should not be continued posteriorly in a straight line, because the mandible diverges laterally
Experience has showed that the envelope incision is usually associated with fewer complications and tends to heal more rapidly that the triangular flap. A small artery, the buccal artery, is sometimes encountered while giving the releasing incision, the injury of which will lead to mild bleeding. In cases where more exposure is needed the vertical incision can be placed between the second and first molar as shown in the Figure 8.6.
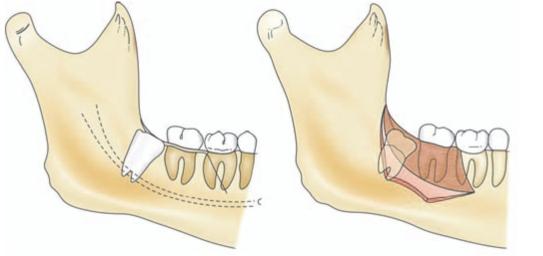
Fig. 8.6: Where more exposure is needed the vertical incision of the triangular flap is placed between the second and first molar
The incision then passes cervically behind the second molar to the middle of its posterior border. It is then extended posteriorly and laterally along the anterior border of the ramus for a maximum of 2.5 cm depending on the exposure required. (Extension of the incision further posteriorly may result in prolapse of buccal pad of fat or lead to marked trismus and swelling post operatively). The incision should not be continued posteriorly in a straight line, because the mandible diverges laterally. If the incision is extended straight, the knife will enter the sublingual space and is likely to damage the lingual nerve. The lateral extension also avoids small vessels emerging from the retromolar fossa.
The sharp end of the periosteal elevator is inserted in the region of vertical incision to ensure that the incision has reached up to bone. If not, the sharp tip of the instrument is employed to sever the remaining attachment. The blunt end of the instrument is then passed beneath the mucoperiosteum to reflect the soft tissue in the correct plane. Care should be taken not to strip the periosteum from the mucosa while reflecting. The mucoperiosteal flap is then reflected laterally to the external oblique ridge with a periosteal elevator and held in this position with an Austin’s retractor (third molar retractor). The flap reflection should be limited to external oblique ridge laterally, because reflecting beyond this area leads to increased dead space resulting in more edema postoperatively.
Certain authors advice the use of a ‘Minnesota retractor’ to hold the flap (Fig. 7.6). This retractor is placed just lateral to the external oblique ridge and is stabilized against the lateral surface of the mandible. The retractor should be held using a few fingers at its distal end so that it can be toed out laterally without the hand holding it blocking the vision of the operator.
Reflection of lingual mucoperiosteum is kept to the minimum to avoid injury to lingual nerve. When reflected the retractor should be held carefully to avoid compression of the lingual nerve.
Extensive reflection of flap is avoided to reduce postoperative pain and swelling. A clinical trial was carried out by Clauser et al (1994)’ to evaluate the influence of incision and reflection of flap on pain after the removal of partially erupted mandibular third molars. The patients underwent bilateral extraction of partially impacted mandibular third molars with a standard incision on one side (control) and without incision (test) on the other side. The nonsurgical approach did not increase the operating time and appeared to be an effective way of reducing postoperative discomfort after extraction of partially erupted third molars.
2. Bone Removal
The next major step is to remove the bone around the impacted tooth. The amount of bone removal varies with the depth of impaction. As stated in the previous chapter, the bone removal around the impacted tooth can be accomplished either by use of bur, or chisel and mallet or a combination of the two methods. Whatever may the method used (which may be of individual preference), the aim is to remove sufficient amount of bone to free the tooth from obstruction and to provide a point of application for the elevator.
The most recent advance is the use of high speed, high torque electric drill, which significantly reduce the time required for bone removal and tooth sectioning. Electric drill (micromotor and handpiece) is considered the instrument of choice in the present day impaction surgery. It has the advantage of rapid bone cutting with minimal discomfort to the patient. At the same time the possibility of the development of emphysema associated with an air driven handpiece is avoided.
A few surgeons still prefer to use chisel and mallet or air driven hand piece for bone removal.
The most common technique using a chisel is the ‘lingual split bone technique’ introduced by Ward (1956)’ in which a section of bone lingual to the wisdom tooth is fractured off to facilitate the removal of the impacted tooth. This technique in which the socket is saucerized was developed to reduce infection at a time when this was common and fatalities were not unknown.
In a 20 year retrospective audit on removal of 2088 teeth by lingual access method for third molar surgery under general anesthesia conducted by Moss CE and Wake MJC (1999) it was noted that a lingual approach does not appear to be associated with higher postoperative morbidity. Chisels were the preferred instruments for bone removal. When a broad Hovell’s retractor was used instead of a Howarth’s elevator, lingual nerve morbidity was lower. Lingual nerve morbidity in all cases was temporary; was present after 16 of the 2088 lingual retraction procedures, i.e. 0.8%. The authors concluded that the lingual approach should be used only by specialists and should be audited, and other operators should use only a buccal approach.
In a study reported by Absi et al (1993)’ on one side the lingual split method by chisel was used to remove impacted mandibular third molars. On the other, the buccal approach using surgical bur was used to remove the tooth. There were no statistically significant differences between the two methods in relation to pain, facial swelling, sensory loss, infection, or periodontal pocket depth distal to the second molar. There were also no statistically significant differences between duration of procedures; mean operating time with burs was 8.28 min (range 4-15 min) and with chisels 7.57 min (range 415 min). This study provided no evidence of difference in either efficiency or outcome between two standard methods of removing lower third molars.
In a recent study by Praveen Get al (2007)5 morbidity rates following the use of different surgical techniques were assessed. The techniques employed were surgical bur technique, lingual split technique and simplified split bone technique. The conclusion of the study was that the lingual split technique was more painful than the other two techniques. Surgical bur technique had more swelling than the other two. The simplified split bone technique had the least morbidity than the lingual split and surgical bur technique. However, as stated previously most of the patients may not tolerate the jarring effect of chisel and mallet while operating under local anesthesia. Hence it will be preferable to opt for rotary instruments for bone removal and tooth sectioning for surgery under local anesthesia.
When an air driven hand piece is used it is essential that the hand piece exhausts the air out of the surgical site to prevent emphysema or air embolism.
The hand piece used should be sterilized, usually in a steam autoclave. Copious irrigation using cold saline or distilled water is done to prevent heating of bone and subsequent bone necrosis. Cooling the bone by way of irrigation will also reduce the postoperative pain and edema. The use of a high vacuum suction to clear the surgical site while irrigation is used can not be over emphasized.
The buccal cortex contributes greatly to the strength of the mandible. Hence buccal bone removal should be kept to minimum to avoid weakening of the mandible and subsequent fracture. The bone on the buccal and the distal aspect of the impacted tooth is removed down to the level of the cervical line. Further bone removal if required is done in a manner not detrimental to the strength of mandible and at the same time not sacrificing the efficiency of surgery. This is achieved by drilling a deep vertical gutter alongside the buccal aspect and if required on the distal aspect of the tooth. This ‘guttering method ‘will ensure that the height of the buccal plate is maintained without weakening the mandible and at the same time adequate space is created around the tooth to permit its free movement (Fig. 8.7).
Fig. 8.7: “Guttering method”-A deep vertical gutter using bur is made alongside the buccal aspect and if required on the distal aspect of the tooth

While using this method, as the bur reaches the apex of the tooth, the inferior alveolar canal may be inadvertently opened. This will result in brisk hemorrhage from inferior alveolar vessels, which can be controlled with pressure pack or bone wax. But sometimes damage to the inferior alveolar nerve can occur resulting in anesthesia over the distribution of mental nerve. In rare instances, the mandibular canal may be buccally placed and at a more superior level than normal. In such cases injury to contents of the canal will occur more easily.
Bone covering the mesial aspect of the impacted tooth is also removed by this method. Drilling in the region of the mesial surface of impacted tooth should be kept to the minimum to avoid damage to the distal aspect of the adjacent second molar. While removing bone on the distolingual aspect extreme care is taken to protect the lingual nerve from bur by way of proper retraction. It is advisable not to remove any bone on the lingual aspect due to the likelihood of damage to the lingual nerve. A variety of burs can be used to remove bone, but the most commonly used are the #8 round bur and a #703 fissure bur.
Besides exposing the tooth and removing the obstructions, an additional aim of bone removal is t/>
Stay updated, free dental videos. Join our Telegram channel
VIDEdental - Online dental courses


