

Diagnosis of impacted third molar should be based on patient complaint, history, physical evaluation and diagnostic test evaluation.
Preoperative evaluation of the third molar, both clinically and radiographically is an important step for the successful and speedy removal. Time spent at this stage is time gained. A good periapical radiograph is a must. If required the periapical radiograph should be supplemented with an occlusal X-ray. An OPG or a lateral oblique radiograph should be taken whenever intra oral radiographs are inadequate to provide the necessary information regarding the tooth or adjacent structures. However, the former lack the details seen in a periapical film.
PREOPERATIVE PLANNING HELP IN THE FOLLOWING WAYS
1.It provides a rough estimate of time required for the procedure. (Put in extra 15 minutes for any eventuality.)
2.Helps to exclude those cases which are beyond one’s competence.
3.Expect the complications that are likely to occur and get informed consent from the patient
4.Helps in selection of instruments.
5.Selection of the type of anesthesia to be employedwhether local anesthesia or general anesthesia is required. Most patients can tolerate surgery under local anesthesia lasting from 45 minutes to 1 hour.
A complete assessment of the possible problems which could be encountered in the surgical removal of an impacted third molar and a treatment plan can be formulated only after a careful clinical and radiographic examination of the area.
Clinical Examination
This include (1) History taking (2) Extra oral examination, and (3) Intraoral examination
1. History Taking
Complaints of the patient: Impacted teeth very often cause no symptoms and patients are unaware of its presence until told by the dental practitioner. Symptoms when present are usually related to pericoronitis, which may be either acute or chronic in nature or complaints related to acute pulpitis associated with dental caries. Symptoms associated with other conditions listed in Chapter 3 under indications for surgical removal may also be present.
Medical and dental history: An important part of the interrogation is the medical and dental history of the patient. Advances in modern medicine have resulted in the improved survival of people with significant medical conditions. As a result people are living longer and receiving treatment for disorders that were fatal a few years ago. These patients have a relatively high risk of developing complications from surgical procedures. Hence, it is imperative that the dental surgeon be competent to recognize and manage such cases in the safest possible manner. Apart from the fate of the patient, neglect of the medical history can result in unpleasant medico-legal problems.
There are three basic aspects regarding the dental management of medically compromised patient. The first is to detect such patients. This is a difficult task, especially when there are no significant symptoms or if the patient is uneducated and has no idea about the disease and the drug therapy. However, this does not preclude the responsibility of the dental surgeon in the event any complications occur. Secondly, if the patient is found to have a systemic disease it is essential to determine the implications of the disease or its treatment on the dental management. Finally, once it has been decided, it then remains necessary to discover how best to deal with the problem.
In an ordinary dental surgery setting, it is unlikely that the dental surgeon will undertake a full medical examination of the patient prior to any surgical procedures. Instead the operator must rely on a proper medical history that will help to identify those patients with medical conditions that will require precautionary measures. A written questionnaire will help as a screening measure to recognize such patients. Alternatively, if the patient is not literate the dental surgeon or the assistant can do a thorough interrogation and the matter entered in the case record. The basic example is as follows:
Medical Evaluation
Date
Please note to answer the questions correctly. For any clarification contact the dental staff. Your health and fitness is of utmost importance to make sure that the dental treatment you receive will not affect adversely your general health.
Name, address and Tel. no. of your Physician
Are you suffering from/ suffered any of the following conditions/ disease?

Do you consider yourself to be in the high-risk group for HIV/ AIDS/ Hepatitis B

To the best of my knowledge, all the preceding answers are true and correct. If I ever have any change in my health, abnormal laboratory test, or if my medication change, I will inform the dentist at the next appointment without fail.

Medical Evaluation Form
A detailed medical history will help to identify medical conditions which contraindicate surgical removal or modify the management of the patient with impacted tooth. A detailed discussion of the medical conditions to be considered is beyond the scope of this chapter.
However, the following are the common medical conditions to be considered which have significant impact in the management of patients with impacted third molar:
1. Cardiovascular diseases
(a) Hypertension
(b) Infective endocarditis
(c) Ischemic heart disease
(d)Thromboembolic disorders (patientson anticoagulants)
2. Endocrine diseases
(a) Diabetes mellitus
(b) Hyperthyroidism
(c) Adrenal insufficiency
3. Bleeding disorders
4. Respiratory diseases
(a) Bronchial asthma
(b) Chronic obstructive pulmonary disease (COPD)
5. Liver disease
(a) Chronic alcoholism and Liver cirrhosis
(b) Viral hepatitis
6. Pregnancy
7. AIDS and HIV infection
8. Prosthetic joint replacements
9. Neurological Disorders
(a) Epilepsy
(b) Stroke
(c) Parkinson’s disease
10. Patients with organ transplantation
11. Chronic renal failure
12. Allergy to drugs/ food items
Significance of Medical Evaluation
A proper medical history enables the operator to take the necessary precautions that will ensure patient’s safety during the dental surgical procedure. These maybe either one or a combination of the following precautions:
1. Additional investigations: For example clotting screen for those with history of bleeding.
2. Alteration of patient’s current medication to facilitate surgery. For example stopping warfarin preoperatively. Such measures must only be taken in consultation with the patient’s physician.
3. Administration of preoperative medication: (a) antibiotic cover, (b) steroid cover, (c) oral sedation
4.Selection of anesthetic that is safe for the patient
5.Undertaking surgery in a hospital set up where appropriate medical back up is available.
6.Selection of medication (e.g. antibiotics and analgesics) that is safe for the patient. For example avoid penicillin in those with reported history of allergy.
7.Anticipate and adequately prepare for a potential medical emergency. For example, acute asthmatic attack.
2. Extraoral Examination
The face and neck is examined for signs of swelling or redness of the cheek suggestive of infection. The lower lip is tested for anesthesia or paresthesia. The regional lymph nodes are palpated for enlargement and tenderness.
3. Intraoral Examination
The following points are noted:
1.Mouth opening: Normal mouth opening/microsomia/macrosomia/trismus/hypermobility of TM joint/habitual dislocation /fibrosis of mucosa e.g. submucous fibrosis. In retrognathic mandible accessibility to third molar area is restricted, while in prognathic mandible accessibility is better.
2.General examination of oral cavity: Oral mucosa, teeth, oral hygiene.
3.Third molar area: State of eruption of tooth, tissue overlying the tooth (bone/soft tissue only), signs of pericoronitis.
4.Condition of impacted tooth: Carious or with fillings, internal resorption (not to be mistaken for caries), angulation of tooth, locking of crown of third molar beneath second molar. This is later confirmed with appropriate radiographs.
5.Condition of second molar and first molar: Caries, crown/filling, distal periodontal pocket/resorption of root of second molar, missing second molar. Carious second molar or large filling/crown of second molar is likely to fracture while using leverage in attempting to elevate third molar. The patient has to be warned of this to avoid unpleasantness later on in the event of a mishap.
6. Amount of space available between the distal surface of second molar and the ascending ramus: If the distance is small, the tooth is less accessible; if large it is accessible. In the maxilla the accessibility depends on the relationship of the tooth to the tuberosity. Distal tilting of second molar also decreases accessibility.
7. Adjacent bone: May be infected along the mesial surface of the tooth and may involve the second molar necessitating its extraction. Infection / osteomyelitis may involve the ramus posterior to the crown especially in cases of recurrent submasseteric abscess arising in relation to distoangularly impacted third molar.
8. Fracture may complicate the removal of an impacted third molar. When the jaw contains an impacted tooth, it is more vulnerable to a blow and frequently fractures through an unerupted third molar crypt. After the tooth is removed, the fracture is immobilized in the usual manner. Fracture caused by an attempted surgical removal of third molar should be recognized and a careful record should be made of it.
9. Pathological complications due to skeletal diseases should be noted. They may increase the danger of fracture as in osteogenesis imperfecta and osteosclerosis. In acromegaly the removal of tooth is difficult because the mandible consists of massive bone. In Paget’s disease the tooth may be affected by resorption and repair by bone make its removal difficult.
10. Presence of cysts and tumors: Small eruption cysts and large cysts may occur in relation to impacted tooth. Generally they cause displacement of the tooth. Tumors, benign and malignant may be found involving the tooth, especially ameloblastoma. Odontomes also may be found around third molar tooth.
Radiography of Impacted Mandibular Third Molar
The purpose of a careful radiological evaluation is to complement the clinical examination by providing additional information about the third molar, the related teeth and anatomical features, and the surrounding bone. This is necessary in order to make a sound decision about
the proposed surgical procedure, the most appropriate location for this to take place, and to highlight aspects of management which may require specific mention to the patient.
Moreover, diseases of adjacent soft and hard tissues may proceed to advanced stages without symptoms (e.g. associated cyst/ tumor), it is important that radiographic evaluation be performed. The most commonly accepted imaging modality is the intra oral periapical X-ray and panoramic radiograph. Other imaging techniques may be appropriate if they provide appropriate visualization of the entire tooth and associated structures. However, it must be kept in mind that radiographs may not provide complete or accurate information as to tooth position.
Most of the local factors causing difficulty in removal of third molar can be diagnosed by careful interpretation of preoperative radiograph.
The following intra oral and extra oral radiographs are required:
1. Periapical radiograph
2. Occlusal X-ray of mandible
3. Lateral oblique view of mandible
4. Orthopantomogram
An important criteria for a good film is that there should be a clear superimposition of the buccal and lingual cusps of the second molar upon one another in the same vertical and horizontal plane which is visualized as a typical’enamel cap’ appearance of the second molar.
1. Periapical radiograph: An ideal periapical X-ray should include the whole third molar, its investing bone, the anterior border of ramus, the inferior alveolar canal and the adjacent second molar tooth. An important criteria for a good film is that there should be a clear superimposition of the buccal and lingual cusps of the second molar upon one another in the same vertical and horizontal plane which is visualized as a typical ‘enamel cap’ appearance of the second molar. This can be achieved by positioning the X-ray tube in such a way that the central ray will be parallel to the occlusal surface of the second molar and pass through the distal cusps of the second molar at right angles to the film packet. In a good film the lateral image of the second molar will be sharp without vertical shortening. In a poor film with incorrect angulation, the ‘enamel cap’ will be absent and there will be overlapping of contact points of molars.
For taking a good periapical radiograph, the patient is seated with the mouth open, occlusal plane of mandibular teeth horizontal and parallel to the floor. The film is then inserted on the lingual side of the corresponding third molar with the anterior edge of the film reaching up to the mesial surface of first molar. In suspected cases of horizontal impaction, the film should be inserted more posteriorly so that the root apices also will be visualized in the radiograph. A film holder or a straight ‘mosquito’ hemostat will help to grip the film and position it correctly. The X-ray tube is positioned so that the central ray will be parallel to the occlusal surface of the second molar and pass through the distal cusps of the second molar at right angles to the film packet. Moreover, when viewed from the front the angulation of the central ray should be parallel with the transverse occlusal plane which is usually at an angle of 3° to 4° above the horizontal plane (Figs 6.1 A and B).
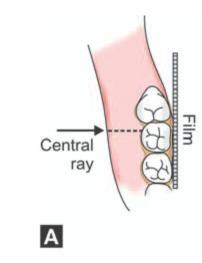
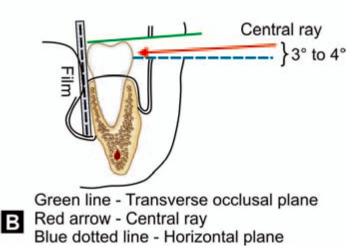
Figs 6.1 A and B: (A) Positioning of periapical film packet and angulation of central ray in an average case (viewed from above), (B) Angulation of the central ray when viewed from the front-the central ray (red arrow) is parallel with the transverse occlusal plane (green line) which is usually at an angle of 3° to 4° above the horizontal plane (blue dotted line)
In cases of horizontal impactions, the central ray is directed through the middle of the crown of the impacted tooth (Figs 6.2 A and B) and at right angles to the film packet. Lingual tilt or rotation of the second molar if present should be considered while positioning the tube and interpretation of such radiographs.
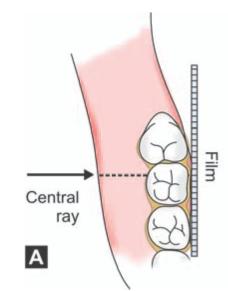
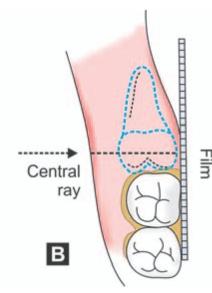
Figs 6.2A and B: Location of the film and direction of central ray seen from above. (A) Average case. Note that central ray is directed along the crown of the second molar. (B) In case of a horizontal impaction. Note that the central ray is directed through the middle of the crown of the impacted tooth
As stated above in a good film the lateral image of the second molar will be sharp without vertical shortening. But in a poor film with incorrect angulation, the ‘enamel cap’ will be absent and there will be overlapping of contact points of molars (Figs 6.3 A and B). This occurs when the central ray is not parallel to the transverse occlusal plane and if the central ray does not pass at right angles to the film in the horizontal plane.
Figs 6.3 Aand B: (A) Schematic diagram showing that when the central ray is not parallel to the transverse occlusal plane the enamel cap of the second molar is absent, (B) If the central ray does not pass at right angles to the film in the horizontal plane, overlapping of contact points occur
Very often the correct positioning of periapical film in the third molar region can be difficult due to gagging reflex or pain in the floor of the mouth due to sharp edge of the film or difficulty in positioning the X-ray film sufficiently posteriorly. Should these difficulties occur, the resulting film will be far from adequate to yield sufficient information about the impacted tooth and surrounding area. Also the narrow viewing field obtained in periapical film has limited diagnostic value. However, periapical radiographs are more discriminating than OPG and may be more helpful in detecting caries, bone height at the level of second molar and root contour.
2. Occlusal X-ray: This will help to confirm the presence of a bucco-lingual relationship indicated by a periapical X-ray, and will demonstrate the exact position of the crown of the tooth and the shape of laterally deviated roots.
3. Lateral oblique view of mandible: There is inevitable distortion associated with this radiograph due to the need to rotate the opposite side of the mandible out of the path of the central ray during exposure of the film. Hence, this is not as useful as a good periapical Xray to assess the local factors causing difficulty in removal. However, this X-ray has a definite role in the following situations:
•When periapical film could not be taken due to retching, trismus or some other cause.
•To provide additional information like vertical height of mandible in the area, amount of bone beneath deeply buried impacted tooth in a thin mandible, existence of pathology in the vicinity like cyst / tumor or double impactions.
Since the introduction of OPG, the indication for the use of extra oral X-ray’s is limited. However, its use may be considered in the absence of OPG.
4.Orthopantomogram (OPG): Recently due to easy availability OPG has replaced the lateral oblique view of mandible. All the information available from a lateral oblique view can be had from OPG with less distortion (Fig. 6.4). Routine use of OPG is an important advance in the accurate localization of impacted teeth
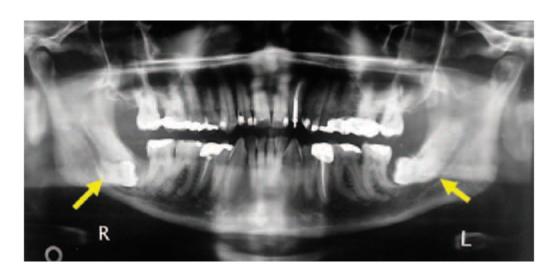
Fig. 6.4: OPG of a 61-year-old man showing bilaterally impacted third molar with their roots in close relationship to inferior alveolar neurovascular bundle
OPG is considered the gold standard for surveying the maxilla and mandible for diseases and other pathological conditions in the lateral plane.
Different radiographic views helps to identify other conditions affecting the area (Figs 6.5 A and B)
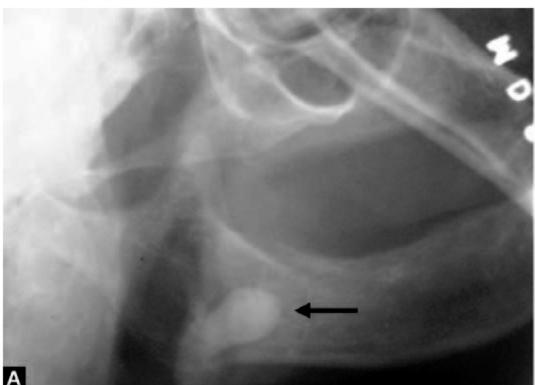
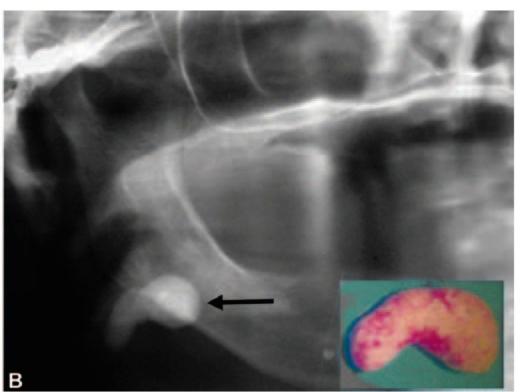
Figs 6.5A and B: A 63-year-old lady was referred to the author with a provisional diagnosis of impacted 48 who complained of recurrent pain and swelling of the right side of face with a lateral oblique X-ray of mandible (A) taken by the general dental practitioner (note the dark arrow). Detailed history and findings of clinical examination was suggestive of submandibular calculus. Subsequently an OPG (B) was taken which showed a change in position of the opaque mass which confirmed the final diagnosis of salivary calculus. The calculus was removed (see the inset picture in figure ‘B’) under general anesthesia by a submandibular approach
Interpretation of Periapical X-ray
The radiograph should be carefully examined in a well lit X-ray lobby. The use of a good hand lens will greatly assist the detection of small ancillary roots and the relationship of roots to the inferior alveolar canal.
The following factors are considered while interpreting the radiograph:
a. Access
b. Position and depth of impacted tooth
c. Root pattern of impacted tooth
d. Shape of crown
e. Texture of investing bone
f. Relation to inferior alveolar canal
g. Position and root pattern of second molar.
a. Access: By noting the inclination of the radioopaque line cast by the external oblique ridge the ease of access can be determined. If this line is vertical the access is poor and if horizontal, access is good.
b. Position and depth of impacted tooth: This is determined by a method described by George Winter. In this technique three imaginary lines are drawn on the radiograph. These lines are described as ‘white’, ‘amber’ and ‘red’ lines (Figs 6.6 to 6.10).
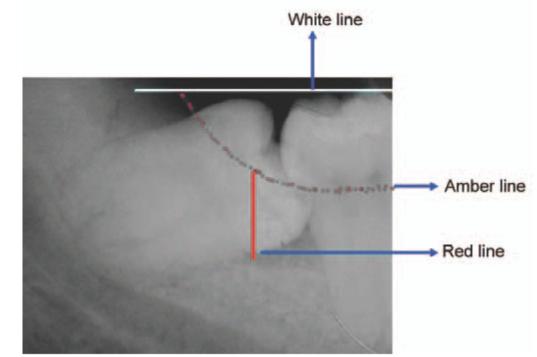
Fig. 6.6: White, amber and red lines (Winter’s WAR lines) marked in the periapical X-ray
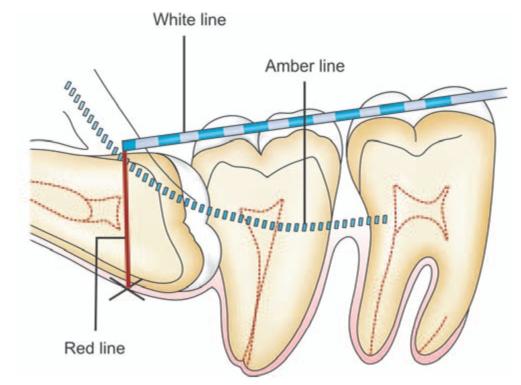
Fig. 6.7: Tracing of WAR’ lines on a horizontally impacted mandibular third molar. White’ line is drawn along the occlusal surface of the erupted mandibular molars and extended posteriorly over the third molar region. ‘Amber’ line is drawn from the surface of the bone lying distal to the third molar to the crest of the interdental septum between the first and second molar. ‘Red’line is a perpendicular dropped from the ‘amber’ line to an imaginary ‘point of application’ of an elevator
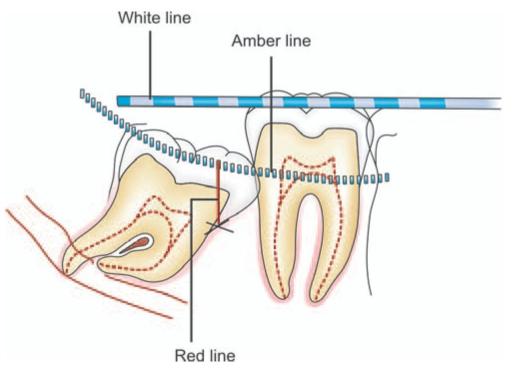
Fig. 6.8: ‘WAR’ lines drawn on a mesioangularly impacted mandibular third molar
Fig. 6.9: ‘WAR’ lines drawn on a vertically impacted mandibular third molar. Note that there is no ‘red’ line drawn. The point of application of elevator (marked X in red colour) is at the same level of ‘amber’ line at the mesial aspect of the third molar
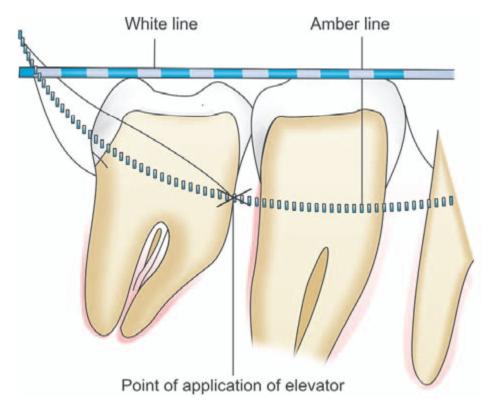
The first line or’white’ line is drawn along the occlusal surface of the erupted mandibular molars and extended posteriorly over the third molar region. From this the axial inclination or position of impacted tooth can be assessed. For example, the ‘white’ line will be parallel to the occlusal surface of a vertically impacted tooth. While in case of a disto-angular impaction, the occlusal surface of the tooth and ‘white’ line are seen to converge as if to meet in front of the third molar.
The ‘white’ line also provides an indication regarding the depth at which the tooth is lying in mandible, when compared to the erupted second molar.
The second imaginary line or ‘amber’ line is drawn from the surface of the bone lying distal to the third molar to the crest of the interdental septum between the first and second molar. When drawing this line it is important to differentiate between the shadow cast by the external oblique ridge and that cast by the bone lying distal to the tooth. It is important to note that the posterior end of the ‘amber’ line is drawn on the shadow cast by the bone in the retromolar fossa and not that cast by the external oblique ridge which lies above and in front of it. The ‘amber’ line indicates the margin of the alveolar bone enclosing the tooth. Hence, when soft tissues are reflected, only that portion of the tooth shown on the film to be lying above and in front of the ‘amber’ line will be visible; while the reminder of the tooth will be encased within the alveolar bone.
Stay updated, free dental videos. Join our Telegram channel
VIDEdental - Online dental courses


