TECHNIQUES, MATERIALS AND INSTRUMENTATION
In this section, some techniques, which may be applicable to all of the treatment options, will be considered and the essentials of each described. The purpose is to clarify those aspects I have found to be clinically relevant or about which questions are often asked. Associated factors which influence treatment will be considered. Techniques and considerations which are specific to a particular treatment option will be considered in the relevant section.
Chapter 8
PREMEDICATION, ELECTROSURGERY, TEMPORARY AND PROVISIONAL RESTORATIONS
RESTORATION OF THE ENDODONTICALLY TREATED TOOTH
Premedication
Frequently, prolonged visits will be required and oral premedication may be helpful, particularly in the early stages when the patient often requires emergency treatment in a new and unfamiliar environment. Premedication may include:
- Ibuprofen, 400 mg. Caution should be exercised when there is a history of allergies, peptic ulceration, asthma or anticoagulant therapy. It is best to give an analgesic prior to surgical treatment, so as to reduce the formation of local prostaglandins, which occur as a consequence of trauma and are the mediators of pain.1–2 Following the extensive use of electro-surgery, it is advisable to continue the analgesic for two days, at six hourly intervals.
- Oral Temazepam 10–30 mg, taken three quarters of an hour prior to the appointment. This is an effective short-acting Benzodiazepine for dental sedation.3 Ten milligrams is used for a small, frail patient and in the presence of hepatic or renal impairment. Thirty milligrams is suitable for the average adult. It should not be prescribed during pregnancy, breastfeeding or for somebody who may have suicidal tendencies, for example, following bereavement. It may interact with other depressive drugs. Since there is the possibility of sexual fantasy, a male dentist should always have a female assistant in attendance when treating a female patient.4 The effects of medication usually last for approximately four hours. The patient should not drive for 24 hours and should be accompanied home. It is advisable to monitor pulse and oxygen saturation with a pulse oximeter during treatment.
Intravenous sedation may be helpful when treating more anxious patients.
- Oral propantheline bromide 30 mg (Pro-Banthine), three quarters of an hour prior to the appointment. This can be useful when working in the lower jaw, to reduce salivary flow, but should be used with caution in cases of urinary retention, prostatic enlargement, tachycardia, cardiac insufficiency, glaucoma, ulcerative colitis, paralytic ileus, pyloric stenosis, or during breast feeding. If the mouth becomes very dry, care is taken during electrosurgery to moisten the tissues so as to ensure minimal build-up of lateral heat. It causes dilation of the pupil and drying of the cornea, so that patients should be cautioned not to drive or to perform tasks requiring visual acuity for approximately four hours or longer if they are experiencing difficulty in focussing. They should also be warned to wear dark glasses if going into daylight, and not to wear contact lenses.
Electrosurgery (Radiosurgery)
The following are useful applications of electrosurgery in the management of failed restorations:
- Exposure of sound tooth tissue when removing old restorations.
- Widening of the gingival sulcus (troughing) prior to the placement of subgingival finishing lines and the taking of impressions.
- Recontouring of edentulous ridges.
- Clinical crown lengthening.
Exposure of Sound Tooth Tissue when Removing Old Restorations
(Figs 8-1a, 8-2h+i)
On removal of defective restorations, one is frequently faced with the problem of subgingival caries. It is important, in the early stages of treatment, to provide provisional restorations with margins on sound tooth structure. Electrosurgical techniques are indispensable for exposing sound tooth tissue at this time. The following principles should be adhered to:
- Do not use electrosurgery if the patient has a cardiac pacemaker, as it can interfere with the latter’s function.
- Wherever possible remove metallic restorations from the teeth to be treated with the electrosurgical unit first.
- The unit should be readily accessible. It is time-wasting if the unit has to be taken out of a cupboard, wires untangled, plugged in, and so on, prior to use. If the office is designed so that the handpiece can be picked up easily and with the minimum of fuss, this valuable piece of equipment will be used as required.
- A high frequency unit should be used 4.0 MHz.5 Units in the frequency range of 525 KHz to 4 MHz are more appropriately termed radiosurgical units than electrosurgical units. The latter have a frequency range of 300 KHz to 1.5 MHz.
- In sites in which the gingival margin will not be visible during function and is of no aesthetic consequence, use a fully rectified unfiltered waveform. This cuts well and gives some coagulation but also some recession.
- In sites visible to others, use a fully rectified filtered waveform.5, 6, 7
This cuts well and causes little recession but produces minimum coagulation. If the tip of the electrode accidentally touches tooth apical to the epithelial attachment, there is a high risk of attachment loss.8 - A ground plate should be incorporated.
- A loop electrode (Figs 8-1b, c) will generally be used at this early stage. It is important to move the electrode quickly. Not less than 7 mm/sec, cutting for no more than 1 second and leaving 15 seconds between cuts to allow for cooling.9 Eight seconds cooling is adequate for a non-loop electrode.
- There should not be:
resistance to movement of the electrode; charring or sparking; contact with metallic restorations for longer than 0.4 seconds.8 - The tissues should be moist but not obviously wet.
- The stroke should be practiced before cutting.
- Bony contact should be avoided.
- The electrode should be clean and free from debris. A sandpaper disc or cleaning pad (Electrode Wipes, Ellman) are useful.
- Use effective aspiration and retraction with plastic sucker tips and mirrors. Ensure that the insulation sleeve covers the electrode properly.
- Avoid contact with bridgework, since burning can occur at a remote site if a pointed piece of metal, for example, a cusp, contacts soft tissue.
- There may well be bleeding, since at this stage, the tissues are often highly inflammed. Bleeding cannot be arrested with the coagulation tip. It must first be arrested using pressure, following this the coagulating ball is used with light pressure against the tissues, thereby sealing the capillaries.
- The tooth preparation should subsequently be cleaned of tissue tags by ‘shoe shining’ a gauze square over the preparation, and then swabbing with 3% peroxide or tincture of myrrh and benzoin (50%/50% mix).
- Application of isobutyl cyanoacrylate cement (Isodent, Ellman) over the cut tissue can assist in protecting and preventing further bleeding from coagulated tissue during tooth preparation and impression taking.
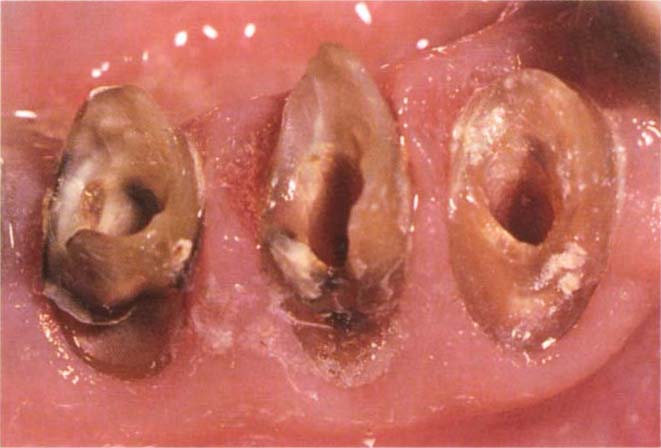
Fig. 8-1a (i) Following removal of old poorly fitting restorations, electrosurgical exposure of sound tooth using a loop electrode is required, so that provisional bridgework can be well-fitting at the margins.
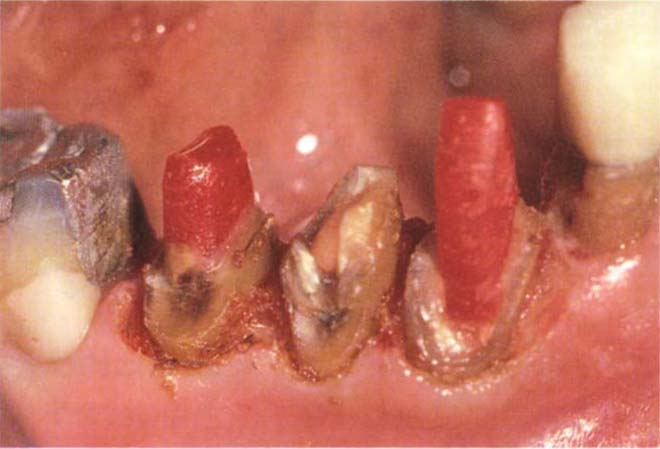
Fig. 8-1a (ii) Sound dentine exposed. Direct post and cores being made. Tissue tags are removed with 3% hydrogen peroxide on a cotton pellet.
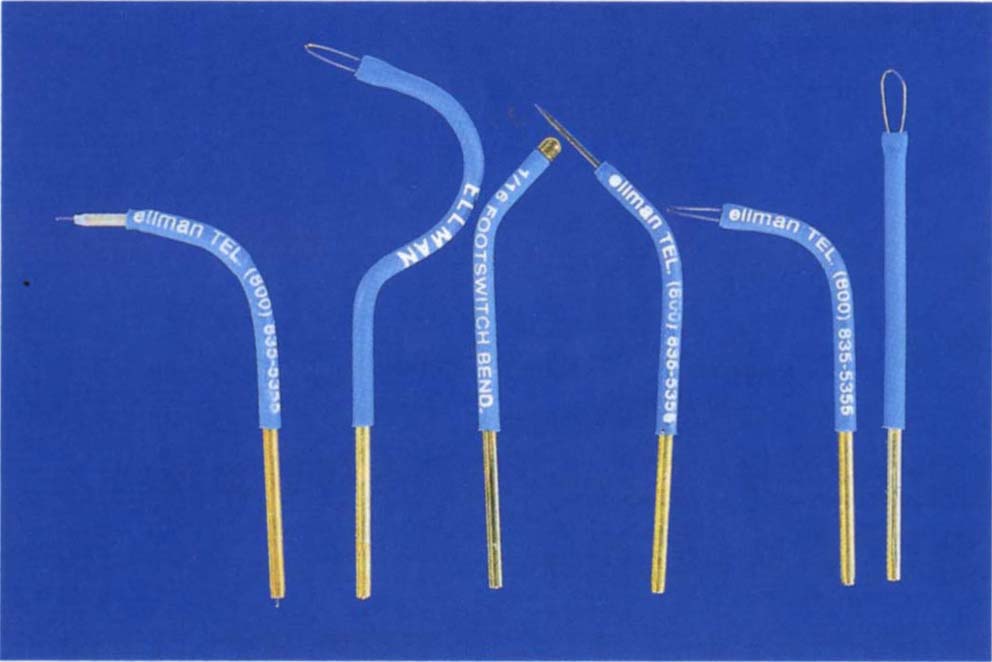
Fig. 8-1b Useful electrodes for electrosurgery:
i. Varitip with 1 mm exposed wire – for widening the gingival sulcus.
ii. Lampeloop for gaining access to the distal aspect of the distal tooth.
iii. Ball electrode for coagulation.
iv. Fillastre tip for widening the gingival sulcus.
vi. Loops for ‘bulk’ removal of tissue.
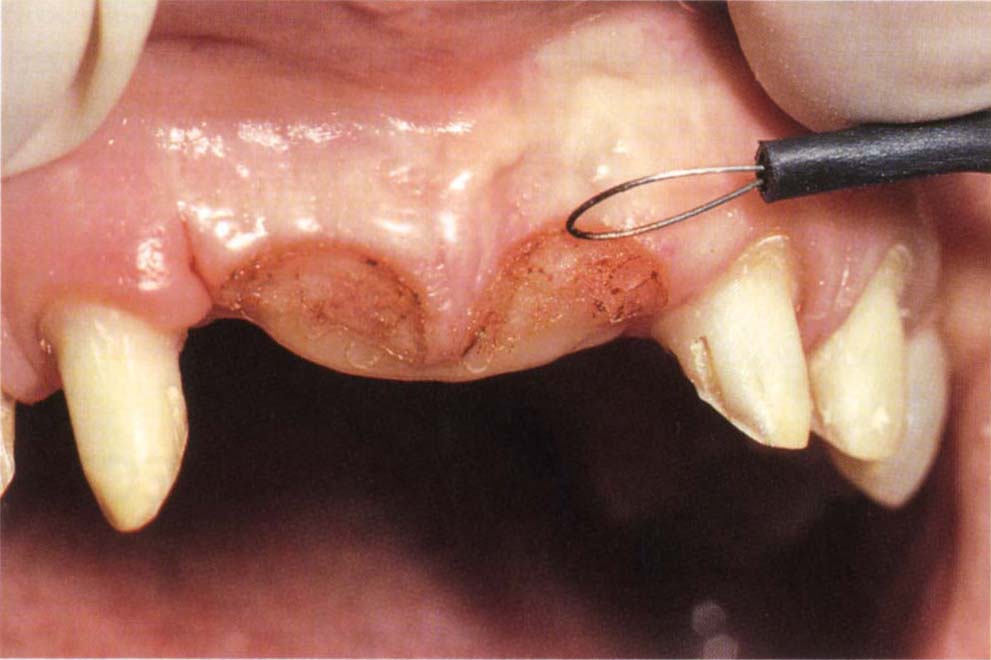
Fig. 8-1c Loop electrode making minor correction to pontic areas. The provisional restoration is extended to fit the recontoured tissue. Three months later, the definitive bridge is made [see Fig. 22-1i (ix)].
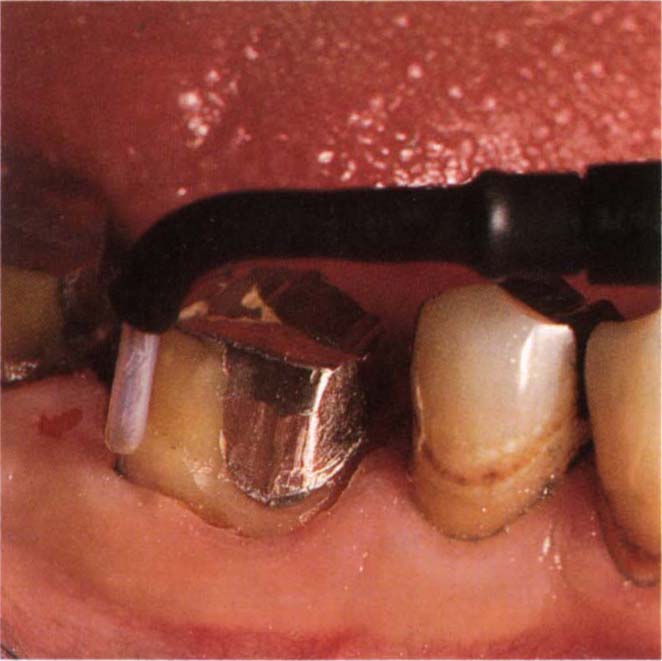
Fig. 8-1d Widening of the gingival sulcus using a wire electrode with a 1 mm depth stop (Varitip).
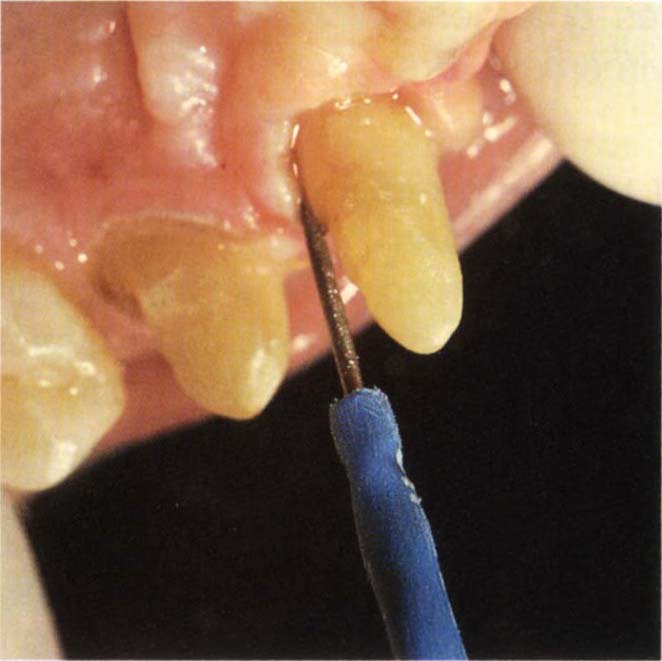
Fig. 8-1e Widening of the gingival sulcus by removing thick palatal tissue with a Fillastre tip.
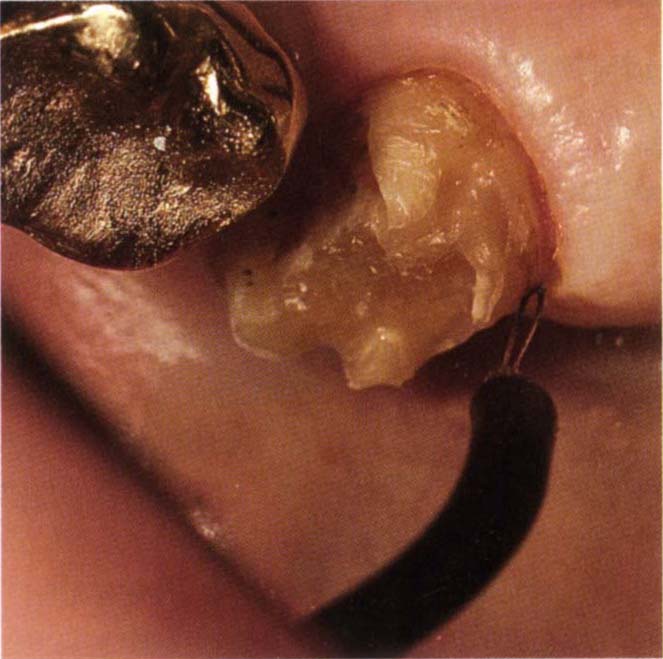
Fig. 8-1f Widening of the gingival sulcus distal to tooth 17 using the Lampeloop. The curve on the electrode provides access to the distal aspect.
By adhering to the above principles, the initial and often very difficult stage of removing failed restorations and making preparations for interim restorations, can be greatly facilitated.
Widening of the Gingival Sulcus Preparatory to the Placement of Subgingival Finishing Lines and the Taking of Impressions
Once the gingival tissue is healthy, it is possible to remove the lining of the gingival sulcus to create space for instrumentation and the introduction of impression material (particularly of reversible hydrocolloid material, which tends to tear if there is insufficient room in the sulcus). If the principles outlined above are observed, and a single wire-protected electrode is used (Fig 8-1d) (only 1 mm of electrode will contact the tissue, thereby limiting the amount of tissue removed), healing without recession should occur. Although there may be an initial loss in height of 0.12 mm to 1.0 mm, most of this is regained during healing.10–16 It should be noted, however, that even with careful use, there is risk of attachment loss.17 When widening the sulcus in the presence of thick tissue at the back of the mouth, the thicker ‘Fillastre’ tip (Ellman) (Fig 8-1e) produces a more predictable space than a thin wire tip. In addition to the principles outlined above, the following should be included:
- Do not widen the buccal gingival sulcus when the tissue in this region shows in function and is thin. Thin tissue appears to be almost translucent, a probe placed in the sulcus is visible through the tissue, the probe will displace the tissue. Thick tissue is compact and thick and a probe is not visible through the tissue which is not obviously displaced. Thin tissue will tend to recede following electrosurgery.
- Following widening of the sulcus, wash the sulcus with 3% peroxide followed by warm water. Pack the sulcus with 00 retraction cord (Ultrapack – Ultradent) not containing an astringent (Fig 9-9). Do not use adrenalin impregnated cords, the cut tissue bed could result in unacceptable absorption of adrenalin.18
- Prepare the finishing line.
- Remove tissue tags and other debris with pumice and a rubber cup in a slow handpiece.
- Repack with 00 cord if the original cord was damaged during finishing.
- Pack additional cord against the 00 cord. Suitable additional cords are Ultrapak Knitted Cord, sizes 00, 0, 1, 2, soaked in astringent such as Styptin (Van R Co.), this is 20% aluminium chloride in buffered glycol solution. These cords are colour coded and easy to pack.
Recontouring of Edentulous Ridges
The loop electrode is used for recontouring irregular edentulous ridges. Only minor corrections should be made (Fig 8-1c). Larger corrections require the removal of connective tissue with a scalpel and, frequently, undermining procedures with bone recontouring.
Clinical Crown Lengthening
Minor lengthening of the clinical crown can be accomplished by gingival margin recontouring, using either a loop or straight wire electrode (Figs 8-1a, 24-2c, 29-13d+e). Approximately 0.5 mm of recession can be anticipated subsequently.
Temporary Restorations
Temporary restorations (Figs 8-2a and j) should:
- Be well fitting.
- Be well contoured.
- Be biocompatible.
- Be easy to fabricate.
- Be strong.
- Be aesthetic.
- Have even occlusal contacts.
- Not induce unplanned deflective contacts or occlusal interferences.
- Be stable, neither warping nor exhibiting occlusal wear.
It is usually best to fabricate temporary restorations in the laboratory, as described in the Appendix. Removal of failed cast restorations by tapping devices has a high risk of fracturing the underlying tooth stump and complicating treatment. It is safer to accept that the restoration cannot be salvaged and to cut it and prise the parts apart. A Beaver bur (FG 1958; Jet Carbide) is used to cut vertically through the buccal and lingual surfaces of the crown through to the underlying tooth or core. The two cuts are joined across the occlusal surface. A bone chisel with a 3 mm wide tip and a 191 mm long handle (Eastman Dental Chisel, Downs Surgical) is inserted into the buccal cut and twisted (Fig 8-2b), prising the mesial and distal halves of the crown apart. Ensure that the tip of the chisel is held between the fingers so that it does not slip off the crown. Usually, the crown can be ‘peeled’ away from the underlying preparation. In the case of a bridge, it may be necessary to cut through the proximal joints, otherwise the mesial half of one retainer will be connected to the distal half of the more anterior retainer and the opposing walls resist removal. See page 159 for modification of existing bridgework.
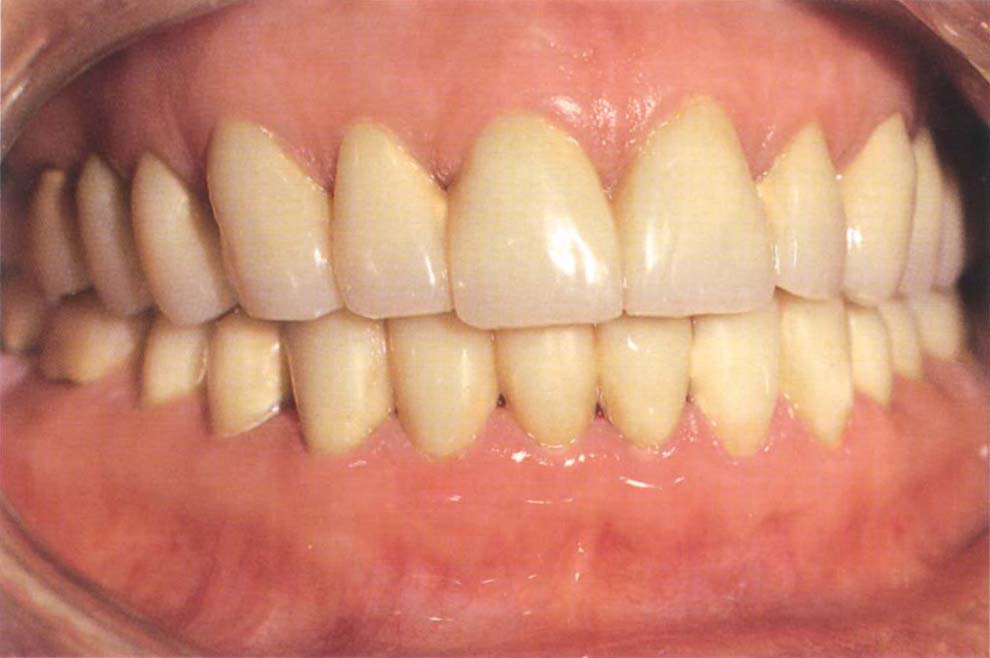
Fig. 8-2a Well-fitting and contoured full arch temporary restorations – made for the patient shown in Figure 8-2e.
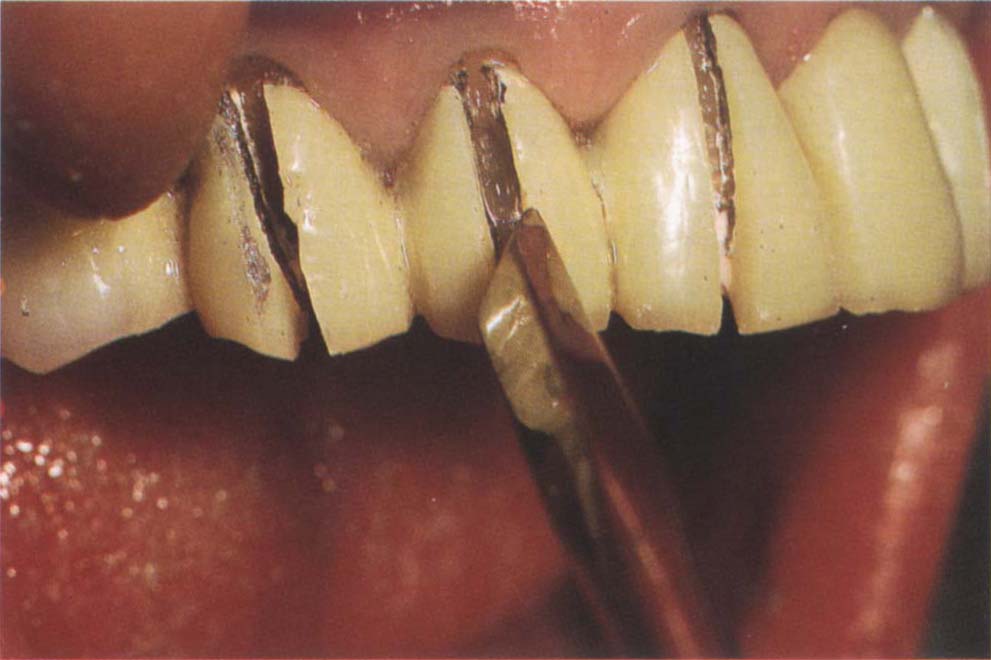
Fig. 8-2b Failed bridgework and crowns should be removed by first cutting through the castings vertically on the buccal and lingual walls and then across the occlusal surface. A bone chisel with a 3 mm wide tip is inserted into the cut and twisted so as to prise the pieces apart.

Fig. 8-2c (i) Adding ceramic stains to Palaseal (Kultzer). These are painted onto the surface of the temporary or provisional crown and then the Palaseal polymerized with blue light.
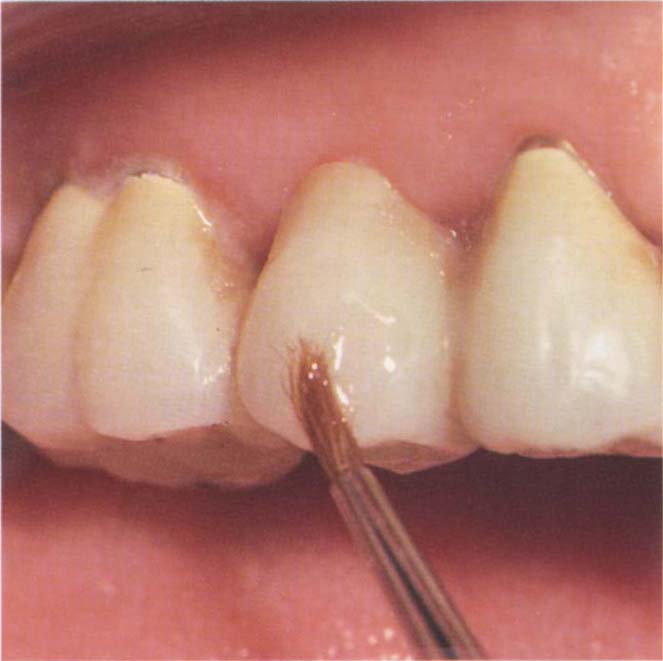
Fig. 8-2c (ii) Staining with Palaseal and ceramic stains.
In the early stabilization stage, it is not necessary to prepare immediately all the grossly carious tooth stumps for the temporary restorations. A sufficient number of teeth around the arch should be prepared to support temporary bridgework or crowns (Figs 8-2h+i).
Methods of building-up stumps, which will be described later, comprise:
- Pinned amalgam cores.
- Resin bonded amalgam cores.
- Orthodontic tubing, cemented pins and composite resin cores.
- Cemented pins (using glass ionomer cement) and a composite resin core – this is a reasonable interim restoration, but is not suitable for a long-term core. A heavily filled resin should be used, with a dentine bonding agent. The composite must be kept away from the cavosurface margin.
- Cermet cement strengthened with cemented pins. This can provide a useful core19 and has the advantage of fluoride release. However, Kao et al., in 1989 reported that although pins reduced the fracture resistance of amalgam and composite resin cores and increased the resistance of cermet cores, the weakened (amalgam and composite) cores were still stronger than the cermet cores.20 The latter should not be used in areas of high stress or when dentine constitutes less than 60% of the core.
- Direct posts and cores, for teeth that have acceptable existing endodontics. Direct patterns are fabricated using a precious metal post and building a DuraLay core onto this. The impression for the temporary restorations is made directly over the DuraLay core and later the same day, the pattern is cast and cemented into the tooth preparatory to cementation of the temporary restoration. It is necessary to have a one and a half hour gap between fabrication of the direct pattern and its cementation.
Other non-vital stumps can be cut down and protected with temporary cement, prior to endodontics.
The shade of the plastic temporary crowns can be modified in the mouth with either Minute Stain, a varnish (G. Taub Inc.) or Palaseal, a light cured clear resin (Kulzer Inc.) which can be mixed with porcelain stains (Fig 8-2c). The Minute Stain must be applied rapidly with a fine brush. The brush is dipped repeatedly in thinner and the varnish must not be allowed to dry out. The Palaseal is easier to use since it does not evaporate. Both are temporary in nature. Since the temporary cement may subsequently alter the shade of the crown, it is sometimes advisable to cement the crown and then make minor colour modifications with Palaseal and porcelain stains.
Care must be taken in the fabrication and fitting of temporary and provisional restorations. These restorations can become very difficult to construct and may create gingival problems if insufficient time is allowed for their fabrication. Donaldson, in 1973 reported that in 10% of cases there was a gingival recession of 1 mm or more associated with temporary restorations.21 Recession was more likely if the restoration extended subgingivally. Furthermore, since these restorations are often retained for long periods, it is important to remember that poor margins encourage the growth of gram-negative melanogenic organisms22 and that these are associated with pathogenic change. Also that, the longer the irritation is present, the more severe the inflammation.23–24 In the early stages of re-restoration, such factors may be relatively trivial in comparison with the gross nature of the problems (Fig 8-2d), but at subsequent stages they are of far greater significance.
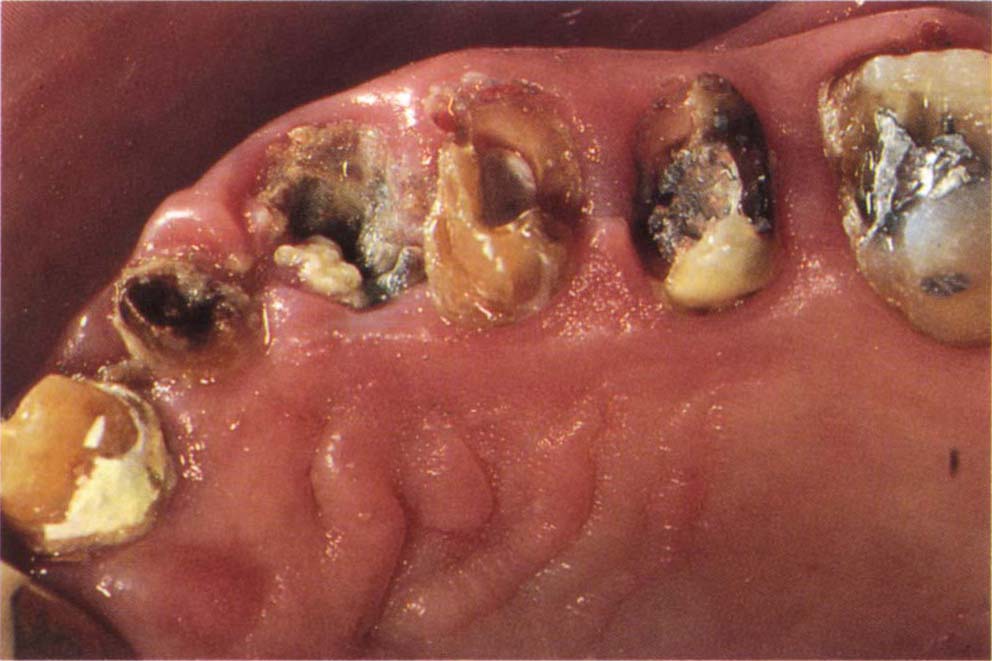
Fig. 8-2d (i) Removal of bridgework reveals extensive problems. At this stage it is very difficult to provide optimal interim restorations. To provide well-fitting, well-contoured interim restorations it is necessary to initially make a temporary restoration, then begin to treat the tissues and replace the temporary with a provisional restoration.
Figs 8-2d (ii) and (iii) Metal casting, made prior to removal of the failed bridge and then incorporated into the temporary restoration to reinforce the acrylic resin (see Appendix for laboratory details).
Provisional Restorations
(Figs 8-2e, I)
Treatment often takes between 18 months and two years. In consequence, it is necessary, to provide robust provisional restorations, so that they can be:
- Modified as treatment progresses.
- Adjusted for aesthetics.
- Adjusted for phonetics.
- Adjusted for occlusal change.
- Easily handled.
- Easily removed without breaking to gain access to the underlying teeth and related soft tissues.
- Relied upon to protect the underlying teeth during interim stages.
- Relied upon to protect the teeth should some unforseen event in the patient’s life result in a long delay in treatment (Fig 8-2f).
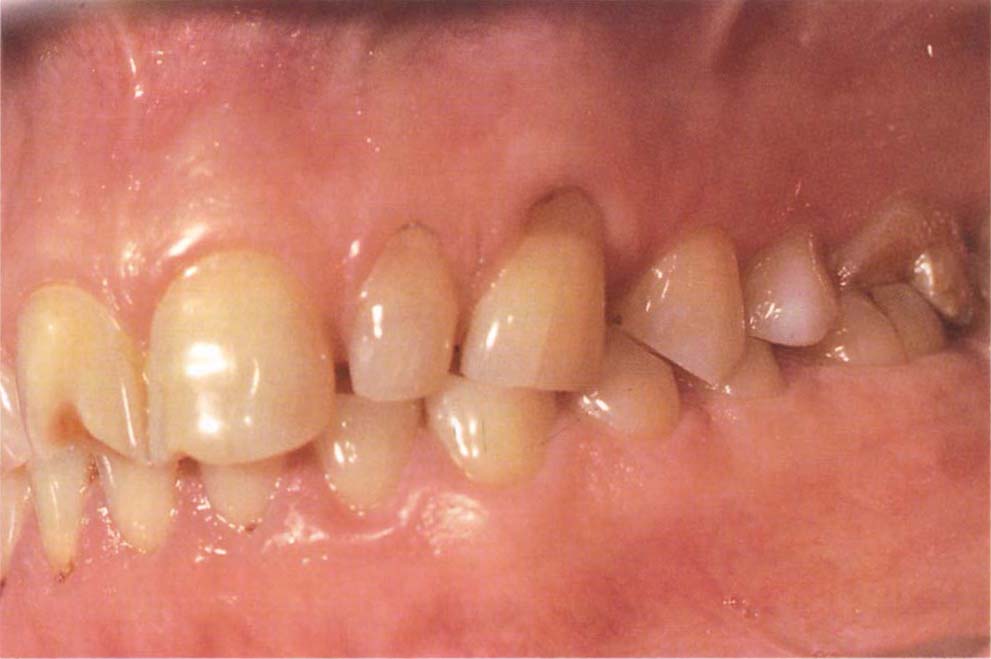
Fig. 8-2e (i) Start – before clinical crown lengthening surgery and placement of provisional restorations.
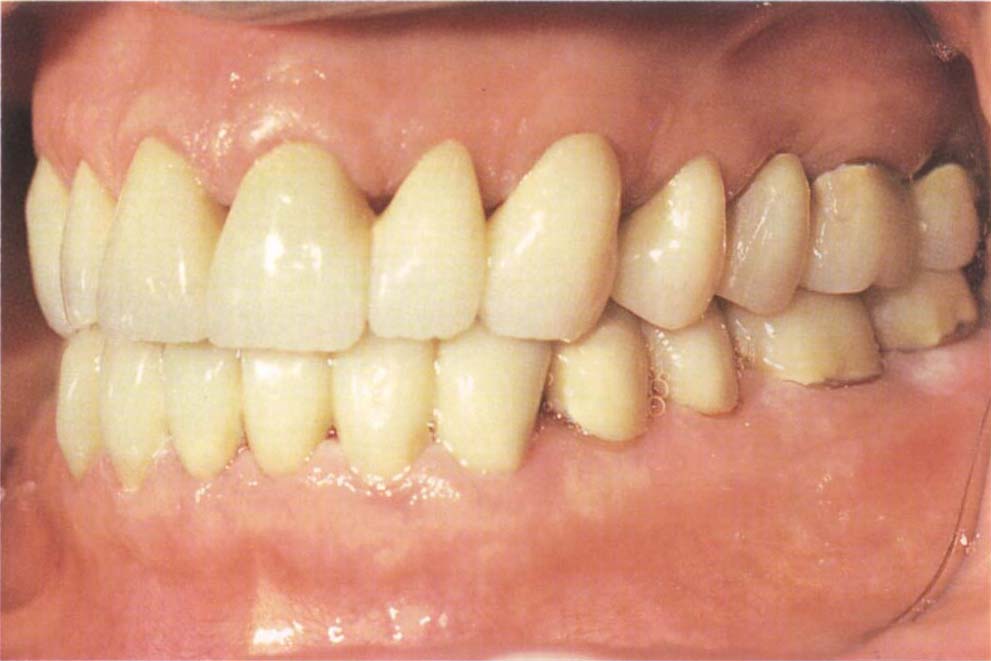
Fig. 8-2e (ii) Provisional restorations made on mounted casts to reduce the intraoral adjustment.
Provisional restorations consist of a white gold substructure (Palliag, Degussa) covered by acrylic or composite resin. The patient is charged for the gold and then appropriately re-imbursed on replacement with definitive restorations. It is preferable to make provisional restorations as integral multiple units to facilitate handling and cementation. Separate individual units are difficult to handle. For details of the laboratory procedures, see Appendix.
Should provisional restorations break during removal by the endodontist or periodontist, unnecessary complications are created, since these specialists are usually not ‘geared’ to repair them. Further, a patient feels very insecure if interim restorations fail, particularly if they are far away from the practice. The time, effort and expense involved in fabricating metal based provisional restorations is, therefore, fully justified. Unfortunately, it is impossible to predict which cases really will need such restorations. Since it cannot be predicted, such restorations are made routinely and their benefit fully justifies all of those cases for which they were fabricated and not necessarily required (Fig 8-2f).
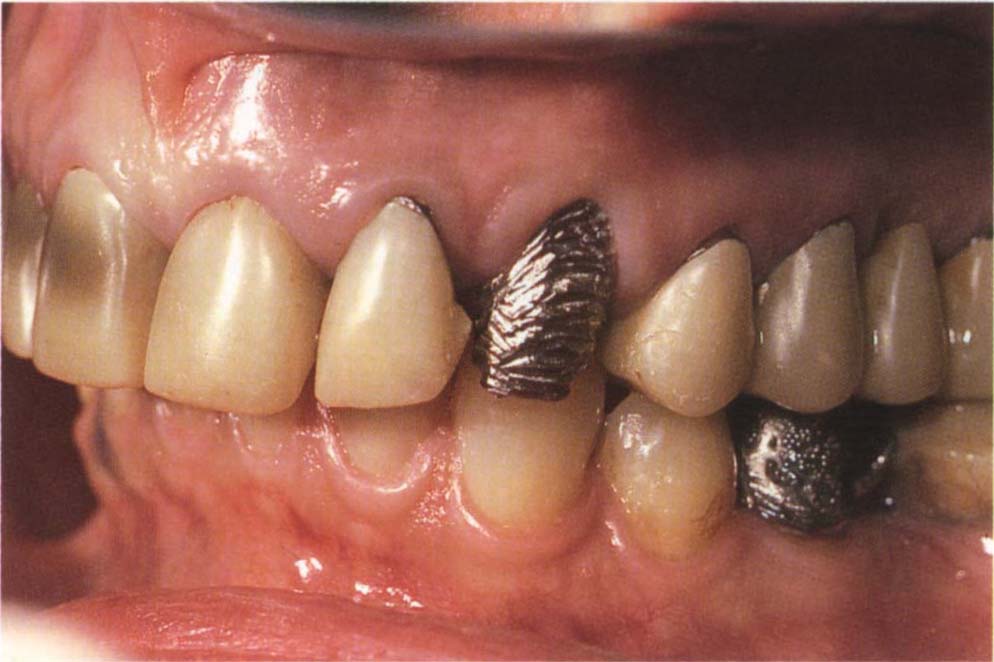
Fig. 8-2f The patient developed tuberculosis shortly after the placement of the provisional restoration. She did not receive any dental treatment for six years. In that time she used a fluoride mouthwash and recemented one provisional bridge with the Tempbond that had been provided at initial cementation. Note the excellent gingival tissue condition. There was no caries, only the fractured facings. Plastic interim restorations could have led to severe dental complications.
If marginal inflammation is noted prior to placement of the definitive restorations, this can often be resolved by cementation of the provisional restorations with Opotow trial cement (Teledyne Getz), instead of Tempbond for five days. This also helps to remove Tempbond from the preparations.
There are four kinds of case that require consideration:
Provisional Restorations for the Non-Caries Susceptible Patient
(Figs 8-2e, g)
These consist of a one piece (that is, the framework is cast as one piece) metal casting, covered with acrylic or composite resin. For the simple provisional restoration this is fabricated in the laboratory on quadrant unmounted casts, particularly if there is good location for the matrix and intraoral occlusal adjustment of the restoration will be straightforward (Fig 8-2g). Mounted casts are used when the restoration is extensive (Fig 8-2e), or when location of the matrix is not obvious and stable, or when adjustment in the mouth is likely to be difficult – see Appendix.
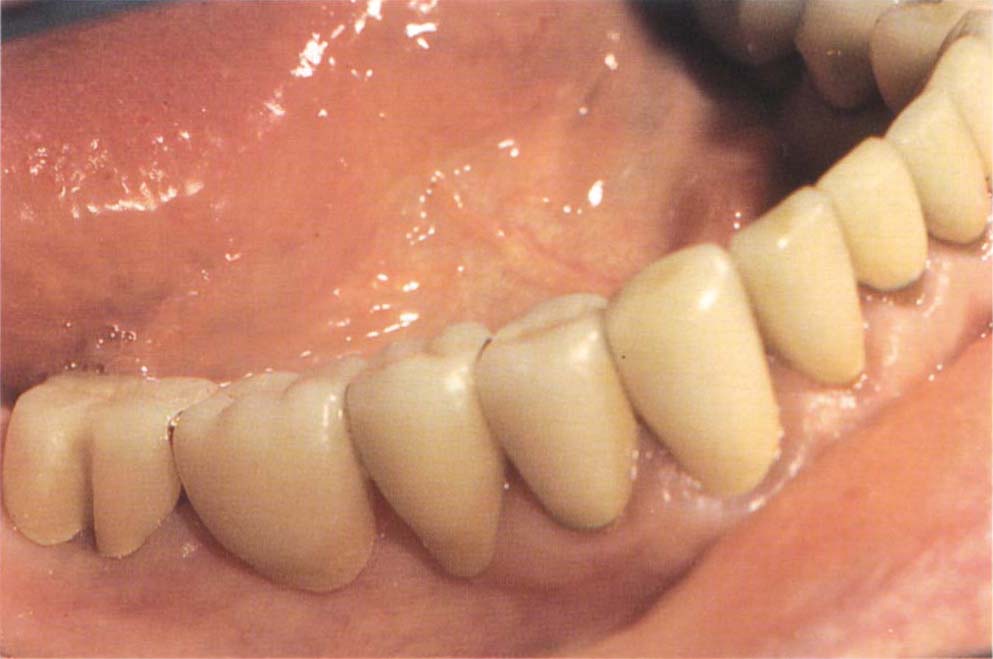
Fig. 8-2g Quadrant provisional restorations (teeth 47–43) easy to adjust in the mouth – therefore mounted casts not required.
The restorations are cemented with Tempbond. Equal lengths of Tempbond base and catalyst are mixed with a one-third length of Vaseline dispensed from a 2 ml disposable syringe. Following the use of electrosurgery, a one-third length of 1% Aureomycin eye ointment is incorporated in the mix in an attempt to promote healing. Cohen et al. (1989) demonstrated an in vitro bacteriostatic effect of tetracycline incorporated in Tempbond.25
Provisional Restorations for the Caries Susceptible Patient
(Figs 8-2h–l, 8-10)
Following cementation of a provisional restoration, one or more units may separate from the supporting teeth whilst others remain cemented. Leakage will occur around the former and in the caries susceptible patient this could lead to rapid destruction of the tooth stump. In such caries susceptible patients individual gold copings are made. These are cemented with zinc phosphate or glass ionomer cement. The provisional restoration is cemented over the top of these with a temporary cement (equal lengths base and catalyst plus ½ a length of Vaseline). Any cementation failure, therefore, will occur between the coping and the superstructure and will not lead to caries of the tooth stump (Figs 8-2k–l). For details of fabrication, see Appendix. See also Telescopic Units, Chapter 18. Furthermore, the provisional bridge can be removed from the underlying copings with little fear of pulling the underlying core away from the root face. In the absence of copings, the strength of cement required to retain the bridge may be more liable to pull off the core on bridge removal. If the core should detach, then a new interim core can be made as follows:
1) Clean out the core from within the coping.
2) Open an occlusal hole in the coping.
3) Cement new pins in the root face.
4) Cement the coping with a thin layer of glass ionomer cement only around the bevel.
5) Following the set of the cement, pack spherical alloy amalgam (Tytin, Kerr) into the coping.
Extension After Surgery
Following periodontal surgery, it is frequently necessary to extend the provisional restorations further towards the gingivae so as to:
- Reduce post-operative dentine sensitivity.
- Improve aesthetics.
- Improve retention and resistance form (now this has been made possible).
- Provide margins on sound tooth structure.
There are three ways of extending the provisional restorations following appropriate adjustment of the tooth preparation:
- Direct Bead-on Technique
Vaseline is applied to the tooth stump and the provisional restoration is roughened around the margins so as to remove any surface varnish and polish. The region is dried, the provisional restoration is inserted and temporary crown and bridge acrylic or light cured monomer and polymer (Unifast L-C, G. C. Company) added as necessary (to the deficient areas) by the bead-on technique. The chairside assistant wraps a tissue around her first finger and holds two Dappens dishes as shown in Figure 8-2m. One contains monomer liquid and the other polymer powder. An 0-0 sable brush is dipped in the monomer and then touched against the centre of the polymer, ensuring that the sides of the dish are not contacted, otherwise monomer passes by capillary action around the polymer, making it unusable. A bead of monomer and polymer are taken to the mouth and added to the crown margin (Fig 8-2n). A light is applied to polymerise light activated materials. The brush is wiped against a paper tissue, cleaned in the monomer, and the process repeated. This is a difficult technique to use when application is required circumferentially to the tooth. - Addition by Means of a Laboratory Fabricated Slip
A slip is fabricated on a study cast so as to extend to the repositioned gingival margins. The provisional bridgework is cleaned as before, placed in the mouth and the slip filled in the requisite regions with self-curing crown and bridge acrylic resin and placed over the provisional bridge. Following initial polymerization, it is removed, placed in hot water and then trimmed and polished. This is also a difficult technique (Fig 8-2p). - Laboratory Extension
An impression is made of the extended preparations and poured in a 50/50 mix of impression plaster and die stone and the provisionals extended in the laboratory, see Appendix. This is the best method. It may be necessary to make some small bead-on additions in the mouth (Fig 8-2o).
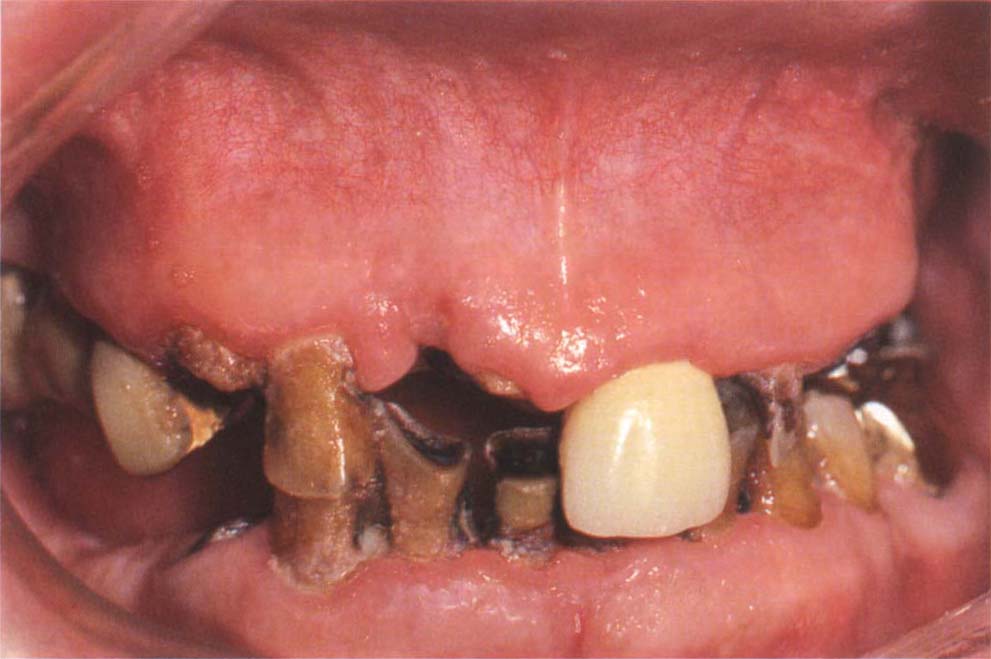
Fig. 8-2h Caries susceptible patient, retained roots 13, 11, 22, 23, 24, 44, following the removal of failed crowns.
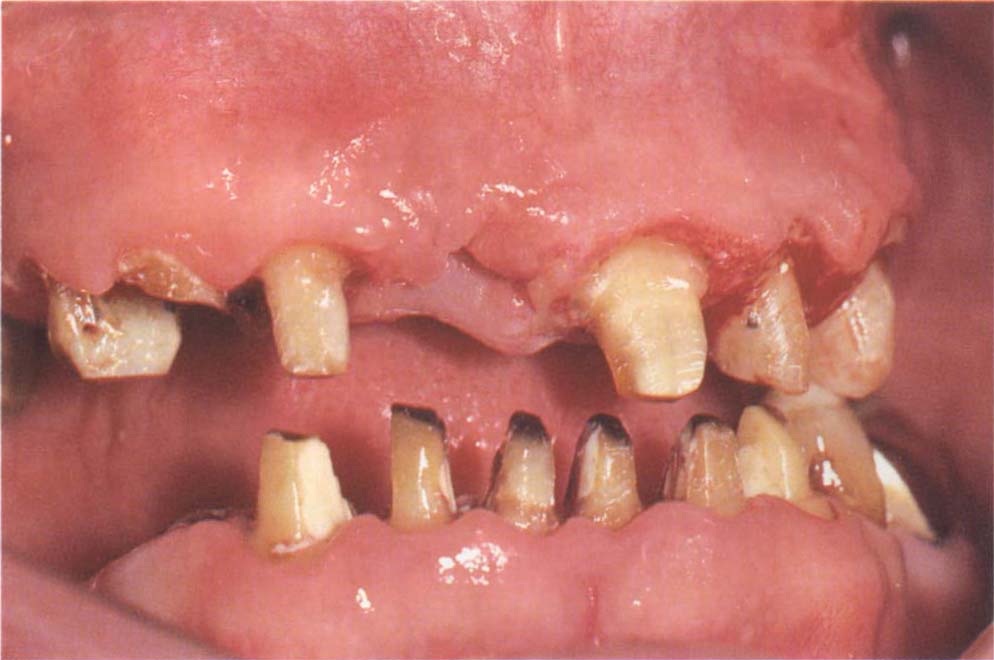
Fig. 8-2i Following electrosurgery to expose non-carious dentine and building of pin and Allbond 2 (Bisco) retained composite resin cores on 14, 12, 22, 23. Note 13, 11, 44 are left untreated. The objective was to produce a sufficient number of cores to support the temporary and provisional bridges. The resin cores were temporary.
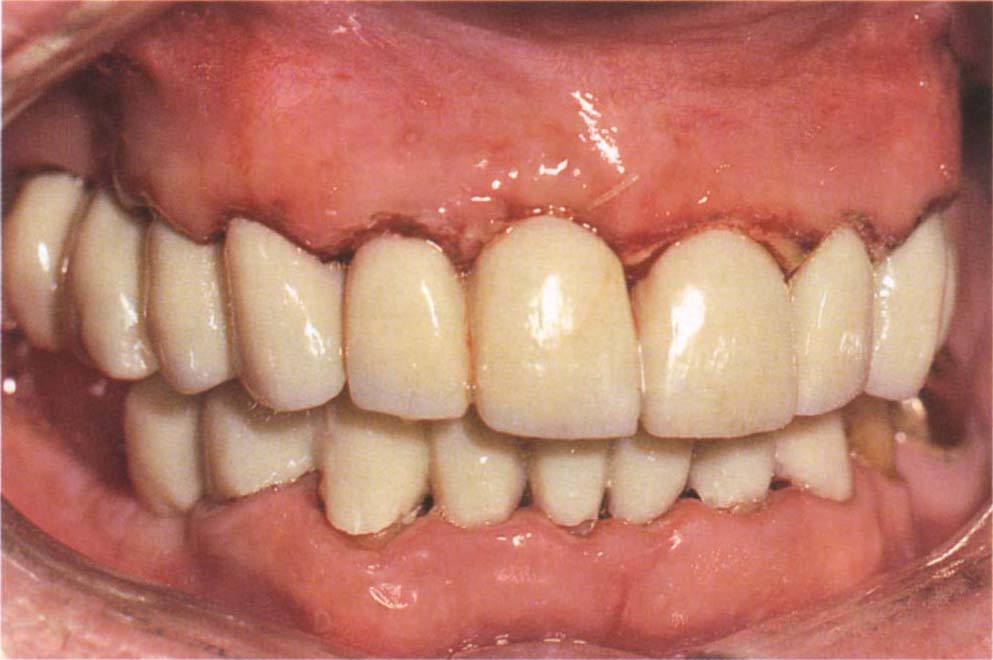
Fig. 8-2j Temporary bridges.
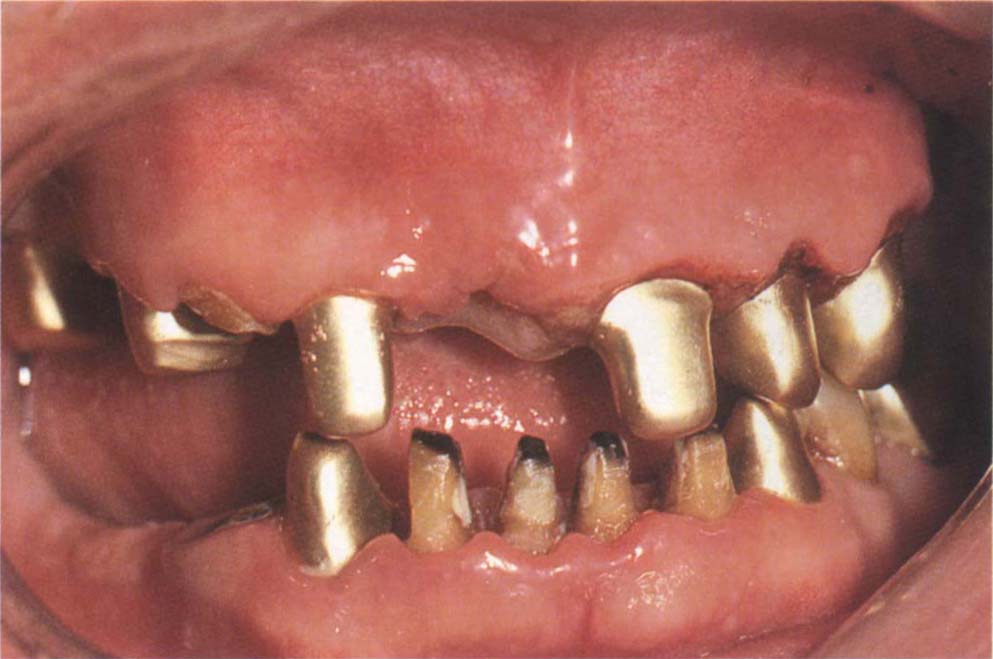
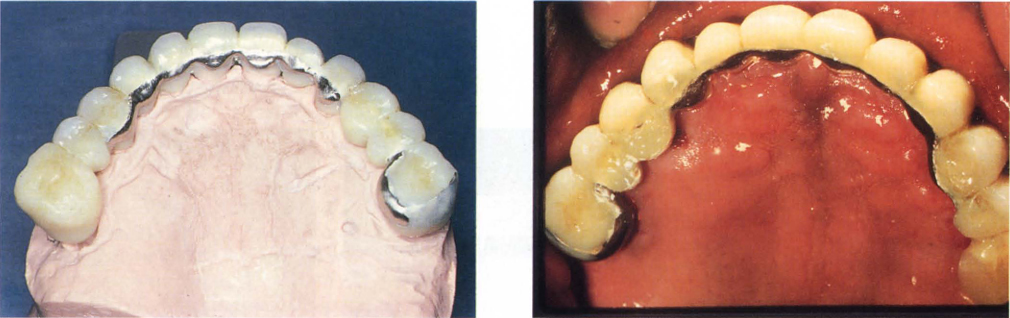
Fig. 8-2k Gold copings cemented with glass ionomer cement. 42–32 will be extracted and osseointegrated fixtures placed.
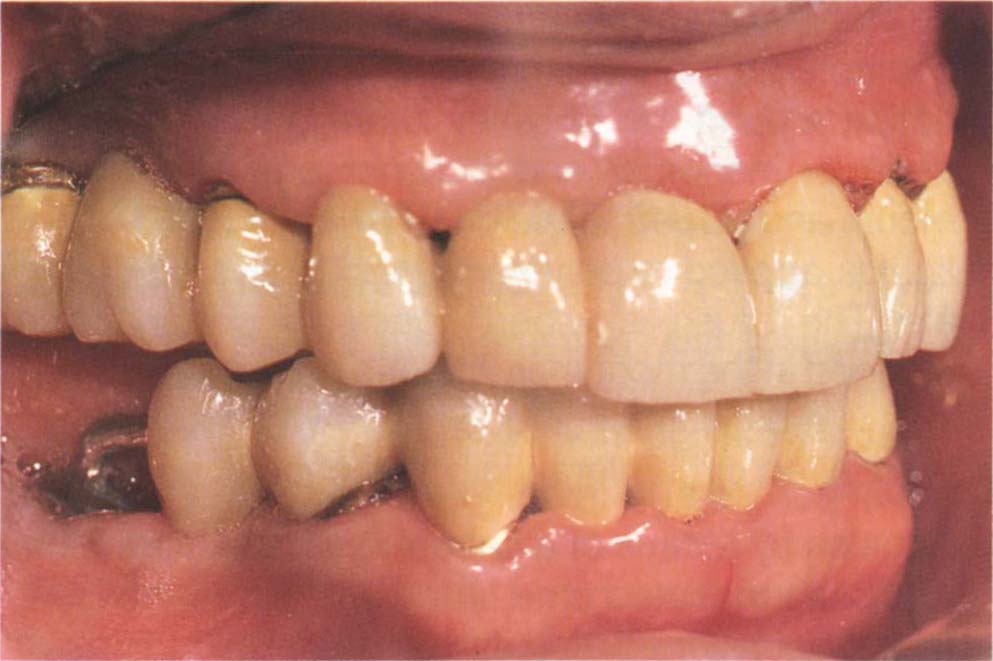
Fig. 8-2l Provisional bridge cemented with Tempbond and Vaseline over the copings in Figure 8-2k. Note the tissue extension 46, to give distal support. The bridge rests on the roots 13 and 44. Treatment can now be provided, using the bridge as an interim restoration. The objective was to slowly convert to osseointegrated fixture-retained bridges.
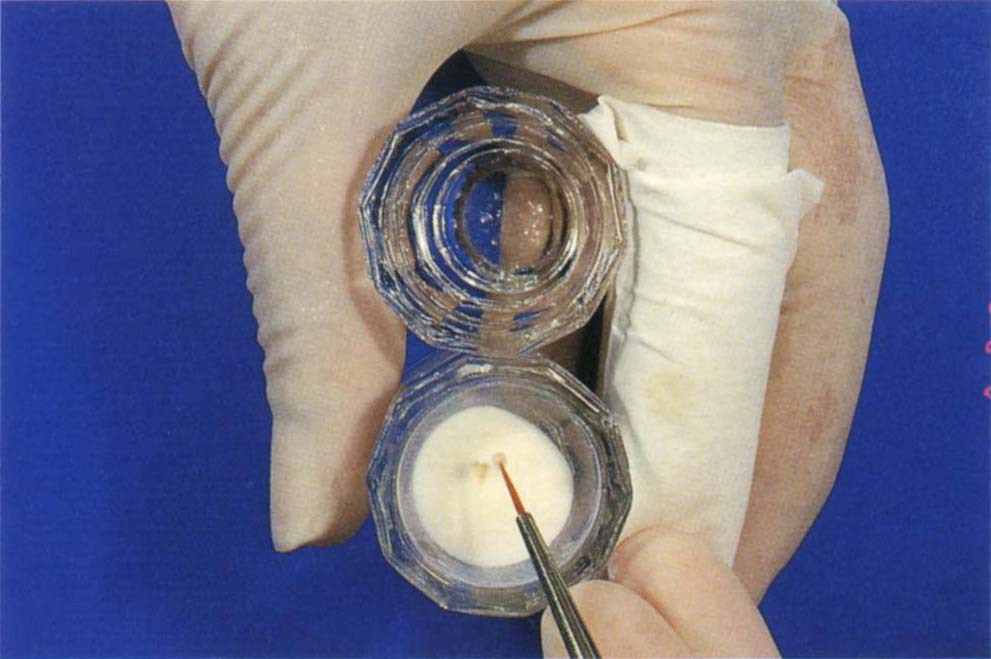
Fig. 8-2m Holding two Dappens dishes – one containing monomer and one containing polymer powder. The tissue over the finger is for drying the brush. 00 sable brush has been touched in the liquid and then into the centre of the polymer to pick-up a bead. The brush must not touch the side of the Dappens dish.
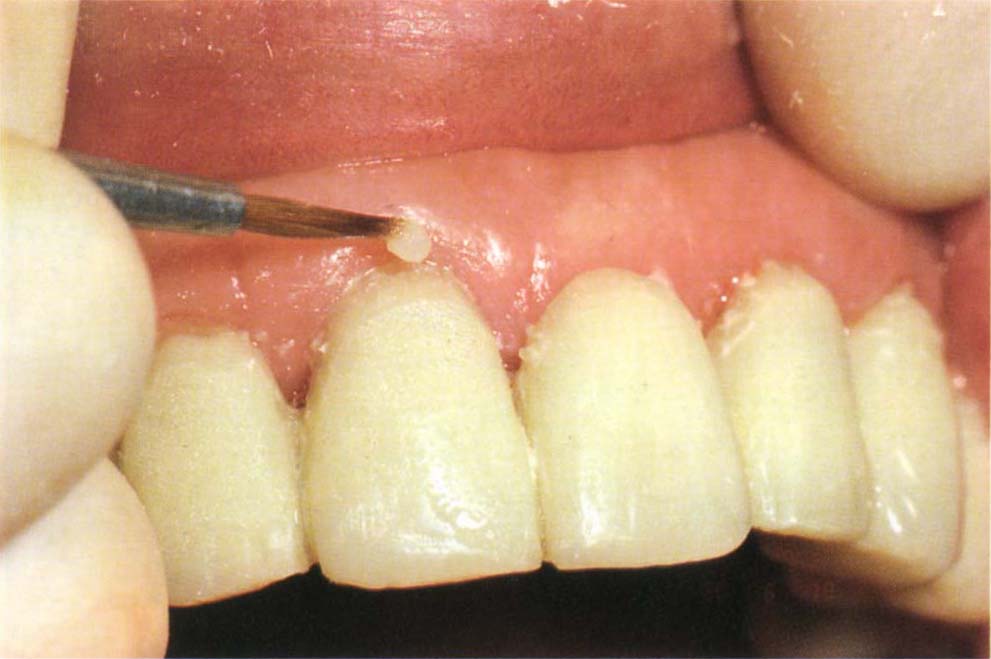
Fig. 8-2n Making additions to the crown margin following periodontal therapy, with associated shrinkage of the gingivae. The margins have been extended using a slip (Fig. 8-2p) and final additions are made in the mouth with a bead-on technique.
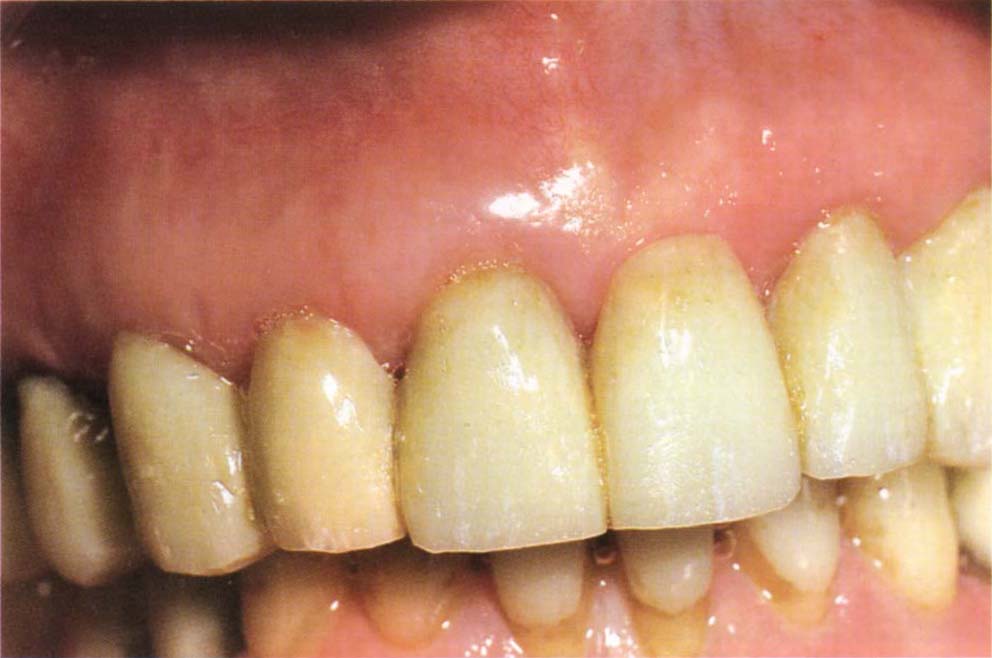
Fig. 8-2o After laboratory extension and bead on addition.
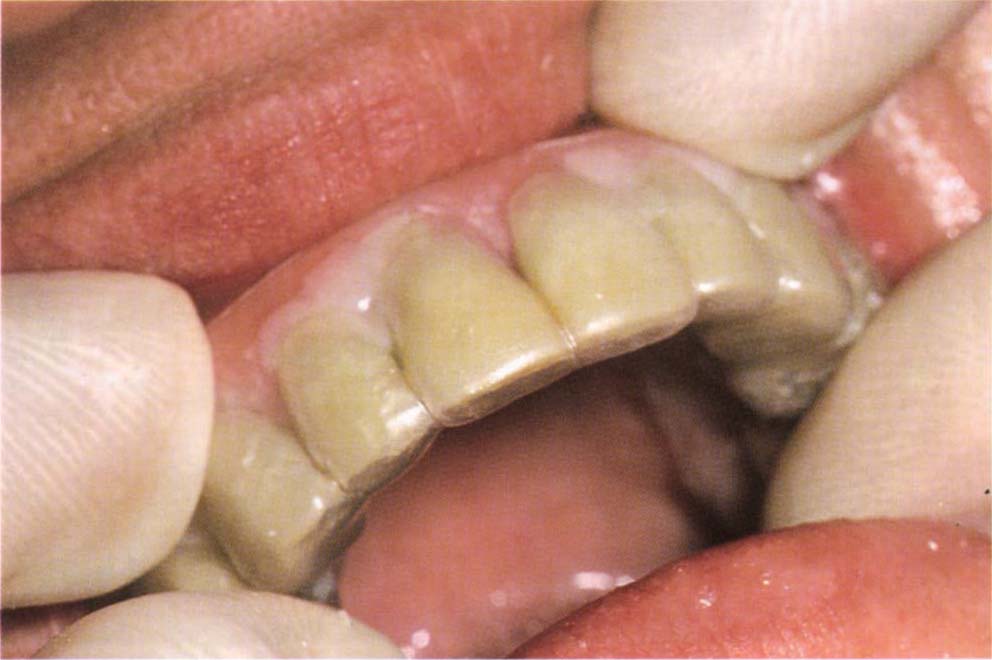
Fig. 8-2p Making additions with a laboratory fabricated slip.
Modification of Existing Bridgework
Existing bridgework can sometimes be removed by slitting a crown vertically, prising the flaps of the crown apart, removing the bridge, adding acrylic or light cured resin to the bridge, including the slit, and recementing with temporary cement. If the bridge is partially uncemented, removal can be attempted initially using a Higa bridge remover (Higa Manufac. Ltd), see page 162. If this is successful, it may be possible to reuse the bridge as a temporary restoration.
Preparation for Endodontics
When endodontic therapy is required, it is generally preferable to gain access to the tooth stump after removing any bridgework. This provides better access and isolation than working through the bridge. The following items can assist the endodontist:
Overdenture
A removable overdenture during the endodontic stage can facilitate endodontics by making access to tooth stumps easy, but isolation and length control of instruments potentially more difficult.
Removable Bridgework
Provisional bridgework should be designed so that it is readily removable at endodontic visits.
Copings
Cementation of individual cast copings with open tops facilitate placement of rubber dam and access for the endodontics. This is particularly important when there are very broken down teeth with short clinical crowns. It is usually best to cement such copings with a reinforced zinc oxide eugenol cement (IRM: De Trey) to minimize any leakage. The provisional bridge is cemented over the copings as described above.
Cantilevered Units
Sometimes the temporization of a tooth requiring endodontic treatment can be difficult, since there is insufficient tooth stump to retain a temporary restoration. In such situations, the root canal can be dressed, the crown removed, and a cantilever provisional bridge fabricated on adjacent teeth, carrying a pontic to replace the crown of the tooth to be treated (Fig 8-3a). This bridge is removed at each visit. The cantilevered unit is made to fit a prepared cervical finishing line on the tooth under treatment and has internal space to accommodate a core, which is made to fit into the provisional bridge following completion of endodontic therapy (see Posts into Provisional Restorations).
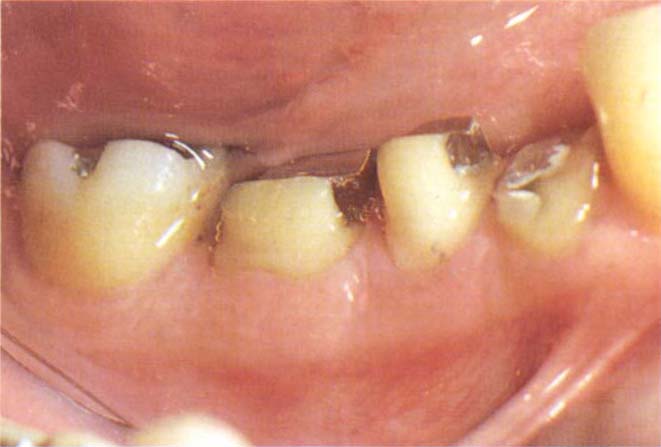
Fig. 8-3a Cantilevered unit to allow access for root canal therapy. The provisional bridge is retained by teeth 46 and 45 and rests on the margins of 44. This is easier to manage than making an individual temporary restoration on tooth 44.
Amalgam Core
Placement of cemented pins into the root face and building up of an amalgam core will often provide an adequate stump through which endodontics can be carried out. It is important to ensure that the matrix is stable during condensation of the amalgam and sometimes this entails the use of green stick composition (Fig 8-6b). Self threading pins should not be used since the strength of the tooth will be reduced by the endodontic access cavity and self threading pins can induce unnecessary stress concentrations. The pin holes should be slightly enlarged and the pins cemented wi/>
Stay updated, free dental videos. Join our Telegram channel
VIDEdental - Online dental courses


