Basic Implant Surgical Procedures
The surgical procedures for the placement of nearly all endosseous dental implants currently used are based on the original work of Professor Per-Ingvar Brånemark and colleagues in Sweden in the 1960s and 1970s.4,5 Their landmark research evaluated the biologic, physiologic, and mechanical aspects of the titanium screw-shaped implant, subsequently known commercially as the Nobelpharma “Brånemark” implant system and currently manufactured by Nobel Biocare. The original Brånemark implant was a parallel-walled, cylindrically shaped, threaded implant with an external hex connection and a machined surface. In the last few decades many different designs of root form implants have been developed, modified, and studied. The same fundamental principles of atraumatic, precise implant site preparation applies to all implant systems. Briefly, this includes a gentle surgical technique and progressive, incremental preparation of the bone for a precise fit of the implant at the time of placement.
General Principles of Implant Surgery
Patient Preparation
Most implant surgical procedures can be done in the office using local anesthesia. Conscious sedation (oral or intravenous) may be indicated (see Chapter 36) for some patients. The risks and benefits of implant surgery specific to the patient’s situation and needs should be thoroughly explained prior to surgery. A written, informed consent should be obtained for the procedure.
Implant Site Preparation
Some basic principles must be followed to achieve osseointegration with a high degree of predictability3,4,7 (Box 75-1). The surgical site should be kept aseptic, and the patient should be appropriately prepared and draped for an intraoral surgical procedure. Prerinsing with chlorhexidine gluconate for 1 to 2 minutes immediately before the procedure will aid in reducing the bacterial load present around the surgical site. Every effort should be made to maintain a sterile surgical field and to avoid contamination of the implant surface. Implant sites should be prepared using gentle, atraumatic surgical techniques with an effort to avoid overheating the bone.
When these clinical guidelines are followed, successful osseointegration occurs predictably for submerged4 and nonsubmerged11 dental implants. Well-controlled studies of patients with good plaque control and appropriate occlusal forces have demonstrated that root form, endosseous dental implants show little change in bone height around the implant over years of function.1 After initial bone remodeling in the first year (1.0 to 1.5 mm of resorption described as “normal remodeling around an externally hexed implant”),1 the bone level around healthy functioning implants remains stable for many years. The average annual crestal bone loss after the first year in function is expected to be 0.1 mm or less. Hence, implants offer a predictable solution for tooth replacement.
Regardless of the surgical approach, the implant must be placed in healthy bone with good primary stability to achieve osseointegration, and an atraumatic technique must be followed to avoid damage to bone. Drilling of the bone without adequate cooling generates excessive heat, which injures bone and increases the risk of failure.12 The anatomic features of bone quality (dense compact versus loose trabecular) at the recipient site influence the interface between bone and implant.9 Compact bone offers a much greater surface area for bone-to-implant contact than cancellous bone. Areas of the jaw exhibiting thin layers of cortical bone and large cancellous spaces, such as the posterior maxilla, have lower success rates than areas of dense bone.9 The best results are achieved when the bone-to-implant contact is intimate at the time of implant placement.
One-Stage Versus Two-Stage Implant Placement Surgery
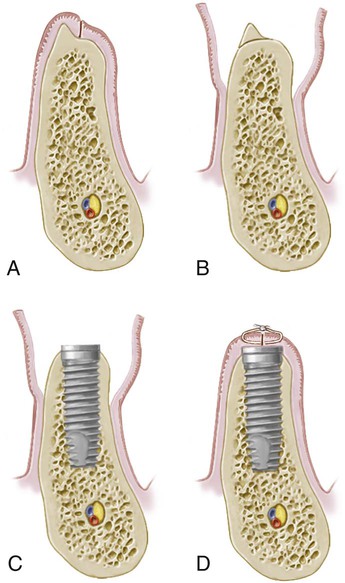
Currently, most threaded endosseous implants can be placed using either a one-stage (nonsubmerged) or a two-stage (submerged) protocol. In the one-stage approach, the implant or the abutment emerges through the mucoperiosteum/gingival tissue at the time of implant placement, whereas in the two-stage approach, the top of the implant and cover screw are completely covered with the flap closure (Figure 75-1). Implants are allowed to heal, without loading or micromovement, for a period of time to allow for osseointegration. In two-stage implant surgery, the implant must be surgically exposed following a healing period. Some implants are specifically designed with the coronal portion of the implant positioned above the crest of bone and extending through the gingival tissues at the time of placement in a one-stage protocol (Figure 75-1, A). Other implant systems are designed to be placed at the level of bone, require a healing abutment to be attached to the implant at the time of placement to be used in a one-stage approach8 (Figure 75-1, B).

A, One-stage surgery with the implant designed so that the coronal portion of the implant extends through the gingiva. B, One-stage surgery with implant designed to be used for two-stage surgery. A healing abutment is connected to the implant during the first-stage surgery. C, In the two-stage surgery, top of the implant is completely submerged under gingiva.
Two-Stage “Submerged” Implant Placement
In the two-stage implant surgical approach, the first-stage or implant placement surgery ends by suturing the soft tissues together over the implant cover screw so that it remains submerged and isolated from the oral cavity. In areas with dense cortical bone and good initial implant support, the implants are left to heal undisturbed for a period of 2 to 4 months, whereas in areas of loose trabecular bone, grafted sites, and sites with lesser implant stability, implants may be allowed to heal for periods of 4 to 6 months or more. Longer healing periods are indicated for implants in sites with less bone support. During healing, osteoblasts migrate to the surface and form bone adjacent to the implant (osseointegration).6 Shorter healing periods are indicated for implants placed in good quality (dense) bone and for implants with an altered surface microtopography (e.g., acid etched, blasted, or etched and blasted). Readers are referred to online material and other resources for more information about implant surface microtopography.
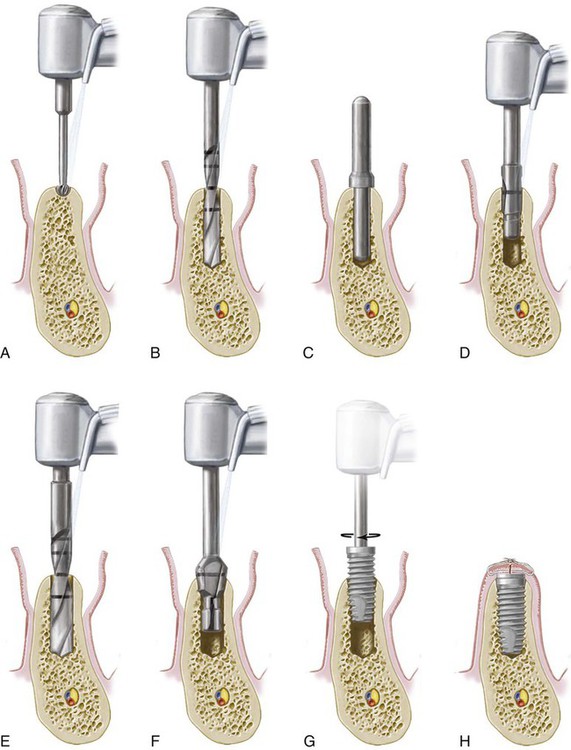
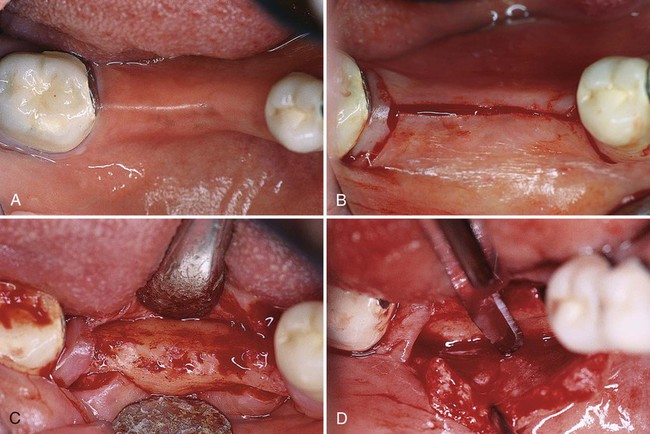
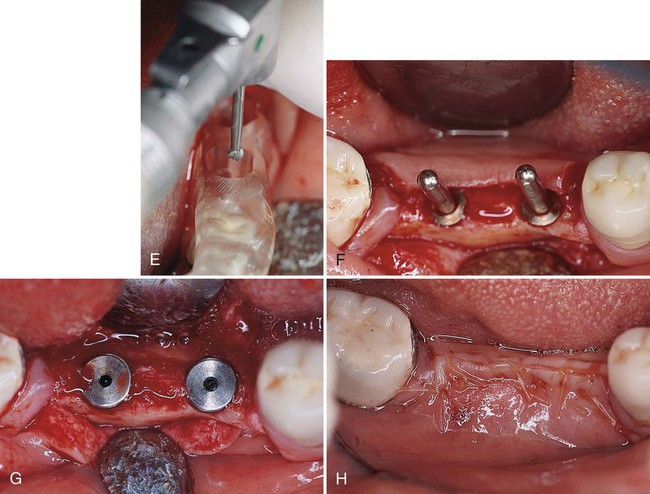
The following paragraphs describe the steps for osteotomy preparation and the first-stage implant placement surgery of the two-stage protocol. Figures 75-2 and 75-3 illustrate the procedures via diagrams, and Figure 75-4 depicts the procedures with clinical photographs.

A, Crestal incision made along the crest of the ridge, bisecting the existing zone of keratinized mucosa. B, Full-thickness flap is raised buccally and lingually to the level of the mucogingival junction. A narrow, sharp ridge can be surgically reduced/contoured to provide a reasonably flat bed for the implant. C, Implant is placed in the prepared osteotomy site. D, Tissue approximation to achieve primary flap closure without tension.

A, Initial marking or preparation of the implant site with a round bur. B, Use of a 2-mm twist drill to establish depth and align the implant. C, Guide pin is placed in the osteotomy site to confirm position and angulation. D, Pilot drill is used to increase the diameter of the coronal aspect of the osteotomy site. E, Final drill used is the 3-mm twist drill to finish preparation of the osteotomy site. F, Countersink drill is used to widen the entrance of the recipient site and allow for the subcrestal placement of the implant collar and cover screw. Note: An optional tap (not shown) can be used following this step to create screw threads in areas of dense bone. G, Implant is inserted into the prepared osteotomy site with a handpiece or handheld driver. Note: In systems that use an implant mount, it would be removed prior to placement of the cover screw. H, Cover screw is placed and soft tissues are closed and sutured.


A, Partial edentulous ridge; presurgical and prosthodontic treatment has been completed. B, Mesial sulcular and distal vertical incisions are connected by a crestal incision. Notice that bands of gingival collars remain adjacent to the distal molar tooth. C, Minimal flap reflection is used to expose the alveolar bone. Sometimes a ridge modification is necessary to provide a flap recipient bed. D, Buccal flap is partially dissected at the apical portion to provide a flap extension. This is a critical step to ensure a tension-free closure of the flap after implant placement. E, It is important to use the surgical stent to determine the mesial-distal and buccal-lingual dimensions and proper angulation of the implant placement. F, Frequent use of the guide pins ensures parallelism of the implant placement. G, After placement of two Nobelpharma implants, the cover screws are placed. The cover screws should be flush with the rest of the ridge to minimize the chance of exposure. This is especially important if the patient will wear a partial denture during the healing phase. H, Suturing completed. Both regular interrupted and inverted mattress sutures are used intermittently to ensure tension-free, tight closure of the flaps.
Flap Design, Incisions, and Elevation
Flap management for implant surgery varies slightly, depending on the location and objective of the planned surgery. There are different incision/flap designs but the most common is the crestal flap design. The incision is made along the crest of the ridge, bisecting the existing zone of keratinized mucosa (see Figures 75-2, A, and 75-4, B).
A remote incision with a layered suturing technique may be used to minimize the incidence of bone graft exposure when extensive bone augmentation is planned. The crestal incision, however, is preferred in most cases, because closure is easier to manage and typically results in less bleeding, less edema, and faster healing.10
A full-thickness flap is raised (buccal and lingual) up to or slightly beyond the level of the mucogingival junction, exposing the alveolar ridge of the implant surgical sites (see Figures 75-2, B, and 75-4, C). Elevated flaps may be s/>
Stay updated, free dental videos. Join our Telegram channel

VIDEdental - Online dental courses


