Chapter 5
Tooth Preparation
Aim
The aim of this chapter is to describe the common tooth preparations for crowns and how to achieve the best results.
Objective
After this chapter the reader will understand how to prepare teeth for crowns.
Cemented Crowns
Preparing teeth for crowns typically involves removing substantial quantities of enamel and dentine and as a consequence it is not a conservative technique. The aim of the preparation, in addition to creating space to accommodate the intended crown, is to prepare a shape appropriate to retain and support the crown. The ideal taper should be 10–20°. This is recognised to be sufficiently parallel to be retentive, yet tapered enough to remove a wax pattern from the stone model and allow cementation of the final crown (Fig 5-1a,b). A parallel-sided preparation mesiodistally increases the risk of either damage to the adjacent teeth, even when a fine tapered bur is used, or over-preparation of the tooth. Short preparations normally provide insufficient retention for conventionally luted crowns. Conversely, it is difficult to avoid creating undercuts in long preparations.
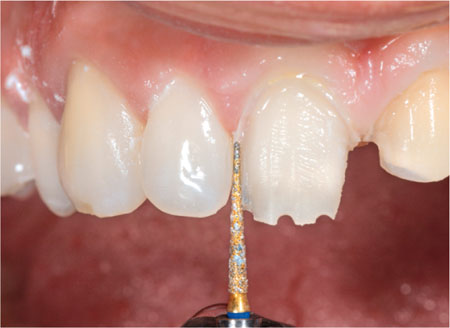
Fig 5-1a The shape of the bur can assist the preparation of an anterior tooth.
Fig 5-1b The taper of these preparations approaches parallel maximising the retention for the crowns.
Preparations may cause death of the pulp – one of the most common complications following tooth reduction. The impact of preparation can be reduced by using copious water spray to dissipate the heat, but even then some pulps die as a result of the effects of excess heat on vital tissues. This most commonly occurs in teeth which are already compromised. Elective root treatment results in even more tooth tissue reduction and tends to limit the longevity of the tooth. A balance needs to be achieved between methods used to maintain pulpal vitality and the implications of having to root treat a tooth soon after crowning.
For most teeth, the amount of tooth tissue that needs to be removed should be sufficient to provide adequate space for the restoration whilst leaving as much tooth tissue as possible to support the restoration and avoid damaging the pulp-dentine complex. Cutting should be intermittent and undertaken with copious water spray.
Burs
The shape of burs can help to achieve the appropriate shape and limit the amount of tooth reduction. Long thin tapered diamonds are ideal for proximal reduction. The taper is designed to create the optimum shape for retention and resistance form. Thicker burs are useful for occlusal, buccal and aspects of lingual reduction. For the reduction of the palatal surfaces of upper incisor teeth a rugby (oval) ball shaped bur creates the optimum shape to the tooth preparation (Fig 5-2).

Fig 5-2 The bur shown in A is designed for preparation of the palatal surfaces of upper anterior teeth and the occlusal surfaces of molars. Bur B is useful for the margins of gold restorations. It has a fine taper for the proximal reduction of teeth. The end of the bur shown in C is too curved for a shoulder preparation for metal-ceramic crowns. A bur like D with a flat end would be more appropriate.
Requirements
-
Open proximal contact areas
The reason for open proximal contact areas (Fig 5-3) is found in the laboratory production of a crown. One of the first stages in making a crown is to section the model by sawing between prepared and adjacent teeth. It allows the technician access to trim the die. Failure to remove proximal contacts would leave the technician needing to saw through part of the preparation in an attempt to separate the model. This would result in an inaccurate die and consequently an ill-fitting crown. -
Space for the restoration
Different types of restoration need differing amounts of space. A metal-ceramic crown needs sufficient tooth reduction to make space for the metal and porcelain. All-ceramic crowns need even more space, in particular, occlusally because the porcelain is weak in thin section. Gold crowns need the least amount of tooth reduction because of their strength. -
Rounded angles
When the preparation is complete the clinician should remove sharp angles, otherwise, when the impression is cast, the sharp angles can be easily abraded or chipped in the laboratory production. If a crown is made to a damaged die it may not fully seat on the tooth (Fig 5-4). -
Retention and resistance form
For most conventional crowns, the shape of the preparation will determine the retention of the crown (Fig 5-5a,b). There are some minor differences in tooth preparation between the various types of crown and inlay preparations.
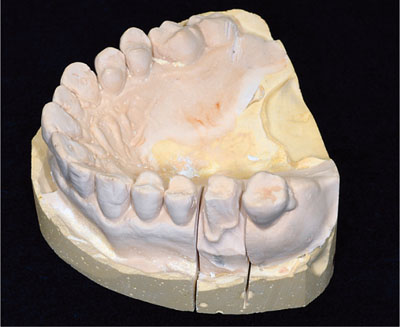
Fig 5-3 Sectioning the model. The contact areas between the teeth should be cleared otherwise sectioning cuts will pass through the preparation.
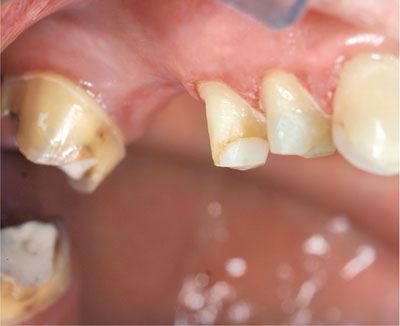
Fig 5-4 Leaving sharp line angles can lead to problems with the seating of crowns. The working model will have sharp edges which may wear. If this occurs, the crown may not seat accurately, leaving a gap at the gingival margin.
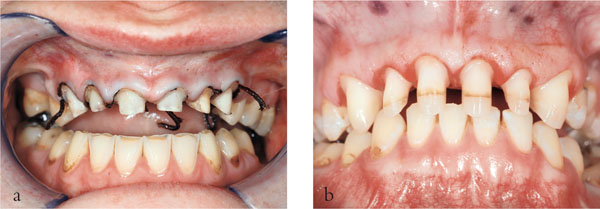
Fig 5-5 (a,b) The preparations in (a) have short clinical crowns which lack retention and resistant form. This is in contrast to the preparations seen in (b).
Extracoronal Restorations
There are two main methods of preparing the tooth – freehand which often results in overpreparation, or using depth slots and grooves to ensure optimum tooth reduction. Depth grooves may appear to some to be unnecessary, but are especially useful in avoiding overpreparation. They should follow the original contour of the tooth so that the crown becomes a veneer of uniform thickness. This element of the preparation is readily achieved using a long parallel sided bur (Fig 5-1).
Stages in Crown Preparation
Occlusal/Incisal Reduction
Assess the position, shape and orientation of the unprepared tooth. This might be best achieved with the aid of a preoperative study cast. An overerupted or inclined opposing tooth may require adjustment to correct the occlusal plane. Following occlusal modification, the tooth being crowned may require limited occlusal reduction as sufficient interocclusal space may have been achieved with the adjustment of the opposing tooth (Fig 5-6). In most cases, 1.5 mm clearance is needed, unless a metal occlusal surface is planned.
Fig 5-6 Occlusal reduction is not needed for the upper left peg lateral incisor as there is already sufficient interocclusal space.
Buccal/Lingual Reduction
It is largely personal preference as to whether the proximal or buccal/lingual reduction is done first (Fig 5-7). The buccal surface of a tooth ha/>
Stay updated, free dental videos. Join our Telegram channel
VIDEdental - Online dental courses


