Chapter 5
Prosthodontic Procedures
Aim
The aim of this chapter is to discuss outline the prosthodontic procedures involved in implant therapy.
Outcome
After reading this chapter the reader should be familiar with the prosthodontic procedures and techniques to be adopted following successful completion of implant surgery.
Introduction
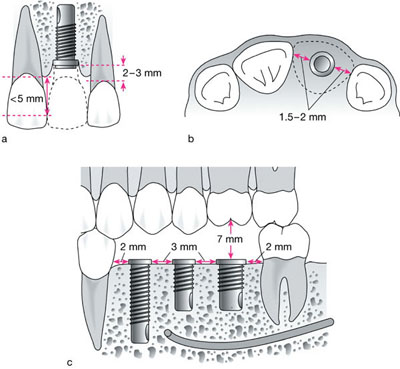
In many ways prosthodontic procedures on dental implants are much simpler than those for conventional crown and bridgework. The ease of restoration depends on the position of the implant. Ideal implant placement is sometimes difficult to achieve, and a functional or aesthetic compromise usually ensues (Fig 5-1). However, the vast majority of implant treatments provide satisfactory functional and aesthetic results. If we are critical of the outcome of implant treatments, the main criticism would relate to the preservation and management of soft tissues, namely the interdental papillae. More often than not when multiple implants are placed there is some reduction of the papillae, referred to as “blunting”.

Fig 5-1 (a) Labial and (b) occlusal view of the ideal positioning of a implant for the replacement of an upper central incisor tooth (c) Ideal placement of multiple posterior implants.
If a machined abutment system is employed, it is relatively easy to achieve an accurate fit of the crown or superstructure. This is in contrast to crown preparation, impression-taking and fitting of conventional crown and bridgework, where it can be difficult to achieve a good fit, in particular if the margins are subgingival. Nevertheless, the prosthodontic procedures involved are broadly similar for the two types of restoration. This chapter will outline the prosthodontic procedures involved following successful completion of implant surgery and the patient presenting with healing abutments in place.
Restoration of the Single Tooth Implant
When aesthetics are important, notably in the anterior part of the mouth, the healing abutment should be left in place for approximately five to six weeks following second- stage surgery. This allows the gingival tissues to take up a stable position. When providing posterior restorations, the healing time is not so critical. Some recession of the gingival margin may, however, be anticipated when prosthodontic procedures are started within three to four weeks. The prosthodontic procedures, if machined abutments are used, are as follows:
-
removal of healing abutments and placement of machined abutment
-
radiographic confirmation of abutment placement
-
tightening of the abutment screw with a torque wrench
-
impression procedures using an impression coping
-
jaw registration
-
shade-taking
-
temporisation
-
try-in and cementation or screw retention.
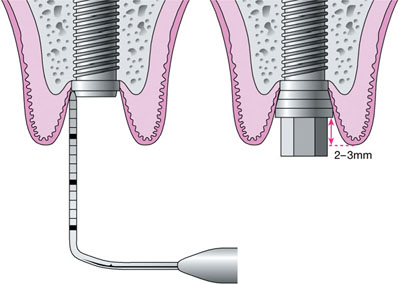
For anterior teeth, the implant should be aligned in such a way that the long axis is in line with the incisal edges of the adjacent teeth. For posterior crowns, the long axis of the implant should be aligned so that the screw access comes through the central fossa of the premolar or molar tooth. Single-tooth machined abutments are usually provided with a variation in collar height. To optimise the emergence profile of the crown the collar should be 2–3mm below the gingival margin (Fig 5-2). A measuring gauge or a graduated periodontal probe is useful in measuring height from the fixture head to the gingival margin. A surgical stent is also useful at this stage, as an assessment can be made of the screw-access channel relative to the labial face of the tooth. If there is poor positioning of the implant, the use of a customised abutment may be appropriate, as described below.

Fig 5-2 Gingival measurement before abutment selection.
Torque Wrench
Following radiographic confirmation of correct seating of the abutment to the implant, a machine or hand torque wrench is used to achieve the required preload on the abutment screw. This prevents loosening in function. It is important to follow the manufacturer’s protocol and guidelines for each abutment system.
Impression Procedure
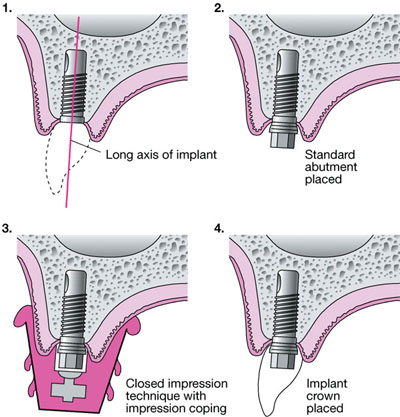
With a machined abutment it is necessary to use a preformed plastic or metal impression coping (Fig 5-3). In many circumstances this impression coping can be enclosed within a stock impression tray. If there is insufficient space the tray should be modified to provide a window access for the impression coping. A polyvinyl siloxane or polyether impression material may be used. Following complete setting of the impression material the tray is removed from the mouth. The impression coping is incorporated within the impression. Careful inspection of the impression will confirm stability of the impression coping and accurate recording of the relevant hard and soft tissues. The impression should be washed and disinfected before being dispatched to the dental laboratory.

Fig 5-3 Procedures in the prosthodontic phase of implant therapy involving the use of a standard machined abutment.
Occlusal Registration
A face-bow transfer is required to mount the maxillary cast in a semi-adjustable articulator. If a sufficient number of occluding teeth are present, the casts may be mounted in the intercuspal position without the aid of a wax jaw registration. If the intercuspal position is not precise, or there are multiple missing teeth, then the use of an occlusal rim or jaw registration with acrylic bonnets will help facilitate the mounting of the casts.
Shade Taking
Shade taking and the completion of the laboratory prescription follow normal practice. Prescriptions should specify whether a metal framework or a ceramic coping is required. Despite improvements in porcelain technology, porcelain fused to a metal crown is still more durable than an all-ceramic crown. Where aesthetics are of particular importance in the anterior part of the mouth, an all-ceramic crown may be indicated. However, where occlusal loads may be high, in particular, in posterior locations or on guidance teeth, it may be more prudent to provide a porcelain fused-to-metal crown (Fig 5-4).

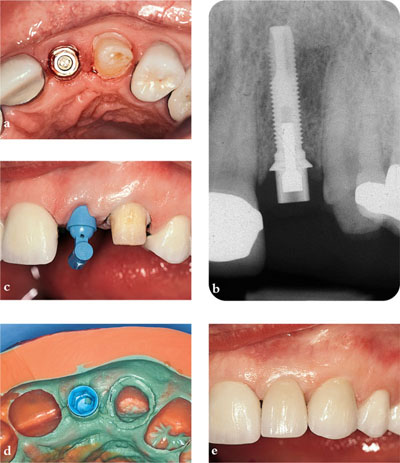
Fig 5-4 (a) Single-tooth abutment to replace an upper lateral incisor tooth. The canine has been an abutment for a temporary cantilever bridge (b) Radiographic confirmation of abutment placement (c) Impression coping in place (d) Impression showing pick-up of impression coping and margins of canine (e) Implant and conventional crown in place.
Temporisation
Temporisation at the end of the impression procedures usually takes the form of a protective silicone cap. If temporary tooth replacement has been provided in the form of a partial denture or a resin-bonded bridge, these restorations will need to be adjusted to fit the new abutment surface. Alternatively, a temporary crown or bridge may be made at this stage, using techniques similar to those used in conventional bridgework. Frequently, a preformed temporary cylinder is used to help in the construction of the temporary restoration. The great benefit of using temporary crowns or bridges is that appearance and function can be assess/>
Stay updated, free dental videos. Join our Telegram channel

VIDEdental - Online dental courses


