Chapter 29
APPROACHES TO TREATMENT
OPTION ONE REFER
If the dentist feels incapable of managing the patient’s problems, specialist referral is in the interest of:
- The patient
- The dentist
- The other patients in the practice
- The dentist’s family (by reducing stress in the dentist)
OPTION TWO MAINTENANCE
The Primary Indications for Adopting Maintenance Therapy
- Adverse medical condition.
- Financial considerations.
- As an interim/emergency form of treatment.
- Dentist’s inability to provide more complex restorative care.
- As a preliminary assessment stage, prior to deciding upon more appropriate long-term therapy.
- When the patient not wish to be re-restored.
Medical condition
Patients with severe debilitating conditions, such as advanced multiple sclerosis, Parkinson’s disease, heart failure, unstable diabetes, or malignancy requiring debilitating therapy or terminal in nature are not suited to extensive re-reconstruction and are often best treated by maintenance therapy.
Financial
Unfortunately, the patient has frequently paid a great deal of money for the existing extensive restorative dentistry and is unable to afford re-reconstruction.
Interim/Emergency
As an initial stage of re-reconstruction, some maintenance therapy is required to alleviate acute problems resulting from failure.
Dentist’s Ability
In many instances, practitioners or their backup team do not have the ability to embark upon more extensive re-restoration. Restricting treatment to maintenance therapy can, however, prove hazardous. This approach should only be adopted if both dentist and patient are totally realistic about possible future failure and the need for emergency treatment. Frequently, it would be far better to refer, but if this is not feasible, then in the prensence of extensive failure, adoption of the more definitive overdenture approach should be considered.
As a Preliminary Assessment Stage
It is not often possible to decide upon a long-term plan of treatment until:
- The patient’s response to initial therapy has been assessed.
- A relationship has developed between the dentist and patient.
- Masticatory muscle relaxation has been obtained.
Maintenance therapy may be instituted until the above are achieved.
Remember – maintenance is not always possible. Be realistic, do not promise something that you cannot achieve.
The dentist must be realistic about the implications of increasing the number of patients in the practice for whom emergencies may occur.
Patient Does Not Wish to be Re-Restored
In such circumstances the limitations of maintenance therapy must be explained clearly to the patient.
Useful Equipment Includes:
Whaledent RX 911 System
For joining two sections of cast resorations, for example, following fracture of an approximal joint, cementation failure or fracture of a splinted unit. The major components are as follows:
This is a gold plated stainless steel or titanium alloy pin with a threaded lead section and a wider, smooth-sided shank. When two parts of a broken cast restoration are to be joined, the inner part is threaded and the outer part prepared with a countersink, so that when the threaded section of the pin is screwed into place, the outer part is pulled towards the threaded part, thereby uniting them (Fig 29-1b).
These pins can be used by direct or indirect techniques.
Direct Technique (Fig 29-1)
A dovetail is cut into the castings on either side of the fracture and a starter indentation for the vaselined Stop Lok drill made with a half round bur at high speed. A channel is prepared to a depth of 1.5 mm to 2 mm, with a sharp free floating 0.675 mm twist drill (coloured gold). The depth of channel is measured with an Omnidepth gauge, supplied in the kit. The channels in the castings are threaded using the piloted tap. In the absence of rubber dam, ensure that floss is tied around the tap and gauze inserted lingual to the tooth, in case the tap is dropped, especially in view of the difficulty in manipulating the taps when wearing rubber gloves. The tap is advanced by not more than a half a turn at a time and withdrawn a quarter of a turn to break off chips of debris. The process is slowly continued until the channel is threaded. Great care is required when using the easily fractured tap, as it is impossible to remove a fractured tap from the casting. A lubricated (Vaseline) nickel silver Stop Lok technique pin is taken and shortened so that at least 0.5 mm of the wider diameter section of the pin will be embedded in the inlay pattern constructed in the dovetail. The Stop Lok technique pin is placed in the channel and an inlay pattern built with DuraLay resin. The pin is removed and the occlusion refined on the DuraLay pattern, which is then removed.
The Stop Lok technique pins are replaced and sealed in the DuraLay pattern and sent to the laboratory for casting (see Appendix).
The dovetail casting is placed in the dovetail and, using the Omni-depth gauge, the depth of the channel measured from the base of the shoulder within the dovetail casting to the far end of the channel. The Stop Lok pin is then held in mosquito forceps with the Omni-depth gauge alongside and the threaded section of the pin shortened to make it slightly shorter than the pin channel. The shortened pin is then inserted through the dovetail casting and gently screwed to place to ensure that the casting will be held firmly, following completion of the repair. The screw is then removed and the dovetail casting cemented into place, the Stop Lok pins are screwed into place with a handwrench whilst the cement is soft. After hardening, the projecting end of the pin is held with a pair of mosquito forceps and cut off with an inverted cone diamond bur and the stump polished.
Indirect Technique
The dovetail and channel are prepared as before. The channel is then refined by one pass of a 0.7 mm twist drill (green) and an elastic impression made with impression pins in the channels. The pins are withdrawn in the impression, which is sent to the laboratory (see Appendix).
The procedure followed after the casting is returned from the laboratory has been described previously. It is advisable to tap the channel before sending the impression to the laboratory rather than after the casting is made, in case the tap fractures.
Thru Lok Pin
This is a titanium alloy or gold plated stainless steel pin (Fig 29-1a) with a serrated lead section followed by a wider diameter threaded section. It is used to prevent dislocation of restorations by threading the outer section of two units and drilling a horizontal channel through the inner section. The pin is screwed and cemented into place (Fig 29-1c). These pins are less convenient to use by the indirect technique than Stop Loks, since the impression pin must be removed from the impression before the latter is removed from the mouth – see below. They require sufficient room occluso-gingivally so that there is at least 1 mm of casting occlusal to the horizontal channel.
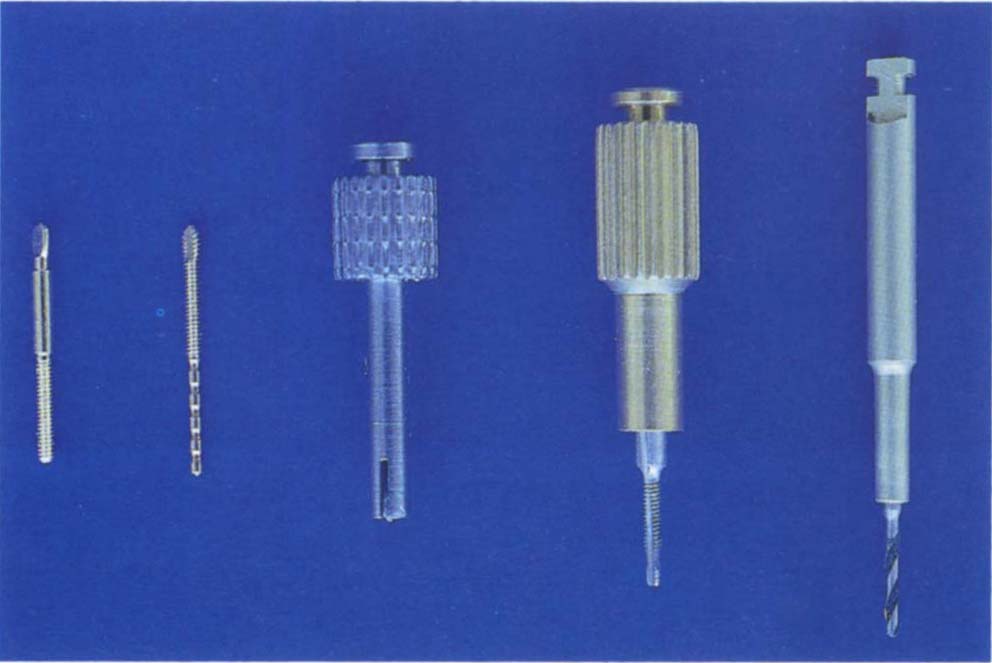
Fig. 29-1a Twist drill, tap and holder. Thru Lok pin – serrated lead, wider threaded shank. Stop Lok pin – threaded lead with wider smooth-sided shank.
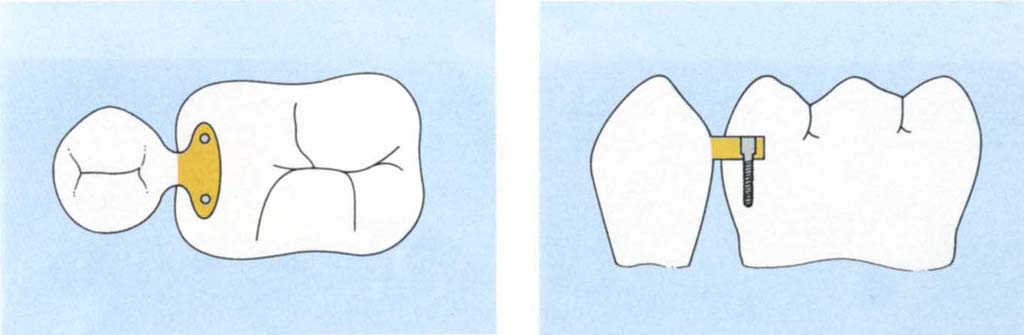
Figs 29-1b (i) and (ii) Sections showing Stop Lok pins – used to connect an outer casting – dovetail patrix from premolar – to an inner casting – dovetail matrix cut into the molar. The inner casting is threaded, the outer countersunk and the screws pull the outer casting to the inner one.
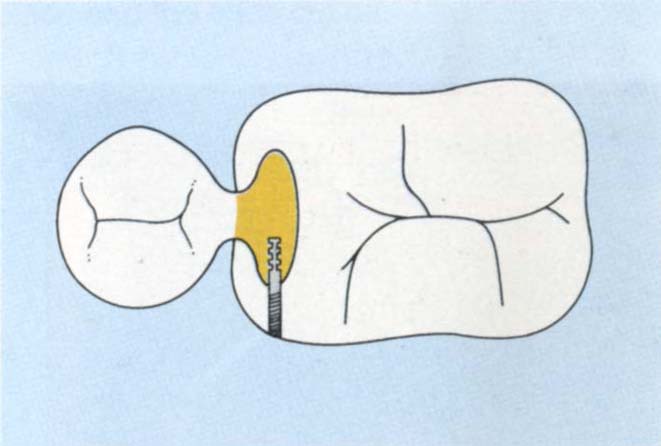
Fig. 29-1c Section showing the use of a Thru Lok pin. The outer casting is threaded and the pin prevents displacement of the castings relative to each other.
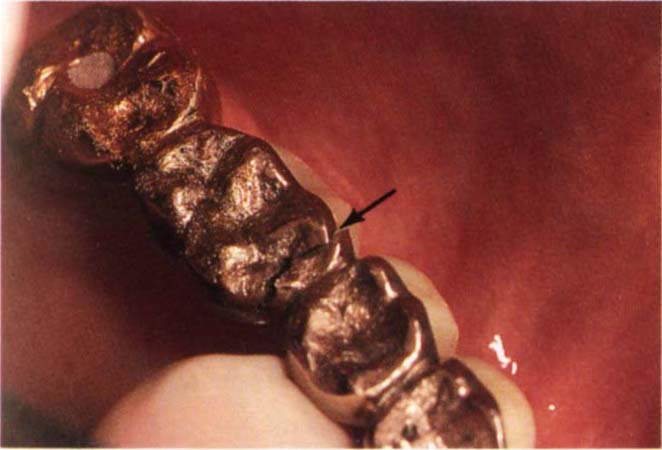
Fig. 29-1d Bridge fractured through the mesial of 16 pontic. To be repaired with Stop Lok and Thru Lok pins to give vertical and horizontal stability.
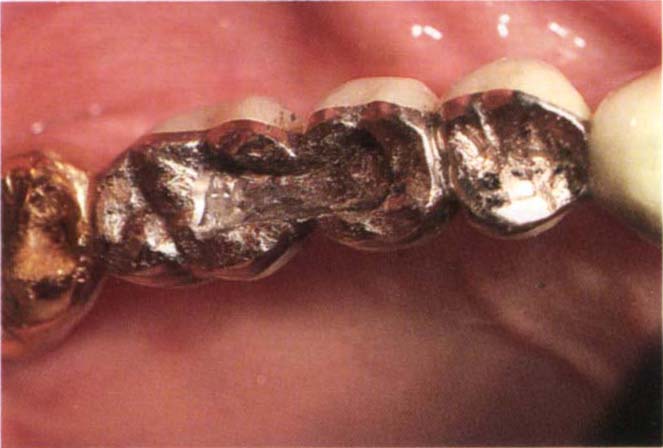
Fig. 29-1e Dovetailed recess cut to a depth of 2 mm in 16 and 15 pontics.
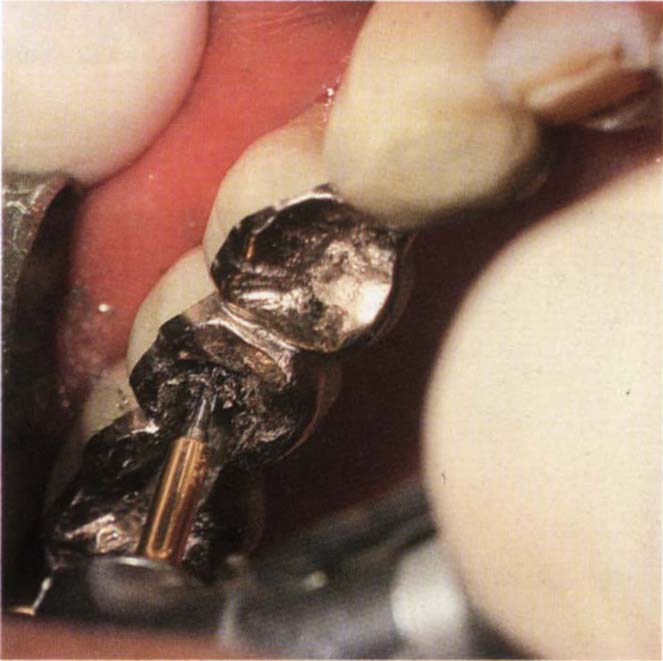
Fig. 29-1f Divergent pin holes drilled for Stop Lok pins with gold twist drill using slow speed and Vaseline on the drill.
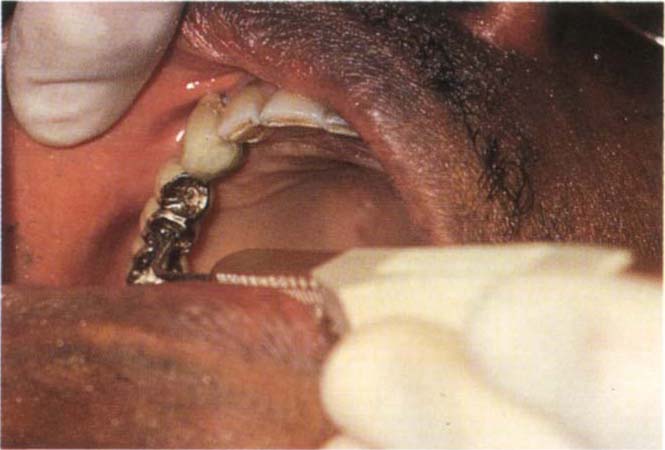
Fig. 29-1g Measuring the depth of the pin hole with an Omnidepth gauge.
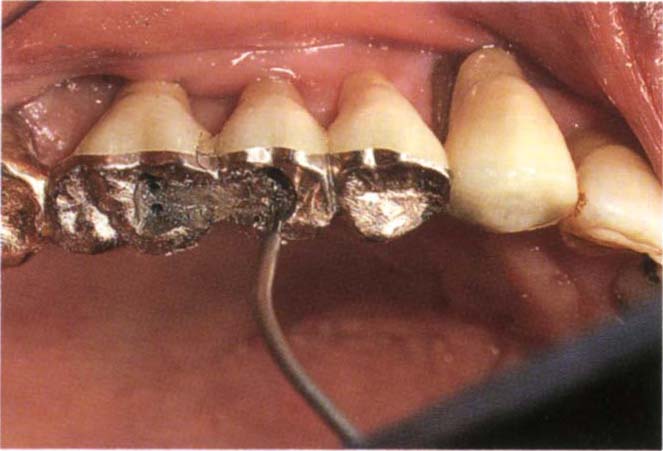
Fig. 29-1h The shoulder of the Omnidepth gauge rests on the periphery of the pin hole and the wire extends into the hole.
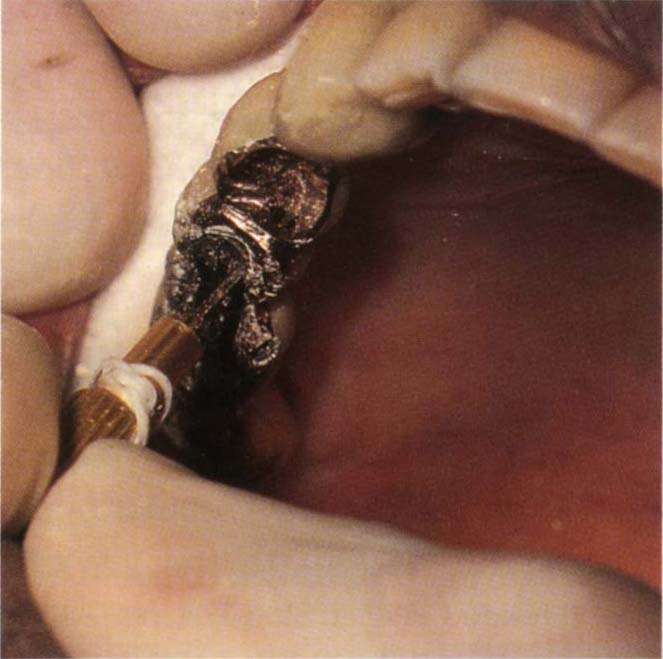
Fig. 29-1i Pin hole tapped.
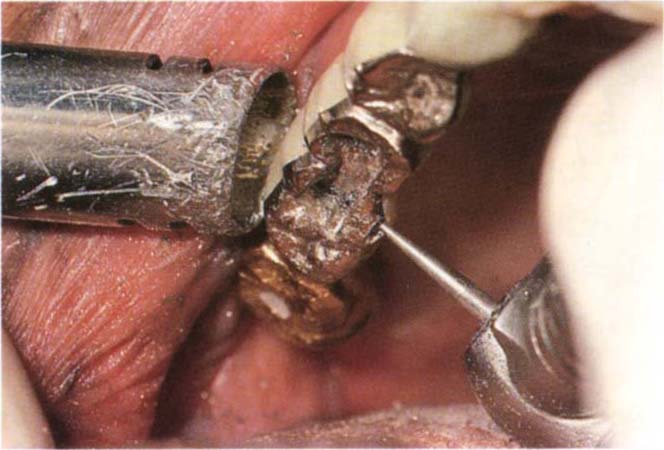
Fig. 29-1j Horizontal pin hole started with a half round bur.
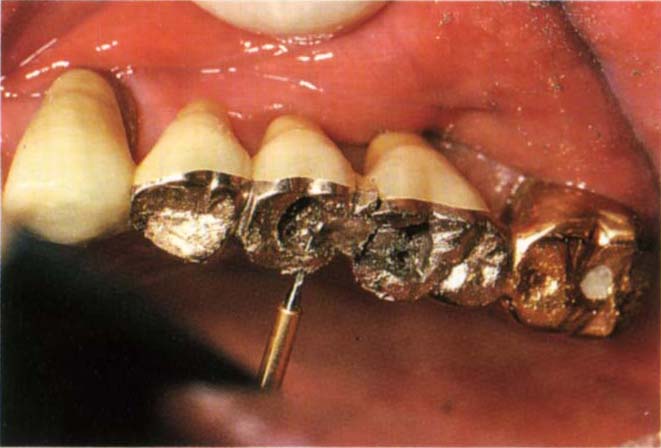
Fig. 29-1k Horizontal pin hole drilled for Thru Lok pin.
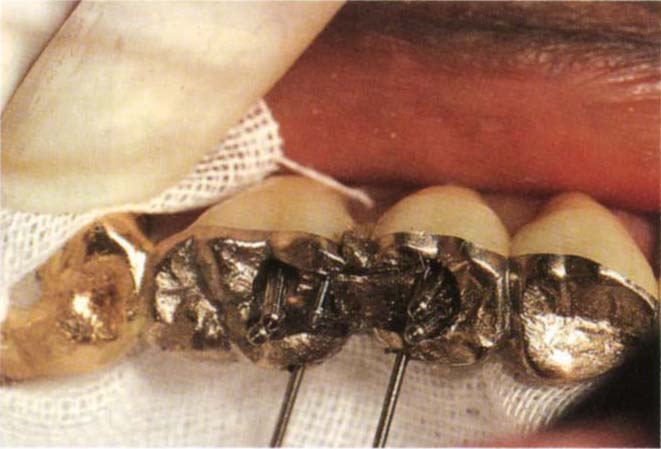
Fig. 29-1l Lightly Vaseline the dovetail. Thru Lok nickel silver technique pin in place in the horizontal pin hole. Stop Lok technique pin in place in the vertical pin hole. Ensure that at least 0.5 mm of the wider head of the pin is embedded in the DuraLay and creates a countersunk shoulder in the pattern.
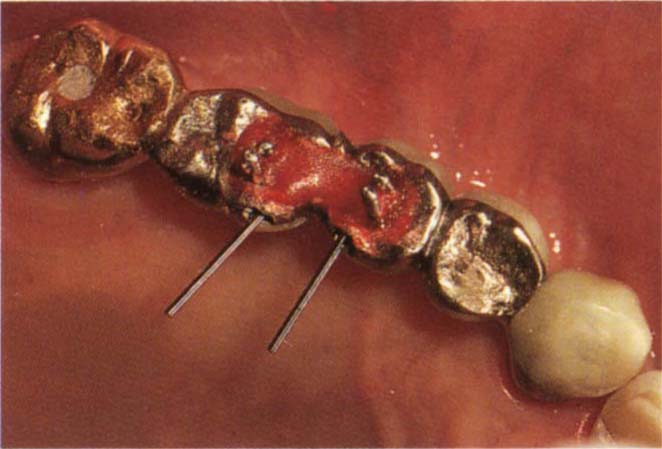
Fig. 29-1m DuraLay pattern.

Fig. 29-1n Technique pins removed to leave pattern. Occlusion adjusted on the pattern. The pattern is forwarded to the laboratory – see Appendix.
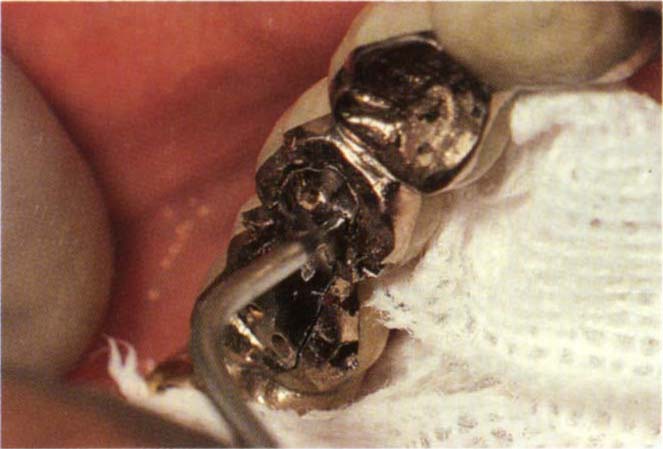
Fig. 29-1o Casting tried-in and depth of pin holes from base of countersink measured with the Omnidepth gauge.
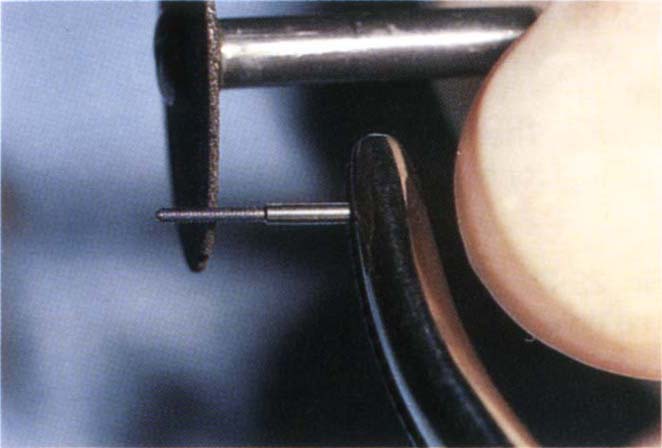
Fig. 29-1p Stop Lok pin cut to slightly than the measured depth.
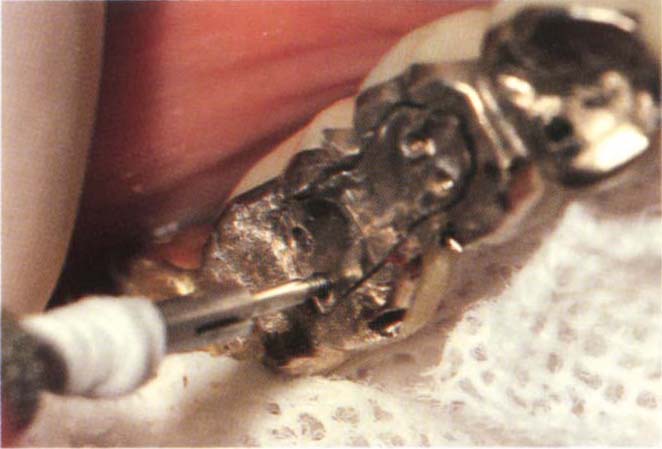
Fig. 29-1q Casting cemented to place and Stop Lok pins secured.
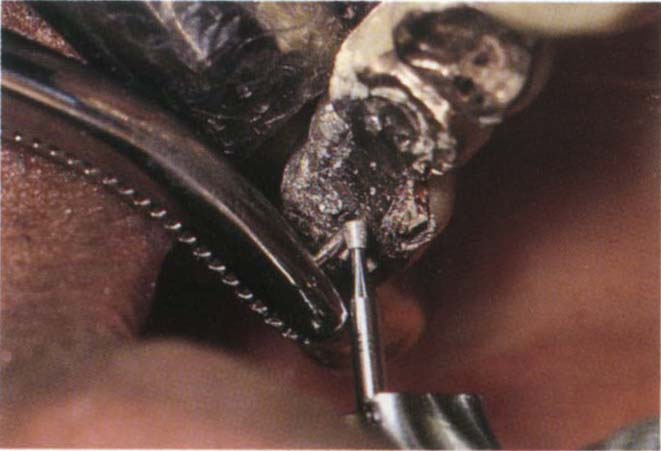
Fig. 29-1r Pin held in mosquito forceps and excess cut off with a diamond inverted cone bur. The horizontal pin holes are refined with one pass of the green twist drill and then tapped. Only the outer portion requires taping. The Thru Lok pins are then screwed to place and the ends cut off.
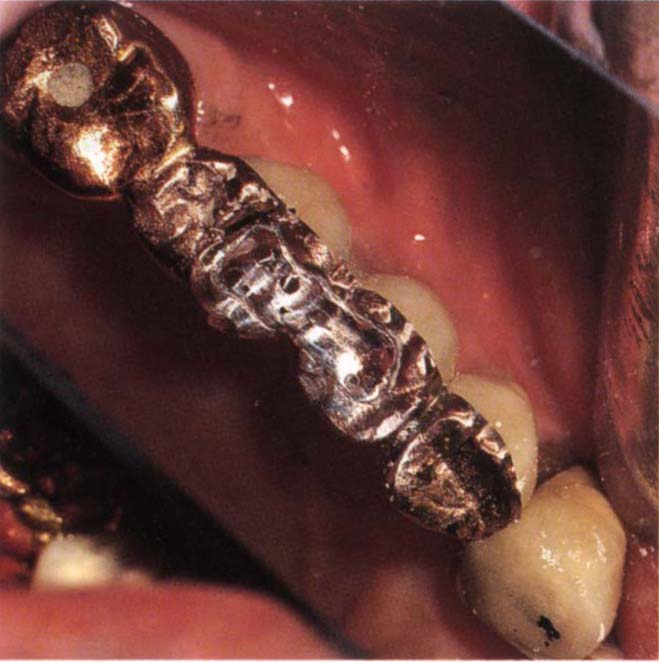
Fig. 29-1s Finished repair.
Direct Technique
A dovetail preparation is cut in the inner aspect of the casting and a horizontal starter hole is made in the outer aspect with a No. ½ round bur at high speed, preparatory to preparing the pin channel with a lubricated free floating, 0.675 mm twist drill (gold coloured). The channel is threaded for at least 1.5 mm with the tap. A lubricated, (Vaseline) nickel silver Thru Lok technique pin is placed in the cross pin channel to extend well into the dovetail. The pattern is then built in DuraLay, and the occlusion adjusted. The Thru Lok technique pin is removed, as is the inlay pattern. The technique pin is replaced in the pattern and is forwarded to the laboratory for casting (see Appendix). The casting is then tried into the dovetail and the depth of channel measured with the Omnidepth gauge. The lead section of a Thru Lok pin is then shortened and checked by inserting the casting and screwing it into place. The pin is then removed, the casting cemented and the pin screwed into place with a hand wrench whilst the cement is soft. After the cement has set the excess pin is cut off, as before and polished.
Indirect Technique
The dovetail and the outer pinhole are prepared as before; the pinhole is not threaded. An elastic impression is taken in a tray which allows the impression pin to be withdrawn from the impression before the latter is removed from the mouth (Fig 29-1t). The pin is replaced in the impression prior to pouring. Following casting, the restoration is tried in place. The 0.675 mm twist drill is passed through the outer channel and into the inner casting to a depth of at least 1 mm. The outer channel is then tapped using the lubricated tap, as before. The depth of the channel is measured and the pin cut and placed, as before.
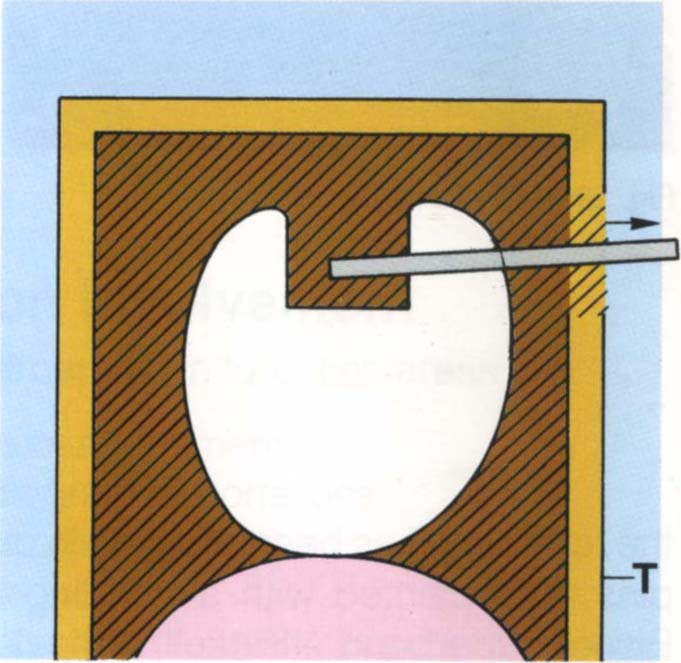
Fig 29-1t For indirect technique, an impression is made using a tray (T) which allows the pin to be removed buccally prior to removing the impression.
Indentra Repair Bar
These bars (Fig 29-2) come in three lengths – 4 mm, 5 mm and 6 mm. They are used to join two restorations and are secured with Stop Lok pins. Slightly undercut dovetails are cut in adjacent restorations and the appropriate repair bar selected (Fig 29-2). Channels are drilled through the repair bar to a depth of 1.5 mm using the 0.675 mm lubricated, free-floating twist drill. The channels are threaded with the lubricated tap. The depths of the channels are measured with the depth gauge and Stop Lok pins shortened accordingly. After the repair bar has been secured in place with Stop Lok pins, it is painted with a bonding agent (Allbond – Bisco; Superbond – Parkell; Panavia – Cavex), which is then covered with an opaque resin (or Panavia opaque) and a composite resin restoration. Sometimes, it is possible to gain additional strength by placing a buccal and/or lingual Indentra repair bar. This system is not suitable for repair of a joint between highly mobile abutments and usually fails in such cases.
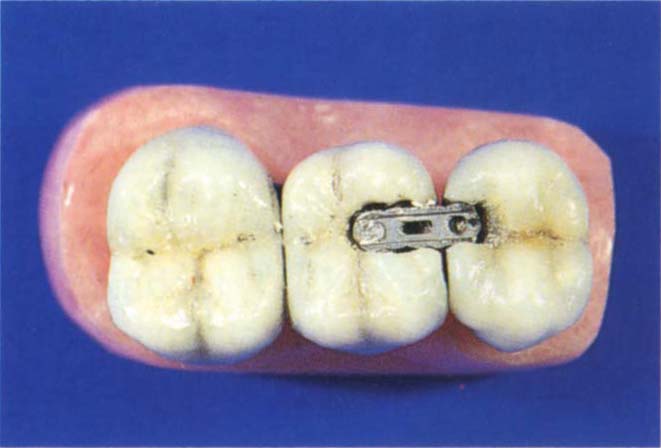
Fig. 29-2 Indentra repair bar. There are three size bars – 4 mm, 5 mm and 6 mm in length. The appropriate bar is chosen and screwed to place with Stop Lok pins placed at divergent angles into an occlusal dovetail. The bar is then covered with either 4Meta followed by an opaque and composite resin, Allbond opaque and composite resin or Panavia opaque and composite resin.
The above descriptions are similar to those described in the RX911 technical manual issued by Whaledent International. The manual also describes additional uses of the system.
Attwood Crown/Bridge and Inlay Remover (Attwood Industries)
This consists of a spanner, a twist drill and heat treated stainless steel taps (Fig 29-3).
Use:

Fig. 29-3a Atwood Crown and Bridge Remover. Spanner, drill, self-threading tapered tap. This is useful for removal of single crowns. The Higa remover (Fig 8-3) is more suitable for bridge removal.
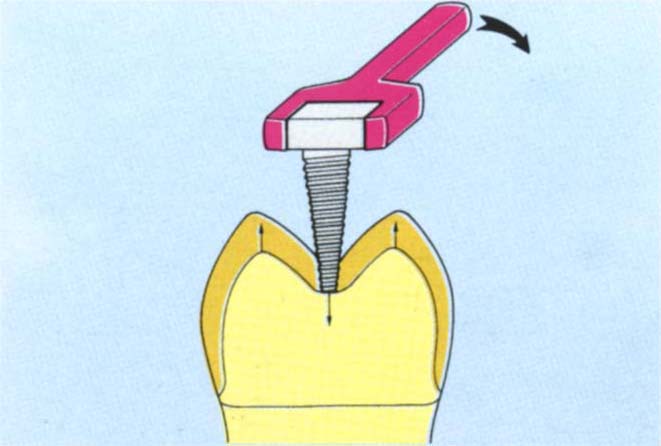
Fig. 29-3b Crown tapped, remover in place. The hole has been cut with the twist drill and then the tap seated and screwed to place with the spanner. As the tap engages the preparation, the crown is raised occlusally.
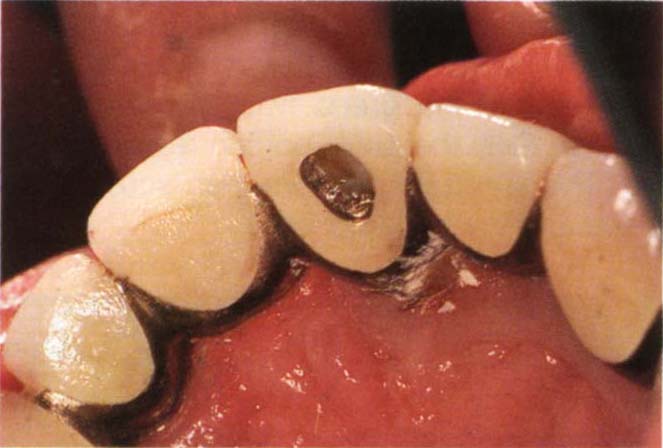
Fig. 29-3c Hole cut in the crown.
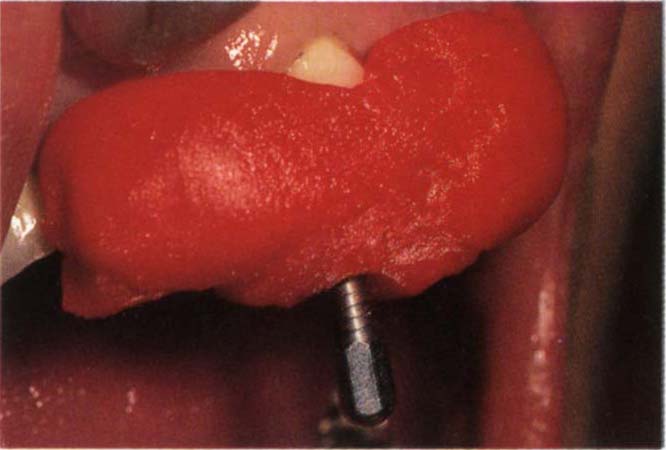
Fig. 29-3d DuraLay built around a bridge to incorporate the vaselined tap. In this situation the DuraLay is adding additional support and must be wrapped around undercuts.
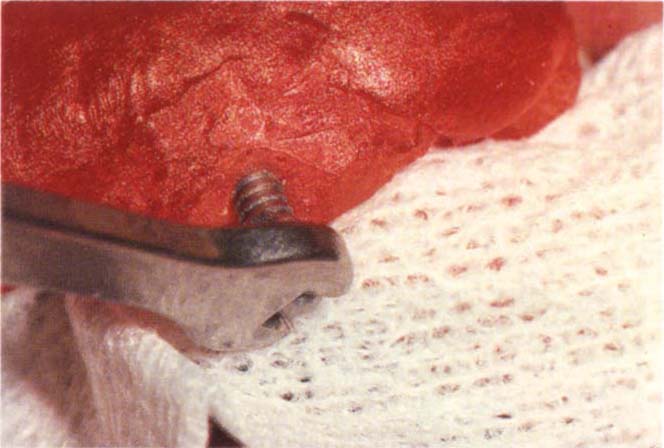
Fig. 29-3e Spanner applied – screwing the tap through the DuraLay to engage the tooth stump. Continued tightening will either uncement the crown or fracture the DuraLay.
- At least a 1.5 mm thickness of occlusal metal is required for the threads to bite into the gold. An initial channel is drilled with a No. ½ round bur in a high speed handpiece. Several pilot channels may need to be drilled in order to locate the thickest portion of metal, preferably over the centre of the crown. The channel is then widened, using the twist drill at slow speed with water coolant. The channel can extend slightly into the underlying tooth or cement. The self-tapping screw is placed in the channel and rotated by hand. The spanner is then used to advance the screw until the tooth is engaged and the crown pushed off.
Possible Complications are that:
- The thread cut by the advancing screw can strip from the crown, particularly if it is thin or soft gold.
- Porcelain can fracture.
- Restricted access may make use of the wrench difficult.
- The roof of the pulp chamber may collapse or fracture, although the manufacturers claim that there is no such possibility and I have never had this occur.
- Underlying cement may not be hard enough to resist the advancing screw and so, the crown will not be elevated.
Sometimes it is advantageous to cut undercuts in the outside of the crown and lock DuraLay around the embrasures (preferably under a joint) and into the undercuts, building it up around the hand tightened and lubricated screw (Figs 29-3c–e). This increases the length of the tapped thread and improves mechanical advantages.
This is very useful for the removal of partially uncemented bridges or splints. Its use is described on page 162.
Procedures
Maintenance therapy will be considered in relation to the causes of failure and some examples given.
Periodontitis
(i) Acute Periodontal Abscess
- Drain by incision through the soft tissues if there is a localized fluctuant lesion.
- If the collection of pus was large, insert a drain made from a T-shaped piece of sterile rubber dam. Insert the head of the T into the incision site.
- Debride the root.
- Irrigate the pocket with 0.2% chlorhexidine solution (Corsodyl – ICI).
- Prescribe antibiotics such as metronidazole 400 mg/12 hourly or amoxycillin 500 mg/8 hourly, if there is:
- Cellulitis.
- Spreading abscess.
- Fever and generalized malaise.
- Risk of bacterial endocarditis, in which case appropriate prophylactic antibiotic therapy is commenced before instrumentation. The antibiotic recommendation above is inadequate for this purpose.
- Culture organisms from aspirated pus, to ensure that the correct antibiotic is being prescribed.
- Prescribe a chlorhexidine, 0.2% mouthwash, twice daily.
- Two days later remove the drain.
- Determine the cause and treat appropriately.
(ii) Advanced Periodontitis Localized Mainly Around a Pier Abutment (Fig 20-4)
If feasible, appropriate non surgical (see page 437) and/or surgical techniques should be used to correct the lesion. Surgery should not be attempted in a plaque-infected dentition.
It has been reported that symptomless teeth, that are considered ‘hopeless’ do not affect the adjacent proximal periodontium up to eight years and four months following periodontal therapy,1 provided that they are maintained by frequent professional debridement and have an anatomy which allows the patient to carry out effective plaque control.
If periodontitis has almost exfoliated a pier abutment and the patient is experiencing symptoms, for example, periodic abscess formation, a small flap is raised and the root sectioned and removed. If possible, some root stump is left for aesthetic reasons, prior to replacing and suturing the flap. If the result is unsatisfactory aesthetically, it is sometimes possible to extend the root stump by placing autopolymerizing composite resin within the crown, followed by light polymerizing resin to rebuild the root. It is not possible to shine a light into the crown but it is easier to mould the light cured resin, hence the two resins. Access is facilitated by the collapse of the socket as a consequence of periodontitis. The use of an exclusion membrane such as Gore-Tex augmentation material should be considered to correct the bony defect.
(iii) Furcation Involvement
Indications for interception in furcation areas are:
- Progressive loss of attachment
- Progressive radiographic bone loss
- Pain and bleeding on probing
- Purulent exudate
- Extrusion of the tooth so that is is ‘high’ in occlusion
- Caries in the furcation
Remember that a pulpal lesion can give rise to furcal signs and symptoms, communicating via accessory canals.
Treatment Options are:
(Referred to in Chapter 4)
- Endodontics
- Maintenance
- Root amputation/resection
- Generation of new attachment
- Division
- Hemisection
- Extraction
The tooth should be radiographed and vitality tested and the furcation probed.
Endodontics
If the tooth is non-vital and must be retained, endodontic therapy should be instituted. The furcation lesion may be purely pulpal in origin and resolve following endodontic treatment (Figs 29-4a–b).
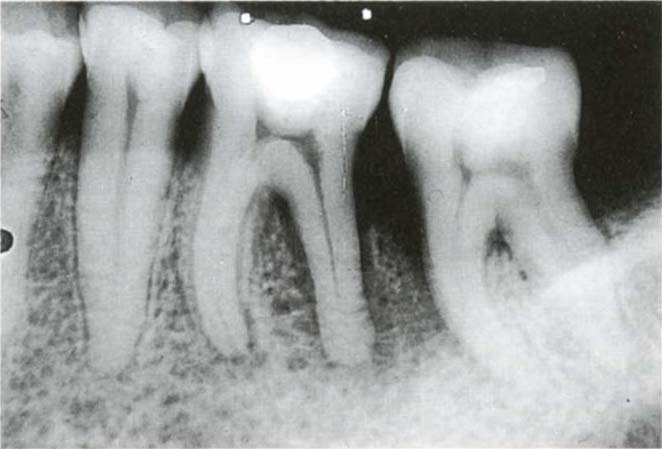
Fig. 29-4a Furcation problem of endodontic origin. The furcation on 36 could be probed horizontally to 7 mm.
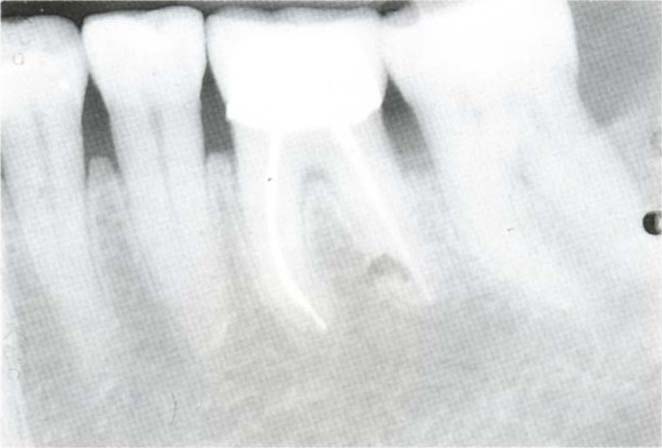
Fig. 29-4b Ten years after treatment.
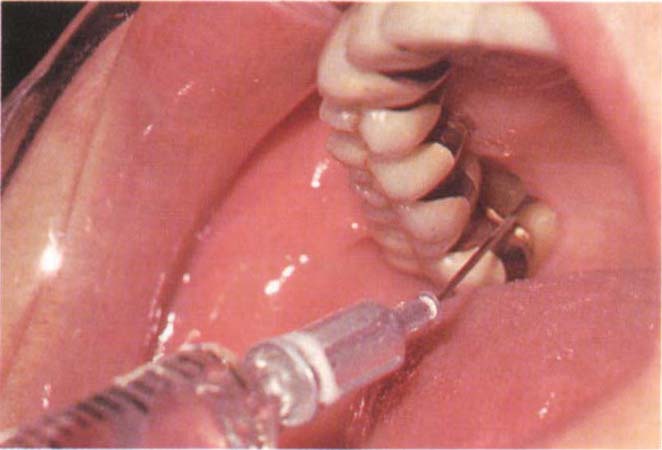
Fig. 29-4c Application of chlorhexadine gel (Corsodyl – ICI) via a wide bore blunt needle and syringe. There is floss attached to the hub of the needle (obscured by the syringe). It is often helpful to warm the Corsodyl gel in warm water to lower its viscosity.
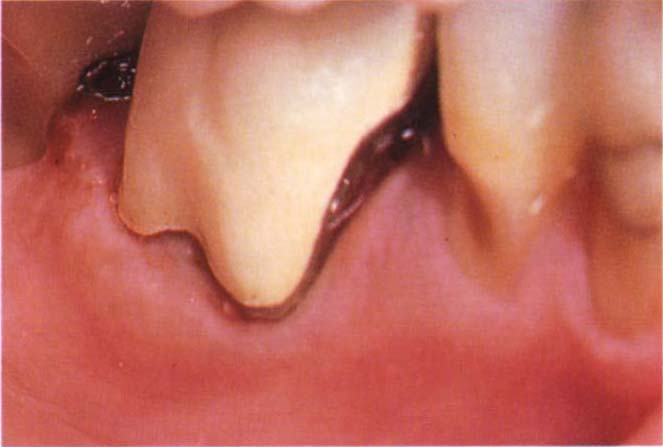
Fig. 29-4d (i) Recontouring a tooth to gain access to the furcation area. The patient was medically compromised having suffered two severe heart attacks. The crown was bulbous and filled the furcation area.
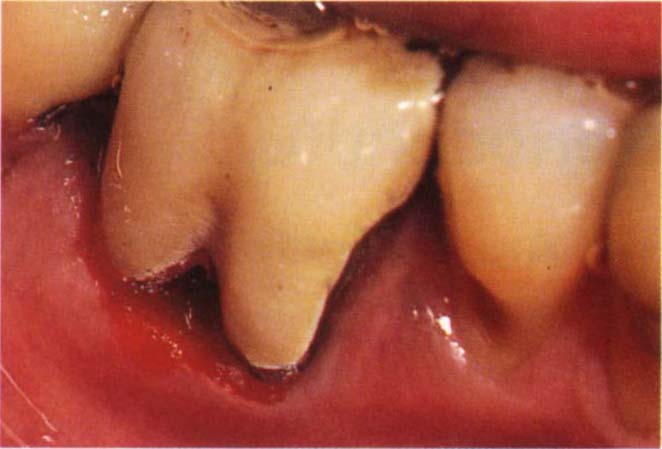
Fig. 29-4d (ii) Reshaping the crown with diamond burs followed by Shofu porcelain rubbers. Provided that recontouring ceases at the metal, the fit will not be compromised.
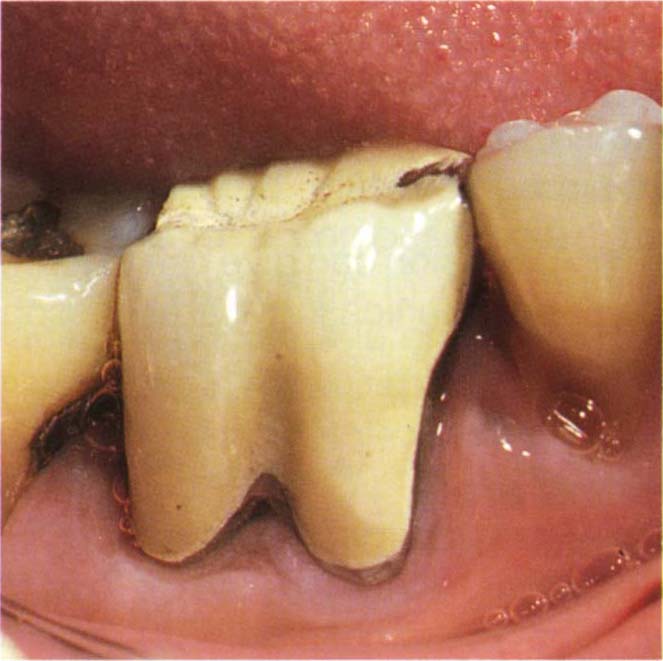
Fig. 29-4d (iii) Four years later. There is some inflammation, but the furcation lesion has not progressed.
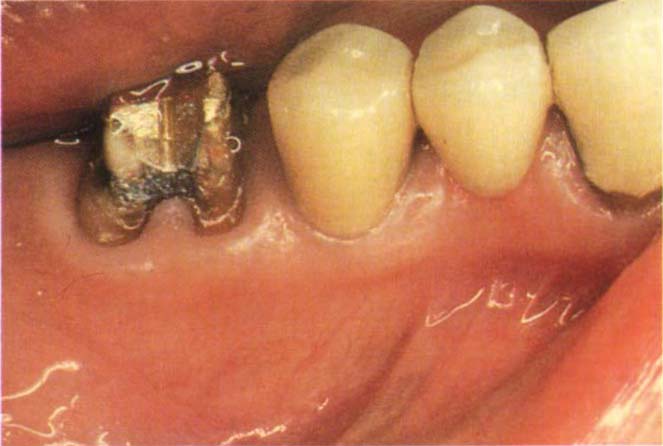
Fig. 29-4e Failure of existing crown due to cervical caries in the furcation area. Contouring a crown preparation into the deep class I furcation.
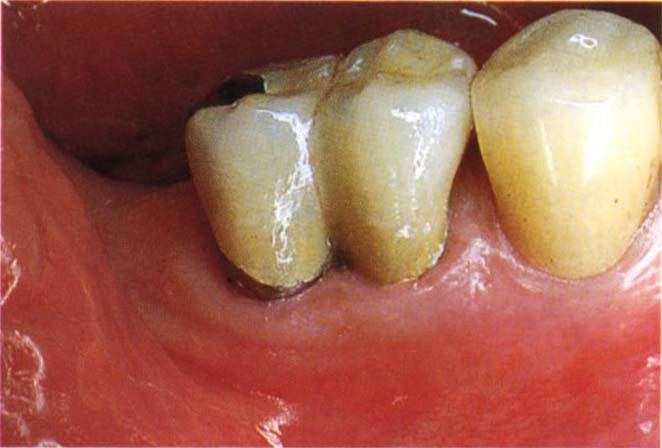
Fig. 29-4f Crown with buccal fluted contour to facilitate cleaning of the furcation area.
Maintenance
Indications for maintenance therapy are:
- A debilitated patient.
- Financial constraints.
- Unwillingness of the patient to undergo extensive replacement restorative therapy.
- When there will be a lengthy delay before more definitive treatment can be provided.
- Class I or Class III furcations.
- Multiple Class II furcations.
- Infrequent inflammatory episodes, that is, signs (subject to frequent review) that this is a non-active, non-progressive periodontal lesion.
- Well-maintained furcations.
- When failure of maintenance therapy would not jeopardize adjacent potential abutments.
Maintenance Therapy may consist of:
- Further root debridement under local anaesthesia.
- Removal of soft tissue pocketing to obtain better access for patient maintenance. Often this can be readily achieved by means of electro-section (Chapter 8), provided that there is sufficient attached gingivae to permit resection (Figs 29-12d–f). If, however, osseous recontouring is required, cold surgery must be used to elevate a flap.
- The application of chlorhexidine gel 1 % (Corsodyl – ICI) using a syringe, by the patient (Fig 29-4c). It is helpful if the syringe is warmed in hot water first to reduce the viscosity of the gel before syringing it through a large blunt needle. The latter should be tied to the syringe by floss in case it should become detached in the patient’s mouth. Although Wennstrom et al. (1987a, 1987b)2–3 and Newman (1986)4 reported that sub-gingival irrigation gives only short-term benefit, it may assist during periodic acute exacerbations of furcation problems.
- Debridement under direct vision, after elevation of a flap. As pointed out by Waerhaug, in 1980,5 in the presence of persistent bleeding and pain on probing, it is important to gain direct access to the roots to remove surface deposits.
- Recontouring of the tooth to obtain better access for maintenance (Fig 29-4d). Although Hamp et al. (1975)6 reported that this procedure was associated with a high caries risk, in a non-caries susceptible mouth that is, one in which there has been no caries within the last two years and in a patient under careful dietary control and receiving regular fluoride varnish applications (Duraphet – Woelm Pharma) it is not unreasonable. Furthermore, Hellden et al. (1989) reported very acceptable results with tunnel preparations.7
- Remaking a single crown to provide better access for patient maintenance (Figs 29-4e–f).
- The clinician must not be reticent about retreating sites under direct vision by means of flap elevation, even though they have been treated before.
- Systemic antibiotic therapy. Doxycycline, 200 mg on day one then 100 mg per day for three weeks may be useful in conjunction with root debridement.8 Subsequent abscess formation or loss of attachment may respond to a 10 day course of metronidazole, 400 mg twice daily.9 It should be noted however that by seven months after drug therapy, microbiota will be similar to those present following placebo therapy.
- Topical application of minocycline hydrochloride gel, four times at two weekly intervals, may be helpful but the results of controlled trials are required. One study49 reported that this regime reduced pocket depths more than did a placebo but there was no difference between attachment levels.
Root Amputation/Resection (Fig 29-5)
It is sometimes feasible to remove all or part of a single root, leaving the coronal stump intact. Klavan (1975)10 reported that, of 34 unsplinted maxillary molars with negligible pre-resection mobility, only three displayed increased post-resection mobility and two of these were partial denture abutments. In general, therefore, non-mobile maxillary teeth do not require post-resection splinting, on the other hand it is advisable to splint mobile maxillary teeth and most mandibular teeth, since the unsupported part of the coronal stump acts as a cantilever and tooth movement, or fracture of the remaining root may otherwise occur.
Indications for Root Amputation/Resection are:
- Advanced periodontal loss around one root.
- Untreatable caries within the furcation.
- Unmaintainable morphology, which would be improved by removal of a root.
- When the periodontitis around the affected root is jeopardizing an adjacent sound root.
- Untreatable failed root filling in one root.
The Prerequisites are:
- Separation between roots, such that resection is possible (Figs 29-5a–b). Even if resection is mechanically possible, the root proximity might be such that insufficient bone remains to ensure regeneration on the remaining root aspect.
- Access for resection.
- Aesthetic acceptability after resection. This is particularly relevant for mesio-buccal roots of maxillary first molars (Fig 29-5c).
- Restorable, if necessary, following resection.
Sequence of Treatment
(i) Endodontic Therapy Prior to Resection:
1) Endodontically treat the tooth, dressing the root to be resected with calcium hydroxide, and sealing the coronal orifice of its canal with amalgam from within the pulp chamber.
2) Elevate a flap and resect the root. This should be done as soon as possible to prevent exacerbation arising from the dressed canal. A long, tapered diamond bur is used for resection, starting in the furcation and working out (Fig 29-5d [i]).
3) Smooth and polish the cut stump.
4) Suture.
5) Pack – to push the tissues away from the stump.
6) Follow-up as usual.
7) If, after endodontic treatment, a healing phase is required prior to resection, the root to be resected should be treated and filled conventionally to reduce the possibility of an acute episode, which may cause pain and reverse any repair that has occurred.
Fig. 29-5 Root resection.
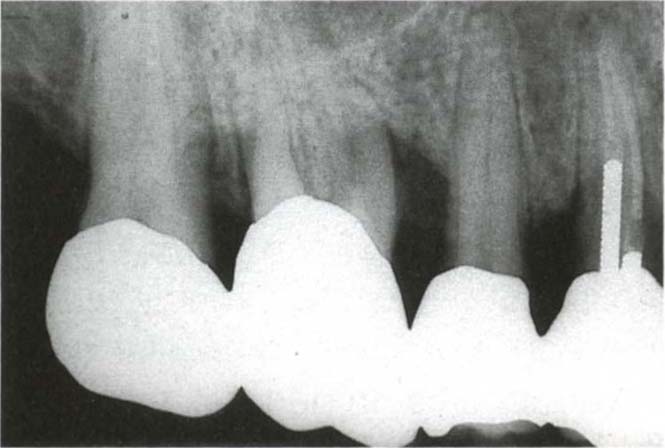
Fig. 29-5a (i) The mesial and disto-buccal roots are radiographically separated. The furcation is probe-able to 7 mm between the mesio-buccal root and the palatal root, which are separate as determined by a probe. There is a 4 mm pocket between the two buccal roots.
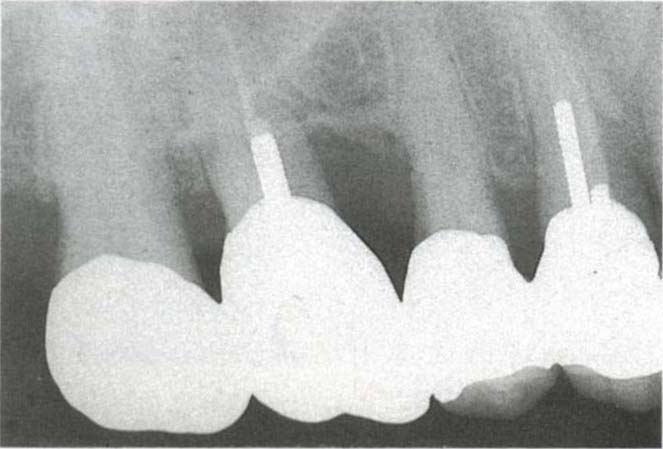
Fig. 29-5a (ii) Five years following root canal therapy, amputation of the mesio-buccal root and placement of a post. The existing splinted units were not removed.
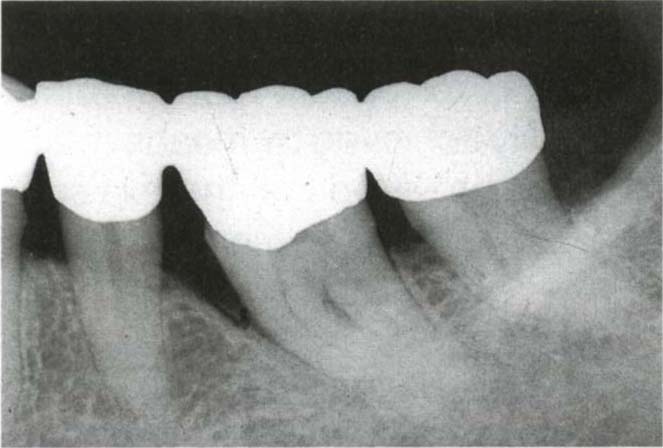
Fig. 29-5b Fused roots. There is a furcation lesion between the roots of 37 (36 missing). The fused roots will not enable resection to be performed.
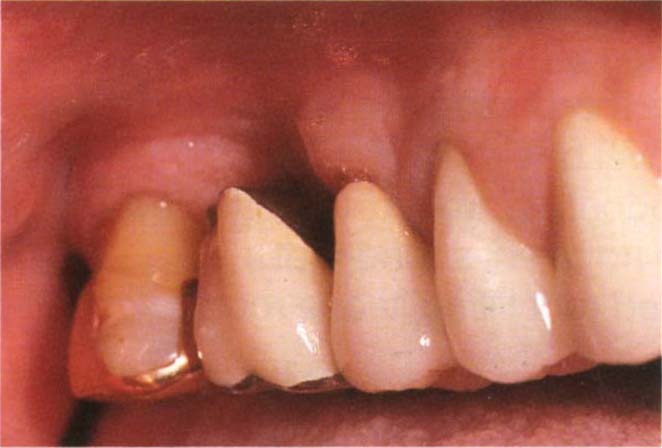
Fig. 29-5c If the patient has a high lipline, removal of the mesiobuccal root of a maxillary first molar can gave rise to an aesthetic problem following resection.
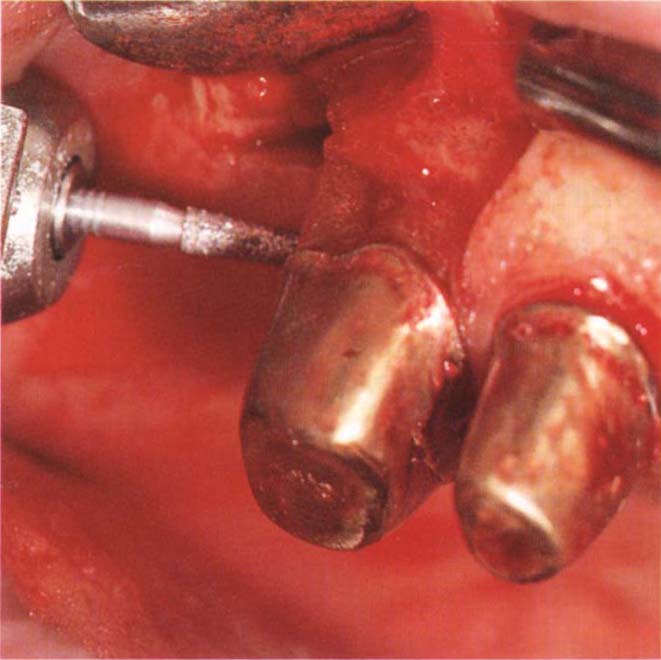
Fig. 29-5d (i) Resection is best carried out by raising a flap, and using a long tapered diamond bur. The bur is placed into the furcation, in this case between the palatal and distobuccal roots, and the cut made by working from the furcation outwards, using stroking movements.
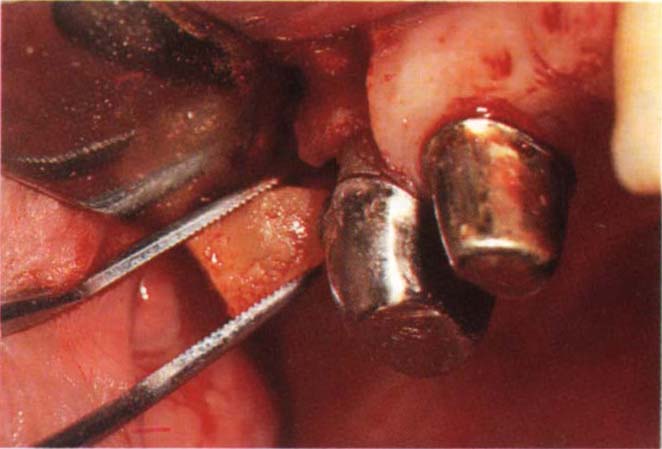
Fig. 29-5d (ii) Removing the cleanly sectioned root.
(ii) Endodontic Therapy Following Resection (Vital Amputation)
This technique was first described by Sternlicht, in 1963,11 and clinical efficacy reported by Smukler and Tagger, in 1976.12
If the prognosis following resection is uncertain and the clinician does not want to involve the patient in possibly needless endodontic therapy prior to resection, the root may be resected, and the exposed pulp then dressed with calcium hydroxide. Dry foil (Burlew Dryfoil – Jelenko) is burnished over the tooth and a pack placed. Endodontic therapy is performed two weeks afterwards. It is, however, preferable to carry out endodontics prior to resection.
Guided Tissue Regeneration – Using a Cell Exclusion Membrane – New Attachment Procedure (Fig 29-6)
The reader is referred to Chapter 20.
An inverse bevel incision flap is elevated – to remove the epithelial lining of the pocket, and the root surfaces debrided. A cell exclusion membrane (Gore-Tex) is sutured across the furcation and is tightly adapted to the suprafurcation root trunk, to retard epithelial down-growth and encourage proliferation of periodontal cells along the root surface. Lu (1992)13 reported that concavities on the root trunk may prevent complete isolation of the furcation defect and that further investigation is required to determine whether the edge of the membrane should be placed 1–2 mm subgingivally or supragingivally.
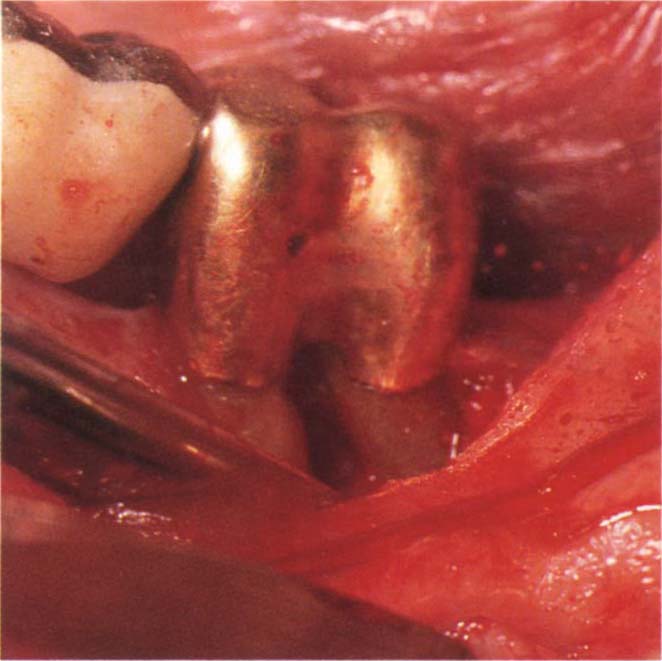
Fig. 29-6a Class II furcation with frequent abscess formation. This is not ideal for the use of an exclusion membrane because there is no root trunk between the roof of the furcation and the crown margin. The patient was not in a position to have the bridge replaced at this time, he was 72 years old and undergoing radiotherapy treatment for a bladder malignancy – this was possibly contributory to the lowered resistance and abscess formation.
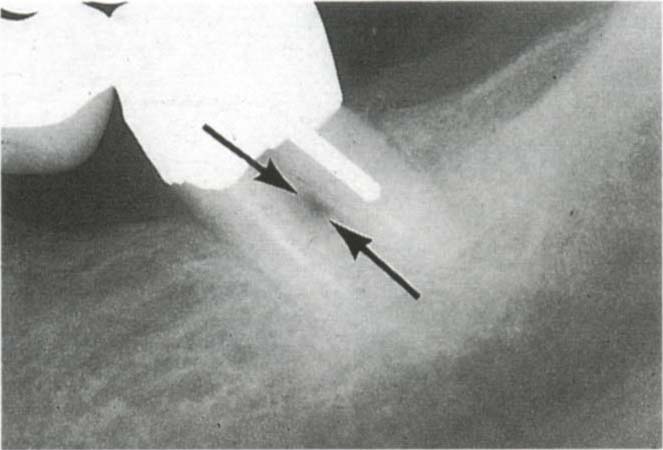
Fig. 29-6b Furcation indicated with the arrow.
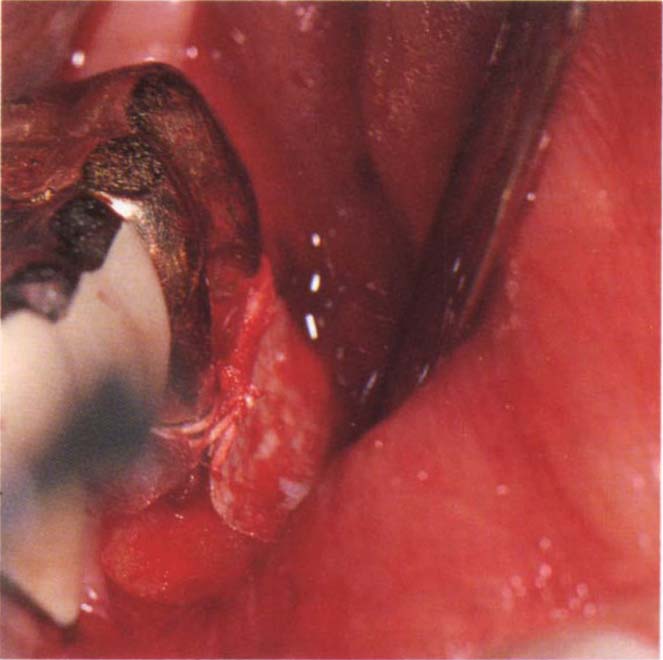
Fig. 29-6c Gore-Tex membrane placed two months after completion of radiotherapy.
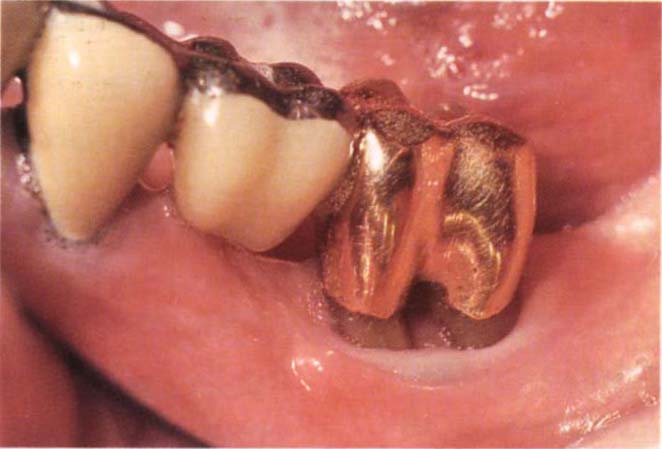
Fig. 29-6d Tissue has filled the furcation and the crevice can be probed to 2 mm. There was no recurrence of the abscess formation.
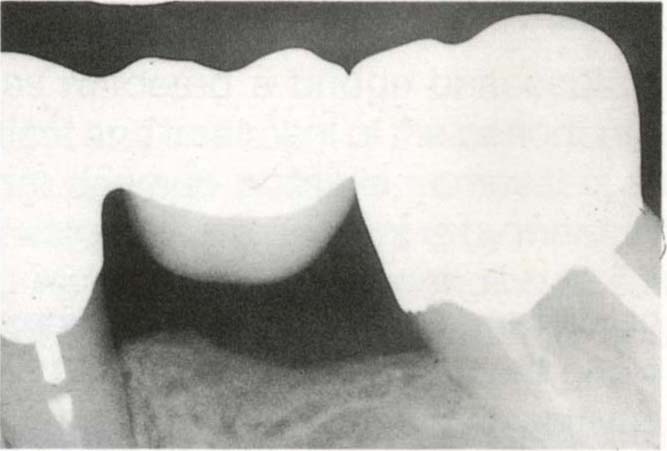
Fig. 29-6e One year later, different angulation of X-ray beam, but the furcation is closed.
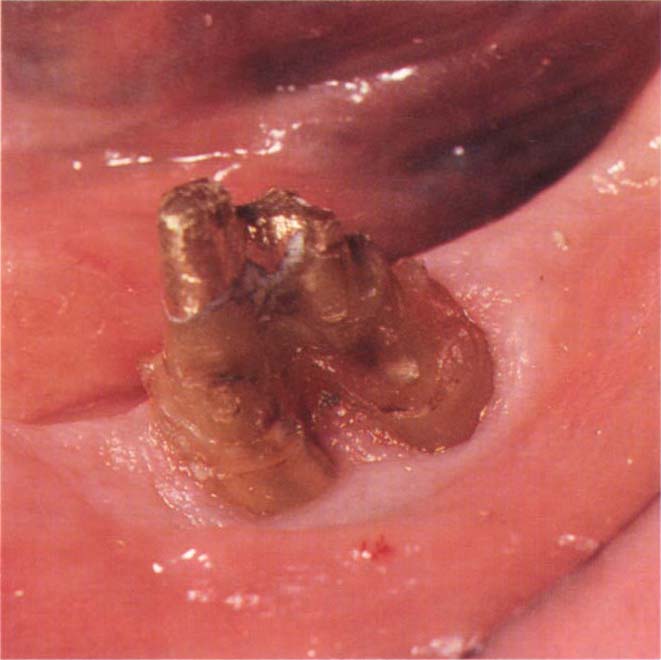
Fig. 29-6f Four years later. No recurrence of bladder malignancy. Bridge to be remade. Removal of old crown reveals pink firm tissue. The crevice could not be probed more than 1 mm.
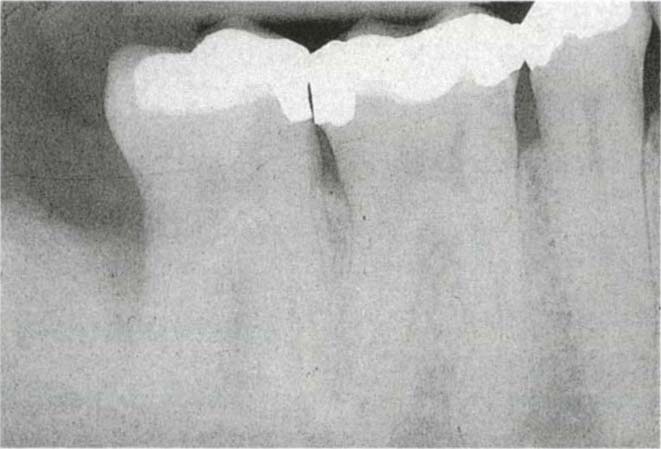
Fig. 29-6g Nine mm pocket distal to 47 which extended buccally to involve the furcation.
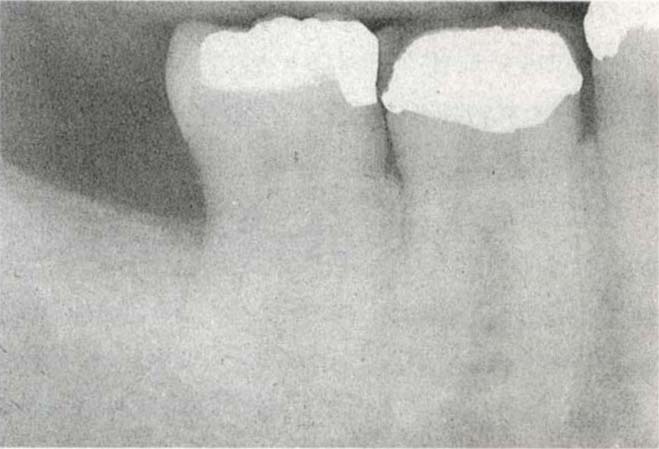
Fig. 29-6h Six months following the use of a Gore-Tex membrane. Note the bony regeneration, without the use of a bone graft.
Favourable factors are:
- Solitary Class II furcations, particularly in the mandible with horizontal rather than vertical defects.
- Adequate zone of attached gingiva (that is, minimal recession) to provide soft tissue coverage of the membrane in wound closure.
- Well maintained mouth.
- Large root trunk, with the amelo-cemental junction occurring a long way from the furcation.
- Two or three wall vertical bony defects.
- Good access.
- Patient availability, as post-operative care is essential.
- Vital or satisfactorily root treated tooth.
- That the clinician has attended recognized course.
- Careful surgical technique.
Division and Hemisection
The foregoing forms of treatment often permit retention of the existing restoration. If the tooth will be divided, however, refabrication of an existing crown will be required.
Division
- It is sometimes possible to divide a tooth, particularly a lower molar, to convert it into 2 ‘premolars’, thereby making accessible the furcation and any intrafurcal caries (Fig 29-7a–c).
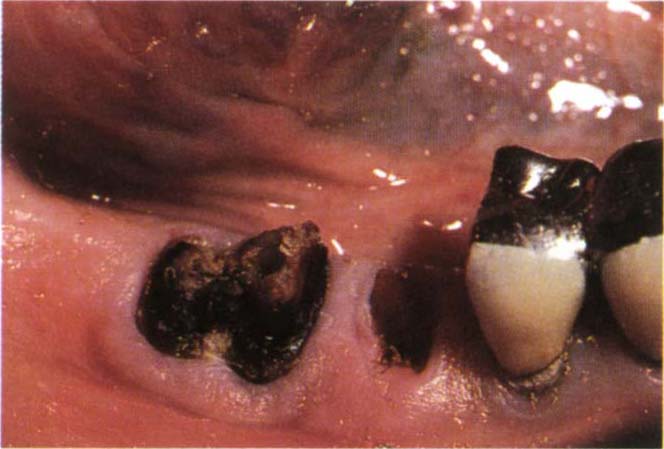
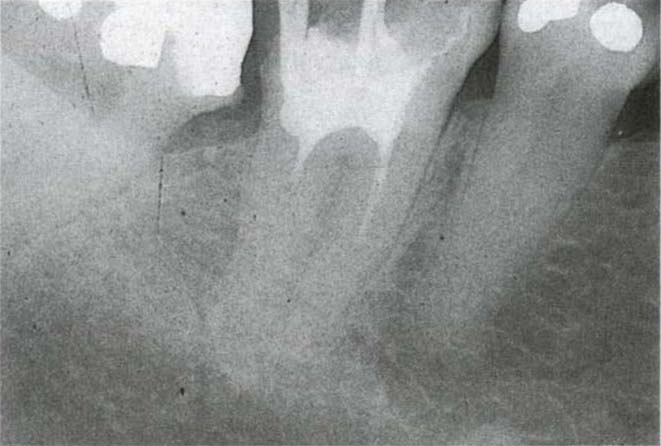
Fig. 29-7a Caries beneath splinted units. The elderly patient was not a suitable candidate for fixture placement.
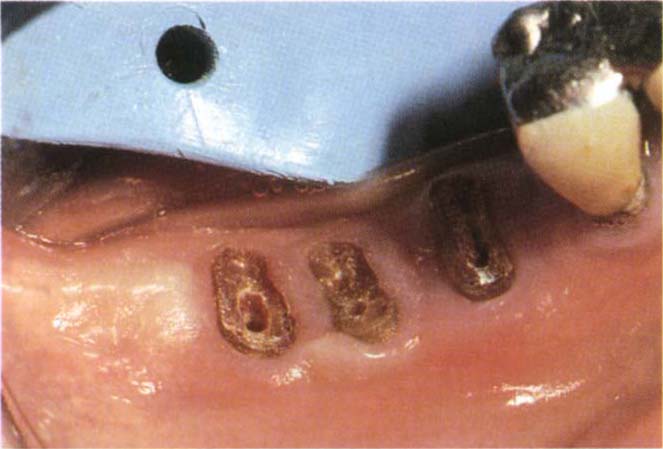
Fig. 29-7b Following caries removal, electrosurgical exposure of sound dentine, division of 46 three weeks healing, preparation of post holes, the tooth had been previously root treated.
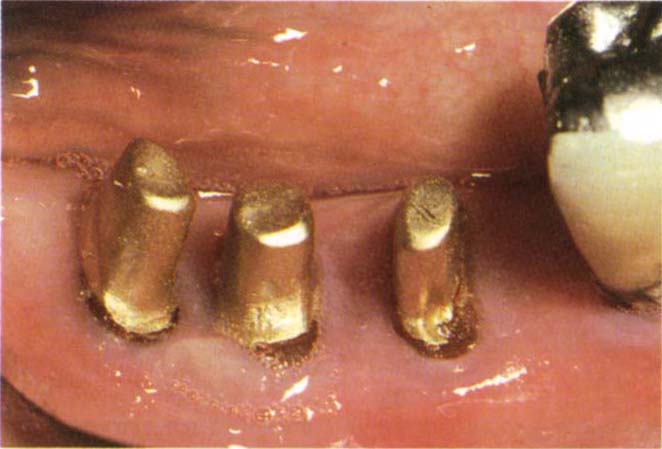
Fig. 29-7c Posts and copings in preparation for fabrication of restorations which will fit into a dovetail cut into the distal surface of the anterior crown.
Prerequisites for such therapy are: (Fig 29-7d)
- Endodontically treatable roots, or a satisfactorily root treated tooth.
- Well splayed roots with a wide mesio-distal furcation, although fusion of the apices of the roots is acceptable.
- The possible restoration of individual roots. Very curved roots would be difficult to restore since they may not be amenable to post fabrication.
- Accessible caries.
- Surgically correctable periodontal lesion.

Fig. 29-7d Tooth 36 is amenable to hemisection or division – there is a wide mesiodistal furcal orifice, the tooth is restorable and will be subsequently maintainable. Division would require re-root treating of the mesial root. Hemisection has a more favourable prognosis.
Hemisection
If root amputation/resection or tooth division are contraindicated, then one root, together with the associated part of the crown, may be removed.
Prerequisites for such therapy are:
- Endodontically treatable roots or satisfactorily root treated tooth.
- Non-fused roots.
- Well splayed roots with wide furcation so that removal of one root will not denude the remaining root of bone (Fig 29-7d, 8).
- Adequate bone (at least 2 mm) between the root and adjacent uninvolved tooth, so that the adjacent root is not jeopardised.
- Remaining root restorable. In the mandible, distal roots are generally more readily restored than mesial ones, since the former have a straighter canal and are wider in cross section. Furthermore, the distal concavity often present on a mesial root makes maintenance more difficult. However, if there is to be a bridge from a premolar to a second molar, it may be sometimes be preferable to remove the distal root of the latter, to shorten the span and thereby reduce the load on the post restored root. In most instances it is preferable to retain the distal root, rather than the mesial. With upper molars, better crown contour can usually be obtained by removing the palatal root and overlying crown and retaining the two buccal roots. Notwithstanding, the disease pattern will often finally determine which root should be removed.
Stay updated, free dental videos. Join our Telegram channel
VIDEdental - Online dental courses


