Chapter 24
ORTHODONTIC TECHNIQUES
It is often helpful, when treating failure of the extensively restored dentition, to reposition teeth orthodontically. A number of different methods of treatment have been advocated, and the interested reader is strongly recommended to read Miller, 1989a and b.1 Miller describes the principles and techniques of orthodontic therapy, the latter largely in terms of using multistranded stainless steel and titanium wires.
Although it is often helpful, and sometimes even essential, to seek the assistance of an orthodontist often in the presence of restorations, it is more sensible for the prosthodontist to carry out simple orthodontic therapy. Some cases will be described subsequently together with the appliances that were used in each procedure.
It is important to consider five basic factors, namely:
- Diagnosis.
- Space.
- Anchorage.
- Retention.
- Light forces.
Diagnosis
An accurate diagnosis is essential before prescribing orthodontic treatment. This requires:
- Clinical examination.
- Study casts.
- Radiographs.
- Usually, trial tooth repositioning on duplicate study casts.
- Consideration of alternative therapy, for example, extraction and bridge fabrication or extraction and restoration, by means of an osseointegrated fixture.
Space
The space into which the tooth, or teeth, will be moved must be large enough, not only in the horizontal plane, but also in the vertical plane in relation to the opposing arch.
Space may be created by: extraction; reduction of mesio-distal width of adjacent teeth, either by enamel stripping or reducing the size of existing restorations; and by moving the teeth into an existing space to create more space either mesially or distally.
Anchorage
There will be an equal and opposite force on the anchor teeth. There must, therefore, be sufficient anchorage to ensure that the tooth movement that occurs has been planned and is not unwanted movement of the anchor teeth.
Retention
Following treatment, a period of retention is required. Often, with the type of restorative case under consideration, fixed restorations will be provided and these will retain the teeth in their new positions.
Light Forces
Light forces should be applied for most movement. However, for rapid extrusions greater forces will be utilized. In the cases shown subsequently, tooth movement was usually accomplished using either polymer plastic chain elastics (Alastik – Unitech) or conventional light orthodontic elastics.
In the management of failure in restored dentitions, orthodontic therapy has commonly proved valuable in the following types of cases:
- Tilting, including alteration of vertical dimension.
- Rapid extrusion.
- Tilting.
- Molar uprighting.
- Rotation.
- Bodily movement.
- Intrusion – alteration of vertical dimension.
Some examples of clinical cases will be given to demonstrate these points.
Tilting Plus Alteration of Vertical Dimension (Fig 24-1)
The upper anterior teeth exhibited Grade III mobility, with repeated fracture of the composite resin splint. The lower anterior teeth had drifted labially and there was an apparent loss of vertical dimension. Retraction of the upper anterior teeth prior to restoration was not possible without retraction of the lower teeth, it was also necessary to regain some lost vertical dimension. The teeth were repositioned on a diagnostic study cast, an impression made of this and a new cast poured. An upper Hawley appliance was made with the anterior lingual contour fitting the repositioned teeth on the new cast (Figs 24-1a–d) (Appendix). The lower appliance was similarly constructed. When the appliances were placed in the mouth, composite resin elevations on the labial surfaces of the anterior teeth ensured that the elastics did not slip gingivally and also ensured a degree of intrusion (Fig 24-1a) as well as lingual tilting. The acrylic, fabricated to the repositioned teeth on the study cast, guided the teeth into the preplanned positions (Fig 24-1d) (different patient). Besides providing some intrusion of the lower anterior teeth, the appliance also resulted in extrusion of the posterior teeth, and some of the lost vertical dimension was regained. The posterior occlusion was subsequently adjusted to eliminate any slide between CRCP and IP. The anterior teeth were retained by acid etch composite resin and an occlusal stabilization appliance made for night-time wear. Following three months of retention, the upper teeth were restored and splinted (Fig 24-1e) to retain the position. The lower posterior teeth were restored.
Fig. 24-1 Tilting plus alteration of vertical dimension.
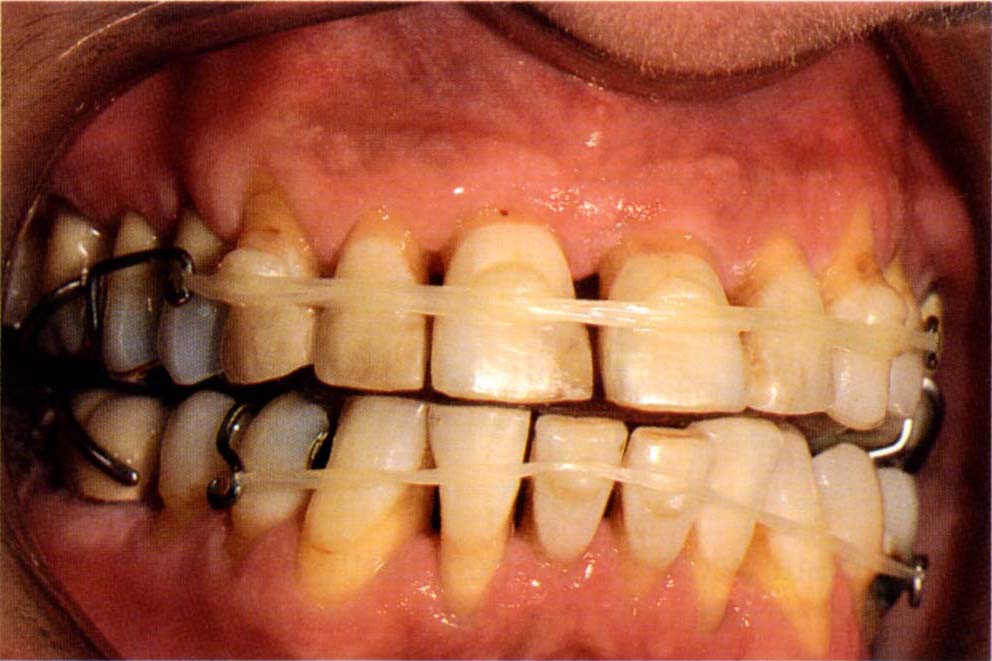
Fig. 24-1a Start. 12–22 exhibit Grade III mobility. The combination of reduced vertical dimension and loss of attachment has resulted in movement of the anterior teeth. Composite resin on the anterior teeth to prevent the elastics slipping cervically and to intrude and lingually tilt the teeth.
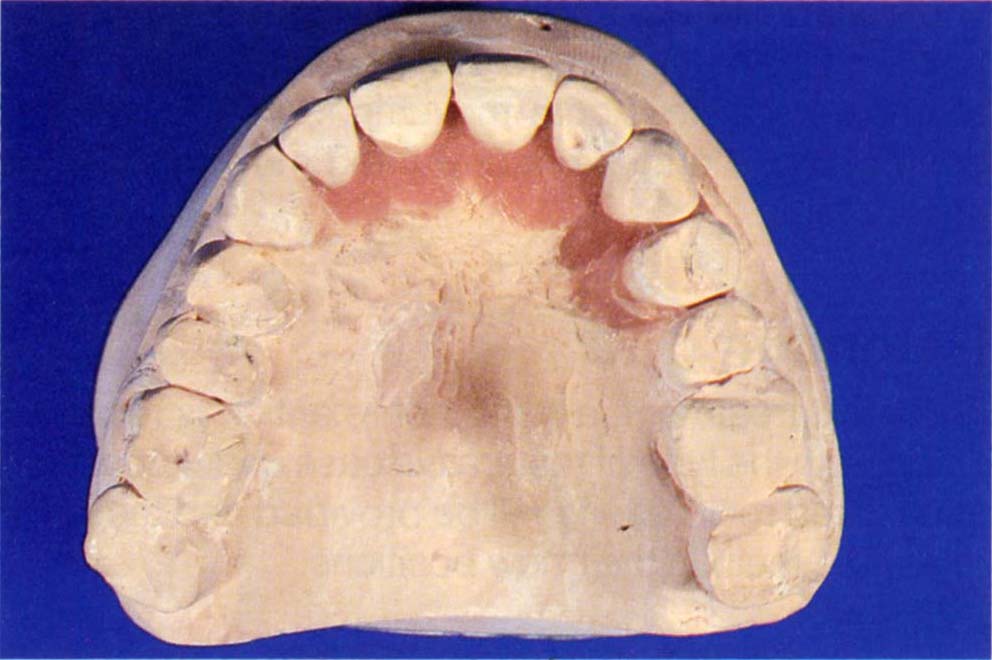
Fig. 24-1b Fabrication of the appliance. The teeth have been repositioned.
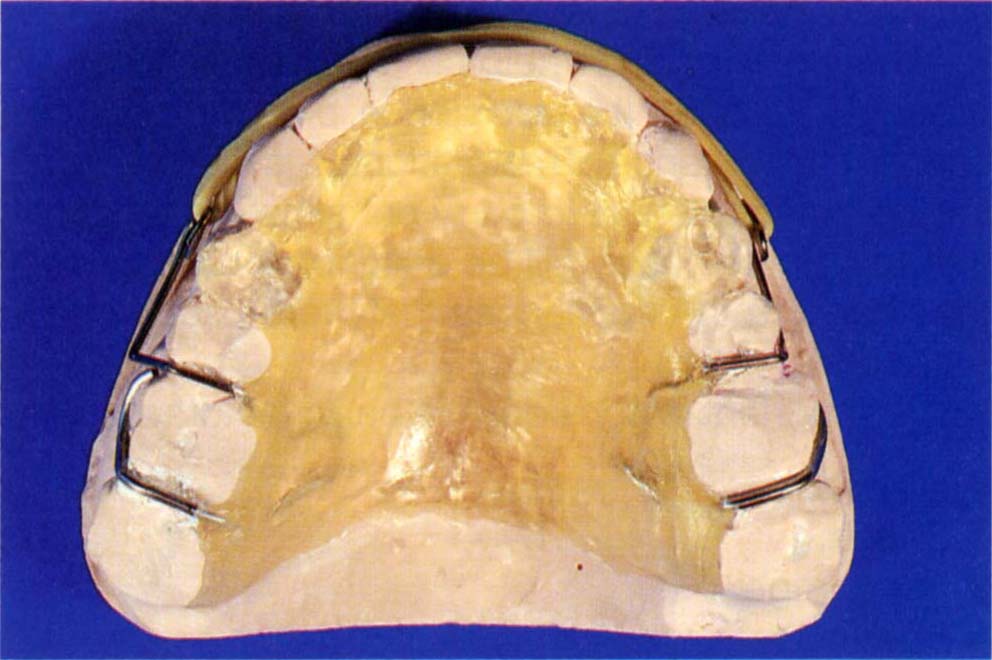
Fig. 24-1c A duplicate cast has been made of the repositioned teeth. On this cast, an appliance has been made to retract the teeth into the pre-planned positions, intrude the anterior teeth and allow the posterior teeth to erupt.
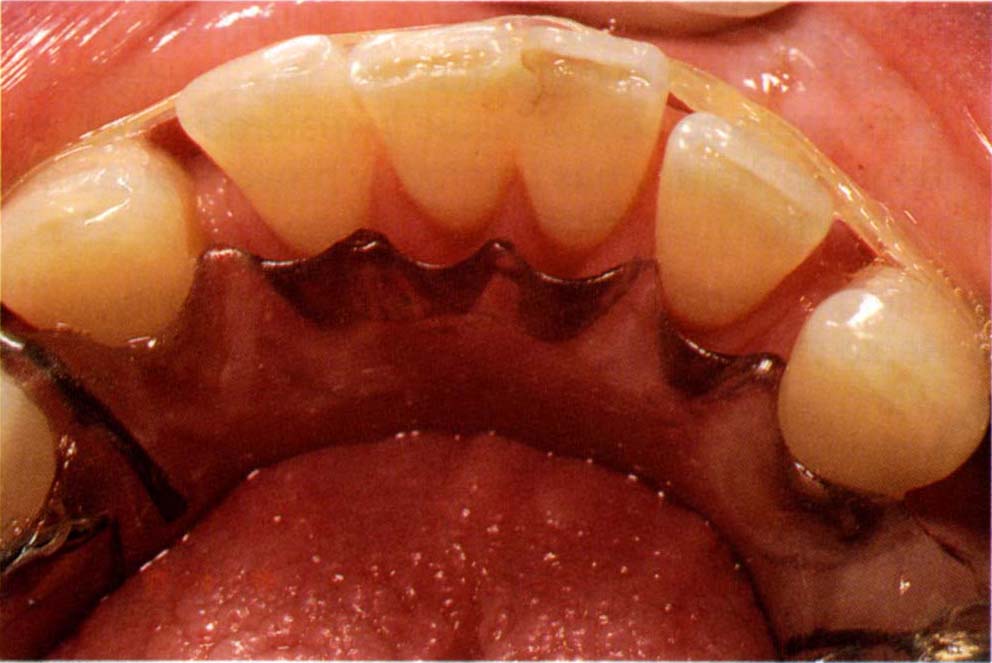
Fig. 24-1d Similar appliance in a different patient. Note how the acrylic resin, which has been fabricated to the repositioned teeih on the study cast, guide the teeth into the pre-planned positions.
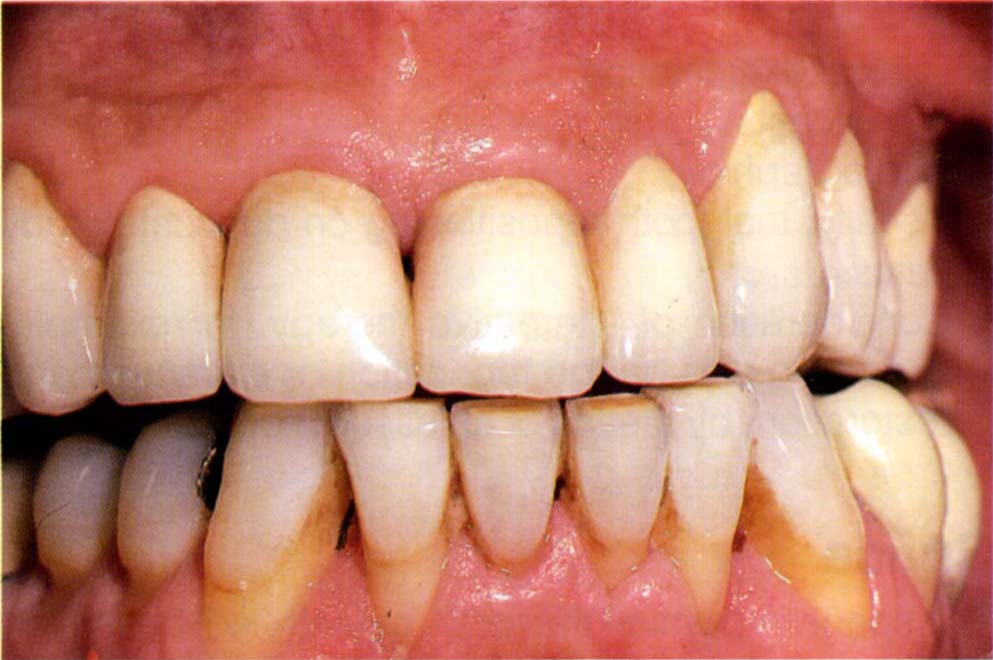
Fig. 24-1e Definitive restorations, eleven years following completion. Note that 43–33 are unsplinted. Note also the loss of surface detail of the porcelain, due to weekly application of acidulated fluoro-phosphate gel. This has etched the surface.
Rapid Extrusion
This was first described by Ingber in 1974,2 and subsequently by others.2–6 It is used when, for example, caries or tooth fracture has resulted in the loss of all sound dentine occlusal to the alveolar crest. If the remaining root is rapidly extruded, it will ‘pull with it’ the gingivae and bone, thereby increasing the zone of attached gingivae and/or filling the infra-bony defect. This technique may be used prior to extraction to create a more favourable environment for placement of an osseointegrated fixture.6 If, on the other hand, prior to extrusion a pericision is made to sever the transceptal fibres within the gingival crevice, the tooth will erupt through the tissues, which remain more or less in their original location. Both techniques are useful. This type of orthodontic movement is particularly useful and several examples will be presented to illustrate the diverse techniques available.
Rapid Extrusion, No Pericision
(Fig 24-2)
The patient had an existing crown with extremely unsightly corrosion tattooing of the gingival margin. Conventional gingival surgery was contraindicated, as the resulting gingival margin would be unacceptably high and differ considerably from that of the adjacent teeth. The adjacent teeth were acid etched and a piece of rectangular arch wire 0.018 x 0.022 inch (0.4 x 0.45 mm) (Unitech Catalogue Number 500-165) was adapted and attached to them using acid etched retained composite resin. Prior to attachment, a chain elastic was placed over the wire. A temporary crown was fabricated for the lateral incisor to incorporate a small buccal hook. The crown was cemented with Tempbond. The chain elastic was attached to the hook and within 20 days eruption had occurred, pulling with it the gingivae. As a general rule the tension applied to these elastics should be such that they form an oval shape, without the two sides touching (Fig 24-2b). The crown was shortened to ensure no occlusal trauma occurred (Fig 24-2c). The extrusion continued until there was sufficient attached gingivae for a good gingival margin contour after the removal of the tattoo and the associated post surgical shrinkage. The excess gingiva was excised with the electrosurgical device. Following healing, the new gingival contour matched the original contour, without the black tattoo. The tooth was stabilized in its new position for six weeks, a temporary crown made and a new porcelain crown was fabricated six months later (Fig 24-2d).
Fig. 24-2 Rapid extrusion – no pericision.
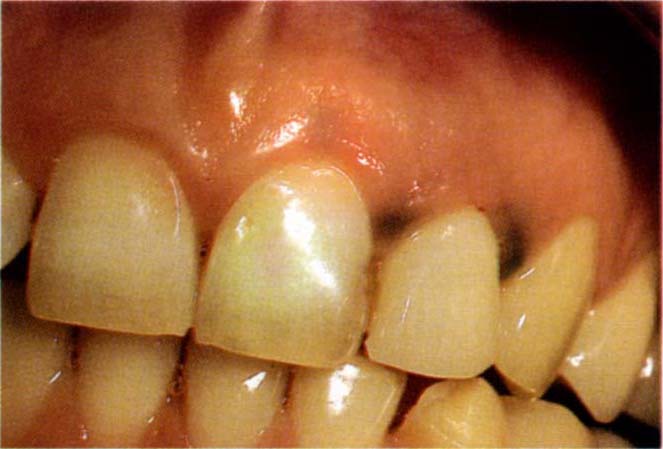
Fig. 24-2a Start – note the discolouration of the gingival margin due to corrosion of the metallic part of the restoration.
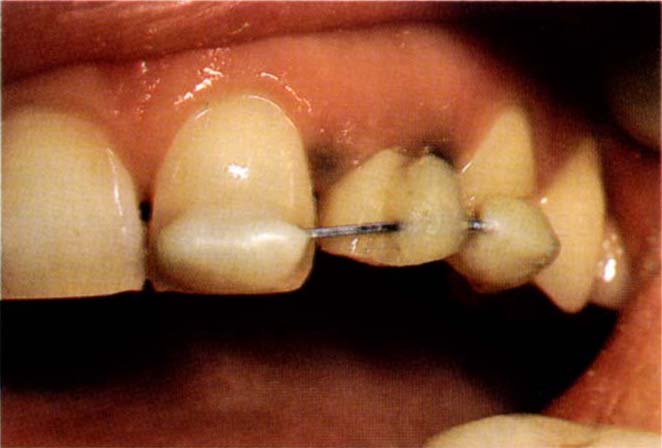
Fig. 24-2b Appliance in place – see text for details. Note that the elastic has been stretched to an oval shape without both sides touching.
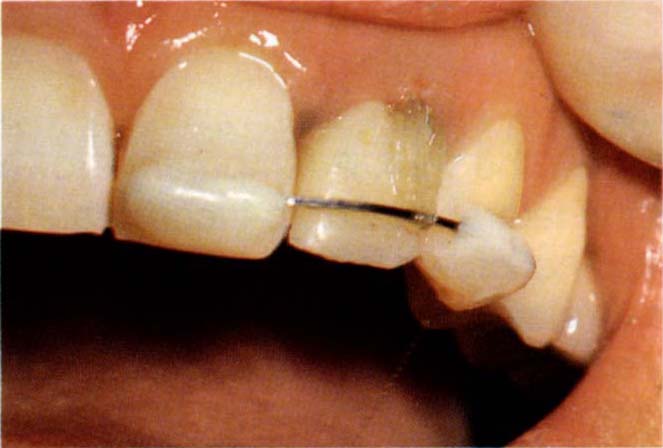
Fig. 24-2c The tooth has extruded pulling with it the gingiva. The crown has been reduced in height so as not to be traumatised by the occlusion – note the increase in the zone of attached gingiva. The temporary crown has now been locked with acrylic resin to the rectangular wire. The gingiva was recontoured with electrosurgery.
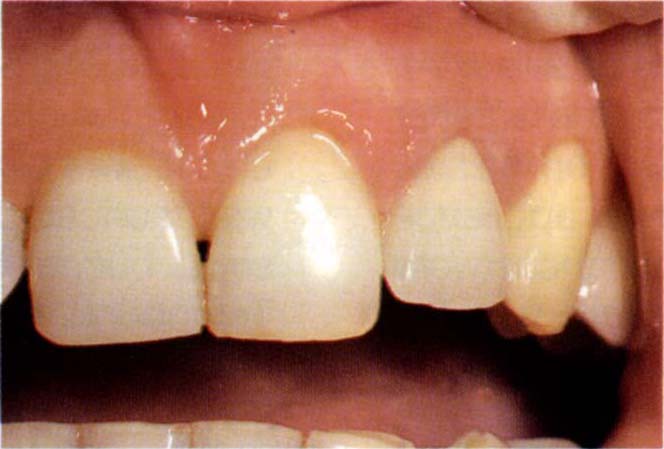
Fig. 24-2d The tooth was stabilized for six weeks, then a new crown was made.
Rapid Extrusion with Pericision
(Fig 24-3)
Tooth 24 had fractured with subsequent subgingival caries of the root face (Fig 24-3a). Restoration without extrusion would have resulted in a subosseous crown margin. A cobalt chromium casting was fabricated, a post placed in the root face and a temporary crown made with a buccal hook. Rapid extrusion was accomplished by means of a chain elastic, anchorage being achieved by cementing the cobalt chromium casting to the adjacent teeth with temporary cement; the elastic passed over a hook extension of the casting (Figs 24-3b–c). Pericision at fortnightly intervals allowed the root to erupt without movement of the gingival margin, with the carious lesion of the root moving in eight weeks from a subosseous to a supraosseous location. Follwoing extrusion, caries was removed from the root face, the tooth was retained in its extruded position for a further six weeks and a crown fabricated (Fig 24-3d). Conceivably, arch wires could have been attached with composite resin to the adjacent porcelain crowns by means of hydrofluoric acid etching and silane coupling, but the restorations would have been damaged on removal of the composite resin.
Fig. 24-3 Rapid extrusion with pericision.
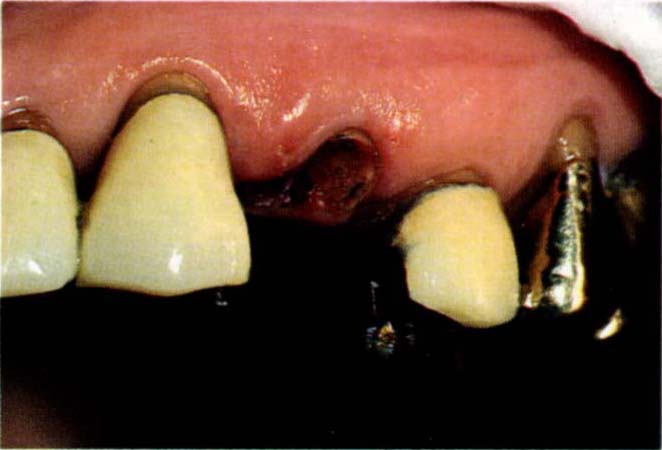
Fig. 24-3a Start – subgingival caries of root face – tooth 24.
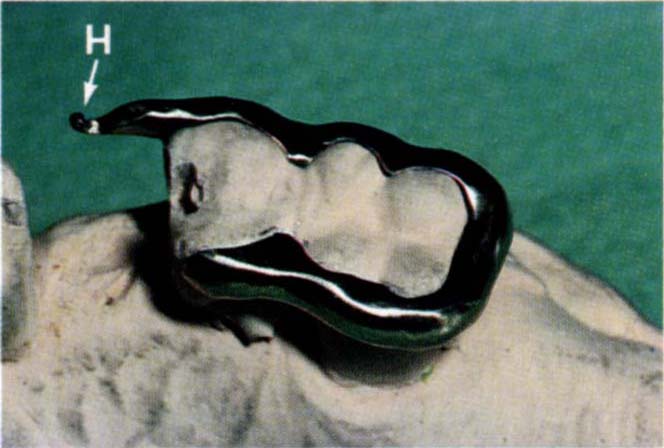
Fig. 24-3b Cobalt chromium appliance with buccal hook (H).
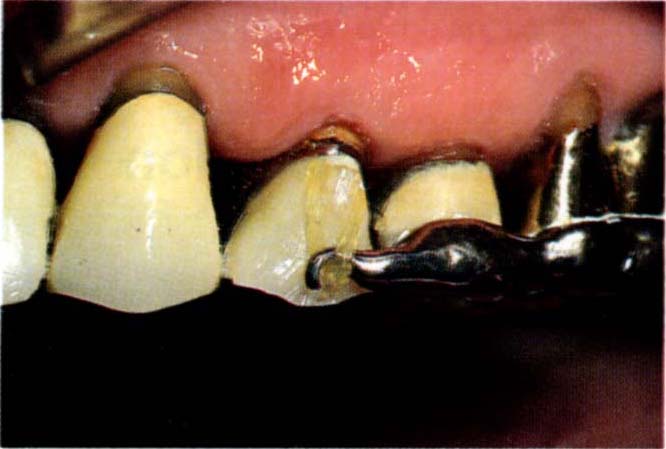
Fig. 24-3c Cobalt chromium appliance (buccal view). The appliance was cemented to the posterior crowns with Tempbond so as to provide anchorage for rapid extrusion. A temporary crown has been cemented to tooth 24. An elastic attaches to a cervical hook on the crown and to the hook on the appliance. Extrusion was accomplished in eight weeks and the tooth was retained for a further six weeks.
Stay updated, free dental videos. Join our Telegram channel
VIDEdental - Online dental courses


