Restorative Dentistry for the Primary Dentition
 Outline
Instrumentation and Caries Removal
Anatomic Considerations of Primary Teeth
Use of the Rubber Dam in Pediatric Restorative Dentistry
Problems with Amalgam Restorations
Finishing of Amalgam Restorations
Adhesive Materials in Primary Molars
General Principles for Restoring Primary Posterior Teeth with Resin-Based Composite
Sealants and Conservative Adhesive Restorations for Primary Teeth
Class I and II Preparation and Restoration of Primary Molars with Adhesive Restorative Materials
Placement of Back-to-Back Class II Resin-Based Composite Restorations
Pediatric restorative dentistry is a dynamic combination of ever-improving materials and tried-and-true techniques. Many aspects of primary teeth restoration have not changed for decades. In 1924, G. V. Black outlined several steps for the preparation of carious permanent teeth to receive an amalgam restoration.1 These steps have been adopted, with slight modification, for the restoration of primary teeth. Restorative techniques for the primary dentition using amalgam and stainless steel crowns (SSCs) have remained relatively consistent for many years (Figure 21-1). However, with an increased use of adhesive restorative materials and bonding systems, there has been a shift to more conservative preparations and restorations. Materials such as glass ionomers, resin ionomer products, and improved resin-based composite systems have been developed that are having a profound impact on the restoration of primary teeth. Unfortunately, long-term clinical data (i.e., longer than 3 years) regarding many of these materials are limited; but even so, many clinicians are using these materials with increasing frequency. Hence we find ourselves in a transitional age.
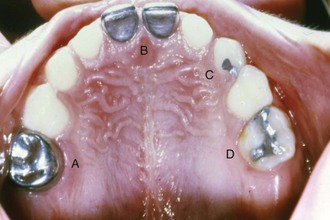
 FIGURE 21-1
The clinician can stay with the proven, successful materials of the past, such as amalgam and stainless steel, or move to newer, more aesthetic materials that offer advantages such as bonding to tooth structure, fluoride release, improved aesthetics, reduction of mercury exposure, and conservation of tooth structure. None of the aesthetic materials have the track record and proven durability of amalgam or stainless steel, but when they are placed appropriately, they can provide useful restorations for the life span of the primary tooth. This chapter will provide information on both the new and the old restorative techniques. For the interested reader, in 2002 the American Academy of Pediatric Dentistry sponsored a Pediatric Dentistry Restorative Consensus Conference. The published proceedings2 include extensive and up-to-date literature reviews and discussion of pediatric restorative techniques at a greater depth than can be included in this chapter. In addition, a more detailed discussion of dental materials used in pediatric restorative dentistry can be found in Chapter 20.
Instrumentation and Caries Removal
Nearly all instrumentation for restorative procedures is carried out with the high-speed handpiece (100,000 to 300,000 rpm, either electric or air turbine) combined with coolant. The coolant may be water spray or air alone. A water spray coolant is often recommended for high-speed instrumentation; however, there is some evidence that air coolant alone may be used without creating irreversible pulpal damage,3,4 and use of both coolant techniques is taught in many pediatric dental residency programs.5 There are some instances when a water spray coolant is absolutely necessary. This is especially true when removing old amalgam restorations or using diamond burs. Regardless of the coolant used, intermittent cutting at intervals of a few seconds with light, brushing strokes should be done to prevent excessive heat generation. Protective masks and eyewear should always be worn when using the high-speed air turbine handpiece.
Though use of a handpiece for caries removal and cavity preparation is by far the most popular and frequently used method, there are at least three other methods of treating carious teeth. These are air abrasion, laser treatment, and chemomechanical methods. With these methods, tooth preparations move from the traditional, conventional preparations used by G. V. Black to much more conservative, “tooth-saving” preparations, known as microdentistry. Depending on the type of carious lesions, method of instrumentation, and restorative material to be used, the clinician can opt for a conventional Black type of cavity preparation or for a much more conservative micropreparation. Figure 21-2 illustrates a continuum of cavity preparation based on size and instrumentation.
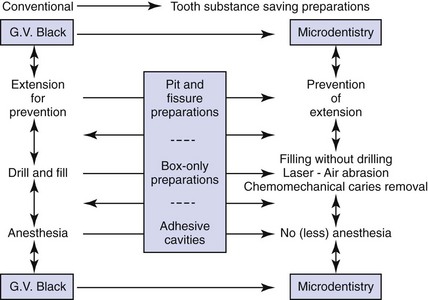
 FIGURE 21-2
Air abrasion uses a stream of purified aluminum oxide particles (27 to 50 µm) that are forced under pressure (40 to 120 psi) through a fine-focused nozzle onto the tooth surface. This cuts through enamel and dentin quickly, and it can also abrade or roughen a tooth surface.6 Originally introduced into dentistry by R. Black in 1945,7 air abrasion virtually disappeared from the dental environment by the early 1960s and was reintroduced in the early 1990s. Air abrasion offers several advantages over conventional handpieces. There is an absence of vibration and noise, caries excavation can often be done without the need for local anesthesia, and tooth preparation can be very fast. It is best suited for use with adhesive restorations that require minimal tooth preparation and less rigid classic cavity design than does amalgam. The cost of the air abrasion unit ($2000 to $5000), the dust that can be generated during the procedure, and the fact that it does not totally eliminate the need for conventional handpieces are three disadvantages of the system that will probably keep it from gaining widespread use. Laser techniques have also become popular with some dental operators. Lasers can be used in children for soft tissue surgery, caries prevention, caries diagnosis, biostimulation and pain control, hemostasis during pulpotomy procedures, and cavity preparation.8 An erbium-YAG laser can be used in restorative dentistry for minimally invasive preparation of pits and fissures and hypoplastic teeth, cavity preparation of all classes (I thorough V), treatment of deep dentinal caries, and laser-assisted pulp capping. Some of the advantages of using lasers for cavity preparation include (1) better patient acceptance because they are quiet, (2) no vibration and minimal need for use of anesthetic, (3) minimally invasive cavity preparation because of the selective absorption of laser light by carious tissue, (4) production of very clean cavity preparations free of a smear layer, (5) minimal thermal increase in the pulp chamber, and (6) the production of cavity preparations with a macroroughened surface that increases surface bonding area for better adhesion of resin-based materials. Some disadvantages include (1) a longer learning curve; (2) higher equipment costs ($30,000 to $60,000 for an erbium-YAG laser); (3) need for specialized training; and (4) possible need for a traditional handpiece to complete the process, depending on the cavity size and preparation needed.9 Chemomechanical caries removal is a noninvasive technique that eliminates infected dentin via a chemical agent by means of dissolution. Instead of drilling, a chemical agent such as Carisolv (MediTeam Dental, Göteberg, Sweden) or Papacarie (F&A Laboratorio Farmaceutico Ltd., São Paulo, Brazil) is applied to the carious dentin and assisted by hand instruments to remove soft carious material. This method usually does not require anesthesia, it preserves sound tooth structure, and it relies on bonded restorative materials for final restoration. Drawbacks to this method include an increase in operator time to remove caries, only certain carious lesions are suitable for its use, a handpiece may still be necessary to gain access to the dentinal or interproximal areas, and little long-term data is available to confirm long-term success of the method.10
One final aspect to be considered when discussing tooth preparation is the use of magnification during operative procedures. Up until the 1990s the use of magnification for dental procedures by most practitioners came only with increasing age and failing eyesight, but now the use of magnifying loupes or microscopes for most dental procedures is taught from the beginning of most dental school training. Loupes are available in a wide range of magnification, but generally a set of loupes with a 2.5× to 3.5× magnification is recommended for restorative dentistry. The use of magnification for completing restorative procedures has several advantages, such as an increase in productivity, an increase in the level of excellence and confidence in dental treatment, an increase in visual diagnostic abilities, and perhaps most importantly, improvement in operator posture and comfort to help prevent musculoskeletal disorders brought about by poor operator positioning.11 Use of magnification during cavity preparation has not yet become the standard of care, but it is highly recommended, and will likely become the standard of care in the next few years.
Anatomic Considerations of Primary Teeth
Although some primary teeth resemble their permanent successors, they are not miniature permanent teeth. Several anatomic differences must be distinguished before restorative procedures are begun (Box 21-1, Figure 21-3).
 Box 21-1 Anatomic Differences between Primary and Permanent Teeth
1. Primary teeth have thinner enamel and dentin thickness than permanent teeth (see Figure 21-3).
2. The pulps of primary teeth are larger in relation to crown size than permanent pulps.
3. The pulp horns of primary teeth are closer to the outer surface of the tooth than permanent pulps. The mesiobuccal pulp horn is the most prominent.
4. In primary teeth, the enamel rods of the gingival third of the crown extend in an occlusal direction from the dentin-enamel junction. This is in contrast to the permanent dentition in which the rods extend in a cervical direction.
5. Primary teeth demonstrate greater constriction of the crown and have a more prominent cervical contour than permanent teeth.
6. Primary teeth have broad, flat proximal contact areas.
7. Primary teeth are whiter than their permanent successors.
8. Primary teeth have relatively narrow occlusal surfaces in comparison with their permanent successors.
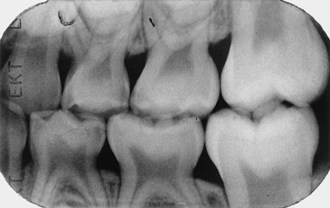
 FIGURE 21-3
Use of the Rubber Dam in Pediatric Restorative Dentistry
The use of the rubber dam is indispensable in pediatric restorative dentistry. Numerous advantages have been listed for its use, all allowing for provision of the highest quality of care (Box 21-2).
 Box 21-2 Advantages of Rubber Dam Use
1. Better access and visualization are gained by retracting soft tissues and providing a dark contrasting background to the teeth.
2. Moisture control is superior to other forms of isolation.
3. The safety of the child is improved by preventing aspiration or swallowing of foreign bodies and by protecting the soft tissues.
4. Placement generally results in decreased operating time.
5. Many children tend to become quieter and relaxed with a rubber dam in place. The dam seems to act as a separating barrier, so that movements in and out of the oral cavity are perceived by the child as being less invasive than without the dam in place.
6. With a rubber dam in place, a child becomes primarily a nasal breather. This enhances nitrous oxide administration when it has been deemed necessary from a behavioral standpoint.
Preparing for Placement of the Rubber Dam
The rubber dam is available in an assortment of colors and may even be scented or flavored. Virtually all rubber dams are made of latex, although a latex-free rubber dam material is available (Hygienic Corporation, Akron, Ohio) for use in latex-sensitive patients. A 5 × 5 inch medium-gauge rubber dam is best suited for use in children. Rubber dams are available with a preattached disposable frame (HandiDam, Aseptico, Woodinville, Wash.), eliminating the need for a separate dam frame. The darker the dam, the better the contrast between the teeth and dam. The holes should be punched so that the rubber dam is centered horizontally on the face and the upper lip is covered by the upper border of the dam, but the dam does not cover the nostrils. One method of proper hole placement is seen in Figure 21-4, A. Figure 21-4, B, demonstrates proper hole size selection for different teeth.
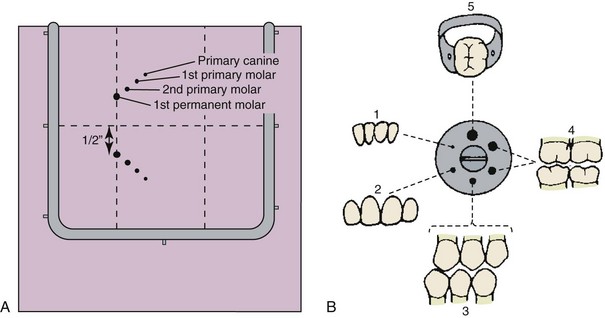
 FIGURE 21-4
 inch apart and cut the rubber dam with scissors connecting the two holes. This is called the “slit technique” and allows for very quick placement of the rubber dam. Because there is no rubber dam material interproximally, moisture control is not as dependable with this placement technique, but it is often still adequate, especially for isolation of maxillary quadrants.
Proper clamp selection is one of the most critical aspects of good rubber dam application. Box 21-3 lists the most frequently used clamps and their areas of use. Incisors usually require ligation with dental floss for stabilization instead of a clamp.
 Box 21-3 Common Rubber Dam Clamps for Pediatric Restorative Dentistry
Partially erupted permanent molars: 14A, 8A*†‡
Fully erupted permanent molars: 14, 8†‡
Second primary molars: 26, 27‡, 3*†
First primary molars/bicuspids/permanent canines: 2, 2A*† 207, 208‡
Primary incisors and canines: 0*, 00†, 209‡
“A” clamps have jaws angled gingivally to seat below subgingival heights of contour.
After selecting an appropriate clamp, place a 12- to 18-inch piece of dental floss on the bow of the clamp as a safety measure (Figure 21-5). This is necessary for easy retrieval of the clamp if it is dislodged from the tooth and falls into the posterior pharyngeal area.
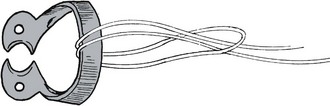
 FIGURE 21-5
Restoration of Primary Molars
The anatomy of the primary molars, with their fissured occlusal surfaces and broad, flat interproximal contact areas, makes them the most caries-susceptible primary teeth. The importance of primary molars in mastication and as maintainers of space for the succedaneous teeth, coupled with the development of suitable economic restorative materials, has shaped a philosophy of restoring and conserving primary molars. SSCs, amalgam, and adhesive materials such as resin-based composites, resin-modified glass ionomers, polyacid-modified resin-based composites (compomers), and, to a small degree, glass ionomers are the materials used in the restoration of primary molars. The use of adhesive materials for restoring posterior teeth continues to increase annually. It is estimated that in 2011 more than 50% of intracoronal restorations placed will be resin-based composites, but amalgam remains the restorative material of choice for many clinicians. It should be noted, however, that concerns have been raised about the mercury in amalgam and the exposure of dentists, patients, and the environment to it. This has lead to the use of amalgam for cavity restoration to be banned in several European countries. Current scientific information continues to support the use of amalgam as a restorative material,12 but for a more detailed discussion of the controversy the reader is referred to Chapter 20. Under conditions of good moisture control, both alloys and adhesive materials can provide very serviceable restorations. Placement procedures for both classes of materials are included in this chapter. Because of the successful wide and historical use of amalgam, its placement is discussed first.
Class I Amalgam Restorations
General Considerations
The classic G. V. Black outline form for class I restorations in primary molars can be seen in Figure 21-6. The outline form should include all retentive fissures and carious areas but should be as conservative as possible. Ideal pulpal floor depth is 0.5 mm into dentin (approximately 1.5 mm from the enamel surface). The length of the cutting end of the no. 330 bur is 1.5 mm, so this becomes a good tool for gauging cavity depth. The cavosurface margin should be placed out of stress-bearing areas and should have no bevel. To help prevent stress concentration, the outline form should be composed of smoothly flowing arcs and curves, and all internal angles should be rounded slightly. When a dovetail is placed in the second primary molars, its buccolingual width should be greater than the width of the isthmus so as to produce a locking form to provide resistance against occlusal torque, which may displace the restoration mesially or distally. The isthmus should be one third of the intercuspal width, and the buccolingual walls should converge slightly in an occlusal direction. The mesial and distal walls should flare at the marginal ridge so as not to undercut ridges. Oblique ridges should not be crossed unless they are undermined with caries or are deeply fissured. Primary mandibular second molars often exhibit buccal developmental pits. When carious, these should be restored with a small teardrop or ovoid-shaped restoration, including all the adjacent susceptible pits and fissures.
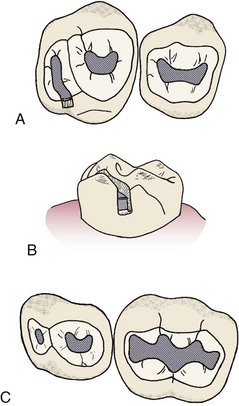
 FIGURE 21-6
Neither liners nor bases are very widely used, but various bases and liners are discussed in Chapter 20. Thin liners such as calcium hydroxide do not provide thermal insulation, and recent evidence suggests that calcium hydroxide may hydrolyze gradually,13 leaving a small void underneath the restoration and ultimately weakening it.14 Therefore use of calcium hydroxide is discouraged. Cavity varnish, though widely used in the past to prevent microleakage, is no longer considered useful. Placement of bases in primary teeth is also uncommon, but when necessary, use of a glass ionomer or resin modified glass ionomer material is recommended. Because of the relatively large size of the pulp chamber in primary teeth, preparations that are placed deep enough to require bases are generally found to be into the pulp and hence require other treatment.
The steps of preparation and restoration of class I amalgam restorations are listed in Box 21-4.
 Box 21-4 Steps of Preparation and Restoration of Class I Amalgam Restorations
1. Administer appropriate anesthesia and place the rubber dam.
2. Using a no. 330 bur in the high-speed turbine handpiece, penetrate into the tooth parallel to its long axis in the central pit region and extend into all susceptible fissures and pits to a depth 0.5 mm in dentin.
3. Remove all carious dentin. Use a large, round bur in the slow-speed handpiece or a sharp spoon excavator.
4. Smooth the enamel walls and refine the final outline form with the no. 330 bur.
5. Rinse and dry the preparation, and inspect for (1) caries removal, (2) sharp cavosurface margins, and (3) removal of all unsupported enamel.
6. Triturate the amalgam, and place one carrier load of amalgam into the preparation.
7. Using a small condenser, immediately begin condensation of the amalgam into the preparation, condensing small overlapping increments with a firm pressure until the cavity is slightly overfilled.
8. Following condensation, use a ball burnisher to begin the initial contouring of the amalgam by pushing the excess amalgam up and away from the margins. Then carving of most alloys can begin almost immediately. A small cleoid-discoid carver works very well for carving primary restorations. Always keep part of the carving edge of the instrument on the tooth structure so that overcarving of the cavosurface margin does not occur. Remove all amalgam flash from cavosurface margins. Keep the carved anatomy shallow. Placing deep anatomy in primary teeth (i.e., grooves) can weaken the restoration by creating a thin shelf of amalgam at the cavosurface margin and also by reducing the bulk of amalgam in the central stress-bearing areas, both leading to fracture.
9. When the amalgam has begun its initial set and resists deformation, begin to burnish the amalgam. Burnishing is done with a small, round burnisher, which is lightly rubbed across the carved amalgam surface to produce a satin-like appearance. Besides smoothing, burnishing creates a substructure with fewer voids and reduces finishing time.
10. A wet cotton pellet can be wiped across the burnished amalgam for a final smoothing (optional).
11. Remove the rubber dam and check the occlusion. Children must be cautioned before the rubber dam is completely removed that they must not close their teeth into occlusion until instructed to do so. With articulating paper, check the restoration for occlusal irregularities, instructing the child to close gently. Make necessary adjustments with the carver.
12. Rinse the oral cavity and massage the soft tissue around the previously clamped tooth.
Class II Amalgam Restorations
General Considerations
The outline form for several class II amalgam preparations is shown in Figure 21-7. The guidelines given for the class I preparation should be followed during the preparation of the occlusal portion of the class II preparation and, additionally, there are several recommendations for the proximal box preparation. The proximal box should be broader at the cervical portion than at the occlusal portion. The buccal, lingual, and gingival walls should all break contact with the adjacent tooth, just enough to allow the tip of an explorer to pass. The buccal and lingual walls should create a 90-degree angle with the enamel. The gingival wall should be flat, not beveled, and all unsupported enamel should be removed. Ideally, the axial wall of the proximal box should be 0.5 mm into dentin and should follow the same contour as the outer proximal contour of the tooth. Because occlusal forces may permit a concentration of stress within the amalgam around sharp angles, the axiopulpal line angle is routinely beveled or rounded. No buccal or lingual retentive grooves should be placed in the proximal box. The mesiodistal width of the gingival seat should be 1 mm, which is approximately equal to the width of a no. 330 bur.
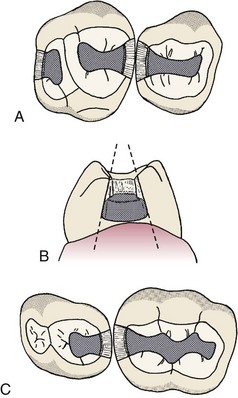
 FIGURE 21-7
In primary teeth many practitioners limit class II amalgam restorations to relatively small two-surface restorations. Three-surface (MOD) restorations may be done, but studies have shown that SSCs are a more durable and predictable restoration for large multiple surface restorations in primary teeth.15,16 Messer and Levering17 reported that SSCs placed in 4-year-old and younger children showed a success rate approximately twice that of class II amalgams, for each year up to 10 years of service. Roberts and Sherriff18 reported that after 5 years, one third of class II amalgams placed in primary teeth had failed or required replacement, whereas only 8% of SSCs required retreatment. In the preschool child with large proximal carious lesions, SSCs are preferred to amalgams because of their durability. Similar-sized lesions in teeth that are within 2 or 3 years of exfoliation may be restored with amalgam since the anticipated life span is fairly short.
The steps of preparation and restoration of class II amalgam restorations are listed in Box 21-5.
 Box 21-5 Steps of Preparation and Restoration for Class II Amalgam Restorations
1. Administer appropriate anesthesia and place the rubber dam.
2. Place a wooden wedge in the interproximal area being restored (optional). This retracts the gingival papilla during instrumentation, keeps the operator from cutting the interseptal rubber dam material and underlying gingiva, and creates some prewedging, which helps to ensure a tight proximal contact of the final restoration.
3. Using a no. 330 bur in the high-speed turbine handpiece with a light, brushing motion, prepare the occlusal outline form at ideal depth.
4. To prepare the proximal box, begin at the marginal ridge by brushing the bur buccolingually in a pendulum motion and in a gingival direction at the dentin-enamel junction. Continue until contact is just broken between the adjacent tooth and the gingival wall and the wedge is seen. If the gingival wall is made too deep, the cervical constriction of the primary molar will create a very narrow gingival seat. The widest buccolingual width of the box will be at the gingival margin. Take care not to damage the adjacent proximal surface.
5. Remove any remaining caries with a sharp spoon excavator or with a round bur in the low-speed handpiece.
6. Round the axiopulpal line angle slightly. Because of the shape of the no. 330 bur, all other internal line angles will automatically be gently rounded.
7. Remove the wedge placed at the beginning of the treatment and place a matrix band.
8. While holding the matrix band in place, forcefully reinsert the wedge between the matrix band and the adjacent tooth, beneath the gingival seat of the preparation. The wedge is placed with a pair of Howe pliers or cotton forceps from the widest embrasure. The wedge should hold the band tightly against the tooth but should not push the band into the proximal box. It may be necessary to trim the wedge slightly to achieve a proper fit.
9. Triturate the amalgam. With the amalgam carrier, add the amalgam to the preparation in single increments, beginning in the proximal box.
10. Using a small condenser, condense the amalgam into the corners of the proximal box and against the matrix band to ensure the reestablishment of a tight proximal contact. Continue filling and condensing until the entire cavity is overfilled.
11. Use a small round burnisher to begin the initial contouring of the amalgam. Carving of the occlusal portion is performed with a small cleoid-discoid carver, as in class I restorations. The marginal ridge can be carved with the tip of an explorer or with a Hollenback carver.
12. Carefully remove the wedge and the matrix band. Drawing the band in a buccal-lingual direction, as opposed to an occlusal direction, will be less likely to damage the marginal ridge of the newly placed restoration during withdrawal.
13. Remove excess amalgam at the buccal, lingual, and gingival margins with an explorer or Hollenback carver. Check to see that the height of the newly restored marginal ridge is approximately equal to the adjacent marginal ridge.
14. Gently floss the interproximal contact to check the tightness of the contact, to check for gingival overhang, and to remove any loose amalgam particles from the interproximal region.
15. Do a final burnish of the restoration, and use a wet cotton pellet held with the cotton pliers for final smoothing if necessary.
16. Remove the rubber dam carefully.
17. Check the occlusion for irregularities with articulating paper and adjust as needed.
Matrix Application
1. T band: allows for multiple matrices; no special equipment is needed.
2. Sectional matrices (e.g., Strip-T, DENOVO Dental Inc., Baldwin Park, Calif.): allows for multiple matrix placement, is very easy to use, is not circumferential, must be held in place by a wedge.
3. AutoMatrix (DENTSPLY Caulk, Milford, Del.): allows for multiple matrix placement, is very easy to use, requires special tightening and removal tools.
4. Tofflemire matrix: is used infrequently because it does not fit primary tooth contour well and is difficult to place as multiple matrices.
T bands are available in different sizes, contours, and materials. A straight, narrow, brass T band will work in almost all pediatric restorative procedures. The T-band matrix (Figure 21-8) is formed by folding the band back on itself in the form of a circle and by folding over the extension wings of the “T” to make an adjustable loop. The band is contoured and positioned onto the tooth with the folded extension wings on the buccal surface. The free end of the band is drawn mesially to pull the band snugly against the tooth. The extension folds are then grasped firmly with a pair of Howe no. 110 pliers and removed from the tooth. The band should then be tightened an additional 0.5 to 1.0 mm, and the free end should be bent back over the vertical folds and cut with scissors to a length of 5 to 6 mm. The band is then reseated onto the tooth and wedged. It must fit below the gingival margin of the preparation and must also be at least 1 mm higher than the marginal ridge of the adjacent tooth. The T band is removed by opening the extension wings with an explorer or spoon excavator and allowing the band to open. Scissors are then used to cut one end of the band close to the restored proximal surface, the wedge is removed, and the band is then drawn buccally or lingually through the contact.
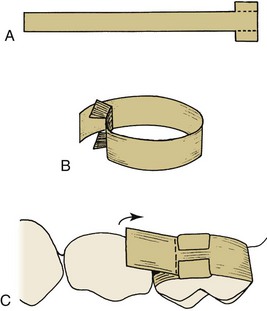
 FIGURE 21-8
There are many commercially available sectional matrices or “matrix pieces.” One commonly used in pediatrics is the Strip-T matrix. They are stainless steel matrix strips approximately  inch long that do not encircle the prepared tooth but rather only fit in the prepared proximal area (Figure 21-9). For small class II preparations they are very simple to place and use. After placement they must be firmly wedged to stay in place. They are not recommended for proximal preparations that extend beyond the line angles; a circumferential matrix (or SSC) is more appropriate in that instance.
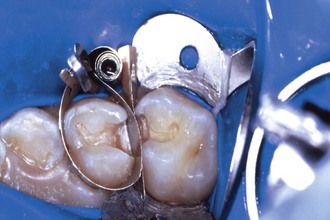
 FIGURE 21-9
AutoMatrix is a preformed loop of stainless steel matrix material that is placed on the tooth (see Figure 21-9) and tightened with a special tightening tool that comes with the kit. A small pin automatically keeps the tightened matrix tightly bound around the tooth. To remove the matrix, this small pin is clipped (another special tool) and the matrix is easily loosened and removed.
Adjacent or Back-to-Back Class II Amalgam Restorations
Preparation for adjacent proximal restorations is identical to those previously described. A matrix is placed on each tooth and is properly wedged. T bands, sectional, or automatrices are preferable because multiple matrix holders are difficult to place side by side. Condensation of the amalgam should be done in small increments, alternately in each preparation, so that the restorations are filled simultaneously (Figure 21-10). Condensation pressure toward the matrix will help ensure a tight interproximal contact. Carve the marginal ridges to an equal height, and carefully remove the wedge and matrix bands one at a time. Final carving is similar to that described for solitary class II restorations.
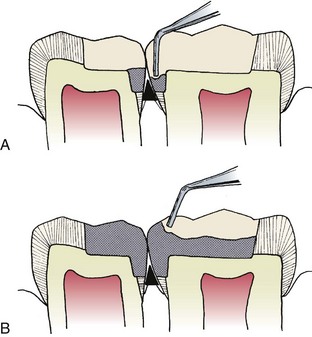
 FIGURE 21-10
Problems with Amalgam Restorations
Most restorative problems in pediatric dentistry result from a failure to prepare and restore the teeth in a way that takes into account their anatomic or morphologic structural characteristics and limitations (Figure 21-11). Fracture of the isthmus of a class II amalgam restoration is a common problem that may result from the restoration being left high in occlusion or from insufficient bulk of amalgam in the isthmus, because the preparation is too shallow, or because the amalgam has been overcarved. Marginal failure in the proximal box, usually owing to an excessive flare of the cavosurface margin, is another common problem with class II amalgam restorations. Failure to remove all caries or to extend preparations into caries-susceptible fissures is another common cause of restoration failure.19,20
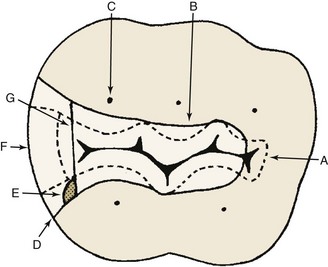
 FIGURE 21-11
Stay updated, free dental videos. Join our Telegram channel
VIDEdental - Online dental courses


