The standard surgical technique of removal of impacted third molar has been described in the previous chapter. However there may be instances where other methods of surgical removal also have to be considered. This is because, no technique is suited to every case and it will be ideal to learn the different methods and choose the appropriate one depending upon the case.
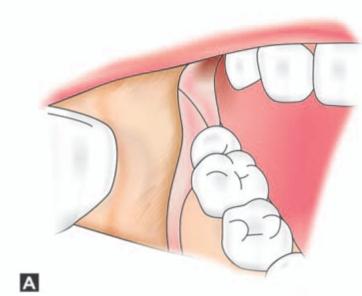
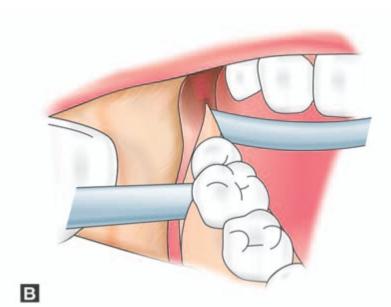
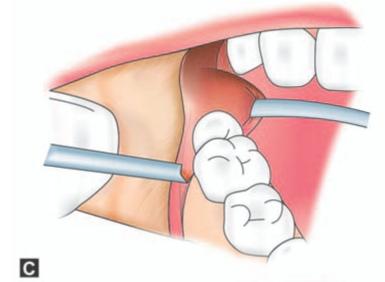
1. Sagittal split ramus osteotomy: This technique has been conventionally used for the surgical correction of mandibular excess (push back) and for mandibular deficiency (advancement). Recently this has been used to remove deeply impacted mandibular third molars as reported by Amin (1995)1 and Toffanin (2003)2 and Jones (2004)3. This is not done as a standard procedure for removal of impacted tooth, but performed when indicated. The various steps involved in the procedure are given in Figures 9.1 A to C.
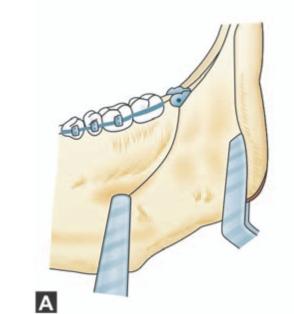
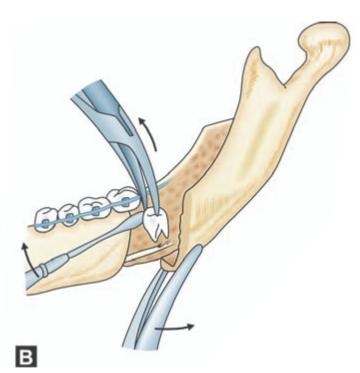
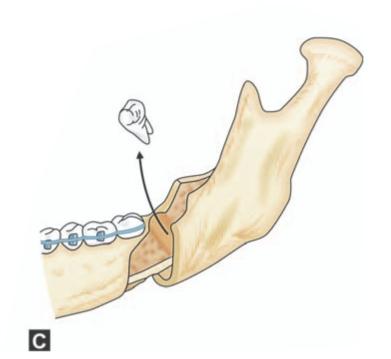
Figs 9.1A to C: Schematic diagram showing steps in the surgical removal of impacted mandibular third molar by sagittal split ramus osteotomy. (A)Incision in the buccal sulcus extending posteriorly along the coronoid process, (B) Sagittal splitting of the ramus showing the impacted third molar inside, (C) Removal of impacted tooth
In a case reported by Jones et al (2004)3 a 48-year-old man who, after a 5 year history of recurrent infection and intermittent trismus associated with a deeply impacted lower right third molar tooth, presented to the accident and emergency department with severely limited mouth opening, extensive facial swelling and pyrexia. The lower right third molar was later removed successfully through a sagittal split ramus osteotomy approach. This case shows that the sagittal split osteotomy have a valuable role in the removal of deeply impacted lower third molars, particularly when they are in close proximity to the inferior alveolar nerve.
In another case reported by Amin (1995)1 elective sagittal splitting of the mandible was used to gain access to an impacted lower third molar, which was intimately involved with the inferior alveolar nerve.
The main disadvantages of conventional surgical technique if used in the above case reports are: the great extent of bone to be removed, limited visibility, high risk of injury to the inferior alveolar nerve, and fracture of the mandible. In comparison, sagittal split ramus osteotomy gives good access, conserves bone that would otherwise have been removed, and allows the nerve to be seen and avoided. However, the osteotomy puts the occlusion at risk (although this is rare) and there is a risk of an unfavorable split in either the proximal or distal segment (2%). This is about twice as high if the third molar is impacted. The published incidence of disturbance of the inferior alveolar nerve is high: as much as 58% at six months, and 35% at one year postoperatively.
2. Buccal corticotomy: An alternative approach that offers access to deeply impacted mandibular teeth is by buccal corticotomy A trapezoidal mucoperiosteal flap is raised in the mandibular molar region, and a rectangular window is made over the deeply impacted tooth using a narrow fissure bur, with the mesial and distal cuts almost reaching the inferior border of the mandible (Fig. 9.2). The buccal corticotomy window is removed with an osteotome. The deeply impacted molar is exposed, divided with a bur and removed. The alveolar nerve bundle is often in close proximity and may be seen after the tooth has been removed. The bony fragment removed at buccal corticotomy is replaced and secured with wires or plates and screws at the mesial and distal edges, and the wound is sutured.
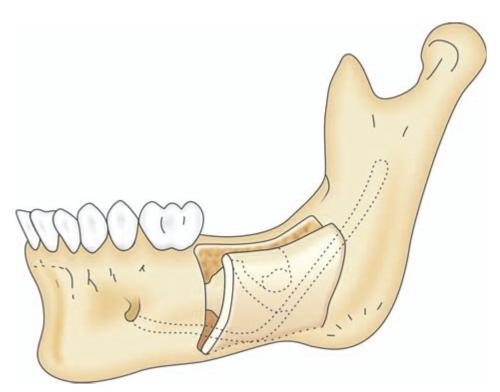
Fig. 9.2: Showing bone cut in buccal corticotomy.
Tay (2007)4 reported 2 cases; a 17-year-old girl with a deeply impacted left lower second molar and another a 12-year-old boy with a deeply impacted left lower first molar and a complex odontome in place of the left lower second molar. In both cases, computed tomograms showed the location of the mandibular canal in relation to the deeply impacted teeth and the buccal cortex. The deeply impacted teeth (and odontome in the second case) were completely removed piecemeal and both patients recovered well and showed evidence of bony healing on radiography 6 months later. The second patient had mild paresthesia of his left lower lip and chin, which resolved after a month.
3. Lingual Split technique (Figs 9.3A to H): This technique was first described by Ward in 19565. The technique continues to be popular in the United Kingdom but has not gained wide acceptance in the United States (Farish and Bouloux, 2007).6 The method involves the use of a chisel and mallet to remove or displace the lingual plate of bone adjacent to lower third molar. A small amount of buccal bone is often removed to facilitate exposure of the crown and provide a point of application for an elevator. Although tooth division is usually not required, it can be achieved with a chisel. Several minor modifications to the original technique have been reported. Although the lingual split technique is well suited to patients being operated under general anesthesia or sedation, it is not appropriate for surgery conducted purely under local anesthesia. This procedure is suitable mainly for young patients where the bone is elastic and where the grain is prominent. Surgery is comparatively quick and clean if the case selection is correct. Moreover, this technique has the advantage of reducing the size of the blood clot by means of saucerization of the socket. Possibility of development of transient lingual nerve anesthesia (rarely permanent) in the postoperative period is considered a major disadvantage. This may be the reason for the lack of popularity for the technique. The exact cause and the timing of lingual nerve injury are not well understood and may be multifactorial. Most studies that evaluate lingual nerve injury are retrospective, involve small sample sizes or are poorly controlled for multiple confounding variables and should be interpreted with some caution. Temporary lingual nerve injury has been reported to vary from 0.8% to 20%, where as permanent injury has been reported to vary from 0% to 1%.
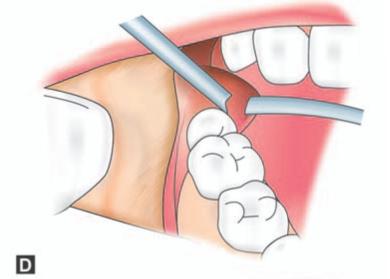
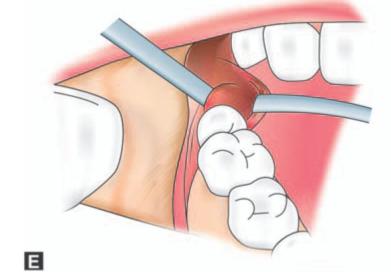
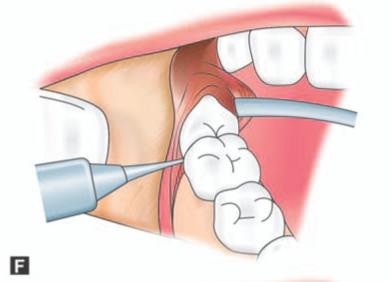
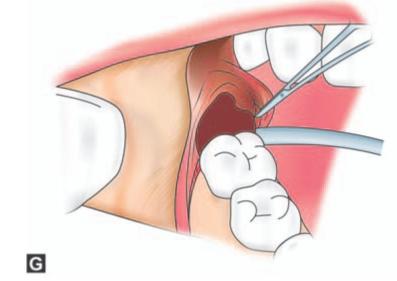
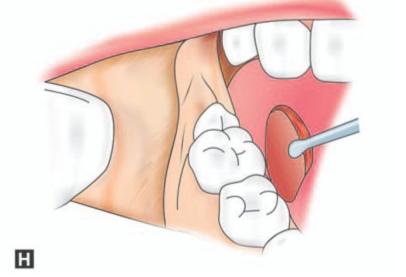
Figs 9.3A to H: (A) Incision marked, (B) Reflection of lingual mucoperiosteum and placement of chisel for buccal vertical stop cut (C) Horizontal bone cut to the distobuccal aspect of third molar for removal of buccal bone, (D) Positioning of chisel on the distolingual aspect of the crown of the third molar held at an angle of 45° to the bone surface and pointing in the direction of the lower second premolar of the opposite side. (E) Excising bone on the distal aspect of third molar, (F) Application of a straight elevator on the mesial aspect of third molar to elevate the tooth. (G) Fractured lingual plate is grasped with a fine artery forceps and is freed from its soft tissue attachments by blunt dissection, (H) Closure of the wound after debridement, irrigation and hemostasis. A single suture placed distal to the second molar is sufficient for adequate closure. The vertical incision in the anterior part is left unsutured
Steps in the Surgical Procedure
Position of the operator: When removing a lower third molar on the right side, the operator must stand on the right side of the patient. While for the removal of a lower left third molar the surgeon must stand on the left side of the patient (Farish and Bouloux, 2007)6. This is in contrast to the bur technique, which is usually performed with the surgeon standing on the right side of the patient for all third molar teeth.
The surgical technique remains relatively the same regardless of the Pell and Gregory classification of impaction. Occasionally a bur may be needed to facilitate tooth division and bone removal. A rubber mouth prop is placed between the teeth on the side contralateral to surgery.
a. Standard incision (as shown in the figure) is given. The buccal flap is then raised in a subperiosteal plane using a #9 periosteal elevator. The flap should be extended just slightly beyond the external oblique ridge to prevent excessive dead space beneath the flap. A 2-0 silk traction suture is then placed through the apex of the triangular flap. The suture should be clamped with a heavy hemostat 6 to 8 inches from the flap, which is then allowed to rest on the skin of the cheek so that the flap is kept retracted.
Attention is then directed to raising a lingual flap, which is done carefully in a subperiosteal plane. A sharp and a slightly curved periosteal elevator such as #9 Molt or a Freeier periosteal elevator is well suited for this purpose. The flap should be raised along a broad length extending from the mesial aspect of the second molar to the lingual aspect of the anterior ramus. This helps to reduce the tension placed on the lingual nerve which adheres to the periosteum. The inferior aspect of the pterygomandibular raphe, superior constrictor muscle along with a small portion of the mylohyoid muscle is included in this flap. It should be remembered that the lingual nerve enters the sublingual space by passing between the superior constrictor and mylohyoid muscles. At this point the nerve is immediately beneath the periosteum and is at risk from trauma. After the elevation of the lingual flap, a Hovell’s retractor is placed beneath the flap and allowed to sit passively.
b. Using a sharp 3 mm chisel a vertical stop cut is made (with the bevel of the chisel facing posteriorly) at the anterior part of the wound just behind the level of the
roots of the second molar. This cut must extend from the crest of the alveolar bone superiorly to a point inferiorly that allows buccal exposure of sufficient tooth structure to place an elevator either mesially or buccally depending on the type of impaction.
c. Then, using a 5 mm chisel with the bevel facing superiorly a horizontal cut is made backwards from a point just above lower end of the stop cut to the distobuccal aspect of third molar. The sectioned piece of the buccal bone is loosened and removed there- by exposing a portion of the third molar crown. The next step is to obtain a point of application for the elevator mesial to the impacted tooth. This is achieved using the chisel by excising a triangular piece of bone bounded anteriorly by the lower end of the stop cut and above by the anterior end of the horizontal cut.
d. The most difficult and crucial aspect of the lingual split is as follows. This step can be considered the most critical one in which the lingual nerve is at risk. Here the distolingual bone is fractured inwards by placing the cutting edge of a 5 mm chisel just posterior to (as shown in the figure) and pointing in the direction of the lower second premolar of the opposite side. In its correct position the cutting edge of the chisel will be parallel to the external oblique ridge. (On the other hand if the cutting edge is held parallel to the internal oblique ridge, the lingual split will extent to the coronoid process). Then a few light taps with the mallet will separate the lingual plate from the alveolar bone making it to hinge on the lingual soft tissue. This step will ensure that the main part of the shelf-like support to the impacted tooth is lost and thus the main resistance to its effective delivery is eliminated. The anterior aspect of the fractured lingual cortex usually extends as far as the mesial aspect of the third molar, while the posterior aspect may extend up to 1 cm distally. The posterior extend of the fracture is limited by the natural bony lingual concavity behind the third molar. The inferior extend of the fracture typically involves the mylohyoid ridge (Fig. 9.4).
If the bone fails to split favourably, it must be presumed that the chisel is wrongly aligned. In such an event the instrument should be realigned. Incorrect angulation of the chisel blade (for example directed perpendicularly down to the inferior border or retromolar area) and use of too great a force may cause fracture of mandible distal to the third molar.
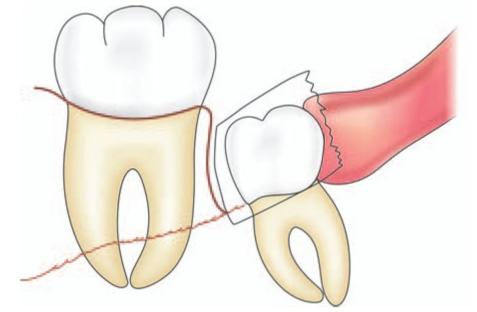
Fig. 9.4: When viewed from the lingual side the inferior extent of lingual cortex fracture can be seen which typically extends up to mylohyoid ridge.
e. Next, the bone that remains distal to the tooth and between the buccal and lingual cut is excised.
f. Then a fine bladed straight elevator is applied mesial to the impacted tooth and with a gentle upward and backward force the tooth is elevated out of the socket. During this backward movement of the tooth, the fractured lingual plate is displaced lingually aiding the removal of tooth.
g. The fractured lingual plate is grasped with a fine artery forceps and is freed from its soft tissue attachments by blunt dissection. Often the inferior extent of the fractured lingual plate is attached to the mylohyoid muscle, which is then removed with a periosteal elevator. This step in effect brings about saucerization of the socket which in turn reduces the size of the socket promoting rapid healing.
h. The sharp edges of the bone is then smoothened with a rongeur and bone file. Failure to do this causes areas of bony prominences leading to patient discomfort, potential bone exposure on the lingual aspect and possible injury to lingual nerve. The wound is then copiously irrigated with normal saline. The wound is then inspected for hemostasis, retraction suture placed initially removed and the wound closed primarily with 3-0 catgut. Usually a single suture placed distal to the second molar is sufficient for adequate closure. The vertical incision in the anterior part is left unsutured. This will act as a wound toilet permitting escape of blood in the event of mild oozing in the postoperative period.
On/>
Stay updated, free dental videos. Join our Telegram channel

VIDEdental - Online dental courses


