10
Impressions
This chapter describes the clinical techniques necessary for obtaining accurate preliminary and master impressions. The information presented here is directly related to the theoretical discussion on stability in Chapter 4.
A denture is constructed on a cast of the denture-bearing tissues. Before this cast can be made, an impression, or negative likeness, of these tissues is obtained. The impression material, which is held against the tissues and supported by an impression tray, exhibits plastic flow in the initial stages and then subsequently hardens or sets. Either plaster of Paris or model stone is then poured into the impression to form the cast, or positive likeness, of the denture-bearing tissues.
If maximum accuracy of the casts is to be achieved, a two-stage impression procedure is required. First, preliminary impressions are taken using stock ‘off the peg’ impression trays and second, the more accurate master impressions are taken using trays which have been ‘tailor-made’ for a particular patient on casts obtained from the preliminary impressions.
The denture-bearing areas
The surface anatomy of the denture-bearing areas is illustrated in Figs. 10.1 and 10.2.
The upper denture is normally extended posteriorly to the vibrating line, which is the junction between the moving tissues of the soft palate and the static tissues anteriorly (Fig. 10.3). Two small depressions in the mucosal surface, the foveae palatinae, common collecting ducts from minor salivary glands, are often seen in this region and are therefore a useful landmark for this junction.
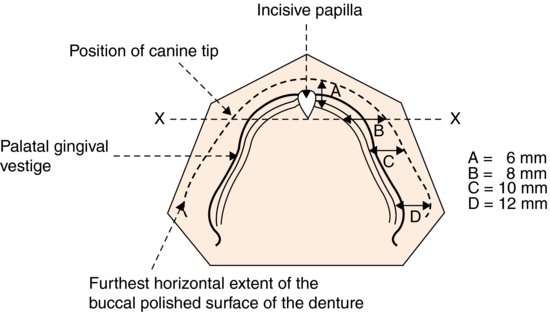
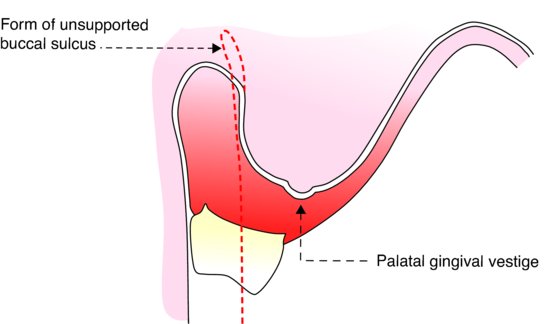
The fibrous band running along the residual ridge is the vestige of the palatal gingivae and, like the incisive papilla, remains relatively constant in position during the remodelling of the ridge which follows extraction of the natural teeth. These two structures can therefore be used as landmarks allowing teeth on complete dentures to be placed in positions similar to those of their natural predecessors (Fig. 10.4). This biometric approach also requires specific design features to be incorporated into the impression trays – for details of these the reader is referred to the relevant bibliography (Watt & MacGregor 1976).
Figure 10.1 Surface anatomy of the upper denture-bearing area. The vibrating line indicates the normal posterior extension of the upper denture.
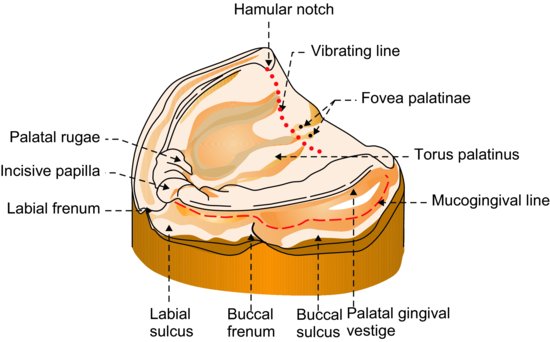
Figure 10.2 Surface anatomy of the lower denture-bearing area. The heavy dotted line indicates the normal posterior extension of the lower denture.
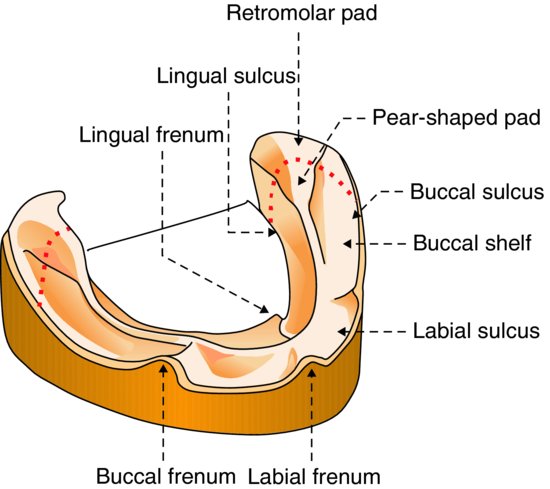
In the lower jaw, the denture should extend over the pear-shaped pads. These pads are very important as buttresses helping to resist distal movement of the denture.
As explained in Chapter 4, it is important that the borders of the denture conform to the functional form of the sulci so that a good facial seal can be produced and maximum physical retention obtained. Broad coverage of the tissues by the denture also ensures that the occlusal loads are distributed as widely as possible.
Anatomy of the sulcus tissues
When recording the functional shape of the sulci, it is necessary to have an understanding of the anatomical structures that influence this shape. These are shown diagrammatically in Figs. 10.5–10.10.
The form of the sulcus changes markedly during function and the shape of the denture must make allowance for these changes, otherwise discomfort or displacement of the denture is likely to result. The required shape of the denture borders is obtained by careful border moulding of the impression. The following areas require particular attention.
Figure 10.3 Longitudinal section through the palate showing correct relationship of the posterior border of the upper denture to the junction between the moving and static tissues (vibrating line).
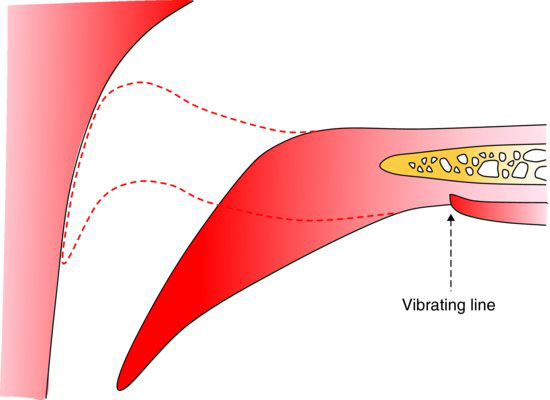
Figure 10.4 Diagram of the upper arch showing average distances from the palatal gingival vestige of the furthest horizontal extent of the polished surface of the denture in the incisal (A), canine (B), premolar (C) and molar (D) regions (the biometric approach). The line (X–X) passing through the posterior border of the incisive papilla can be used as a guide to positioning the tips of the canines.
Mentalis muscle
Contraction of the mentalis muscle raises the soft tissues of the chin, thus reducing the depth and width of the labial sulcus (Fig. 10.7). If there has been marked resorption of the underlying bone, this muscle can exert considerable pressure on the labial flange, resulting in its posterior and upward displacement.
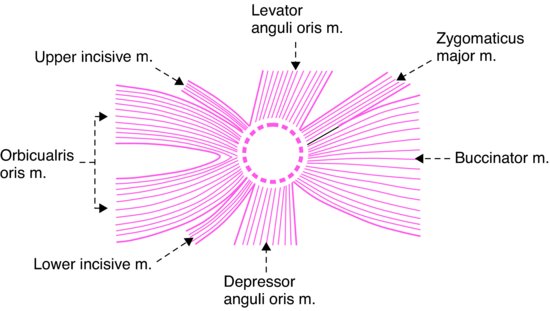
Modiolus
The area of strong muscle activity in the lower labial sulcus is bounded distally on each side by the modiolus, a decussation of muscle fibres at the corner of the mouth (Fig. 10.8). Narrowing of the lower denture base related to the modiolus is usually necessary to avoid displacement (Fig. 10.5). The muscles contributing to the modiolus are able to move or fix the corner of the mouth in any required position during function. For example, approximation of the modiolus to the buccal surface of the denture closes the buccal sulci anteriorly during mastication, so helping to contain the bolus of food as it is being crushed between the posterior teeth.
Figure 10.5 The buccal and distal anatomical relations of the lower denture.
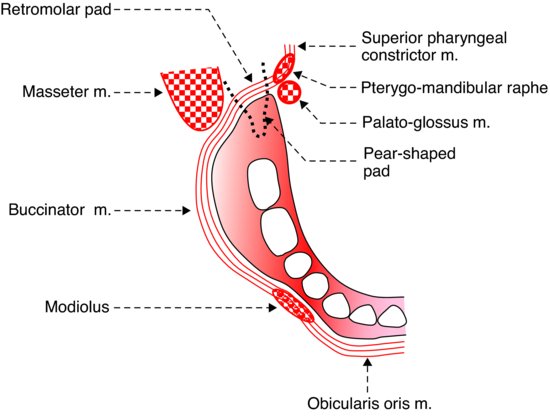
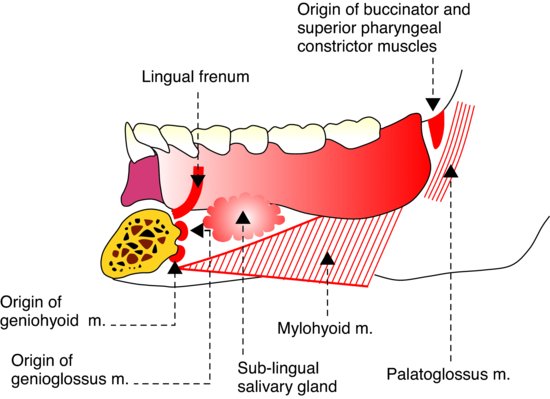
Figure 10.6 The lingual anatomical relations of the lower denture.
Masseter muscle
On clenching the teeth the anterior border of the masseter muscle bulges into the disto-buccal sulcus area (Fig. 10.5).
Floor of mouth
When the tongue is elevated, the sublingual folds are raised and may greatly reduce the depth and width of the lingual sulcus. This phenomenon is most marked when advanced resorption of the ridge has occurred.
Figure 10.7 Section through the lower lip showing the muscles which influence the shape of the labial sulcus.
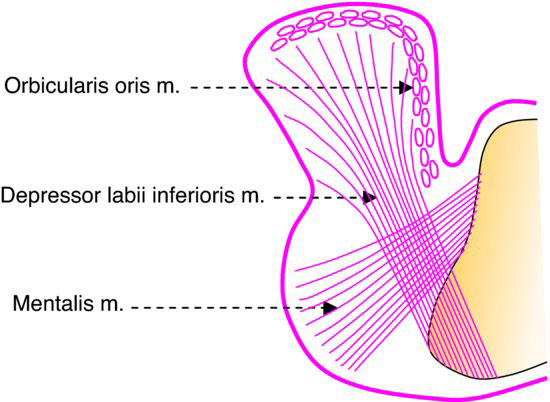
Figure 10.8 The muscles contributing to the modiolus (dotted circle).
Zygomatic process of the maxilla
The anatomical structures determining the form of the sulcus in the upper jaw are shown in Fig. 10.9. Particular care must be taken to avoid vertical over-extension in the first molar region, as mucosal injury may result from a sandwiching of the soft tissues between the denture border and the zygomatic process of the maxilla.
Coronoid process
Buccal to the tuberosities, the sulcus often reaches its deepest point; however, its width is reduced when the mouth is opened because of the close proximity of the coronoid process of the mandible (Fig. 10.9). If the buccal flanges of the eventual denture are too wide posteriorly, they will either restrict mandibular opening or be displaced by the coronoid process. Thus, the borders of the impression in this region should be moulded to the correct width by the patient moving the mandible from side to side when the mouth is open.
Buccinator muscle
A certain amount of lateral displacement of the buccinator muscle by the denture in other areas can occur without causing instability of the denture. In fact, such displacement can be desirable as it can increase retention by improving the facial seal (Fig. 10.10). It can also make it easier to create a favourable slope of the polished surface for effective muscular control of the denture.
The preliminary impression
Stock trays
Stock trays are available in a range of sizes and shapes. These trays are constructed in metal or plastic and may be perforated or unperforated. Certain types of plastic trays are intended to be disposable.
Ideally, a stock tray should cover the entire denture-bearing area and allow a uniform space of a few millimetres in between it and the underlying mucosa (Fig. 10.11).
Figure 10.9 The buccal anatomical relations of the upper denture.

Figure 10.10 Lateral displacement of the buccinator muscle by the denture to improve facial seal.
However, as the range of sizes and shapes of stock trays is limited and the shape of the denture-bearing areas so varied, the fit of the tray is usually less than perfect. The tray may be too wide or too narrow; it may not cover the denture-bearing tissues posteriorly; the tray flange may be under-extended, finishing short of the mucosal reflection in the sulcus, or may be over-extended so that it digs into and distorts the sulcus tissues.
Figure 10.11 The ideal relationship of a stock tray to the sulci and denture-bearing mucosa.

It is a common misconception amongst novice clinicians that accuracy of the preliminary impressions is not particularly important as it is assumed, incorrectly, that any faults can be easily corrected when obtaining the master impressions. However, this is far from the truth. It is very important that the preliminary impression is as accurate as the limitations of the stock tray allow, because the more faults there are in this impression, the more time-consuming and difficult will be the modifications of the special trays at the next visit. As a result the quality of the master impression is likely to be compromised.
When it has been decided to use a relatively low viscosity impression material such as alginate for the preliminary impression it is often necessary to modify the extension of the stock tray. Under-extension of the tray can be corrected by the addition of impression compound or pink wax to the deficient flange, while over-extension can be corrected, if the tray is plastic, by trimming back the flange with a bur.
Impression materials and techniques
As even a correctly selected and modified stock tray is very unlikely to have a perfect relationship to the denture-bearing tissues, it is desirable for the impression material chosen for a preliminary impression to have a relatively high viscosity, as this allows it to compensate better for the shortcomings in fit and extension of the stock tray.
Alginate
Alginates vary considerably in their viscosity and the high viscosity type is most suitable for preliminary impressions. Alternatively, the powder–water ratio of the more fluid alginates can be increased to achieve the required consistency.
Retention of alginate to the impression tray
Alginate does not adhere to the tray surface and so retention must be provided by means of a perforated tray or an adhesive. Perforations allow alginate to flow through and ‘rivet’ the body of the impression to the tray. If adhesive is used, it should be applied thinly to the entire inner surface of the tray and also carried over the peripheries to include a few millimetres of the outer surface. Time should be allowed after application of the adhesive for it to become tacky, a process which can be speeded up considerably by dispersing the adhesive over the surface of the tray with a stream of air from a triple syringe.
Border moulding the lower impression
The lower impression is usually taken first as it is easier for the patient to tolerate than the upper. When the impression is seated in the mouth the patient is asked to raise the tongue to contact the upper lip and to sweep the tongue to touch each cheek in turn before returning to maintain contact with the upper lip until the alginate has set. This tongue movement will raise the floor of the mouth and tense the lingual frenum, causing the alginate in the over-extended parts of the lingual periphery to be moulded to conform more closely to the functional depth of the sulcus. If the tongue is allowed to relax and fall back into the floor of the mouth while the impression material is still fluid, the material may flow down into the floor of the mouth and the impression will become overextended once more. Buccal and labial border moulding is achieved by firm stretching of the relaxed lips and cheeks with the fingers. It is essential that the clinician supports the tray carefully during these border moulding manoeuvres.
Border moulding the upper impression
If the sulci buccal to the maxillary tuberosities are deep, air may be trapped as the loaded impression tray is inserted. To overcome this problem, these areas can be pre-packed with alginate before seating the tray. The tray is first loaded and placed to one side; then with the cheek reflected and the patient’s mouth half closed, alginate is placed into the buccal sulcus with a spatula or finger. The loaded tray is then quickly inserted into the mouth, positioned over the ridge and seated with sufficient pressure to cause the alginate to flow and record the shape of the tissues. Excess alginate will flow into the sulci, producing an over-extended impression. This over-extension must be corrected by carrying out border moulding.
Removing the impression from the mouth
When the border moulding is complete, the tray must be kept perfectly still until the alginate has set, otherwise strains will be induced in the impression. Then when the impression has been removed from the mouth, gradual release of these strains will take place, causing distortion. In order to remove the set impression from the mouth, the border seal must be broken. This is achieved by first asking the patient to half close the mouth; the cheek is then reflected away from the buccal surface of the impression on one side to allow access of air to the periphery, and a sharp jerk is applied to the tray handle. If the impression is removed slowly, distortion of the alginate is more likely to occur.
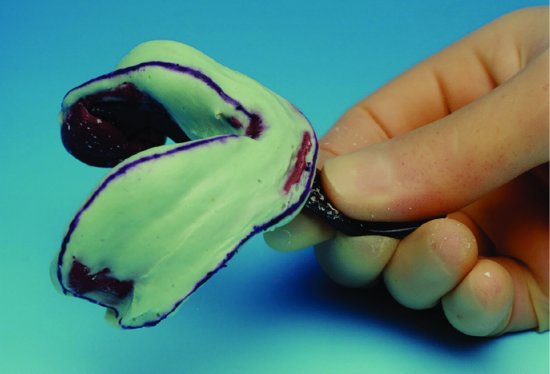
Figure 10.12 A lower impression in alginate showing a border which has been molded by the adjacent tissues. Correct extension in the lingual pouches has been achieved by suitable extension of the tray. The line drawn on the impression provides a useful guide when the cast is trimmed.
The completed impression
Saliva should be removed from the impression surface by rinsing briefly under a cold tap. Excess water is shaken off and the impression is inspected carefully. A satisfactory completed impression will include the entire denture-bearing area. The surface of the impression should be smooth and show evidence of having been moulded by the tissues (Fig. 10.12). The border areas should be rounded and include impressions of the frenal attachments.
The dimensional instability of alginate
An alginate impression is particularly susceptible to dimensional change developing as a result of an increase or a decrease in its water content. These two processes are:
1. Imbibition – the absorption of water
2. Syneresis – the loss of water
If water is left on the surface of the impression imbibition will take place causing the alginate to swell. If the impression is left in a dry atmosphere syneresis will occur with consequent shrinkage of the alginate. Therefore it is essential that a satisfactory impression is rinsed, disinfected, covered as soon as possible with a damp napkin and placed in a plastic bag. Casts should be poured as soon as possible. While the impression is waiting to be poured, it must not be allowed to rest on any surplus alginate which has flowed over the posterior border of the tray, as this will cause distortion.
Impression compound
This is a thermoplastic material which softens when heated in a water-bath to temperatures between 55°C and 70°C. The high viscosit/>
Stay updated, free dental videos. Join our Telegram channel
VIDEdental - Online dental courses


