11
Recording Jaw Relations – Clinical Procedures
This chapter describes the basic technique for recording the jaw relationship. This clinical stage is, in fact, concerned with far more than establishing the relationship between maxilla and mandible. It is the process by which the information essential for the production of new dentures is transferred from the patient to the dental laboratory so that the dental technician is provided with what amounts to a blueprint for the prostheses.
This chapter focuses primarily on recording the jaw relationship for patients without existing dentures. However, in Chapter 8 the point was made that most patients require replacement dentures, and that the existing ones provide a great deal of information which will be invaluable at this clinical stage. Therefore we recommend that the reader also refer to Chapter 8 to obtain a more comprehensive picture of the clinical procedure.
Measuring the rest vertical dimension
The rest vertical dimension is recorded to provide a point of reference from which the occlusal vertical dimension of the dentures can be calculated by subtracting the required freeway space (usually approximately 3 mm). Determining the rest vertical dimension is one of the more difficult tasks in dentistry, as indicated by the large number of denture problems that can be attributed to errors in this dimension.
To reduce the chance of error and to coax the mandible into the rest position, the patient must be completely relaxed. This can be encouraged by paying particular attention to the following points:
- Many patients are apprehensive when they enter a dental surgery. The clinician therefore needs to make every effort to reassure the patient and allay any feelings of anxiety.
- The patient should be seated in a comfortable, upright position in the dental chair.
- External stimuli should be reduced to a minimum, as disturbing noises, or a bright light shining in the patient’s eyes, are likely to increase activity of the mandibular musculature and thus reduce the rest vertical dimension.
- Relaxation may be further promoted if the patient’s eyes are closed, although it is important that the clinician explains what is to be done at the time, otherwise this exercise may achieve quite the opposite effect and induce a state of apprehension.
- Some patients are helped if they are asked to swallow, lick their lips, or make the sound ‘m’ before trying to relax the mandible.
Before measuring the rest vertical dimension, the clinician must be satisfied that the patient is truly relaxed. Visual assessment of facial features and proportions assists the clinician in judging the progressive development of this state of mind. It is pointless making a measurement if the patient appears tense, or if the lower third of the face is clearly reduced or increased in height.
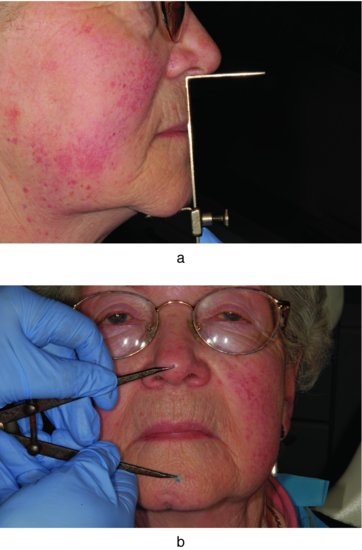
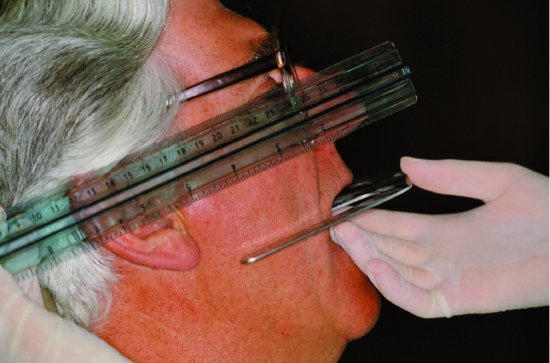
The rest vertical dimension is measured as the distance between two selected points, one related to the upper jaw and one to the lower jaw. Two methods are commonly used to make this measurement, the Willis gauge and the ‘two-dot’ technique (Fig. 11.1). It is most important to appreciate the inherent inaccuracies of both measuring methods. As a general rule, it is advisable to repeat measurements of the rest vertical dimension on several occasions during the appointment. This gives the clinician an idea of the reproducibility and reliability of the recordings. Above all, it should be borne in mind that all clinical methods of measuring the rest vertical dimension are based to a greater or lesser extent on what is in reality intelligent guesswork.
Figure 11.1 Two methods of measuring the rest vertical dimension and the occlusal vertical dimension. (a) The Willis gauge. (b) The two-dot technique; the distance between the dots is measured with a pair of dividers.
The Willis gauge
In the case of the Willis gauge, three points require attention to minimise the potential errors of this technique.
The position of the fixed arm under the nose
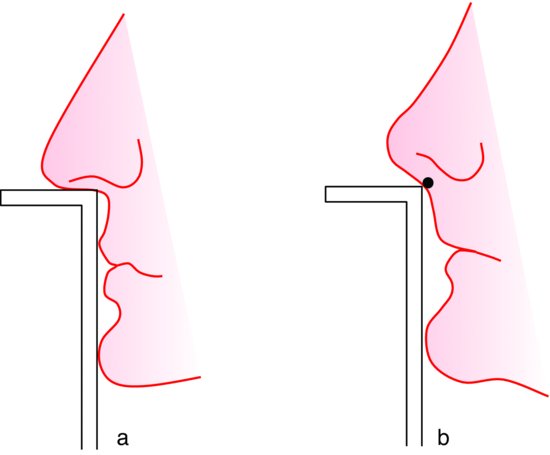
If the patient has a well-defined naso-labial angle, the fixed arm can be positioned with reasonable accuracy. However, if the naso-labial angle is obtuse, positioning of the gauge becomes less precise. Under these circumstances it helps if a small mark is made on the skin at the angle so that the fixed arm can be positioned in relation to it (Fig. 11.2).
Figure 11.2 (a) The shape of the naso-labial angle allows the fixed arm of the Willis gauge to be located accurately. (b) A location mark may be used where the naso-labial angle is obtuse.
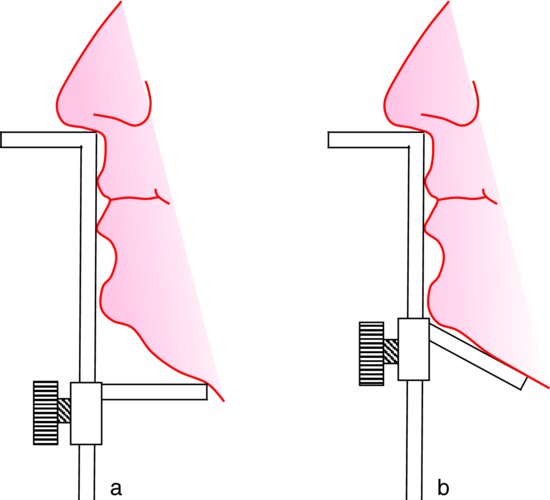
The position of the sliding arm under the chin
The sliding arm should be moved so that it only just touches the under-surface of the chin, because if pressure is applied to the sub-mental tissues by the gauge, errors will result from the mandible being pushed upwards. Also, the tissues will be compressed by an amount that will be impossible to reproduce consistently on subsequent measurements. Further inaccuracies may arise if the shape of the chin is such that it prevents positive location of the sliding arm. However, this difficulty can be avoided by modifying the gauge to reduce the length of the arm and to alter its angle (Fig. 11.3).
Figure 11.3 (a) The shape of the chin prevents positive location of the sliding arm of the Willis gauge. (b) Sliding arm modified to allow more accurate positioning.
The vertical orientation of the gauge
The vertical orientation of the gauge should be such that it makes contact with the face both above and below the lips. The handle contacts the upper lip under the nose and also contacts the chin in the mental region, so that its long axis is in line with the long axis of the face. This keeps any variation in vertical orientation of the gauge to a minimum during successive measurements (Fig. 11.4). However, consistent orientation of the gauge is difficult to achieve with facial profiles associated with full lips or a severe skeletal class II jaw relationship, because the handle of the gauge cannot be placed in contact with the chin.
Figure 11.4 (a) Incorrect; (b) and (c) correct positioning and orientation of the Willis gauge.

The two-dot technique
When the two-dot technique is used, the dot related to the upper jaw is best placed on the tip of the nose and not on the upper lip because the latter is too mobile to provide a reliable location. The rest vertical dimension is then measured using dividers. This technique has been shown to be particularly subject to error. The cause is usually movement of the dot on the chin due to an inability by the patient to thoroughly relax the muscles of facial expression.
A particular complication is that an increase in occlusal vertical dimension will not necessarily be associated with a corresponding increase in the distance between the dots because, as the mandible moves down away from the maxilla, there is a tendency for the patient to try to maintain a lip seal. The effort by the circum-oral musculature needed to keep the lips together pulls the dot on the chin upwards.
However, in spite of these limitations, the technique remains a useful one to have in reserve for certain types of facial profile and for bearded patients for whom consistent positioning of the Willis gauge may be difficult or impossible.
The post-dam
Before discussing the construction of record blocks, it is helpful to consider a related subject, the post-dam.
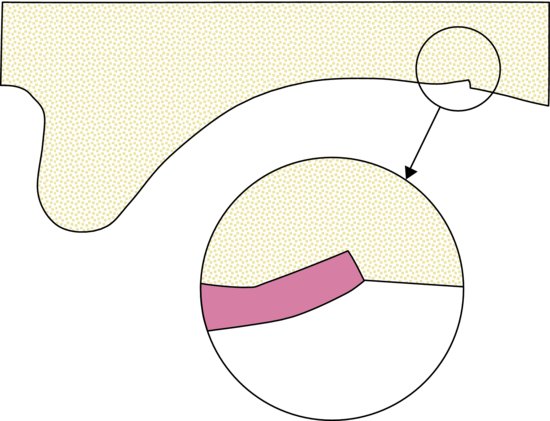
The physical forces of retention are created and maintained in the sulci by a valve-like seal between the flange of the denture and the mucosa. Obviously, this kind of seal cannot be produced along the posterior border of the upper denture as it crosses the palate and so it has to be completed by other means.
To obtain this posterior seal, either a groove is cut into the palate of the master cast, or the mucosa in this area is compressed during impression taking so that when the permanent denture base is processed a raised lip is created on its impression surface. This projection, the post-dam, compresses the palatal mucosa once the denture is placed in the mouth and thus creates a border seal. At the same time, the polished surface of the denture can be bevelled in this region so that the edge of the denture is not so noticeable to the patient’s tongue (Fig. 11.5).
Figure 11.5 The post-dam region of an upper denture. Inset: the bevelled polished surface allows the denture to merge with the mucosa.
When cutting the post-dam it should normally be completed at the appointment for recording the jaw relationship so that the post-dam will be incorporated into the trial denture. However, when problems with retention of the upper record blocks are anticipated, it is advantageous to have a post-dam on the upper record block. In such cases the post-dam will need to be prepared on the master cast before the record block is constructed.
It is the clinician, rather than the dental technician, who should be responsible for creating the post-dam because only the clinician can make the essential clinical assessments regarding its position and depth.
The position of the post-dam
The orthodox position of the post-dam is at the junction of the moving tissues of the soft palate and the static tissues of the hard palate anteriorly (Fig. 11.3). It should extend laterally to the mucosa overlying the hamular notches. If the border of the denture is taken further posteriorly, the patient may well complain of nausea. Furthermore, the continual movement of the soft palate in relation to the posterior border of the denture will repeatedly break the seal and is likely to result in inflammation and even ulceration of the mucosa. If the post-dam is placed anteriorly to the junction, it terminates on relatively incompressible tissue. It is then impossible to achieve a reasonable depth to the post-dam and, as a result, the seal is less efficient.
The depth of the post-dam
The depth to which a post-dam can be cut depends upon the compressibility of the mucosa and this varies across the palate. For example, the mucosa in the midline of the palate is bound tightly to the underlying periosteum, while laterally the presence of a submucosa gives rise to much greater compressibility. Such variation is detected clinically by palpation and the depth of the post-dam is modified accordingly.
The record blocks
It is essential that the wax record rims should be placed on well-fitting rigid bases. A non-rigid wax base is likely to change shape during the recording procedure and thus prevent accurate location both in the mouth and subsequently on the casts.
Suitable materials for the bases are:
- Light-curing acrylic resin
- Heat-curing acrylic resin
- Shellac
Table 11.1 A comparison of materials used in the construction of bases for record rims.
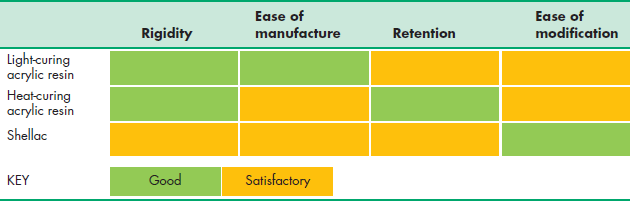
Aspects of the advantages and disadvantages of the materials compared in Table 11.1 are discussed below:
Rigidity and strength
Although both types of acrylic resin are more rigid than shellac, the latter material is rigid enough to use as a base for upper blocks. However, where the lower ridge is narrow in cross-sectional shellac is unreliable as it may easily deform or fracture in use.
Ease of manufacture
Light-curing acrylic is the quickest and easiest of the materials for the dental technician to use.
Accuracy of fit
Heat-curing acrylic resin bases provide the best fit and allow maximum retention to be established. Thus, when the rims have been carved to their final shape, it should be possible to engage the patient in conversation without the blocks becoming dislodged. Observing a patient talking is of immense value in judging the occlusal vertical dimension, as discussed in ‘Adjusting the lower record rim’ later in this chapter.
A heat-curing acrylic base can be particularly valuable when the prognosis for retention in the upper jaw is very poor. It helps to first try the denture base in the mouth alone. Any perfecting of the extension of the base can then be completed and a baseline estimate of retention obtained. The wax rim can then be added. If the retention is significantly reduced the most obvious cause is that the superstructure of the rim is not in muscle balance and must therefore be modified.
Ease of modification
Before positioning a post-dam the clinician needs to be confident about the patient’s tolerance to that degree of posterior extension. Where there is uncertainty about tolerance the use of a shellac base allows the base extension to be modified easily at the chairside.
Where the inter-ridge distance is small the thinness and adjustability of a shellac base can make life easier for both the clinician, when recording the jaw relationship, and the dental technician, when setting up the teeth for the trial denture.
It will be appreciated that the matters just discussed need to be considered immediately after the master impressions have been taken, as they will influence the prescription for the material to be used by the dental technician to construct the record blocks.
Adjusting the upper record rim
Before starting any adjustment, upper and lower record blocks should be placed in the mouth in turn and checked for stability, retention, extension and comfort. It is important to appreciate that a loose or uncomfortable record block will almost certainly disturb normal mandibular movement and invoke such a feeling of insecurity in the patient that the essential relaxation is not achieved and is perhaps the strongest reason for suggesting the use of ‘permanent’ acrylic bases. If there are problems with any of these aspects it is essential that corrections are carried out before proceeding any further.
There are two basic objectives when adjusting the upper record rim:
- To establish the correct orientation and level of the occlusal plane.
- To produce the correct shape for the labial, buccal and palatal surfaces.
Although the procedures are described below in sequence, in practice the final form of the record blocks is most often achieved as a result of a coordinated process in which earlier adjustments are reviewed and modified in the light of the results of later adjustments.
Establishing the orientation of the occlusal plane
The orientation of the occlusal plane of the upper rim is conveniently judged by using a Fox’s occlusal plane indicator (Fig. 11.6) or a disposable wooden tongue spatula. The intra-oral part of the instrument rests on the occlusal surface of the record rim while the extra-oral extension allows the clinician to judge the relationship of the plane to the facial guidelines.
Figure 11.6 A Fox’s occlusal plane indicator; the intra-oral portion is held against the occlusal surface of the upper record block; the extra-oral extension allows the clinician to judge the orientation of the occlusal plane with the interpupillary line and with the ala-tragal line. The latter line is indicated by the ruler held against the patient’s face.
Adjustment in the coronal plane
The rim is adjusted so that the occlusal plane is parallel to the interpupillary line, or alternatively, at right angles to the long axis of the patient’s face. Failure to follow these guidelines, which ensure that the occlusal plane appears horizontal in relation to the general symmetry of the face, will result in an unsightly, lopsided appearance of the finished dentures.
Adjustment in the sagittal plane
A useful guideline for sagittal orientation of the occlusal plane is the ala-tragal line, an imaginary line joining the lower border of the ala of the nose with the midpoint of the tragus of the ear, to which the occlusal plane is made parallel (Fig. 11.6). Failure to conform to this guideline is likely to detract from the aesthetic result. It can also have adverse consequences for stability; for example, if the occlusal plane on the lower denture is tilted up posteriorly it may become so high that the denture is displaced by the tongue rather than being controlled by it.
Establishing the level of the occlusal plane
The incisal level of the upper rim is related to the upper lip, but it is impossible to describe hard and fast rules for determining this relationship. For example, whereas a patient with a long upper lip may show very little of the upper teeth during normal function, the patient with a short upper lip is likely to display more of the teeth. For those patients who don’t have existing dentures, a baseline from which to start is to modify the incisal edge so that it is just visible when the lip is at rest. As the rim is then either reduced or added to, errors in appearance are easy enough to identify. It is important, as part of this assessment, to look at the relationship of the rim to the lip during function by getting the patient to smile and say a few words whilst wearing the record block. The eventual answer comes as the result of trial and error and by exercising a little visual common sense.
Correct shaping of the labial, buccal and palatal surfaces of the wax rim
Shaping the labial surface
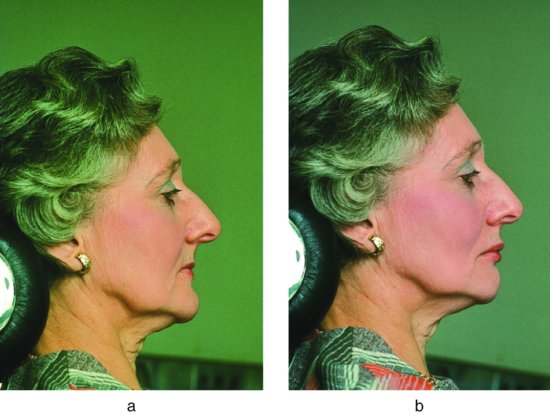
Adequate lip support depends upon the position and inclination of the labial face of the wax rim. The biometric guides mentioned in Chapter 10 can help in achieving the correct shape. For example, the incisal edges of the upper central incisors can be placed up to 1 cm in front of the centre of the incisive papilla to compensate for the resorption of the alveolar ridge. Another useful guide is the naso-labial angle. A study of dentate adults (Brunton & McCord 1993) suggests that if the angle is within the range 102°–116° the upper lip is adequately supported by the record block (Fig. 11.7). It is essential that the position of the labial surface of the rim is compatible with the stability of the record block. The further forward the rim the greater will be the displacing force of the lip muscles acting on the labial surface. Also, it should be remembered that the displacing force occurring on incising food when the finished denture is worn will also be increased. If the prognosis for retention of the upper denture is unfavourable as a result of extensive post-extraction resorption of bone, it may be necessary to effect a compromise between function and appearance by positioning the rim further palatally if this gives greater stability.
Figure 11.7 (a) An upper record block providing inadequate support to the upper lip – the naso-labial angle is obtuse. (b) Addition of wax to the labial face of the upper record block providing more support for the upper lip – the naso-labial angle is 90ˆ.
Shaping the buccal surface
The record rim posteriorly should be shaped so that it fills the buccal sulcus and slightly displaces the buccal mucosa laterally as shown for the denture in Fig. 11.10. This will contribute to retention by achieving an efficient facial seal. The rim itself will usually be buccal to the crest of the ridge by an amount proportional to the amount of resorption that has occurred. Reference to the biometric guides (Chapter 10) will help to identify an appropriate position. However, care should be taken not to place the rim too far buccally, as it will then be outside the neutral zone and increased force from the buccinator muscle will cause displacement. The buccal and palatal surfaces of the rim should be shaped to converge occlusally so that pressure from the cheeks and tongue has a resultant force towards the ridge, thus aiding neuromuscular control.
Shaping the palatal surface
It is essential to create adequate space for the tongue by ensuring that the rim is not placed too far lingually and by reducing the width of the rim where necessary by removing wax from the palatal aspect until it corresponds to the width of the artificial teeth which will replace it. If the record block is too bulky, the constriction of the tongue and the resulting abnormal sensory feedback is likely to influence mandibular posture and so lead to inaccuracies in recording the jaw relationship. In addition, speech quality, which can be most valuable in confirming the accuracy of jaw relationship recordings, can only make a contribution to this assessment if the dimensions of the rims are similar to those of the eventual dentures.
Adjusting the lower record rim
The adjustment of the lower rim may be considered to have three aspects, as discussed in the following.
Adjusting the height of the rim to the required occlusal vertical dimension
The orientation of the occlusal plane has already been established on the upper rim, while the overall height of the lower rim will be governed by the existing height of the upper and the need to fit both into the required occlusal vertical dimension. However, the clinician should be prepared to modify the upper occlusal plane further if problems arise when shaping the lower one. For example, if it becomes increasingly apparent that the lower rim is going to be so high that stability will be poor, or so low that there will be no room for the teeth, then appropriate modifications must be carried out on the upper block.
Shaping the labial, buccal and lingual surfaces to conform to the neutral zone
These surfaces of the rim are shaped to accommodate the surrounding musculature, because the lower rim will be unstable until it is positioned in the neutral zone. First, it is necessary to adjust the buccal and labial surfaces of the rim so that they lie close to, but do not displace, the cheek and lip mucosa. Second, it is vital to allow adequate tongue space by carving the rim on the lingual side so />
Stay updated, free dental videos. Join our Telegram channel
VIDEdental - Online dental courses


