Fig. 12.1
Representing different levels of perforation and their associated prognosis. (a) A lateral perforation coronal to the attachment level can be included in the restoration, and provided a seal is achievable should have no bearing on outcome. (b) and (c) Lateral perforations in the middle or apical portion of the root canal are treated like accessory anatomy, and provided a good endodontic seal is achievable, then this should have no bearing on prognosis in the long term. (d) A lateral perforation at or just apical to the attachment level and furcal perforations have the least favourable prognosis
The diagnosis of an iatrogenic root perforation is made by good vision and lightning (use of the dental operating microscope), radiographic assessment and use of electronic apex locators. Crown-root alignment should be evaluated particularly where a cast restoration has been placed. Radiographs to evaluate the size, shape and depth of the pulp chamber, relative to the furcal floor, are an essential preoperative prerequisite. The author recommends taking a parallel bitewing radiograph as well as a parallel periapical and a 15° horizontal tube shift x-ray as part of the routine endodontic assessment of a case [8–11]. Cone beam CT radiography has been shown to have a higher sensitivity to detect strip perforations and root perforations after root canal treatment in mandibular molar teeth [12].
A narrow isolated periodontal defect may be a possible sign of periodontal breakdown as a result of a perforation and must be differentiated from the differential diagnosis of localized periodontal disease and vertical root fracture [13].
The first step in managing non-surgical orthograde root perforations is to control the haemorrhage at the site of the perforation using either pressure or irrigation. Care must be taken not to irrigate sodium hypochlorite solution through the perforation site into the surrounding tissues for risk of a hypochlorite accident [14]. An internal matrix technique using a resorbable matrix such as decalcified freeze-dried bone, hydroxyapatite and calcium sulfate and restorable collagen with MTA may be placed in which a sealing material can be condensed [7, 15–18]. Numerous sealing materials have been used over the years with varying degrees of success. Glass ionomer cement, resin-ionomers and mineral trioxide aggregate depending on type of perforation (size and location) have been recommended and used with success [19–23].
Indications for a surgical approach include large perforations, perforations as a result of resorption and failure of healing following a non-surgical orthograde approach [24]. Guided tissue regeneration has been attempted in the management of endodontic perforations with some success in case reports by acting as barrier for apical epithelial migration [25].
Perforation repairs can be performed with a high level of success, but long-term studies, ideally prospective, are still lacking to evaluate their success [26].
12.2 Classification of Root Perforations
The following table is a classification of root perforations which is based on the key prognostic factors that affects long-term outcome, namely, size and location of perforation and timeline from diagnosis to repair (Table 12.1).
Table 12.1
Root perforation classification and prognosis according to type
|
(i) Fresh perforation
|
|
Perforation that has occurred and treated at the same time under aseptic conditions. The prognosis should be favourable
|
|
(ii) Old perforation
|
|
Previously not treated with likely bacterial infection. The prognosis is questionable depending on apical migration of epithelium as a result of chronic inflammation/presence of narrow probing profile
|
|
(iii) Small perforation
|
|
A perforation whose diameter is smaller than a #20 endodontic instrument. Mechanical damage to adjacent tissue is minimal and the opportunity to seal is easy. The prognosis is good
|
|
(iv) Large perforation
|
|
This type of perforation may occur during post preparation, during access preparation or as a result of over-instrumentation/strip perforation resulting in significant tissue damage and difficulty in providing an adequate seal. The prognosis is deemed questionable
|
|
(v) Coronal perforation
|
|
A perforation that is coronal to the level of the crestal bone and epithelial attachment with minimal damage to the adjacent supporting tissues. The ability to seal in terms of access to the perforation site is good. The prognosis is good
|
|
(vi) Crestal perforation
|
|
The perforation is at the level of the epithelial attachment into the crestal bone. The prognosis is questionable
|
|
(vii) Apical perforation
|
|
The perforation site is apical to the crestal bone and epithelial attachment. The prognosis should be good provided the perforation site remains aseptic with no microbial contamination. The prognosis should be good provided no orthograde root filling material is extruded through this artificial anatomy
|
12.3 Diagnosis of Root Perforations
Early recognition of a root perforation is crucial to the long-term prognosis. Sudden bleeding or pain during instrumentation of the root canals or post space preparation in the teeth is an important sign that should alert the clinician to the possibility of an iatrogenic error resulting in a perforation. The presence of blood on paper points, particularly on the coronal or middle 1/3, may also be indicative of such a mishap. One must be aware that over-instrumentation beyond the apical foramina or remaining pulp tissue remnants within the canal system can also result in evidence of blood on a paper points.
A more reliable method is to use an electronic apex locator (EAL). The working length should always be verified with an EAL, and a premature reading significantly shorter than the estimated length in combination with profuse bleeding is often a good indicator of the presence of a perforation.
The diagnostic value of a radiograph can be useful when a file is placed to this level often demonstrating that the file is misplaced beyond the confines of the canal into the periodontal tissues. If the perforation is either buccal or lingual, then the diagnostic yield of the radiograph is limited.
The use of a dental operating microscope is another effective tool in the detection of perforations and management thereafter. High magnification combined with illumination will often allow direct unimpeded visualization of the perforation within the straight portion of the root canal.
If a perforation has been present for some time and there has been communication with the perforation site and attachment level at crestal bone level, then a narrow probing profile may be detected in this area. The ingress of bacteria within this communication will result in further apical migration of epithelial attachment resulting in a narrow pocket depth.
12.4 Iatrogenic Causes of Root Perforation
Access preparation
A well-designed and executed access cavity is an essential objective whereby straight-line access is gained to the root canal system without overzealous tooth removal thereby preserving the overall integrity of the tooth (Fig. 12.2).
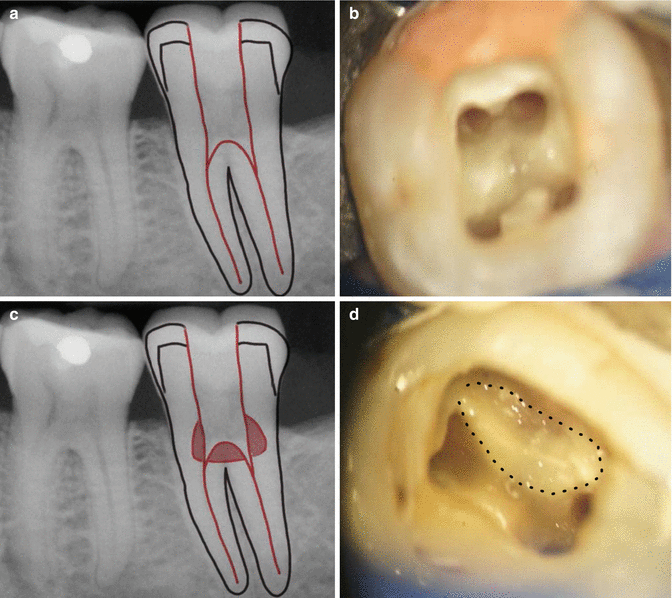
Fig. 12.2
Clinical photograph demonstrating (a) and (b) straight-line access and retention of as much tooth structure as possible and (c) and (d) inappropriate access preparation resulting in over-preparation and risk of perforation (dotted area)
Due consideration should be given to the orientation of the tooth in question and in particular any deviation of the crown and root along the long axis of the tooth. This can typically occur in cases where a crown has been placed or where the tooth is dilacerated, rotated or imbricated (Fig. 12.3).
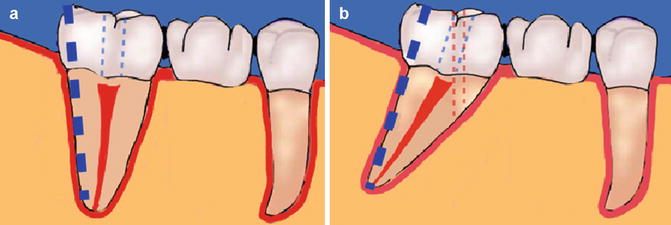
Fig. 12.3
Diagrams showing crown-root mismatch which can account for iatrogenic perforation during access cavity preparation. High risk when the crown of the tooth is a crown or bridge abutment. Careful preoperative clinical and radiographic assessment is imperative. Note the pulp chamber is often in the centre of the tooth at the level of the cementoenamel junction (CEJ). Note (a) thick dotted blue line indicating long axis of root/tooth and thin dotted blue line showing correct access. (b) Note red dotted line indicating perforation possibility if crown-root axis is not correctly aligned with the bur during access preparation
Furcation perforations occurring typically in the floor of the posterior molar teeth usually occur during access preparation when due care has not been given to the level of the furcation relative to the crown. A preoperative bitewing radiograph will give the clinician an excellent idea as to the approximate depth to the pulp chamber. Digital radiographic systems allow for manipulation of the image taken and measurements to be made. Provided the bitewing is a parallel image with minimal distortion, then the measurement should be fairly accurate.
Canal identification
Canal identification can be problematic in those cases where obvious calcification has occurred in the coronal pulp chamber resulting in iatrogenic perforations.
Chronic insults whereby reparative dentine is laid down will result in sclerosed canals and diminished pulp chambers. Anatomical features pertinent to the tooth in question as well as preoperative radiographs will alert the clinician to the expected number of root canals and their likely position. Once an initial access preparation has been made, the individual canals can be located usually following the ‘road map’ of root canal anatomy which is darker compared to the whiter axial walls. Pulp chamber calcifications can often be observed using a dental operating microscope and illumination highlighting the colour difference between surrounding anatomies. Ultrasonic tips are often useful when removing small amount of dentine in search of canal orifices. No burs should be used to gouge the floor of the pulp chamber and risk perforation.
Canal preparation
The advent of nickel titanium rotary instrumentation techniques means the ideal canal shape should be a continuously tapered preparation, maintaining canal anatomy and keeping the apical foramen as small as possible. The clinician should bear in mind the danger zones in relation to root canal anatomy and care during preparation procedures to ensure no strip perforation occurs due to overzealous instrumentation (Fig. 12.4).
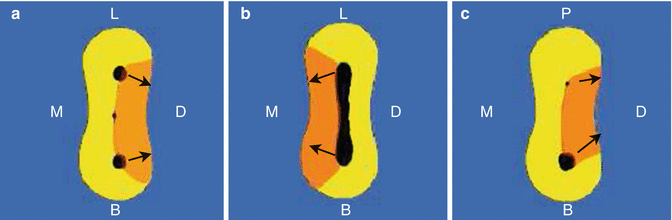
Fig. 12.4
Diagrams representing danger areas typically encountered in posterior molar teeth. (a) Mesial roots of mandibular molars, (b) distal roots of mandibular molars and (c) mesiobuccal roots of maxillary molars. Instrumentation towards the danger areas (orange) such as the furcations or root concavities can increase the likelihood of a strip perforation. Overzealous coronal canal preparation using gates glidden burs, for example, can easily result in this unfavourable outcome. Care must be taken to identify correctly the danger zone in the root area and avoid unnecessary preparation of this area
Incautious preparations without taking into account the original anatomy and overzealous use of either rotary instruments or large tapered Gates Glidden burs can result in apical or crestal strip perforations. Large inflexible instruments used in curvatures can also result in zipping of the canal anatomy leading to perforations. A glide path should always be used prior to negotiating any canal curvature whether straight or curved (Fig. 12.5).
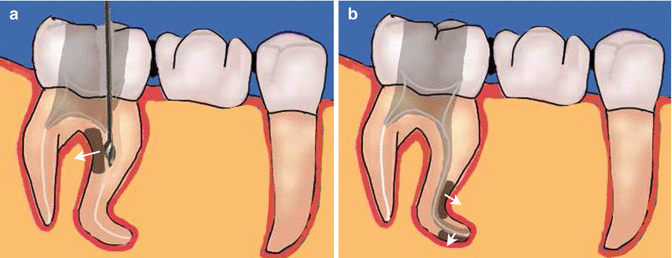
Fig. 12.5
Diagrams showing how a strip perforation can occur when (a) preparing the coronal 1/3 of the canal with rotary instrumentation such as gates glidden drills. These drills are used only in the straight portion of the canal remembering never to prepare the root canal more than 1/3 of the root diameter. Overzealous preparation must be avoided. Overaggressive preparation (b) in a severely curved root canal can result in preferential removal of root dentine from the inside of the curve in the middle 1/3 of the canal and similar removal of dentine on the outside of the curve in the apical 1/3 of the canal due to the tendency for the file to straighten out. This can lead to both a strip perforation and tear-shaped apical preparation, both of which are difficult to obturate
Post space preparation
Post space preparation should be carried out ideally at time of obturation. Clinically 4–5 mm of gutta-percha should remain apical to the post space to maintain an apical seal. A safe preparation should be taken under the guidance of the dental operating microscope to avoid risk of perforation due to deviation of post bur from the long axis of the root. The canal anatomy should be assessed for any changes in curvature along the root length, which would risk perforation.
12.5 Non-surgical Perforation Repair
A prerequisite for non-surgical management is that the perforation site can be visualized using the dental operating microscope. In those instances where a strip perforation has been created, then the canal space beyond the perforation must be obturated prior to repair of the perforation. The first step in order to visualize the perforation site is to stem any bleeding which may be present. Local anaesthetic, sodium hypochlorite or triamcinolone acid soaked on a cotton wool pledget and pressed against the site of perforation should be sufficient to control haemorrhage (Fig. 12.6).
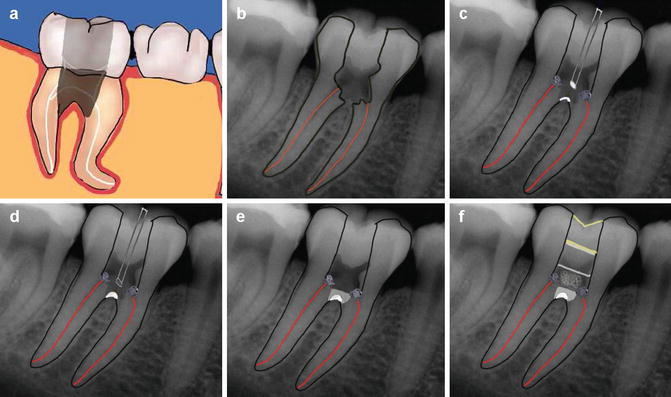
Fig. 12.6
Diagrams showing steps in repair of a furcal perforation. (a, b) Furcal perforation, (c) placement of cotton wool over canal orifices to prevent any reparative material dislodging into canals, (d) placement of barrier material, (e) placement of artificial floor repair material which is packed against the barrier such as MTA and (f) cotton wool and interim dressing to allow setting of MTA. Note the canals have been prepared at this stage ready to obturate at the second appointment. The artificial barrier is assessed at the second appointment for integrity ensuring a permanent seal is present
To avoid extrusion of filling material into the periodontal tissues and risk of further inflammation, delayed healing or need for a surgical procedure for debridement, an internal modified matrix technique can be used. Sterile inorganic bovine bone (ABB; Bio-Oss, Geistlich AG, Wolhusen, Switzerland) is packed into the perforation defect. Once the matrix is in place, the artificial floor barrier can be placed using either glass ionomer cement, MTA or Biodentine without the risk of pushing the material into the surrounding bone and supporting tissues.
If MTA has been used, then the access cavity is sealed with a temporary moist cotton wool pledget to ensure that the site has sealed and the MTA has set (Fig. 12.7).
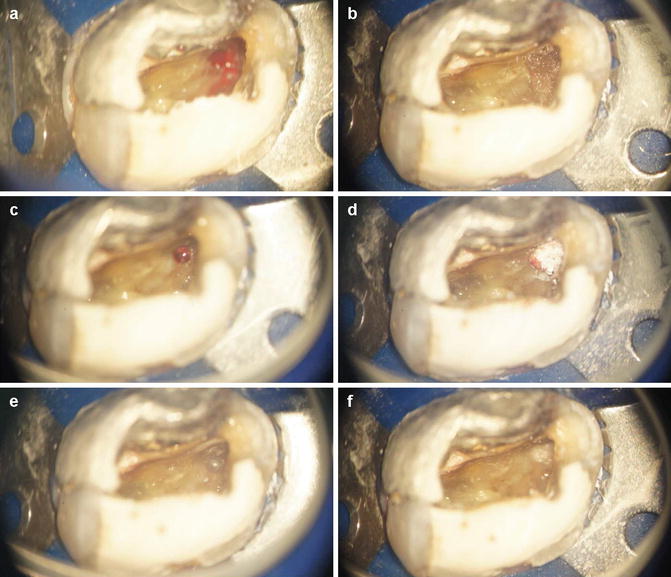
Fig. 12.7


Clinical photographs demonstrating an iatrogenic perforation after the dentist had been searching for a calcified canal. He reported using a bur to remove further dentine in the MB region. (a) Following removal of temporary dressing, obvious bleeding was noted in the MB region. (b) Placement of cotton wool soaked in local anaesthetic to control the bleeding. (c) Perforation diameter greater than a size 20 endodontic instrument. (d) and (e) Placement of freeze-dried bone at the site of the perforation (internal matrix concept) and (f) placement of MTA over the site of perforation to maintain seal
Stay updated, free dental videos. Join our Telegram channel
VIDEdental - Online dental courses
