Fig 23.1 (A and B) A thin, mobile, and nonkeratinized marginal soft tissue is less resistant to the muscle pull and recession, which may result in recurrent peri-implantitis and subsequent peri-implant bone loss.
Advantages of the thick, nonmobile, and keratinized marginal soft tissue
1. Protects the peri-implant tissues from injury and infection
2. Resists the pull of muscles
Soft tissue grafting in implant therapy creates a stable peri-implant soft tissue environment by providing an adequate zone of thick, keratinized, and nonmobile soft tissue with intimate adaptation to the emerging implant superstructures. This results in the maintenance of a biological soft tissue seal, and hence, reduction in the incidence of peri-implantitis. Additionally, it provides adequate soft tissue to craft and achieve natural soft tissue architecture for natural aesthetics, and emerging harmonious implant restoration.
Surgical principles of soft tissue grafting
Graft size
The donor site should provide an adequate sized graft to regenerate the required soft tissue dimensions at the recipient site. The adequate size graft not only facilitates immobilization at the recipient site but also receives adequate peripheral circulation from the surrounding recipient site in cases of exposed implant abutment coverage.
Graft uniformity
Graft with a uniform surface facilitates intimate adaptation to the recipient site.
Graft thickness
Grafts with thickness of more than 1.25 mm are preferred when used to cover an avascular surface like the exposed implant abutment at its centre portion. The graft first gets necrosed over this avascular surface and is gradually taken over by the granulation tissue from the periphery to form a scar. The thicker graft is better able to maintain physical integrity during this process, which may take 4–6 weeks. Thus, a full thickness or a thick split thickness graft should be preferred for soft tissue grafting around the dental implant.
Graft vascularization
The free graft (epithelialized connective tissue graft) initially survives with plasmatic circulation and subsequently receives vascularity from the recipient site when capillaries from the recipient site grow and invade the soft tissue graft. Hence, the recipient site should provide adequate vascularity to the graft. When the recipient site has a partially avascular surface like the exposed implant abutment, a thick and large sized graft should be preferred to receive vascularity from the surrounding vascular surface of the recipient site.
Graft adaptation
The graft should intimately be adapted to the underlying recipient surface at the time of operation, which results in a thin layer of exudates between the graft and the recipient bed and achieves a ‘plasmatic circulation’ for the initial survival of the graft. Inadequate adaptation of the graft causes a thick exudative layer or blood clot at the interface, which may hamper plasmatic circulation and may lead to graft rejection. To achieve adequate graft adaptation over the recipient bed, the graft should have a uniform surface and should be compressed for a few minutes before and after suturing, using moist cotton to eject the blood and extra exudates from the interface to achieve intimate contact of the two surfaces. The recipient site should be uniformly prepared to enhance the intimate adaptation of the graft. The periosteum is considered an excellent recipient surface for the free graft as it provides close adaptation and rich blood supply to the overlying free graft.
Adequate haemostasis
Adequate haemostasis must be obtained at the recipient site because active haemorrhage may prevent intimate adaptation of the graft to the recipient bed. It also facilitates the formation and maintenance of a thin fibrin layer at the graft–recipient surface interface, providing the physical attachment of the graft to the recipient bed and also helping in the establishment of plasmatic circulation between two surfaces, which nourishes the graft before its vascularization.
Graft immobilization
The closely adapted graft should be firmly immobilized onto the recipient bed using multiple interrupted sutures. Mobility of the graft during initial healing, can hamper its nourishment through plasmatic circulation or can disrupt newly forming blood vessels that supply the graft. This may result in excessive shrinkage or sloughing of the graft. The free graft should not be sutured to the surrounding mobile muscular tissue, which can pull the graft during muscle movement. It should be sutured to the underlying periosteum of the recipient bed and the surrounding nonmobile attached tissue.
Healing of free grafts
A free graft, which has been secured onto a connective tissue recipient bed shows three phases of healing (< ?xml:namespace prefix = "mbp" />
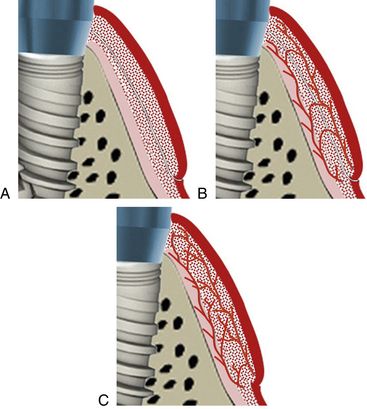
Fig 23.2 (A) Three phases of free soft tissue graft healing – initial phase, (B) revascularization phase and, (C) tissue maturation phase.
Initial phase (0–3 days)
An intimate adaptation of the graft to the recipient site at the time of surgery leads to:
Revascularization phase (2–11 days)
1. Anastomoses occurs between blood vessels of the graft and recipient bed (after 4 to 5 days).
2. Circulation gets re-established in the pre-existing graft vessels.
3. Capillary proliferation within the graft results in the regeneration of dense blood vessels into the graft.
4. Fibrous union between graft and recipient tissue occurs.
5. Re-epithelialization over the graft gets established mainly by proliferation from the adjacent tissues.
6. If a free graft is placed on a root or implant surface, apical migration of epithelium on this surface takes place at this time.
Tissue maturation phase (11–42 days)
1. Gradual reduction of the number of blood vessels occurs in the graft.
Time for soft tissue grafting-usually the soft tissue grafting is preferred at the stage of implant uncovery, but soft tissue grafting can be performed at any stage such as-
Keys to success
Possible donor sites for graft harvesting
The richest autogenous source of connective tissue or epithelialized, connective-tissue intraoral graft is the palate, but in selective cases the epithelialized connective-tissue graft can also be harvested from the edentulous ridge area of the maxilla or mandible and also from the maxillary tuberosity (
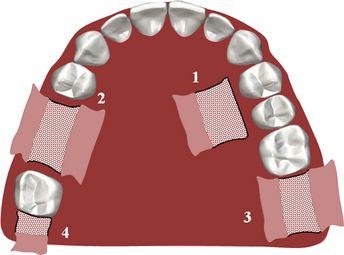
Fig 23.3 Possible donor sites for soft tissue graft – palate mesial to the first molar (1) posterior ridge areas (2), and maxillary tuberosity (3 and 4).
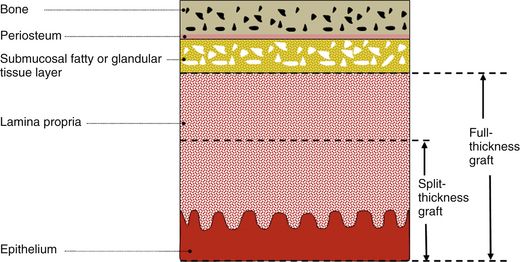
Fig 23.4 A cross-section of the hard palate in the region of maxillary first molar region shows different layers of soft tissue over the palatal bone. Sullivan et al classified the gingival grafts as split-thickness grafts or full-thickness grafts. A full-thickness graft includes all the lamina propria with the epithelium but a split-thickness graft includes only a partial thickness of the connective tissue with the epithelium. A split thickness graft can be further classified as thin, intermediate, and thick depending on the thickness of the connective tissue (1/4, 1/2, or 2/3) harvested with the overlying epithelium. The fatty or glandular tissue is not harvested with the mucosal graft.
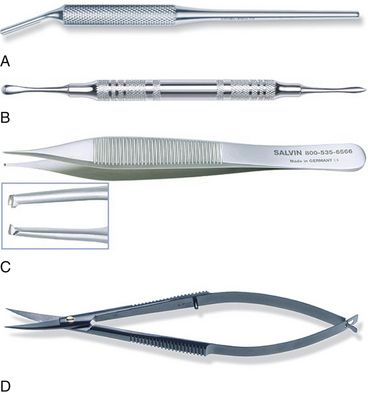
Armamentaria and materials required
4. Straight and angled surgical blade handles
9. Surgical blade numbers 11, 12, and 15
10. Suture material (4-0 with reverse cutting edge needle)
11. Collagen sponge (
Technique-1 – Epithelialized connective tissue graft or free gingival graft technique
A partial thickness or full thickness epithelialized connective tissue graft can be harvested from the palate.
Step by step diagrammatic presentation
1. Recipient site preparation (
2. Harvesting epithelialized connective tissue graft (
3. Adaptation and immobilization of epithelialized connective tissue graft at the recipient site (
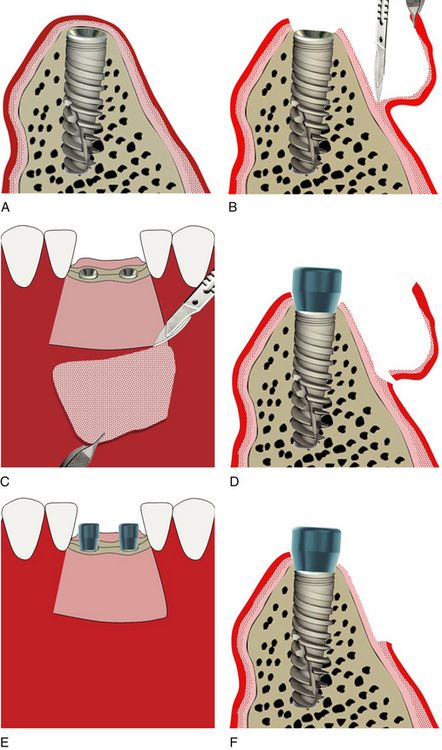
Fig 23.6 A horizontal incision is made, using surgical blade number 15, just coronal to the desired soft tissue augmentation. Vertical incisions are then extended apically from the lateral aspects of the horizontal incision. All three incisions are made perpendicular to the existing soft tissue surface to create butt joint with the free gingival graft. All the incisions are limited to the mucosa and should not cut the underlying periosteum. (A and B) The sharp dissections are made apically to elevate all the mucosal tissue, leaving the periosteum intact to the bone. (C and D) The resultant flap is usually excised. (E and F) All the residual remnants of the connective tissue or muscle attachments are removed using a soft tissue nipper or sharp soft tissue scissors to create a rigid periosteal recipient bed. If performed at the time of implant uncovery, the implant is exposed and a gingival former is inserted. Haemostasis is obtained by compressing the site with a moist cotton pack for few minutes.
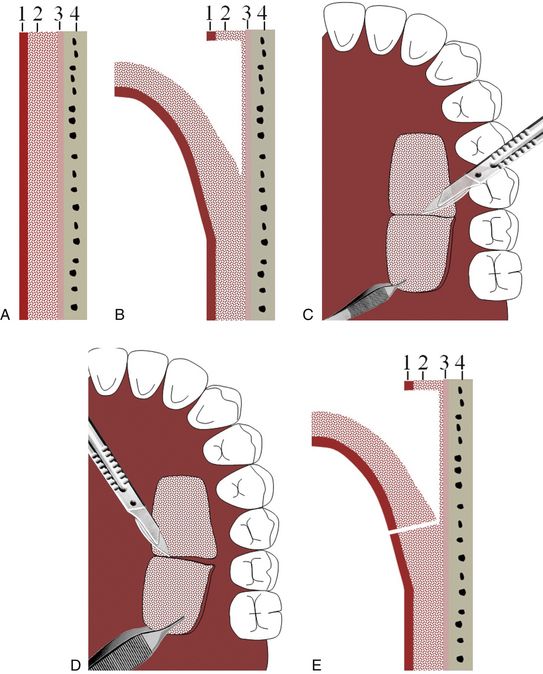
Fig 23.7 Rectangular-shaped horizontal incisions, limited to the connective tissue, are made using a number 15 blade at the hard palate in the premolar region leaving 2–3 mm marginal gingiva. (A–C) The sharp dissections are made to elevate a full thickness or partial thickness free gingival graft, leaving the glandular tissue behind, attached to the periosteum. (D and E) The resultant flap is removed and immediately transferred to the prepared recipient site.
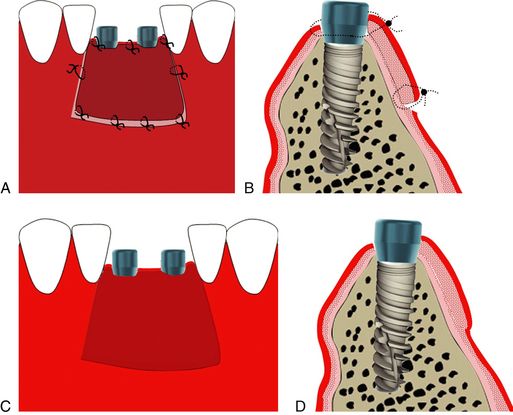
Fig 23.8 Free gingival graft is shaped to accurately fit at the prepared recipient site. (A and B) Once the haemostasis is obtained at the recipient periosteum bed, the graft is adapted and sutured with the periosteum and surrounding nonmobile tissue using 4-0 chromic gut sutures. Once immobilized with sutures, the graft should be compressed using a moistened saline sponge for 10–12 min, to squeeze out extra blood from the interface and to achieve intimate contact between the two surfaces, to form a thin fibrin clot at the interface. The patient is instructed not to brush the site for 3 weeks. Sutures are removed after 10–13 days. (C and D) The graft through the different stages of its regeneration, slowly maturates into a thick keratinized soft tissue at the site and this procedure may however take 8–10 weeks.
Advantages of the free gingival graft technique
1. Relatively easy to perform when compared to other soft tissue grafting procedures.
2. A large area can be grafted.
3. Thickens tissue and regenerates a keratinized epithelium.
4. It can be performed using acellular dermal matrix (AlloDerm®) in patients who resist harvesting autogenous graft.
5. It can be performed at any stage, before or at the time of implant placement, during uncovery or after the implant has been restored.
Stay updated, free dental videos. Join our Telegram channel
VIDEdental - Online dental courses


