Fig. 8.1
(a) Vertical bite wing also used as a periapical radiograph can be used in order to demonstrate information provided by both types of radiographs. Deep carious and periapical radiolucency is observed in the mandibular permanent second molar. (b) Periapical radiograph of the contra lateral tooth showing normal apical papilla (Courtesy Dr. M. Raginsky)
Periapical radiographs should be inspected for continuity of the periodontal ligament in order to diagnose inflammatory and resorptive lesions. The interpretation of radiographs of young, immature permanent teeth can be difficult, due to their normally large and open apex and radiolucent apical papilla. Less experienced dentists treating these teeth should avoid confusing pathologic changes with normal apical anatomy [1]. In a young child a vertical bite-wing with a small size radiograph can be used instead of a periapical radiograph in order to see the periapical area of posterior teeth (Fig. 8.1).
Treatment decision is not always possible based on a single radiograph, hence a radiograph of the antimere is frequently taken for comparison. The degree of root development of the affected tooth and the amount of dentin apposition along the canal should be compared with those of the contra lateral tooth (Fig. 8.1). It is Important to remember that the root canals of permanent teeth are wider in the bucco-lingual plane than the mesio-distal. Therefore it is difficult to determine the extent of apical closure in a regular radiograph showing only the mesio-distal plane.
In the anterior region, radiographs of each central incisor should be obtained separately from a distal angulation to prevent overlapping of the periodontal ligament of the central incisor over the lateral incisor. Performing radiography in this manner is often important in teeth after traumatic injuries (Fig. 8.2b) [1]. Lateral external inflammatory root resorption is a common finding in necrotic young teeth after trauma. External replacement root resorption can also be seen after traumatic injuries.
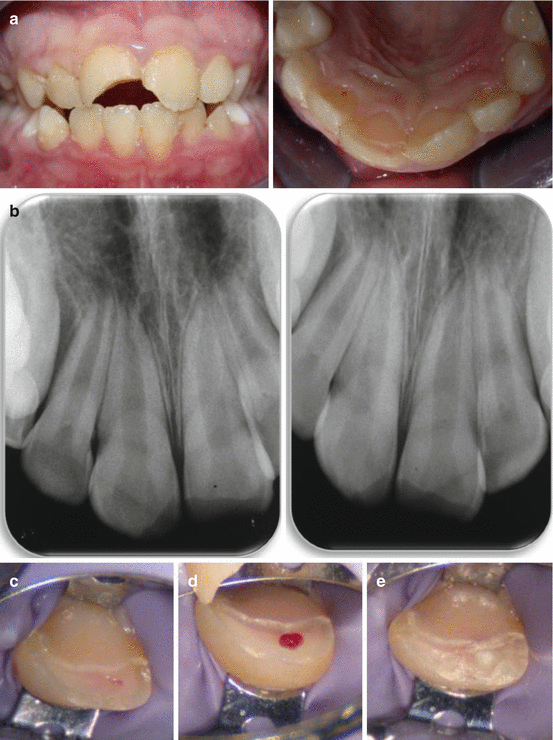
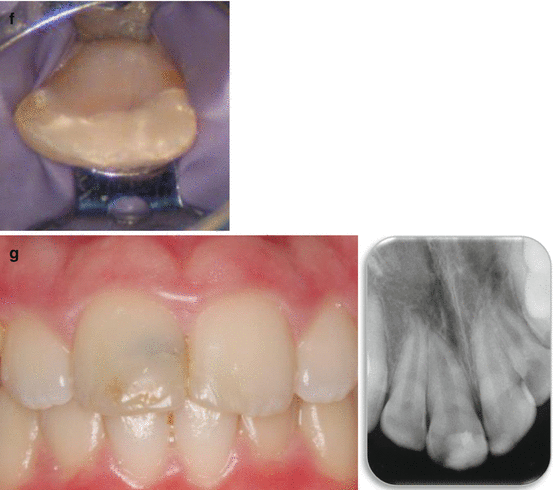
Fig. 8.2
(a) 9½ years old girl 4 days post complicated crown fracture in the right maxillary permanent central incisor. (b) Radiographs of the maxillary central incisors. Immature roots with open apices and wide root canals can be seen. (c) The right maxillary central incisor after cleaning and disinfection with sodium hypochlorite solution. A small pulp exposure is seen. (d) Partial pulpotomy. (e) White MTA (ProRoot, Dentsply, Tulsa, OK, USA) as pulp capping material. (f) Glass Ionomer (Fuji IX, GC, Leuven, Belgium) placed on top of the MTA. (g) Two year follow-up. Grey discoloration caused by the white MTA is seen in the crown. Continuous root formation and apical closure is evident in the radiograph (Courtesy Dr. E. Nuni)
In recent years the use of Cone Beam Computed Tomography (CBCT) in endodontics has significantly increased. CBCT is a technique that produces undistorted three-dimensional digital imaging of the teeth and their surrounding tissues at reduced cost and less radiation for the patient than traditional CT scans. The American Association of Endodontics (AAE) and the American Academy of Oral and Maxillofacial Radiology (AAOMR) states that the use of CBCT is justified in cases in which the benefits to the patient outweigh the potential risks of exposure to X-rays, especially in the case of children or young adults. CBCT should only be used when the question for which imaging is required cannot be answered adequately by lower dose conventional dental radiography or alternate imaging modalities [12].
8.2.4 Direct Pulp Evaluation
In some instances, during the clinical treatment, a final diagnosis can only be reached by direct visualization of the pulp tissue. The appearance of the pulp tissue and the quality (color) and the amount of bleeding from a direct exposure of the pulp must be assessed; profuse or deep purple colored bleeding, or pus exudate indicates irreversible pulpitis. Based on these observations, the treatment plan may be confirmed or changed [1].
The different procedures of vital pulp therapy for immature permanent teeth have much in common with those of primary teeth and include indirect and direct pulp capping, partial pulpotomy, cervical pulpotomy and apexogenesis (see Chaps. 4 and 5). As mentioned, in young permanent teeth all the effort is made to preserve total or partial vitality of the pulp. Treatment procedures for nonvital immature permanent teeth will be presented further in this chapter.
8.3 VitaI Pulp Therapy for Normal Pulp or Reversible Pulpitis Without Pulp Exposure
8.3.1 Indirect Pulp Treatment (IPT)
Caries excavation and indirect pulp treatment (IPT) for immature permanent teeth is similar to that of primary teeth (see Chap. 4). The main objective of indirect pulp treatment is to maintain the vitality of teeth with deep caries and reversible pulpitis, that otherwise might need endodontic therapy if the decay was completely removed. The indication for IPT should be limited to teeth without signs of irreversible pulpitis [13]. Clinically, during cavity preparation the demineralized carious tissue is removed and a thin layer of caries is left on the pulpal floor at the deepest site of the cavity to avoid pulp exposure. The carious tissue is then covered with a biocompatible material. The materials most commonly used in IPT are calcium hydroxide, glass ionomer and Mineral Trioxide Aggregate (MTA). The tooth then is restored with a material that seals the tooth from microleakage.
Two clinical procedures have been described in the literature: one appointment caries excavation and a step-wise technique (two appointments) (see Chap. 4). Research available is inconclusive on which approach is the most successful over time [14, 15]. Several studies have demonstrated a high percentage of success utilizing IPT both in permanent and primary teeth [15–17]. Rickets et al. have demonstrates that in symptomless, vital, carious primary or permanent teeth, stepwise and partial excavation reduced the risk of pulp exposure. Therefore these techniques show clinical advantage over complete caries removal in the management of dentinal caries [16].
8.4 VitaI Pulp Therapy for Normal Pulp or Reversible Pulpitis With Pulp Exposure
8.4.1 Direct Pulp Capping
Direct pulp capping may be performed when a small exposure of the pulp is encountered during cavity preparation in teeth with a normal pulp or reversible pulpitis, or following a recently sustained traumatic injury [18]. The aim of this treatment is to maintain pulp vitality by forming a calcified barrier (reparative dentin) to wall off the exposure. It should be kept in mind that, in teeth affected by caries, there is an inflammatory response of the pulp to bacteria or bacterial products [19, 20].
Direct pulp capping should be performed immediately after the exposure to prevent contamination of the pulp. As the extent of the inflammatory process in the pulp cannot be accurately assessed by clinical tests, the diagnosis of reversible (treatable) pulpitis may be sometimes incorrect. In some teeth affected by deep caries, pulp inflammation might have reached the stage of irreversible pulpitis without showing clinical signs.
The characteristics of the pulp capping material are of significant importance: it should ideally be biocompatible, non-resorbable, capable of establishing and maintaining a good seal to prevent bacterial contamination, and capable of promoting pulp repair and dentin bridge formation. Ideally the dentin bridge formed after direct pulp capping should be without tunnel defects that could allow the penetration of bacteria into the pulp at a later stage [1].
Mineral trioxide aggregate (MTA) and calcium hydroxide are the most frequently recommended capping materials. The mechanism of action of the two materials in vital pulp treatment are similar, as the main soluble component of MTA is calcium hydroxide [21]. Calcium hydroxide dissolves in an aqueous environment into calcium and hydroxyl ions creating a high pH in the close environment (~12). This alkaline pH is responsible for the antibacterial activity of these materials [22]. The initial effect of calcium hydroxide applied to an exposed pulp tissue is the development of a superficial necrosis as a result of the high pH. This necrosis causes low-grade irritation to the tissue and stimulates the pulp to defense and repair. Contrary to calcium hydroxide, MTA causes mild inflammatory and necrotic changes in the subjacent pulp. Thus it is less caustic than the traditional calcium hydroxide preparations [23]. Calcium ions are released from the capping material, forming inorganic precipitations that have been associated with the mechanism controlling cytological and functional changes in the interacting pulpal cells [24].
The high pH and low solubility of calcium hydroxide prolongs its antibacterial effect. However, being water soluble, it might dissolve under leaky restorations and be washed out, leaving an empty space under the filling material. Hard-setting calcium hydroxide cements can induce dentin bridge formation, but they do not provide an effective long-term seal against bacteria or their by-products [1].
Recent studies suggest that the mechanisms by which calcium hydroxide or MTA stimulate the wound healing process is related to the solubilizing effect of calcium hydroxide on the dentin matrix component. Growth factors and other bio-active molecules, sequestered within the dentin matrix during dentinogenesis (e.g., TGF-βs) may be released by the action of calcium hydroxide and mediate the changes in cell behavior observed during reparative dentinogenesis [4, 25].
MTA presents some advantages over calcium hydroxide as the material of choice for direct pulp capping. It is a hard setting biocompatible material with an antibacterial effect that provides a biologically active substrate for cell attachment. These features make this material effective in preventing microleakage, improving the treatment outcome. As previously mentioned, MTA stimulates reparative dentin formation with negligible pulpal necrosis and minimal inflammatory reaction in the exposed pulp [23]. Tziafas demonstrated that after direct pulp capping with MTA in dogs the underlying pulp tissue was consistently normal, and only at a later stage some hemorrhage in the pulp core was observed. The beginning of a hard tissue barrier was observed after 2 weeks, and reparative dentinogenesis was disclosed after 3 weeks, associated with a firm fibrodentin matrix [26]. It was also demonstrated that, compared with calcium hydroxide, MTA consistently induces the formation of dentin bridge at a greater rate with a superior structural integrity. Therefore, MTA appears to be more effective than calcium hydroxide for maintaining long-term pulp vitality after direct pulp capping [23].
However, MTA presents a major drawback by staining tooth material, both in the grey and white versions [27, 28] (Fig. 8.2e,g). Hence, its use in vital pulp therapy procedures (pulp capping, pulpotomy) is not recommended in teeth where there is an esthetic concern. In these teeth alternatives to MTA (such as calcium hydroxide) should be considered.
BiodentineTM (Septodont, Allington Maidstone, Kent ME16 OJZ UK) is a new generation calcium silicate based material (as MTA) which is described by the manufacturer as bioactive and biocompatible dentin substitute. It was introduced to the dental market in 2009 and its properties have been described as similar to MTA. Its main advantage over MTA is its short setting time, ~10 min, which enables the completion of some clinical procedures in one visit vs. two. It also appears that Biodentine does not cause tooth discoloration, but further studies are needed in this matter [29, 30].
Direct pulp capping should always be followed by an immediate and definitive restoration.
8.4.1.1 Direct Pulp Capping Technique
The tooth should be isolated with a rubber dam and disinfected with sodium hypochlorite (NaOCl) solution. During cavity preparation with high speed burs under constant water spray and caries removal with low speed burs, the cavity should be rinsed with sodium hypochlorite from time to time to decrease the bacterial load. No further pulpal tissue is removed except that occurring with the caries removal. Pulpal hemorrhage is controlled by copious irrigation with NaOCl solution [31]. The solution is refreshed every 3–4 min and may be left in contact with the exposed pulp tissue for about 10 min. NaOCl disinfects the cavity and removes the blood clot from the pulp exposure site. Care should be taken to remove the blood clot prior to placement of the dressing material over the exposed pulp, as its presence may compromise the treatment outcome. It has been demonstrated that leaving the blood clot may result in the formation of dystrophic calcifications and internal resorption. It may also interfere with dentin bridge formation and serve as a substrate for bacteria in leaky restorations [32]. NaOCl appears to have no adverse effect on pulpal healing and dentin bridge formation [31].
If the bleeding cannot be controlled within 10 min, it appears that pulp inflammation is more extensive and has progressed deeper into the tissue. Therefore, a tooth initially scheduled for a direct pulp cap may be a better candidate for a pulpotomy [33]. After hemorrhage control, MTA (or calcium hydroxide) should be prepared according to the manufacturer’s instructions and placed directly over the exposed pulp tissue (1.5–2 mm thick). The material should then be covered with a glass ionomer liner followed by a permanent restoration with an excellent sealing ability.
8.4.2 Pulpotomy
Although the use of direct pulp capping and pulpotomy in cariously exposed pulps of mature teeth remains a controversial issue in Endodontics, these procedures are universally accepted in young immature permanent teeth. The pulpotomy procedure involves removing pulp tissue that has inflammatory or degenerative changes, leaving intact the remaining clinically appearing healthy tissue, which is then covered with a pulp-capping agent to promote healing at the amputation site. The only difference between pulpotomy and pulp capping is that in pulpotomy additional tissue is removed from the exposed pulp. Traditionally, pulpotomy implied the removal of the entire coronal pulp up to the cervical area. Today the depth of tissue removal is based on clinical judgment: only tissue with profuse bleeding, judged to be inflamed or infected, should be removed, as the capping material should be placed on healthy tissue [1].
Although many materials and drugs have been used as capping agents after pulpotomy, MTA seems to be the treatment of choice to stimulate dentin bridge formation in young permanent teeth with exposed pulps [23]. In aesthetic areas MTA is not recommended because of its discoloration effect. Calcium hydroxide may be used as its outcomes are similar in some studies [34, 35]. Aguilar reported that partial pulpotomy and full (cervical) pulpotomy provide a more predictable outcome than direct pulp capping in teeth with carious exposure [33].
8.4.2.1 Partial (Cvek) Pulpotomy Technique
Partial pulpotomy was first presented by Cvek as a treatment modality for traumatic pulp exposures after complicated crown fracture [36]. Cvek and his collogues have shown that in untreated traumatic pulp exposures the pulp inflammatory reaction is usually proliferative (hyperplasia), and the inflammation extends not more than 2 mm into the pulp tissue even after 7 days. Therefore they recommended that not more than 2 mm of the pulp beneath the exposure needs to be removed in these cases (Fig. 8.2) [37].
The tooth should be isolated with a rubber dam and disinfected with NaOCl solution. In traumatically exposed pulps, only tissue judged to be inflamed should be removed (~2 mm). In teeth with carious exposure, it might be necessary to remove tissue to a greater depth in order to reach non-inflamed pulp. Care should be taken to remove all the tissue coronal to the amputation site to prevent continuation of bleeding, contamination, and discoloration of the tooth. Cutting of the tissue with an abrasive high speed diamond bur with water cooling, has been shown to be the least damaging to the underlying tissue [38].
After pulp amputation, the preparation is thoroughly washed with NaOCl to disinfect and control hemorrhage. If hemorrhage persists, amputation should be performed at a more apical level [33]. Once hemorrhage has been controlled, a dressing of MTA (or calcium hydroxide in aesthetic area) is gently placed over the amputation site. Care should be taken not to push the material into the pulp [39]. The MTA should be covered with a glass ionomer liner and a permanent restoration should be placed. If the pulpotomy is successful, a tertiary dentin bridge will be formed, and occasionally pulp obliteration may occur (Fig. 8.2) [1].
8.4.2.2 Cervical (full) Pulpotomy
Cervical pulpotomy in mature teeth is performed only when irreversible pulpitis is diagnosed, and it should be considered as an emergency treatment. In these teeth, root canal treatment will follow at the next appointment.
In immature permanent teeth, cervical pulpotomy is performed to allow maturation of the root (Fig. 8.3 ). This procedure is performed in teeth in which it is assumed that healthy pulp tissue, with a potential to produce a dentin bridge and complete the formation of the root, still remains in the root canal [1].
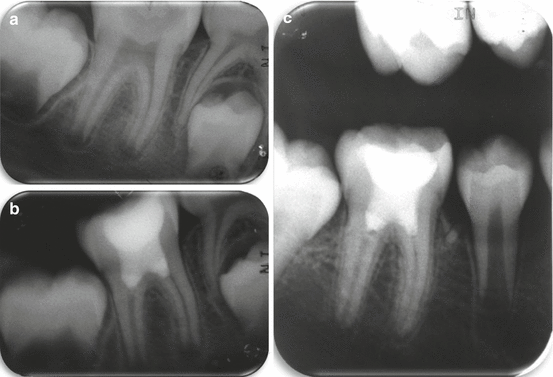
Fig. 8.3
(a) 9 years old girl. First right lower permanent molar with a very deep caries lesion. The tooth is asymptomatic and respond with mild pain to cold test. Radiographically an immature roots with very open apices are observed. (b) After cervical pulpotomy. White MTA (ProRoot®, Dentsply, Tulsa, OK, USA) is seen in the canal orifices covered with a layer of GI. The crown was restored with composite. (c) 2 years follow-up. Continuous root maturation is evident with no signs of apical pathosis (Courtesy Dr. E. Nuni)
The technique for cervical pulpotomy is similar to that for partial pulpotomy except for the level of pulp tissue amputation. In cervical pulpotomy the entire coronal pulp is carefully amputated using a sharp excavator or a slow-speed large round bur to the level of the canal orifice. MTA (or calcium hydroxide) is used as dressing material in order to maintain pulp vitality and function. It is of utmost importance to perform a permanent restoration as soon as possible to prevent bacterial leakage and ensure the success of the treatment (Fig. 8.3b).
Cervical pulpotomy is frequently performed in teeth in which the histopathologic status of the pulp stumps is not clear. If the symptoms continue and pulpectomy is needed the MTA may be removed gently using an ultrasonic instrument and an operative microscope [1].
Follow-up After Vital Pulp Therapy
Clinical and radiographic follow-up of these teeth is essential because pulp necrosis, canal obliteration and root resorption are possible sequelae of vital pulp therapy.
No adverse clinical signs or symptoms of sensitivity, pain, or swelling should be present. Radiographically, no signs of internal or external resorption nor periapical radiolucency should be found. The roots should show continued normal development and maturogenesis in teeth with incompletely formed roots.
In some cases continuous calcification of the root canals is noticed after vital pulp therapy. There is a controversy weather root canal treatment is indicated after achieving root maturation, before obliteration of the root canal space occurs that will prevent performing root canal treatment in the future. Routine prophylactic endodontic treatment is contraindicated because of the low percentage of pulp necrosis [40, 41]. Root canal treatment can be considered in posterior teeth, where apicectomy is difficult to perform in cases of treatment failure, especially in children.
8.4.3 Apexogenesis
Apexogenesis is indicated in immature permanent teeth when the inflammation of the pulp tissue is considered to be so deep, that only part of the tissue inside the root canal is presumed to be vital and healthy. This procedure allows continued physiologic development and maturation of the root apex apical to the dressing material. The root formed may be irregular but nevertheless provides additional support for the tooth. Apexogenesis can be clinically regarded as a very deep pulpotomy therefore, the technique is similar. The use of the operative microscope is recommended in order to execute this meticulous procedure correctly. MTA or calcium hydroxide is placed over the pulp stump after hemostasis control with NaOCl (Fig. 8.4 ).
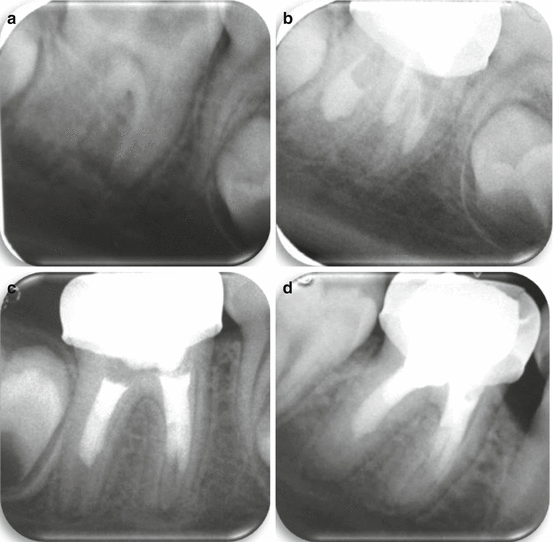
Fig. 8.4
(a) 7 years old boy. First right lower permanent molar with a very deep caries lesion. Radiographically an immature root with very wide blunderbuss shaped open apices are observed. (b) After removal of pulp tissue from the pulp chamber and the coronal part of the canals a tissue judged to be non-inflamed was seen with the help of the operative microscope. White MTA (ProRoot®, Detsply, Tulsa, OK, USA) was placed on the healthy tissue. (Metal crown was placed in order to achieve isolation from the oral cavity). (c) On the next visit the MTA was found to be hard and gutta-percha and sealer were used to obdurate the coronal part of the canals. (d) 4 years follow-up. Complete development of the apical part of the roots is seen with no evidence of periapical pathosis (Courtesy Dr. E. Nuni)
It is difficult to determine the pulp status deep in the root canal or to predict the formation of a calcified barrier and continued root development. Clinical and radiographic follow-up is mandatory, and if signs and/or symptoms of pathology appear, apexification or pulp regenerative procedure should follow. The use of MTA as a dressing material should be carefully considered because of the difficulty in removing the material from deep inside the root canal [1].
8.5 Nonvital Pulp Treatment for Immature Teeth
8.5.1 Apexification
Apexification is a method of treatment for immature permanent teeth in which root growth and development ceased due to pulp necrosis. Its purpose is to induce root end closure by forming a calcified barrier with no canal wall thickening nor continuous root lengthening, as the Hertwig’s epithelial root sheath (HERS) is absent. As previously mentioned, diagnosing pulp necrosis in immature teeth can be challenging due to confounding factors such as the normal radiographic radiolucency visible at the root end in these teeth and the unreliability of sensibility tests (Fig. 8.1b).
Apexification should only be performed when the diagnosis of pulp necrosis is certain. It can be achieved in two ways: the traditional long term procedure using calcium hydroxide dressing to stimulate the formation of a biologic hard tissue barrier, and the more recently short term procedure, creating an artificial apical plug with MTA. Apexification is most often performed in anterior teeth that lost vitality due to a traumatic injury or a deep carious lesion, and in teeth with anatomic variations such as dens invaginatus with an immature root.
The open apex of immature teeth may present a few morphological variations. It can be divergent with flaring apical foramen (blunderbuss apex), parallel, or convergent. The exact morphology is difficult to determine because of the two-dimensional image obtained by dental radiographs. In all of these variations endodontic treatment cannot be performed, as it is difficult, if not impossible, to achieve an apical seal that will prevent extrusion of the filling material.
Follow up should be performed in order to ensure the absence of adverse post-treatment clinical symptoms and/or radiographic signs of pathology. When the procedure is carried out successfully in teeth with radiographic signs of rarifying osteitis, healing of the bone will be observed gradually, the tooth will continue to erupt and the alveolar bone will continue to grow in conjunction with the adjacent teeth.
Publications in the last decade present an alternative treatment to apexification in the form of pulp regenerative therapy even in cases of infected necrotic immature teeth. This will be discussed further in this chapter.
8.5.1.1 Long Term Apexification with Calcium Hydroxide
Apexification is traditionally performed using a calcium hydroxide dressing (Fig. 8.5 ) [42]. It is a predictable procedure, and an apical barrier will be formed in 74–100 % of cases [43]. This procedure demands multiple visits and requires patient and parent compliance, as it could take a year or more to achieve a complete apical barrier that would allow a gutta-percha root canal filling. It is unclear whether the stage of root development at the beginning of the treatment or the presence of a pre-treatment infection affect the time required for barrier formation [44].
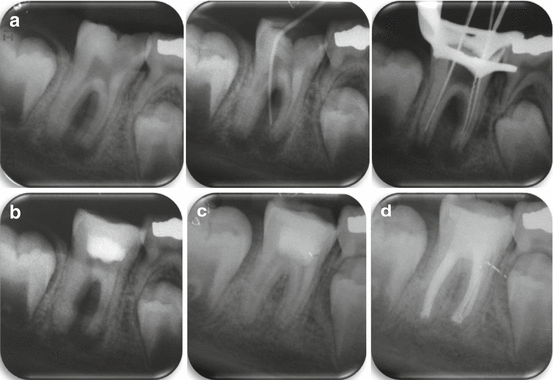
Fig. 8.5
(a) 8½ years old girl. First right lower permanent molar with a very deep caries lesion and buccal sinus tract. Radiographically a large radiolucent lesion around the roots and the bifurcation is seen. Tracing radiograph with gutta-percha master cone leads to this area. (b) Radiographic appearance after packing of the canals with thick calcium hydroxide paste in the second visit. The roots look obliterated because the radio-opacity of thick calcium hydroxide paste resembles that of dentin. (c) Six months after calcium hydroxide packing. The radiolucent area is almost completely resolved and a calcified barrier is seen in the apical area of the canals. (d) Final radiograph (2 months after c) showing obturation of the root canals with gutta-percha and sealer (Courtesy Dr. E. Nuni)
Calcium hydroxide assists in the debridement of the root canal, as it increases the dissolution of necrotic tissue when used alone or in combination with NaOCl [45]. The high pH and low solubility of calcium hydroxide keeps its antimicrobial effect in the root canal for a long period of time [46, 47]. Disagreement still exists as to whether or how often the calcium hydroxide dressing should be changed. Some investigators support a single application of the material and claim that it is only required to initiate the healing reaction, while others propose to replace the calcium hydroxide only when symptoms develop or if the material appears to have been washed out of the canal when viewed radiographically [44].
The calcified barrier is formed by cells originating from the adjacent connective tissue, but the mechanism of action of calcium hydroxide in induction of an apical barrier remains controversial. The calcified barrier, although appearing clinically and radiographically complete, is histologically porous and may be composed of cementum, dentin, bone or osteodentin [44].
The most severe complication of calcium hydroxide apexification is cervical root fracture [3]. Studies have shown that long-term dressing that would expose root dentin to calcium hydroxide for periods exceeding one month results in structural changes in the dentin, with higher susceptibility to root fracture [48, 49].
Calcium Hydroxide Apexification Technique
Rubber dam isolation is mandatory. The coronal access should be wide enough to include the pulp horns to prevent future contamination and discoloration (Fig. 8.5 ). In anterior teeth, Gates-Glidden drills can be used to remove the palatal eminence in the cervical portion of the root canal, facilitating cleaning of all aspects of the canal. The length of the root canal should be determined radiographically with a large gutta percha point (Fig. 8.6a) or endodontic files (Fig. 8.5a), as electronic apex locator is not reliable in teeth with open apices. Inserting a large size paper point to the point of bleeding may also assist in length determination. The working length should be approximately 1 mm short of the radiographic root end [1].
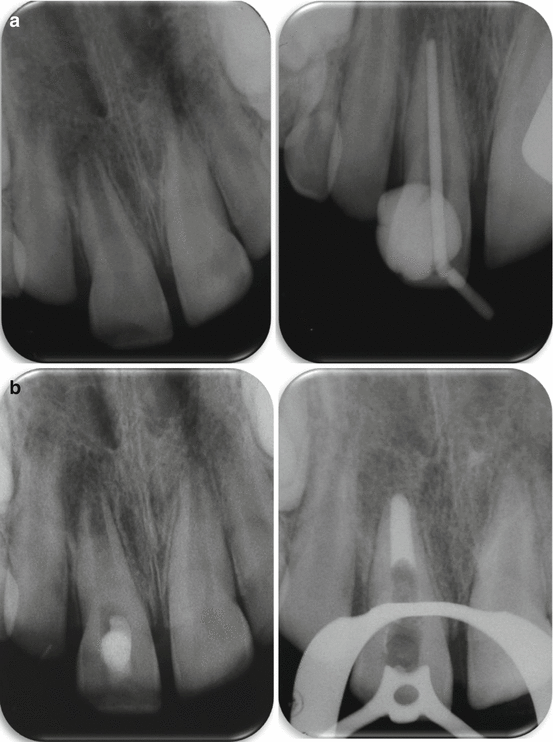
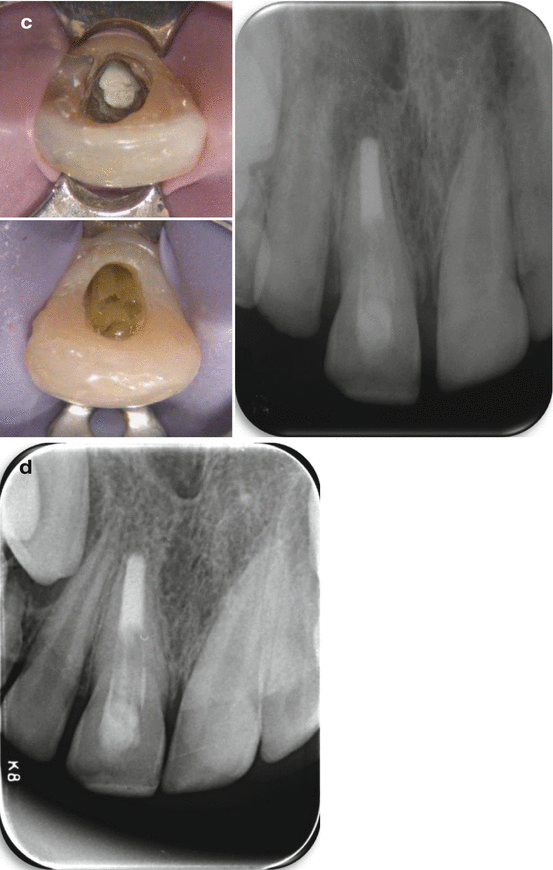
Fig. 8.6
(a, left) 10 years old boy 10 months post dental trauma (11- subluxation + uncomplicated crown fracture). The upper right central incisor presents no clinical symptoms with negative respond to cold test. Radiographically an immature root with open apex and radiolucent periapical lesion is observed. (a, right) Working length radiograph with gutta percha point. (b, left) One month after debridement and dressing with creamy calcium hydroxide paste. (b, right) MTA apical plague placement. (c, left) Set white MTA apical plague (1 month after its placement). (c, right) Permanent restoration with bonding of glass fibers in light curing resin matrix (everStickTM, GC Corporation, Tokyo, Japan) is performed in direct contact with the set MTA plague. (d) 2 years follow up. Complete resolution of the apical radiolucency is evident (Courtesy Dr. E. Nuni)
Debridement of the root canal, is mainly achieved by irrigation with NaOCl solution utilizing its excellent tissue-dissolving properties and its antimicrobial efficacy [50]. The irrigation should be done carefully without pressure, verifying that the needle is loose inside the root canal and short of the working length. Passive ultrasonic irrigation with NaOCl solution is recommended in order to facilitate disinfection and debris removal from these wide canals [51]. Minimal or no instrumentation is advised to prevent damage to the thin dentin walls. A calcium hydroxide dressing in a creamy consistency can then be applied into the canal space with a Lentulo spiral, specially designed syringes or files.
A second visit is scheduled 2–4 weeks later. Its aim is to complete the debridement and remove the tissue remnants denaturized by the calcium hydroxide dressing that could not be removed mechanically in the first appointment and to further disinfect the canal. After disinfection a thick paste of calcium hydroxide is packed in the root canal using endodontic pluggers (Fig. 8.5b) [52]. The dressing is packed to a level apical to the cemento-enamel junction (CEJ) in order to reduce dentin weakening in this fracture sensitive area. The coronal access should be restored with a filling that provide a long term coronal seal.
The tooth should be monitored clinically and radiographically at 3-months intervals to examine the formation of an apical hard tissue barrier and ensure the absence of pathologies. If a calcified barrier is not evident and the calcium hydroxide has been washed out, its replacement is usually indicated. When a calcified barrier can be seen on the radiograph, the tooth is reopened and the calcium hydroxide is removed by copious irrigation. The apical area should be gently examined using a gutta percha point and/or through the operative microscope in order to determine the completeness of the apical barrier. If the barrier is incomplete, the apexification procedure is reestablished until a complete barrier is formed [1].
After the formation of a complete apical barrier the canal is obturated with a permanent root canal filling material (e.g., thermoplasticized gutta-percha) and sealer (Fig. 8.5d). When a calcified barrier is formed coronal to the apex, it should not be perforated in order to fill the canal to the apical end; the tissue forming the apical barrier should be regarded as healthy tissue and root canal filling should be placed up to this point.
Immature teeth with thin dentin walls, especially after calcium hydroxide apexification, are at high risk of fracture. The stage of root development seems to be a key factor [3, 49]. In order to reduce this risk a permanent restoration with an intra-canal placement of bonded composite resin is recommended (Fig. 8.6c, right) [53].
8.5.1.2 Short Term Apexification With MTA (One Visit Apexification)
The use of MTA as an artificial apical plug instead of the long traditional apexification with calcium hydroxide is widespread for more than a decade (Fig. 8.6). Its main advantage lies in reducing the time needed for completion of the root canal treatment and the restoration of the tooth. An artificial apical barrier is placed in one visit while the whole treatment is completed in just few frequent visits [54]. Characteristics such as low solubility, excellent sealability, biocompatibility, release of calcium hydroxide, high pH and radiopacity are responsible for the preferable clinical results and popularity of MTA as an apical plug material [55].
Stay updated, free dental videos. Join our Telegram channel
VIDEdental - Online dental courses


