
Build Treatment into Bracket Placement
Principle 6 described the rationale for the designs of specific brackets. These brackets can be used to position the teeth in ideal locations in terms of both esthetics and stability, but only if they are placed correctly on the teeth.
For proper bracket positioning, three dimensions must be considered:
1. Height
2. Angulation
3. Mesiodistal position
Bracket Height
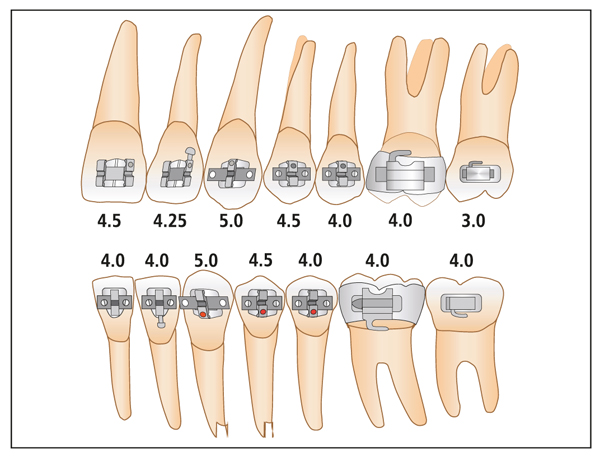
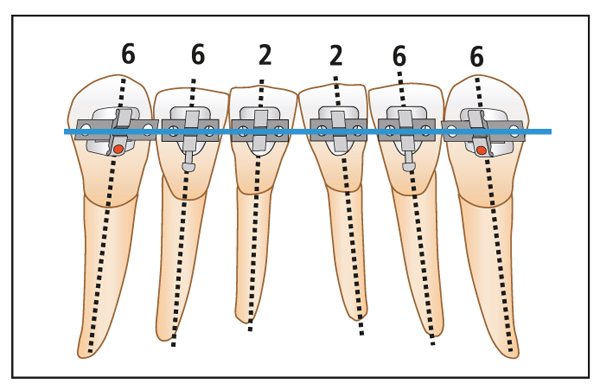
Although tooth anatomy varies from one individual to the next, the vast majority of patients with normal or deep bites can be treated using the bracket placement criteria shown in Fig 7-1. Table 7-1 provides the relative bracket heights for maxillary and mandibular teeth. Accurate use of these measurements will position the teeth so that the treatment will result in excellent overbite, good canine guidance, and good buccal occlusion.

When brackets are placed, it is critical to use a bracket gauge to ensure accuracy. Although many instruments have been designed for this purpose, I use one that I designed, the whimsically named Wick Stick (Figs 7-2 to 7-4).
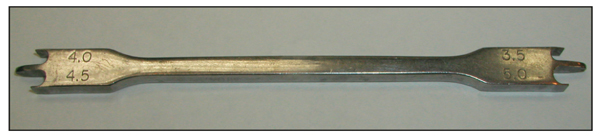
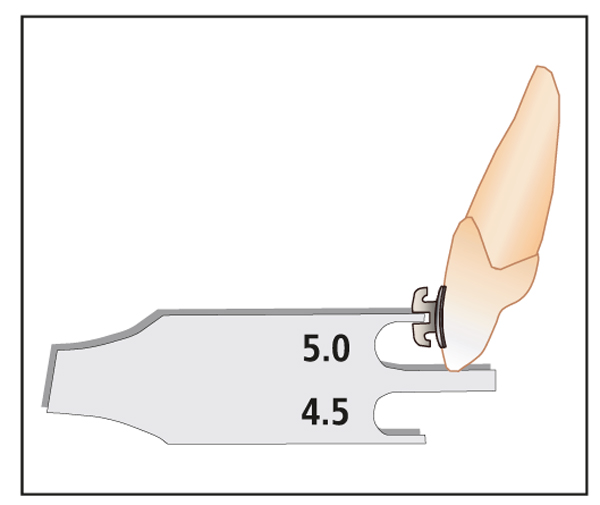
Fig 7-3 Canine bracket gauge used to measure height (mm).
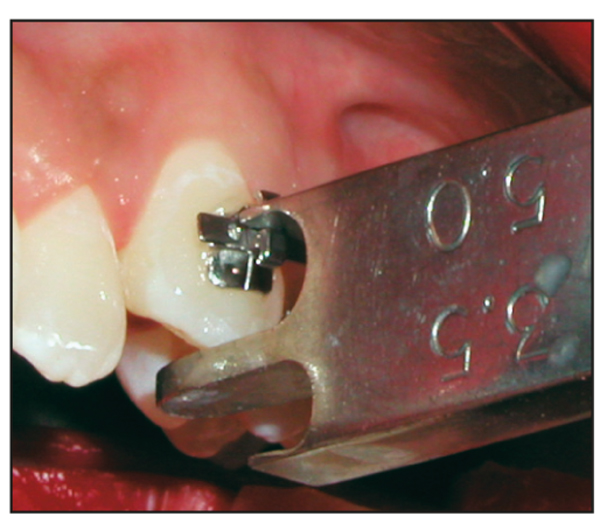
Fig 7-4 Canine bracket height measurement.
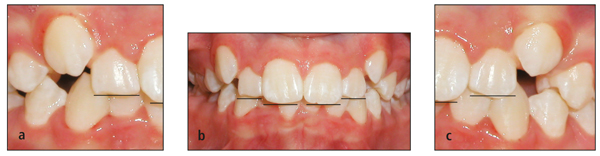
Before brackets are placed on the maxillary anterior teeth, several factors must be considered. First, the incisal edge relationship between the central and lateral incisors should be examined (Fig 7-5). If the central incisor brackets are positioned at 4.50 mm (measured from the incisal edge to the center of the bracket slot), then the lateral incisor brackets should be positioned at 4.25 mm rather than 4.00 mm to ensure an ideal smile arc. The smile arc refers to the relationship of the lower lip to the incisal edges of the maxillary incisors in a natural smile. If the maxillary lateral incisor bracket is placed too far gingivally, the lateral incisor can interfere with the mandibular incisor in lateral excursion.
Second, the incisal edges of the anterior teeth are examined for fractures, signs of excessive wear, and mamelon ridges. If the removal of these defects is part of the treatment plan, it is usually preferable to place the bracket more gingivally. This allows the tooth to be extruded by the amount of the defect, and the incisal edge can be recontoured near the end of treatment, when the position, alignment, and esthetics are assured.
Third, the relative height of the gingival crest is another important consideration. If one incisor is extruded significantly to obtain alignment of the incisal edges, the gingival contours may become imbalanced. This problem most commonly affects adult patients. If orthodontic extrusion causes discrepancy in crown length and/or gingival height, the treatment plan should recommend restoration by a periodontist and/or restorative dentist (Figs 7-6 and 7-7).
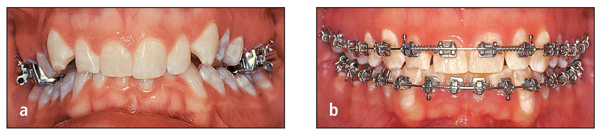
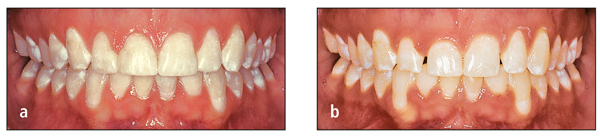
Fig 7-7 Same patient shown in Fig 7-6: (a) at the end of treatment and (b) following a partial gingivectomy and bonding.
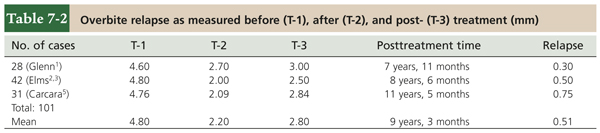
The outcome of treatment to correct an overbite is influenced by the height of the bracket, the degree of occlusal plane leveling, and the use of maxillomandibular elastics. At the completion of active treatment, an anterior overbite of approximately 2 mm is desirable. Studies of my patients1–5 have found “settling” changes over time of less than 1 mm (Table 7-2). Adequate overbite is necessary to create anterior guidance, or disocclusion of the posterior teeth in forward excursions, for normal functioning of the temporomandibular joints (TMJs).
Equally necessary for normal TMJ function is proper canine guidance. Placing all canine brackets 5 mm from the occlusal edge of the canine tip (as measured from the center of the bracket slot) will ensure canine guidance by providing sufficient canine rise during lateral excursions (Fig 7-8). If the cusp tip has an unusual shape, it should be recontoured before the canine bracket is placed. The risk of hypersensitivity associated with enamel contouring is reduced when it is performed in small increments over several appointments.
One of the most common mistakes made when brackets are placed on the mandibular incisors is to place the brackets too far incisally. To avoid this mistake, the incisor bracket first should be placed in the center of the clinical crown and then measured and moved to the specified height.
In general, the cusp tip of the first premolar is larger than that of the second premolar. To offset this difference, the bracket is placed 0.5 mm lower on the second premolar.
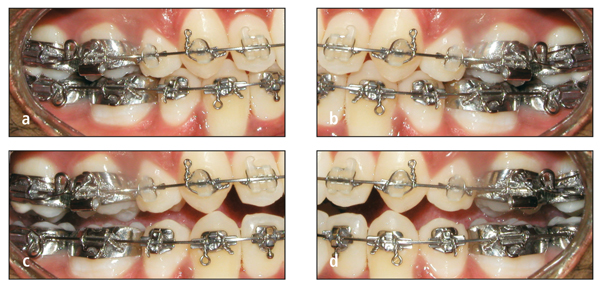
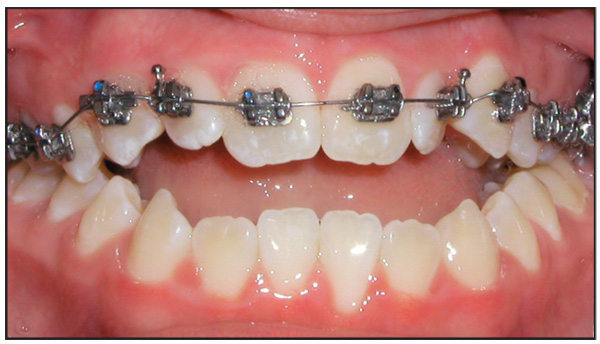
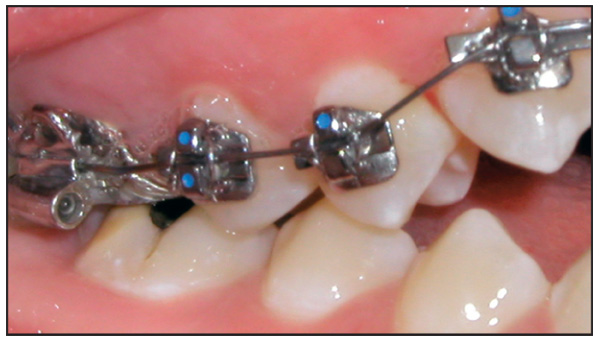
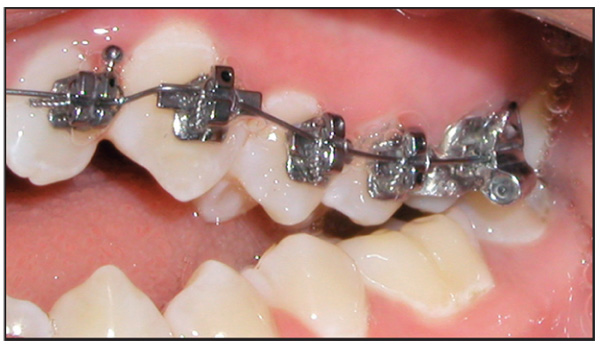
Bracket placement for treatment of open bites
In patients with open bite, the bracket height for the maxillary anterior teeth, which are out of occlusion, is increased by 0.5 mm (Fig 7-9). The bracket height for posterior teeth, which are in occlusion, is decreased by 0.5 mm (Figs 7-10 and 7-11). This height modification for treatment of open bite is not always applied to the mandibular teeth because only the maxillary anterior teeth usually require extrusion. The amount of curve of Spee in the mandibular arch can be used to determine if any change in bracket height is necessary. If there is significant reverse curvature to the mandibular occlusal plane, then the bracket heights are adjusted in both the maxillary and the mandibular arches.
Bracket Angulation
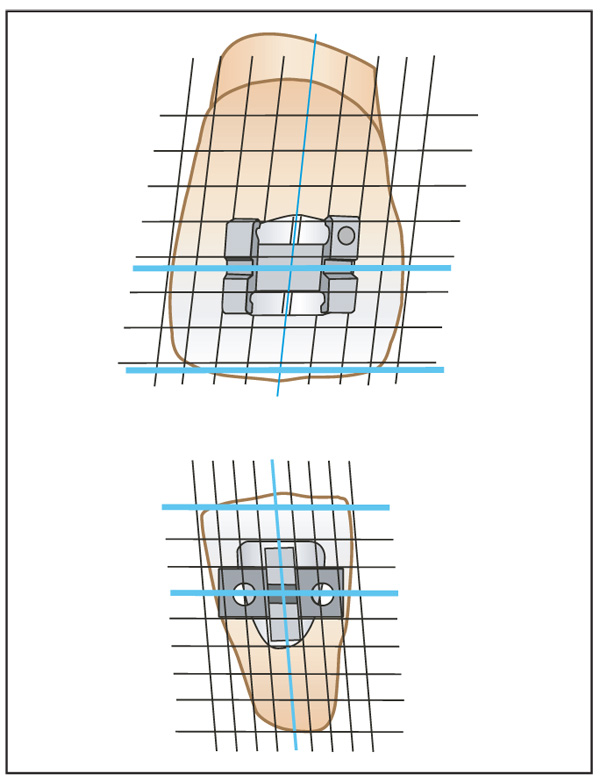
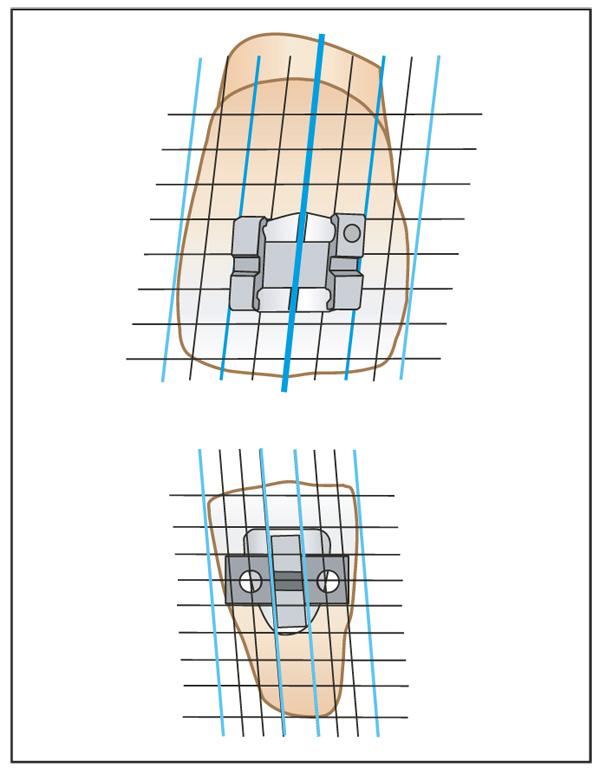
Proper angulation of the brackets on the teeth will bring the roots and crowns closer to their ideal positions at the end of treatment. To promote accuracy, the brackets are designed so that the horizontal aspects (ie, bracket slot and rotation wings) are aligned parallel to the incisal edge of the tooth (Fig 7-12). However, mamelon ridges, attrition, and fractures result in irregular incisal edges that can interfere with this visual reference. For this reason, the long axis of the crown serves as a better and more consistent guide for parallel root alignment. If the vertical aspects of the bracket are aligned with the long axis of the crown, excellent root positioning can be achieved (Fig 7-13).
Angulation of incisors
Proper angulation of the maxillary incisors significantly improves the esthetic appearance of the smile and therefore merits special attention. Dr Charles Tweed introduced the concept of incorporating artistic positioning bends into the brackets of maxillary and mandibular anterior teeth. However, a search of the literature found only one reference to angulating the mandibular incisors, by Williams6 (Fig 7-14).
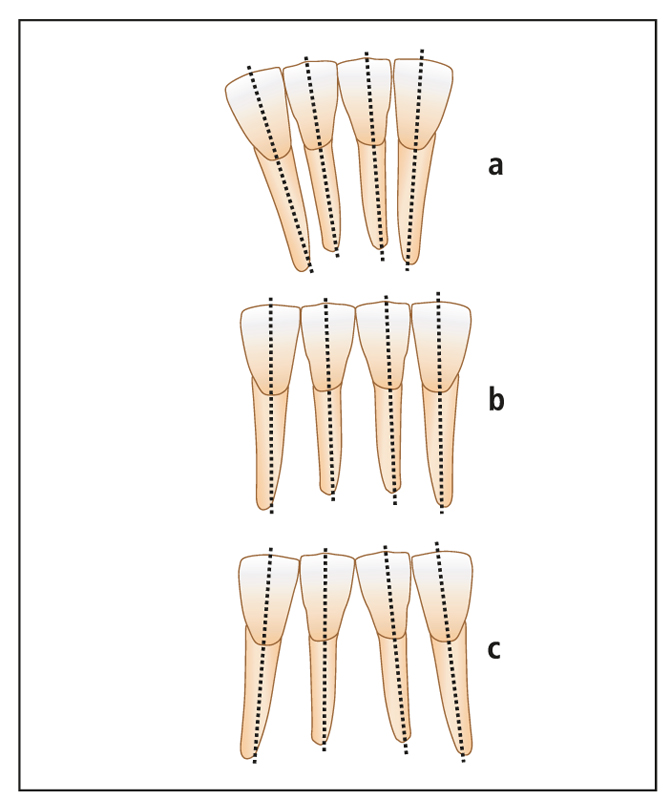
Fig 7-14 Mandibular incisor angulation.6
The angulation of the maxillary and mandibular anterior brackets is designed for root divergence. The maxillary second premolars are angulated to tip the roots distally 4 degrees (see Fig 6-11). The mandibular first molars are angulated to tip the crown distally by 6 degrees (see Fig 6-11).
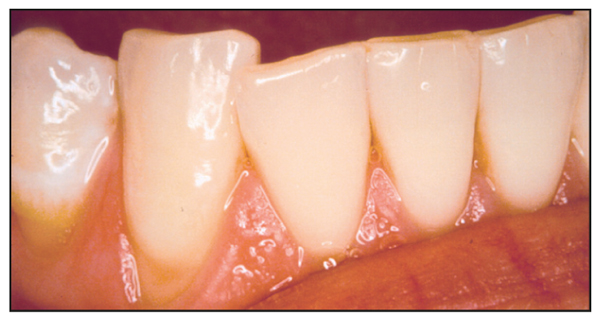
The frequent relapses that resulted when the mandibular lateral incisor was not sufficiently angulated (Fig 7-15) first led me to begin angulating the old, nonprescription brackets at the time of banding (Fig 7-16). Later, the Alexander Discipline appliance was the first to incorporate these angulations into the incisor bracket prescription (Fig 7-17). When the incisors are properly angulated, however, the incisal edges often are not parallel to each other. To address this problem, minor incisal recontouring of these teeth is required to align all of the incisal edges.

Figs 7-16 (a) Increased angulation of nonprescription lateral incisor bracket, (b) producing excellent angulation.
Angulation of mandibular first molars
When I first entered private practice, I routinely angulated the mandibular first molars by –6 degrees (ie, a tipback end) as prescribed by Dr Tweed. This distal crown tip angulation helped level the mandibular arch without tipping back the second molar. Today, this uprighting of the mandibular first molar represents an important factor for success in achieving long-term stability in the treatment of deep bite malocclusions, as confirmed by two studies.3,4 When the mandibular first molars are uprighted, the second premolars are extruded, and this also promotes leveling of the mandibular arch. Because the uprighted first molars are generally stable, correction of the overbite in deep bite cases achieves long-term stability as well.
An exception to the practice of distal tipping of the mandibular first molar is made when an open bite patient is treated. The goal in open bite cases is to maintain or increase—rather than remove—the mandibular arch curvature to assist in closing the bit/>
Stay updated, free dental videos. Join our Telegram channel
VIDEdental - Online dental courses


