Fig 19.1 The anterior nasal spine is the anterior-most component and is considered to be the highest limit for flap elevation to uncover the inferior and lateral piriform rims and to access the nasal floor, which is usually present posterior and inferior to the inferior piriform rim. The canine root remains situated distal to the lateral piriform rim of the nose. (A–C) However, the nasal recess extends distal and behind the piriform rim to reach over the canine site of the resorbed premaxilla.
Indications
1. In the severely resorbed anterior maxilla, the nasal floor elevation and grafting can be performed to insert long implants at the central, lateral incisors as well as canine positions.
2. Anterior maxilla with poor density bone.
3. Demanding situation of placing long implant with desired stability in the anterior maxilla, e.g. all-on-4 technique, knife-edge thin premaxilla.
4. Adjuvant with sinus grafting in cases of severely resorbed maxilla to insert multiple implants for full-arch restoration.
5. Long implant placement to stabilize its apex in high-density nasal floor in cases of large osseous defect in the anterior maxilla, which is grafted simultaneously with implant placement.
6. Adjuvant with ridge splitting procedure to achieve adequate stability of the implant in the high-density nasal floor.
7. High primary stability of the implant is required with bicortical engagement to immediately restore the implant in resorbed anterior maxilla or in immediate implantation in extraction socket.
Advantages
1. 3–5 mm long implant can be inserted in comparison to the usual implant placement.
2. Bicortical implant engagement – implant head is engaged in the high-density crestal bone and its apex is engaged in the high-density nasal floor.
3. The procedure excludes the need of onlay bone grafting for the severely resorbed anterior maxilla.
4. Implant can be established in hard nasal floor to achieve adequate primary stability in case of low-density bone, ridge splitting procedure, immediately grafted large osseous defect, immediate implant in extraction socket in the premaxillary region.
5. Implant can be restored immediately.
6. Less invasive procedure and can be performed under local anaesthesia.
7. Safe procedure as there are minimum chances of any serious complication related to the procedure.
Procedure
There are two techniques for performing the nasal floor grafting procedure:
Open technique
In this technique, the facial flap is elevated to expose the nasal cavity. Further, the nasal floor epithelium is carefully detached from the inferior and lateral piriform rims followed by epithelial elevation 3–5 mm distally and superiorly, using various types of sinus curettes to create a subepithelial pouch at the nasal floor. After achieving the desired height of nasal floor epithelium elevation, the implant osteotomy is prepared with the drills perforating through the nasal floor in the region where the nasal epithelium has been elevated. The nasal floor is grafted using autogenous bone and/or any bone substitutes and the implant is inserted with its apex emerging through the hard nasal bony floor. The nasal mucosa is elevated and grafted approximately 3–5 mm distally and superiorly with this technique.

CASE REPORT-1
Immediate implant with nasal floor grafting. A 50-year-old male patient referred to the author’s centre for immediate replacement of his mobile maxillary central incisor. On examination, the tooth was found extremely mobile with the other adjacent teeth in good periodontal health. The marginal soft tissue on the facial aspect had receded approximately 10 mm from its position but the papillae were at the original level. The teeth were badly stained because of fluorosis and tobacco chewing. On radiographic and dental CT evaluation, a large three-walled osseous defect which nearly reached the nasal floor was visible. The tooth root was seen completely encapsulated into the fibrous tissue. The patient expressed the desire for immediate implant placement and restoration of of aesthetics on the same day. The case was found challenging in a few aspects.
1. Achieving adequate primary stability for the immediately inserted implant, as there were large 3-walled osseous defect nearly reaching the nasal floor
2. Augmentation of the large osseous defect simultaneous with the implant insertion
3. Space maintenance for the bone graft
4. Immediate restoration of the lost marginal soft tissue
5. Achieving primary closure for submerged implant healing and graft maturation
6. Immediate and long-term aesthetic restoration which should match with the fluoride-affected as well as badly tobacco-stained adjacent natural teeth.
After meticulous planning using the radiograph, dental CT imaging, and clinical pictures of the case, the following treatment plan was finally decided upon to treat the patient with implant prosthesis.
Step 2: Careful incision and flap elevation to expose the osseous defect and its debridement.
Step 3: Elevation of the nasal floor epithelium and nasal floor grafting.
Step 4: A long and narrow platform implant (3.75 × 18 mm) insertion within the osseous envelope and at the correct prosthetic position, stabilizing its apex in the high-density nasal floor.
Step 5: Grafting of the osseous defect using autogenous bone (harvested from the maxillary tuberosity) mixed with bone substitutes (HA + β-TCP) and plasma rich in growth factors (PRGF) extracted from the venous blood of the patient just before the implant surgery. The use of a tent screw was planned to provide adequate space for the bone graft.
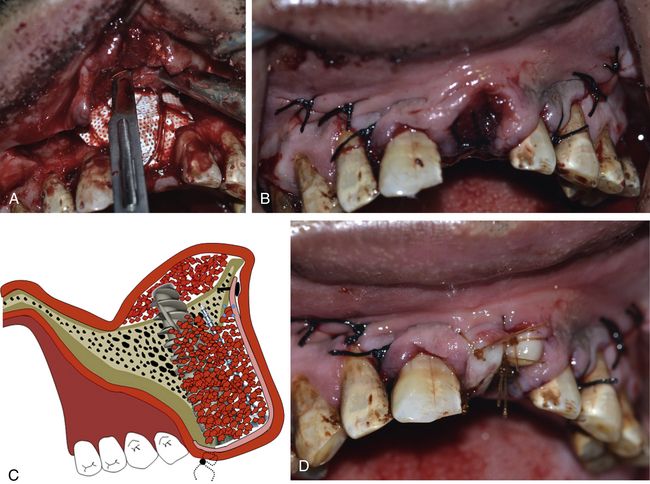
Step 6: Use of nonresorbable polytetrafluoroethylene (PTFE) membrane to cover the whole grafted site, releasing the periosteum to achieve the primary closure. The grafting of the soft tissue defect with an epithelialized connective tissue graft harvested from the tuberosity region, before harvesting the autogenous bone.
Step 7: The sectioning of the root of the extracted tooth and bonding with adjacent teeth to restore the aesthetics of the patient immediately after implant insertion.
Step by step clinical presentation of the case is depicted in < ?xml:namespace prefix = "mbp" />
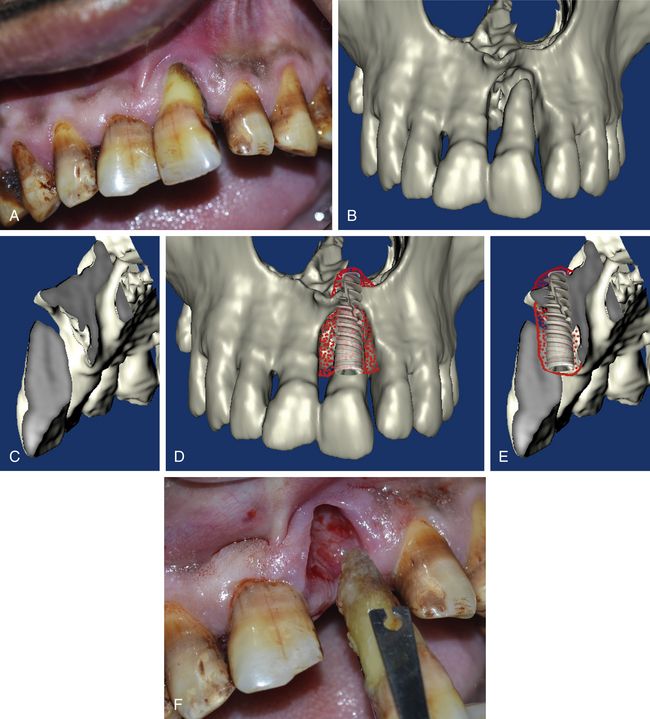
Fig 19.2 (A) Tooth number 21 with severe mobility and soft tissue recession. (B and C) Dental CT has revealed the three-dimensional loss of periodontal bone with complete soft tissue encapsulation of the root. Immediate implantation with simultaneous bone grafting is planned. (D and E) The implant apex needs to be stabilized in the high-density nasal floor to achieve adequate initial stability, thus nasal floor elevation and grafting is planned. (F) The tooth is extracted, showing the soft tissue encapsulation of the root apex.
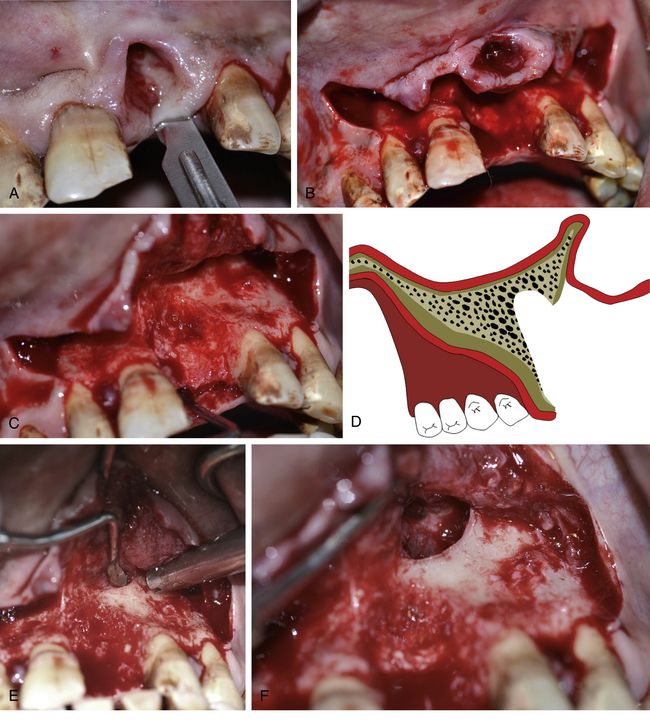
Fig 19.3 (A and B) A mid-crestal incision is given and the facial mucoperiosteal flap is elevated to include the fibrous encapsulation included in the elevated flap. (C and D) A large osseous defect can be seen at the site which looks unfavourable for immediate implant with simultaneous bone grafting because of inadequate bone volume to achieve the primary stability of the implant. (E–G) The flap is further elevated to expose the inferior piriform rim of left nasal cavity and the nasal floor epithelium is elevated using a set of sinus curettes.
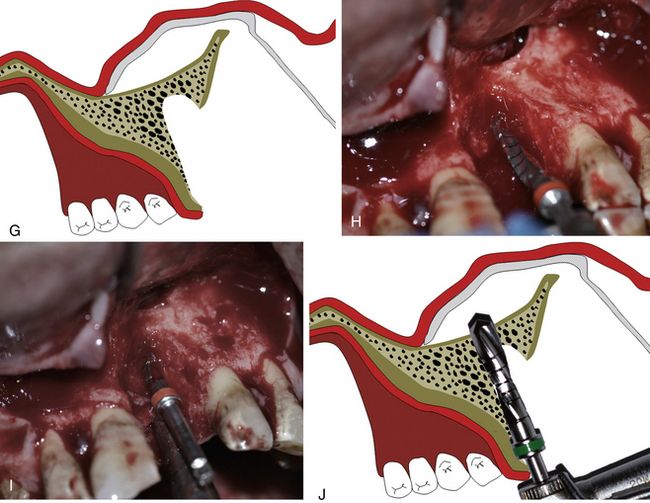
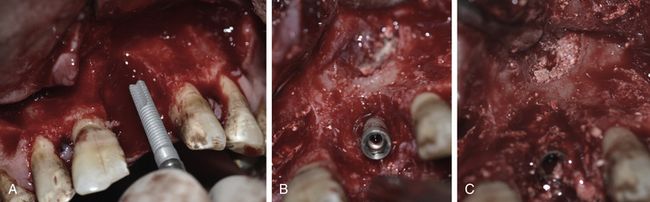
(H–J) The implant osteotomy is prepared with the drills perforating through the nasal floor.
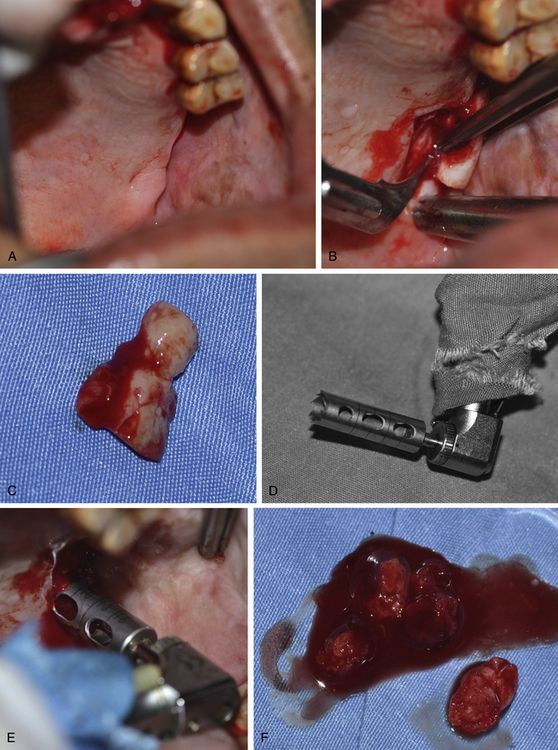
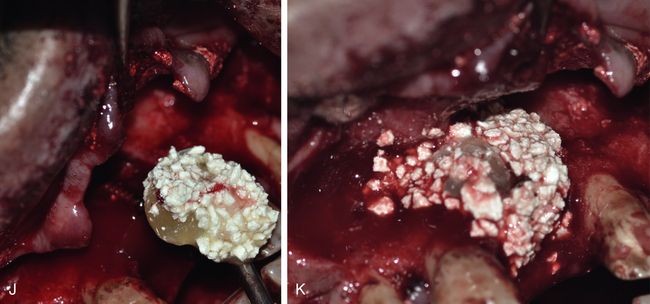
Fig 19.4 (A–C) A thick epithelialized connective tissue graft is harvested from the edentulous posterior maxillary ridge. (D–F) Further, a trephine drill is used to harvest the autogenous bone from the maxillary tuberosity.
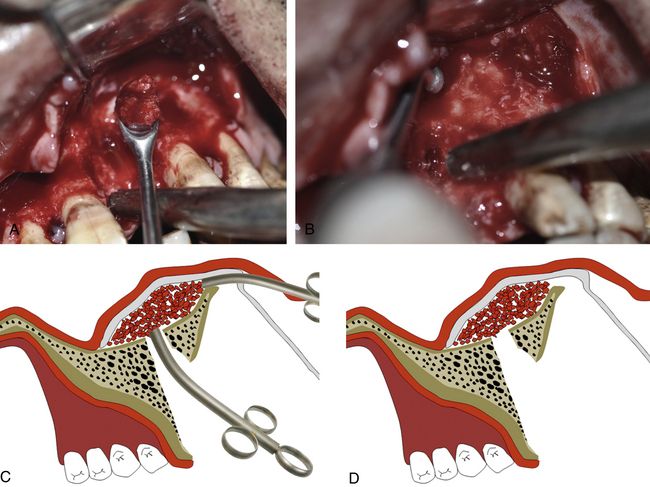
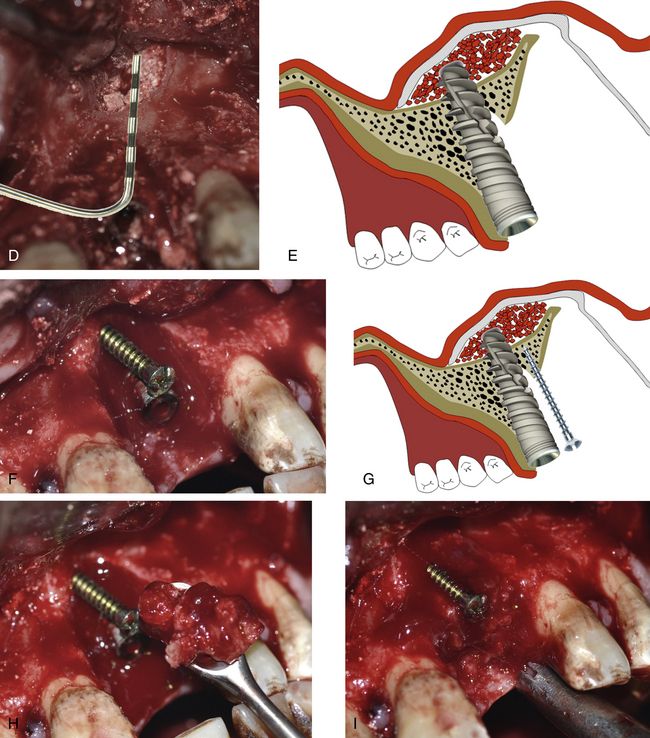
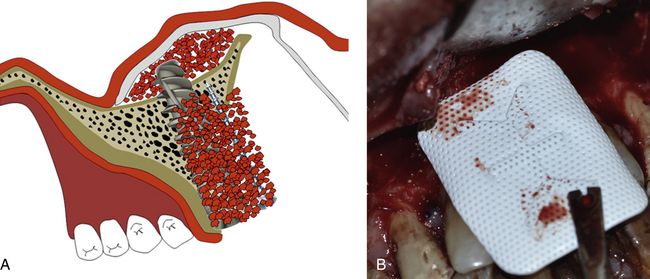
Fig 19.5 (A–D) The elevated nasal floor is grafted using the autogenous bone as the first layer through the both accesses.
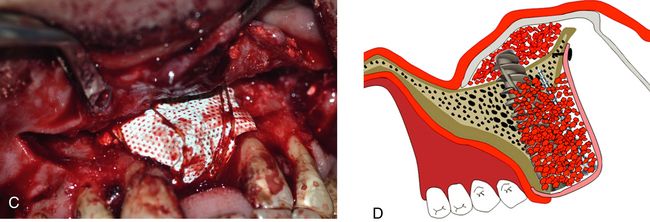
Fig 19.6 A long implant (3.75 × 18 mm) is inserted within the osseous envelope and with the implant apex emerging 5 mm through the nasal floor. High primary stability of the implant is achieved. (A–E) Following implant placement, the rest of the nasal floor is grafted using bone substitute. (F–K) A long tent screw is inserted for space maintenance underneath the barrier membrane and the osseous defect is first grafted with autogenous bone followed by bone substitute (HA + β-TCP) mixed with PRGF.
Stay updated, free dental videos. Join our Telegram channel
VIDEdental - Online dental courses


