Mounting of Casts and Occlusal Analysis
In the field of dental functional diagnosis, dimensionally accurate casts of the dental arches that have been mounted in an adjustable articulator in the correct relation to the cranium and temporomandibular joints serve to complement the clinical examination (instrumented occlusal analysis I). They are also useful for documentation and, if necessary, for providing legal proof of the patient’s current occlusal condition. In some cases correctly mounted casts modified by diagnostic waxup, selective grinding and/or setup, are the primary requirement for preparing and carrying out an occlusal pretreatment as well as for planning the definitive treatment (instrumented occlusal analysis II).
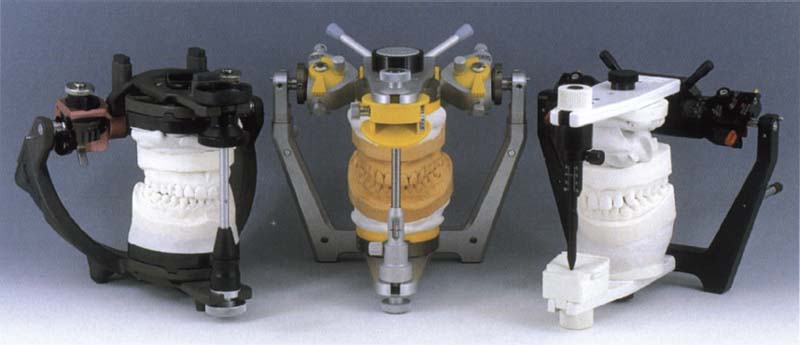
535 Articulator systems
In principle, all articulator systems that have 3 stable mechanical joint and permit at least semiadjustable settings for the condylar inclination and the Bennett angle are suitable for evaluating the occlusal relationship of casts mounted in centric. In some cases the ability to simulate retrusive movements may be desirable. The articulators shown here are essentially equivalent: KaVo, SAM, Artex (from left to right).
One of the many advantages of an instrumented occlusal analysis is that it allows one to analyze the positional relationships between the teeth and alveolar ridges and to make as many trial alterations as desired under direct vision in the absence of the patient. As a supplement to the gathering of clinical information, it is especially useful in determining whether pain and functional limitations described by the patient could be linked with occlusion-forced guidance and incorrect loading (occlusal loading vectors).
Some of the individual features that can be evaluated are: the shape and intermaxillary relation of dental arches and alveolar ridges; the transverse and sagittal contours of the compensating curve; horizontal and vertical relationships of the anterior teeth; stability of the position of maximum intercuspation; location and inclination of active and inactive abrasion facets; the pattern of occlusal contacts in static and dynamic occlusion; and the path the mandible follows in moving out of the centric, adapted, or treatment condylar position into the maximum intercuspation position. The diagnostic value of instrumented occlusal analysis depends not only on the utilization of precise casts, but also on the quality of the jaw relation records.
If there is any doubt regarding the accuracy of the recorded jaw relation, the occlusal contacts on the casts should accordingly be interpreted with a degree of caution. Premature occlusal contacts are not necessarily the cause of other functional disturbances, but are even more likely to be their result.
Making of Impressions and Stone Casts
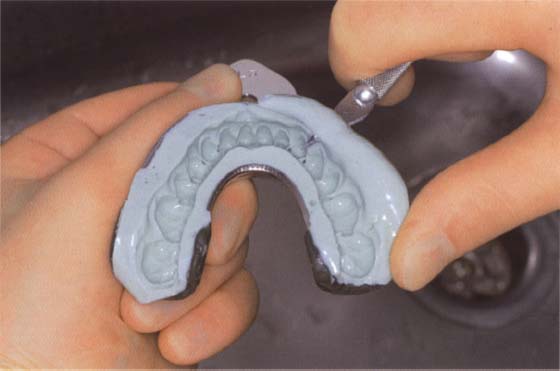
Alginate is the impression material of choice for making casts to record the current situation, to oppose working casts and for occlusal diagnosis, as well as casts for the fabrication of occlusal devices and record bases. When handled correctly during and after making of the impression, alginate permits production of casts with sufficient precision in surface detail and shape. If an impression is be made of teeth that are extremely loose, one should resort to hydrocolloid because of its lower viscosity. The preferred impression tray is one that is rigid and nonperforated with mechanical retention at the rim (Schöttl 1978). Alginate and hydrocolloid impressions should be poured with dental stone within half an hour after removal from the mouth. If multiple casts are to be poured in the same impression then a silicone impression material is recommended. This is especially true if there is a heightened need for disinfecting the impression. For high-quality casts it is recommended that only dental stone that has been mechanically mixed under vacuum be used. It should be mentioned that not every brand of alginate or hydrocolloid is compatible with every dental stone.
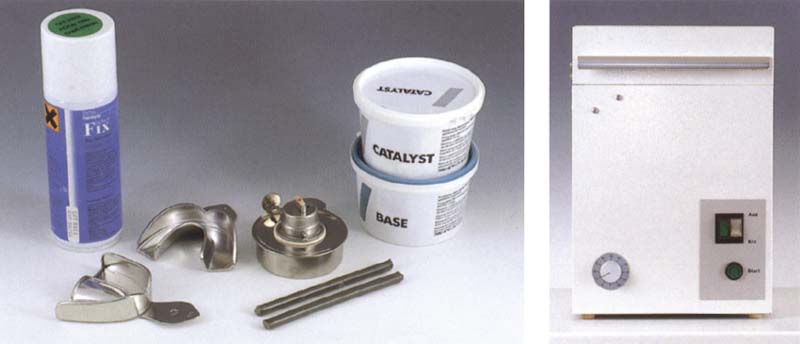
536 Materials for alginate impressions
Rigid metal trays, thermoplastic impression compound, alcohol burner, silicone putty, and alginate adhesive.
Right: Use of a mechanical mixer (here, by Hauschildt) reduces the inclusion of air bubbles and ensures a homogenous mix of alginate.
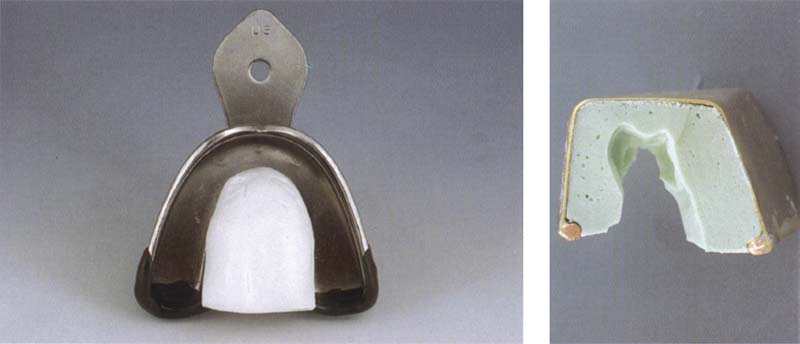
537 Preparation of the impression tray
A palatal stop of silicone putty facilitates placement of the impression tray in the patient’s mouth. The post dam is made preferably with impression compound. The mechanical retention of the algin3te in the tray should be reinforced by applying an alginate adhesive.
Right: A tray size should be selected so that the distance from the teeth to the inner surface of the tray is about three to four times the depth of the undercut.
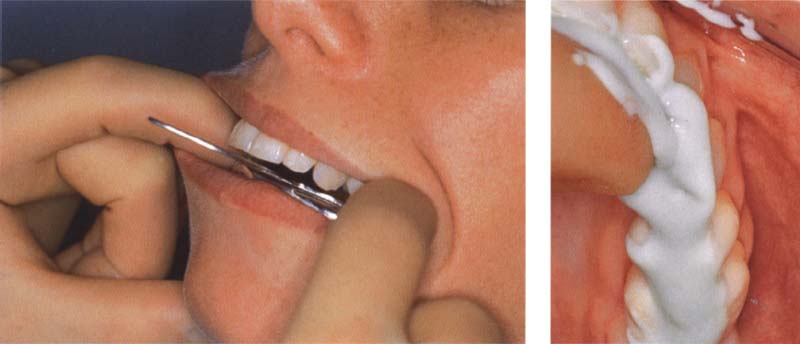
538 Alginate impression
The alginate-filled tray is inserted over the anterior teeth first, then over the posteriors. The patient should close the mouth nearly all the way, but without biting on the tray. The tray is held in place until the alginate has set. During this time the patient should relax the muscles and avoid swallowing or making other tongue movements.
Right: To avoid trapping air bubbles in the important occlusal areas, the teeth should be smeared with alginate just before the tray is inserted.
Further treatment of the alginate impression
539 Trimming
After the impression is removed from the mouth, it is carefully examined to make sure the alginate is well bonded to the tray. If the impression has separated from the tray it must be remade. The impression may be trimmed back to the level of the tray provided further work, such as the construction of an occlusal splint, will not require reproduction of the border areas.
540 Disinfection
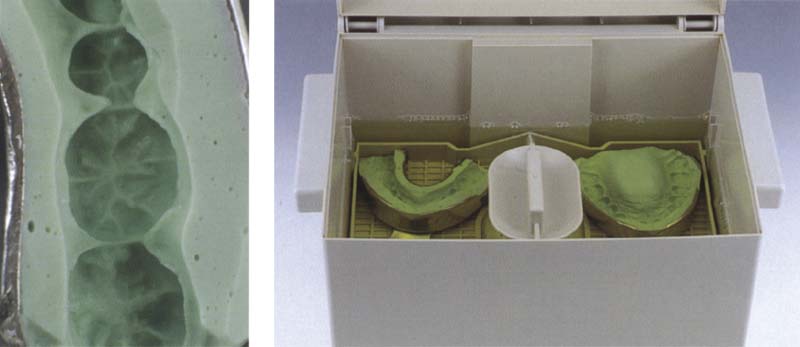
The impression is cleansed of any adhering blood and saliva by rinsing under lukewarm water and is then immersed in a disinfectant bath. The prescribed working time for the particular disinfectant being used must be strictly observed. After removal the impression is once again rinsed under flowing water. Left: A bubble-free impression is a prerequisite for a cast with accurate detail.
541 Interim storage
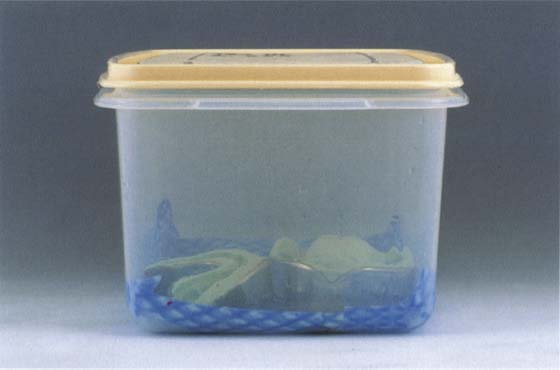
Alginate impressions should be stored for about 15 minutes (100X humidity) in a humidifier so that regions deformed by the removal of the impression can rebound (Meiners and Lehmann 1998).
542 Binding of the alginic acid
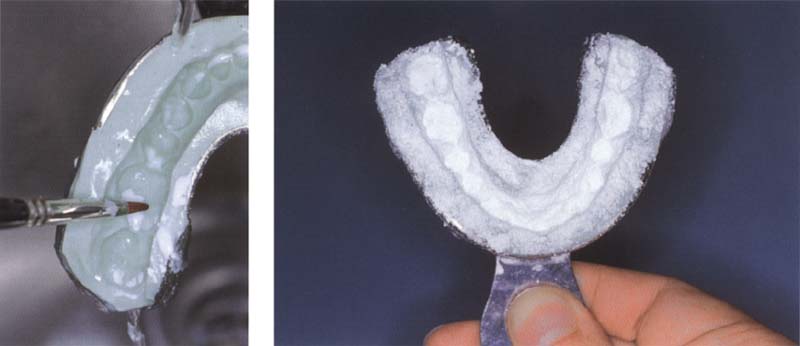
The surface quality of the stone cast can be improved by sprinkling stone powder over the impression to bind with the remaining alginic acid before the impression is poured. Left: After it has been in contact with the alginate for a brief time, the stone powder is carefully rinsed away under running water.
543 Pouring and boxing the impression
After the dental arch has been filled with dental stone, the tray is placed on the base of a Foldox Base Former. The flexible side walls are then wrapped around the tray and the resulting cavity is filled with dental stone.
Right: With the help of a fine brush to avoid bubbles, the impression is filled with vacuum-mixed, hard-setting dental stone.
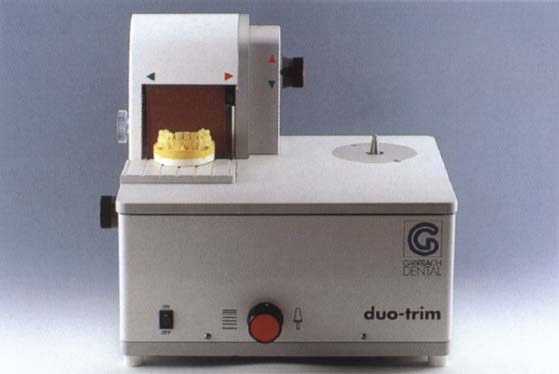
544 Dry trimming
Once the stone cast has hardened, it should no longer come in contact with water. Therefore the use of a dry trimmer (shown here, the Duotrim by Girrbach) is recommended for touching up the base of the cast.
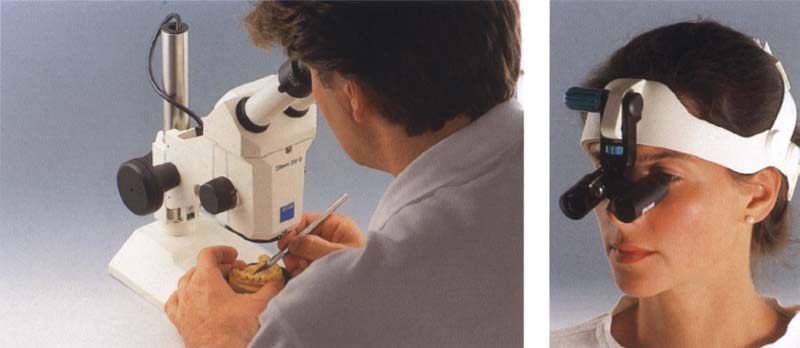
545 Refining the cast
Under a stereo microscope, small nodules of stone are removed with the tip of an X-Acto knife. Nodules that cover a significant area, especially of the occlusal surface, cannot be removed without compromising the accuracy of the cast and require that a new impression be made.
Right: Binocular head-mount loupes (e.g. by Zeiss) are also recommended for inspecting the critical areas of the occlusal surface.

546 Casts ready for mounting
The maxillary and mandibular casts have been dry-trimmed and their occlusal surfaces prepared for mounting. For filing, the following information should be written on the casts: patient’s name, birthday, or patient number; date of impression; first, second, or third cast: simulation or master cast. After mounting on an articulator, the type and number of the articulator is added.
Fabrication of Segmented Casts
Segmented casts are used primarily to provide removable dies for the fabrication of fixed prostheses. However, they are also useful for making a detailed analysis of a patient’s static and dynamic occlusal relationships. For one thing, the removal of an entire quadrant improves the view of the occlusion in the other portions of the arch. For another, by removing only those teeth that carry the current premature occlusal contacts, the effects of making occlusal changes within their space can be anticipated (see p. 236).
Various procedures have been recommended for producing a segmented cast. In addition to the classic method that uses special die pins as described on this page, another interesting method worthy of mention is the Model-Tray procedure. This uses a base-forming tray that can be disassembled and that has numerous orientation grooves on its inner surface (Model-Tray by Model-Tray GmbH). After the cast has been removed and sawed into sections it can be accurately reassembled in the tray.
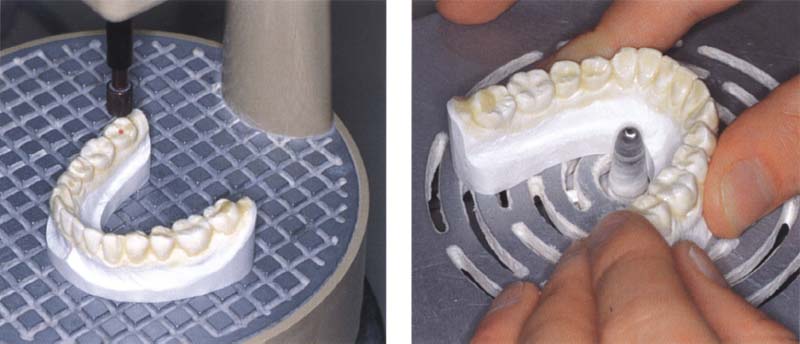
547 Trimming the dental arch and drilling the pin holes
Left: Correct placement of each pin hole is facilitated by projection onto the dental arch of a light ray (red dot) that is coaxial with the intended pin hole.
Right: The basal, facial, and lingual surface of the dental arch are trimmed smooth. Any undercuts or rough areas would interfere with removal of the sawed segments after the base is added. Here the teeth have been previously coated with liquid latex to protect them from water and grinding dust.
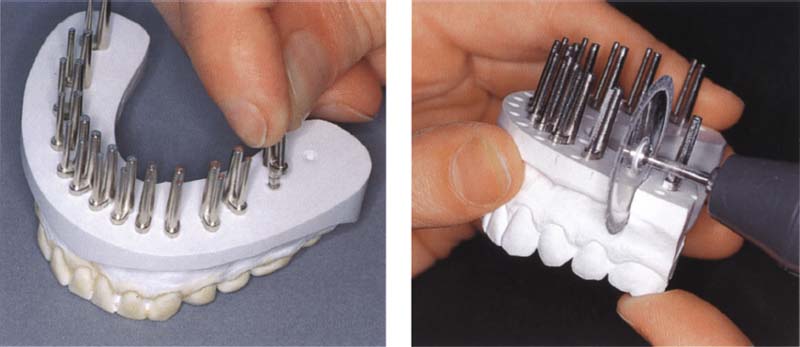
548 Adding pins and base, and sawing the segments
Left: The dowel heads are coated with quick-setting cyanoacrylate cement and pressed into the pin holes. The sleeves are then slid onto the dowels. Next, orientation grooves are added to the cast, a separating medium is applied, and a base is poured with a type-IV dental stone.
Right: After the base has hardened, the cast of the dental arch is removed from it. Saw cuts are made in the cast to just short of the proximal contacts (caution!), then the segments are separated by breaking through the remaining stone.
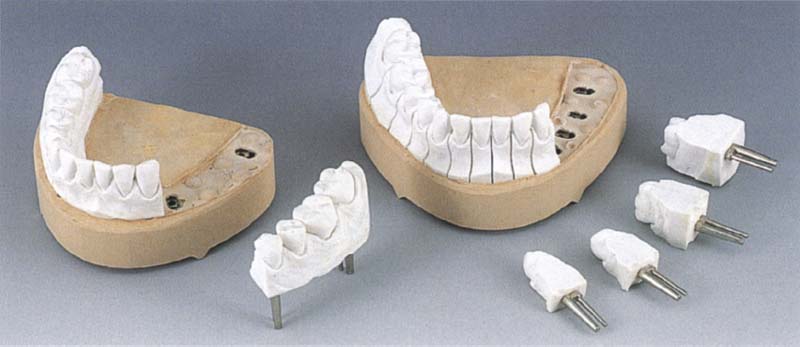
549 Cast with removable segments for occlusal diagnosis
Although in some cases, segmented casts with one anterior segment and two posterior segments are adequate for a quick occlusal diagnosis (left), it is preferable to prepare casts in which each posterior tooth and at least the canines can be removed separately.
Registration of Centric Relation
The starting and ending position of mandibular movements is usually the maximum intercuspaton position at which the spatial orientation of the mandible to the cranium, and consequently the position of the condyles in their fossae, is determined by the occlusal intermeshing of the upper and lower teeth. Tooth loss or changes in tooth position as well as idiopathic or iatrogenic modifications in the shape of the occluding surfaces can lead to changes in the intermaxillary relation and subsequently to a displacement of the condyles. When this has happened, the clinician in the field of diagnosis and treatment of functional disturbances of the masticatory system faces the decision of whether to keep the jaw relations dictated by the intercuspation or to correct them by reorienting the mandible to the cranium. Every type of diagnostic and therapeutic procedure for mandibular misalignment assumes that the chosen reference position can be precisely and repeatedly recorded and that the joint structures will be physiologically loaded (i.e. in the centric or adapted condylar position). However, the commonly used techniques for registering centric jaw relations often show a clinically unacceptable range of results.

550 Maximum intercuspation position
With the teeth in maximal occlusion the condyles may be displaced in any direction from their neutral centric position. For further diagnosis, the magnitude and direction of the condylar displacement is important. From another aspect, it is worthwhile to clarify whether the condyles are in an adapted or pathological position at this maximal occlusion.
551 Premature contact in centric
The position of the mandibular teeth when the condyles are in their centric or adapted position may disclose a considerable discrepancy in the occlusion. In this case there are centric premature contacts against the lingual surfaces of the maxillary central incisors. Since no definitive “centric” can be determined in the presence of neuromuscular incoordination or protective bracing arising in the muscles or joints, one can only attempt here to register the “momentary centric” or “centric of the day.”

552 Centric registration
The centric registration captures the relationship of the mandible to the maxilla at the centric or adapted condylar position. To prevent conditioned neuromuscular deflective movements, the patient must avoid any conscious tooth contact. With natural teeth present, this requires that the recording material offer the least possible obstruction to the occlusion. When evaluating the significance of occlusal findings, the quality of the jaw relation record must be taken into consideration.
Techniques for Recording the Centric Condylar Position
Many methods have been advocated for registering centric jaw relation using either active, semiactive, or passive manipulation techniques (Lotzmann 1994). In active methods the intermaxillary relation is recorded with no manual or instrumented guidance by the clinician. This actively achieved jaw relation is significantly influenced by muscle tone and by the postural position of the head and body. Therefore it often results in asymmetrical and anterior malpositioning of the condyles, especially in patients with functional disturbances.
Most methods used in practice are semiactive registration procedures. While it is true that the patient provides most of the guidance of the mandible into the proximity of the centric region, the movement is either influenced or monitored by intraorally or extraorally mounted devices (e.g., incisal index, intraoral central bearing plates, Myomonitor, paraocclusal axiography).
In passive techniques condylar positioning and intermaxillary registration are accomplished essentially through manual control by the clinician (e.g., Dawson grasp, three-finger technique).
553 Posterior manipulation
The techniques shown here are obsolete today. Admittedly they provided a condylar position that was reproducible, but not physiological. Left: Use of the “chin technique” on a reclining patient further intensifies displacement of the mandible. The condyles are forced into a retrusive border position.
Right: Excessive posteriorly directed pressure applied to the chin will always manipulate the condyles posteriorly beyond their physiological position (circular insert).
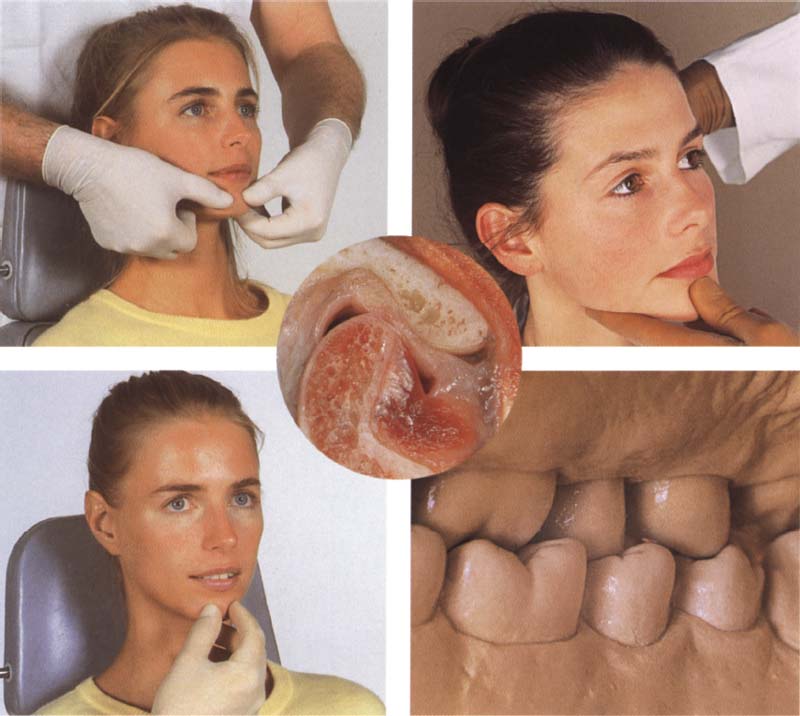
554 Anterosuperior manipulation
Both techniques shown presume a correct disk-condyle relationship or at least an adapted bilaminar zone. Left: The object of this manipulation technique from Dawson (1976) is to bring both condyles into their most anterosuperior position against the eminence (circular insert).
Right: The “three-finger technique” also supports the mandible at its angles and helps to avoid posterior and posteroinferior displacement of the condyles.
555 Gentle chin guidance with the head upright
Left: Careful chin guidance serves only to orient the masticatory nerves and musculature. No force is applied to the mandible. With this technique, iatrogenic compression of the joint structures can be avoided, assuming that the muscles are relaxed.
Right: The centric, or at least the adapted condylar position (circular insert) should coincide with a stable occlusion of the posterior teeth.
Transcutaneous Nerve Stimulation for Muscle Relaxation—“Myocentric”
The Myomonitor procedure is counted among the semiactive techniques for the determination of centric jaw relation. The Myomonitor, devised by Jankelson and Swain (1972), produces transcutaneous electrical nerve stimulation (TENS) which induces rhythmic contractions of the stimulated muscles. This in turn relaxes the muscles to achieve a mandibular rest position that is at least temporarily stable and relaxed. Electrical pulses, each lasting half a second and spaced 1.5 seconds apart, are conducted from two active preauricular electrodes to one indifferent electrode placed below the occipital bone.
On each side the Myomonitor delivers a maximum electrical potential of 65 V and, depending on the resistance of the skin, a maximum current of 25 mA. Through indirect stimulation of motor branches of the trigeminal and facial nerves, these pulses produce synchronous, mutually balancing muscle contractions. After the Myomonitor has been used for 30-40 minutes the mandibular rest position can become stabilized to a great extent through fatigue and relaxation of the muscles of mastication. This newly defined rest position serves further as the starting point for registration of the intermaxillary position referred to as “myocentric.” This assumes that with the torso upright and the head held straight, a closing movement of 2-3 mm (the average interocclusal distance) beyond the rest position will place the mandible in the neuromuscularly determined “true” centric position relative to the cranium (Jankelson and Radke 1978a and b, Schöttl 1991). In the majority of cases registered in this way, including patients with successful pretreatment, the condyles will actually lie about 0.6 mm anterior and superior to the centric condylar position (Lotzmann 1994). Following Myomonitor application, patients will frequently notice distinct premature contacts on the lingual surfaces of the maxillary incisors. If the definitive reconstruction is made in myocentric, the space for retrusive movement will be artificially enlarged by the amount of the anterior condylar displacement. The farther the retrusive path extends from the position of maximal intercuspation, the more difficult it is to create an interference-free occlusion by subtractive equilibration or prosthetic reconstruction (Lotzmann 1999). The Myomonitor technique is useful primarily in patients with stubborn muscle tension-especially where there is hypertonicity of the retractors-for registering a preliminary jaw relation to serve as a starting point during the occlusal pretreatment phase.
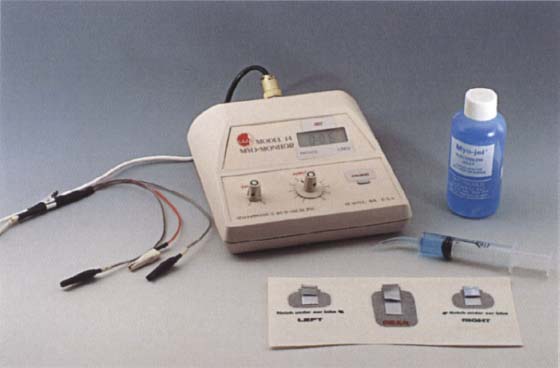
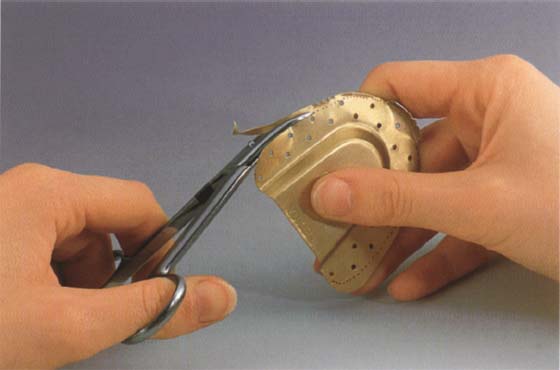
556 The Myomonitor
The Myomonitor, shown here with its set of electrodes, electrode gel, and application syringe, can bring about relaxation of the muscles of expression and mastication through rhythmic transcutaneous electrical stimulation of the facial and masseteric nerves.
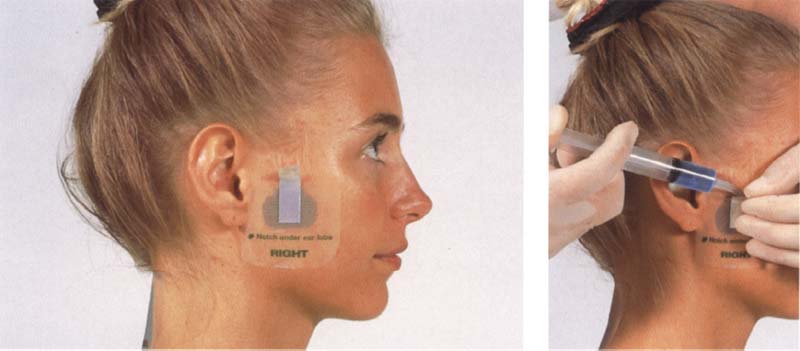
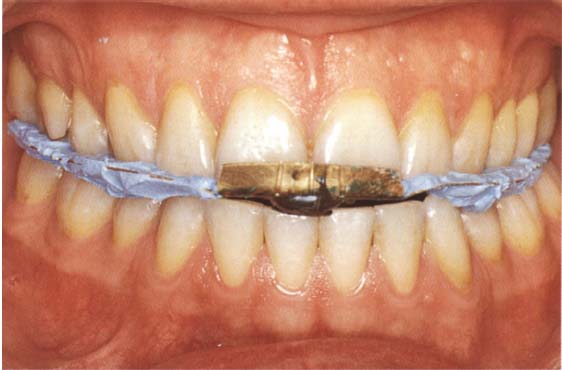
557 Placement of the electrodes
The active electrodes are placed over the preauricular areas on both sides, and the indifferent electrode is centered on the back of the neck just below the hairline.
Right: Contact gel is applied to the skin with a syringe and spread evenly by pressing on the electrode.

558 Cables connecting electrodes to the Myomonitor
The electrodes are connected to the Myomonitor through color-coded cables (green – right; black = left).
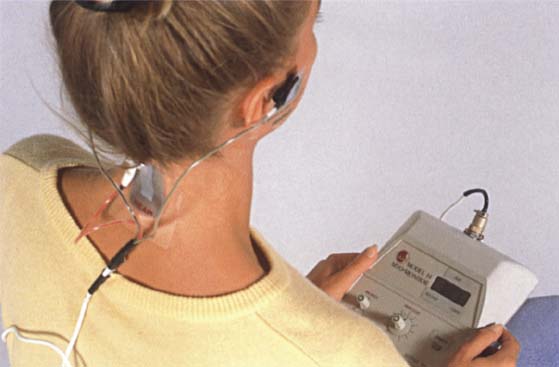
559 Regulation of the impulse intensity
The amplitude of the electrical impulse is adjusted for each individual patient with the head and upper body in the upright position and the teeth out of occlusion. A uniform, rhythmic contraction of the elevator muscles should be visible.
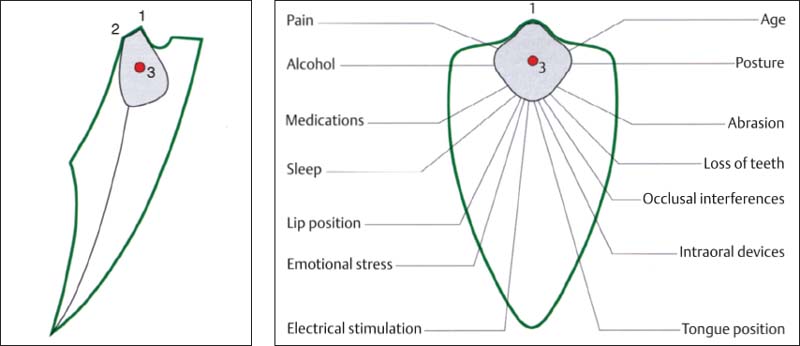
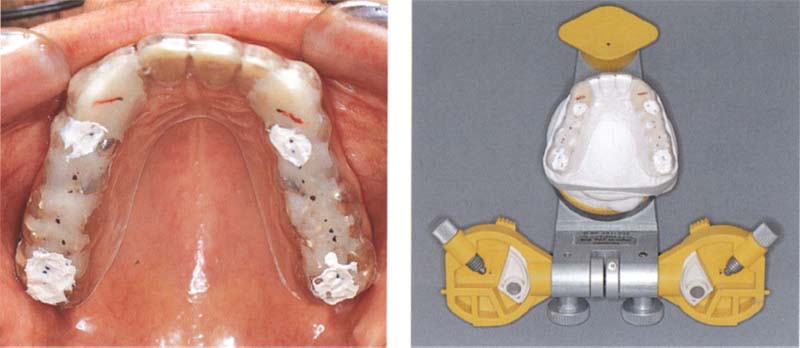
560 Range of possible mandibular rest positions (gray areas)
Posselt diagram in the frontal plane. The rest position depends on a number of factors. Here the “myocentric” lies on the path of closure of the mandible approximately 3 mm superior to the rest position as determined through use of the Myomonitor. Left: Sagittal view.
1 Position of maximum intercuspation
2 Retrusive contact position
3 Neutral rest position
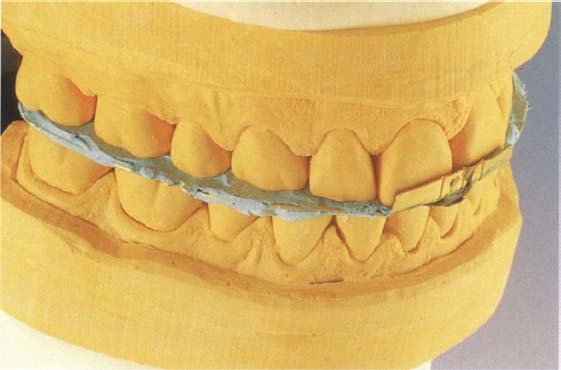
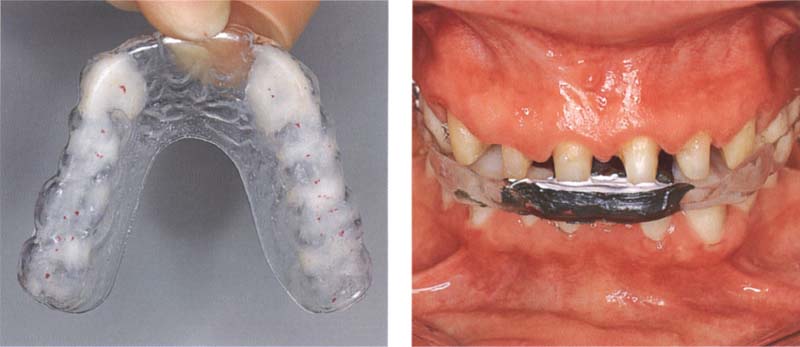
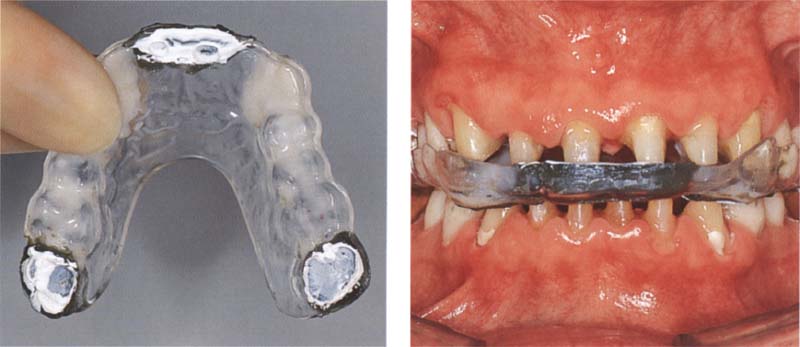
561 Interocclusal registration of the myocentric position
The Myomonitor serves here simply to introduce a relaxed and reproducible rest position from which the patient actively but gently closes into the registration material (here. Beauty-Pink-Wax refined with Aluwax). Apart from this indirect procedure, a direct “myocentric” record can also be made by using the Myomonitorto “pulse” the teeth Into a slow-setting registration material (e.g. Myoprint).
Interocclusal Registration Materials
The classic registration material is hard baseplate wax (e.g. Beauty Pink Wax from Moyco) that is warmed and adapted to the upper teeth and is then corrected on its occlusal surface with Aluwax or a bite registration paste (e.g. Superbite from Bosworth). The slight deformation encountered with wax records can be avoided by using thin metal plates (by Panadent) or bases made of light-curing resin (e.g. Paladisc LC from Kulzer). A more pleasant alternative to the classic registration materials is the special quick-setting, hard registration silicones (e.g. Regisil Pb from Dentsply Caulk, Futar D from Kettenbach). These are available in cartridge systems for convenient mixing and application to the teeth. The resulting silicone records can precisely reproduce the interocclusal relationships. However, because of their residual elasticity they can lead to inaccurate cast mountings. Registration plasters (e.g. Centidur by Girrbach) are also very accurate and easy to use, although they cannot produce thin layers well. If a plaster record cannot be seated on the cast precisely and without rocking, the dimensional accuracy of the cast should be questioned.
562 Wax occlusion record
A “classic” occlusion record of Beauty-Pink-Wax corrected with Aluwax against the lower teeth.
Right: The wax record base is reinforced with an additional layer of wax on both the superior and inferior surfaces of the palatal area. An anterior buildup of wax provides for disclusion of the posterior teeth, adding Aluwax to the premolar and molar areas to form occlusal stops.

563 Synthetic resin occlusion record
Record bases made of light-curing resin offer the advantage of dimensional stability. They can readily be trimmed back to minimize interference with the occlusion if necessary.
Right: A resin record base on the maxillary cast after occlusal refinement. The anterior bite plane parallel with the occlusal plane helped to avoid posterior tooth contact with the record base.
564 Silicone occlusion record
Whenever silicone or plaster is to be used to register the centric jaw relation, an anterior bite index of cold-curing resin should first be formed to prevent occlusion of the posterior teeth.
Right: The silicone record is judiciously trimmed back with a scalpel and placed to fit precisely on the mandibular cast. One advantage of this registration technique is that there is virtually no impingement upon the tongue space.
Centric Registration for Intact Dentitions
Patients with all their teeth, or at least with upper and lower teeth occluding in all quadrants, offer a stable foundation for the occlusal registration provided there is no abnormal tooth mobility. This is advantageous for precise transference of the intraoral relationships to the casts. Basically, because all antagonistic tooth contacts must be avoided as the occlusal registration is being made, an excessive vertical dimension will result unless all the teeth have been prepared for crowns, or the vertical dimension must be increased to restore an abraded dentition. The occlusion should be opened as little as possible consistent with the properties of the registration material.
Prior to making the interocclusal record, the masticatory muscles should be deprogrammed by placing cotton rolls in the premolar regions or by some other method. The actual registration is accomplished in two steps:
1. Construction of a horizontal bite plane to oppose the lower incisors.
2. Occlusal registration in the posterior region.
Multiple interocclusal records used with the split cast method (see p. 230) can provide information on the neuromuscular stability of the recorded position.
565 Trimming of the record base
In this example, 3 prefabricated metal plate (by Panadent) is used in making the registration. After the patient has closed the teeth firmly on the plate, it is trimmed back to the width of the maxillary dental arch. Sharp angles are rounded over with a carborundum stone.
566 Interocclusal correction of the record base
The metal base is loaded with a registration paste capable of reproducing fine details (here: Super Bite) and placed against the upper teeth. Adhesion of this registration paste to the metal base can be increased by first coating the metal with a silicone adhesive. Next an anterior bite index is formed with green stick compound (by Kerr). Finally the occlusion of the mandibular posterior teeth is registered with more fine-detail bite-registration paste.
567 Testing the fit of the occlusal record on the casts
TO be able to critically examine the occlusal record for exactness of fit while the patient is still present, the casts should already be on hand when the jaw relation record is made. The sides of the tooth imprints are trimmed back with a scalpel under magnifying loupes. The casts must seat into the record with no gaps.
Occlusal Splints used as Record Bases
During the course of occlusal pretreatment or, at the latest, immediately after its successful conclusion, it may be necessary to mount upper and lower casts in the current jaw relation achieved with the occlusal splint. This serves the following purposes:
• Occlusal adjustment of the occlusal splint in the articulator
• Testing of the therapeutic mandibular position as registered on the patient by means of the trial mounting base method. (When using the mandibular position indicator or similar registration system, however, there is no new mounting of the mandibular cast.)
• Occlusal diagnosis for planning the measures to be used for the definitive correction of the occlusion.
• Transfer of the stable, comfortable splint intercuspation position arrived at during splint therapy to the definitive restorations.
When the occlusal splint is to be used to carry the occlusal record, there are two different ways of proceeding:
• If the splint is to be remounted for occlusal adjustment, the posterior occlusal regions of the splint are ground back, an anterior bite plane is built up to disocclude the posterior teeth, then fine adjustments are made in the posterior region.
• If the intercuspation with the splint is to be transferred unchanged to the articulator, registration paste is applied in the first premolar and terminal molar regions. Then the patient, with the head and body held upright, closes lightly into the habitual splint occlusion.
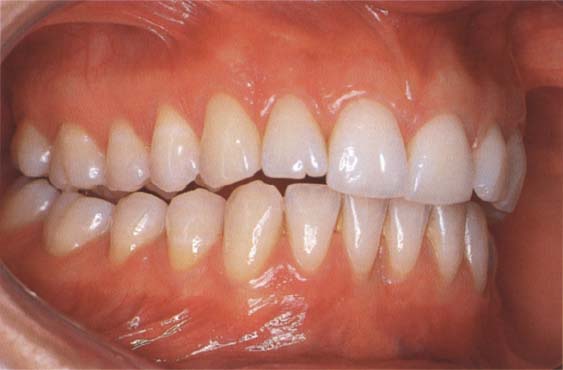
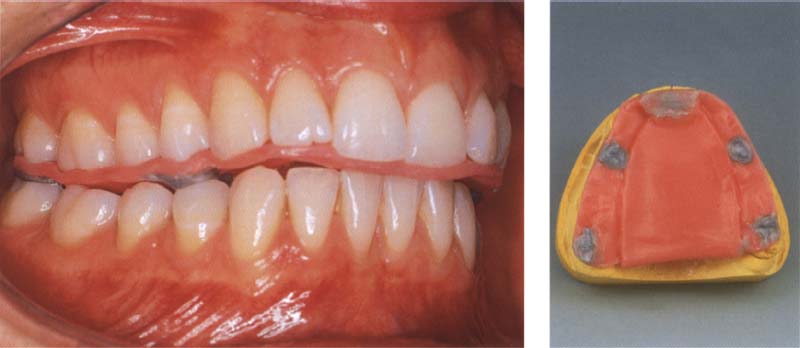
568 Occlusal pretreatment
Left: The pretreatment on this patient has been completed with the help of a canine-guided equilibration splint. The patient is free of her previous complaints, and maximal intercuspation with the splint has been stable for 4 weeks.
Right: The occlusal contacts have been marked on the splint with black articulating film.
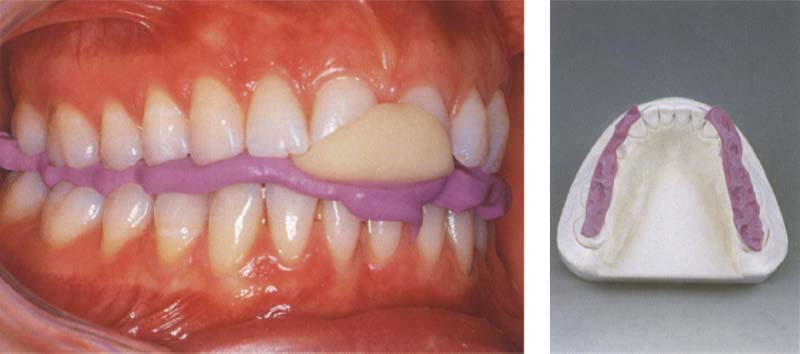
569 Application of registration paste
Left: Testing the eccentric occlusion. The excursive paths marked with red articulating film extend equally. No excursive interferences can be detected in the posterior regions.
Right: A fine-detail registration paste is applied to the splint only over the first premolars and distal-most-molars.
570 Registration of the maximum intercuspation position on the splint
Left: With the head in the upright position, the patient closed gently against the splint. After the registration paste has hardened, the previously marked centric contacts should always be visible at the depths of the occlusal imprints.
Right: In preparation for mounting the mandibular cast, the “splint registration” is seated on a duplicate maxillary cast made before the splint was constructed.
In regard to mounting casts for planning the final treatment, it is recommended that the working cast be duplicated before the occlusal splint is constructed. As a rule, the splint can be reseated accurately only on the working cast or its duplicate.
The tried and proven splint intercuspation position must be transferred precisely to the articulator for the definitive restoration. This is especially true for those patients who responded with a clear increase or decrease of symptoms during the course of occlusal pretreatment. The proven splint occlusion can be captured by using an accurate registration paste immediately before beginning the tooth preparations. Then as the teeth are prepared, the splint is relined in successive steps, with care being taken to preserve the jaw relation established during splint therapy. In this way the splint is transformed into the definitive centric registration record.
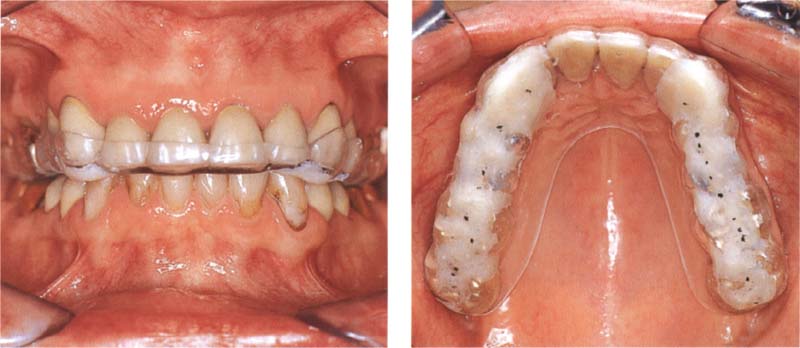
571 Pattern of occlusal contacts
Left: The pattern of occlusal contacts in maximum occlusion as seen on the splint at the conclusion of splint therapy.
Right: Following removal of the old anterior crowns and additional tooth preparation, the splint is readapted to the incisor preparations, here with impression compound and Temp Bond cement.
572 Adapting the splint base to the crown preparations
Left: After removal of the crowns from the distal-most molars, the splint is further adapted on both sides. The original position of the splint relative to the maxilla remains unaltered throughout.
Right: Preliminary preparation of the mandibular incisors and canines.
573 Successive adaptation of the splint occlusion
Left: As soon as the lower canines are prepared for crowns and the distal-most lower crowns are removed, the contact of the occlusal device with these preparations is re-established step by step. This preserves the jaw relation established with the treatment splint.
Right: Mounting of the working casts, here for fabrication of long-term provisional crowns, completes transfer of the stable splint intercuspation position from the patient to the articulator.
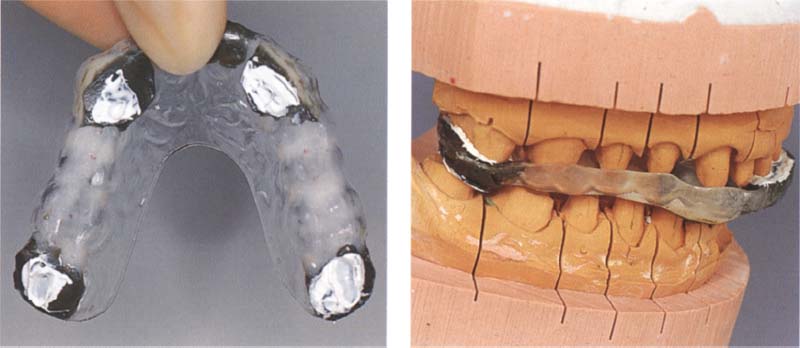
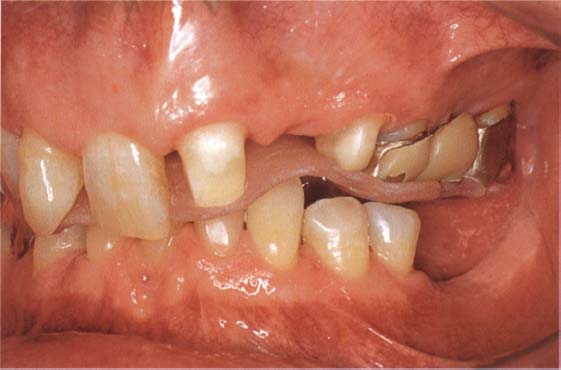
Centric Registration for Posteriorly Shortened Dental Arches
The shape of a centric relation record for a posteriorly shortened dental arch depends, among other things, upon the distribution and mobility of the remaining teeth. As a rule, record bases are used that are supported by soft tissue or, if the dental status permits, by a combination of soft tissue and tooth structure. They can be augmented by a central bearing pin if necessary. These hard resin record bases can be made on a cast that is a duplicate of the one to be mounted and must fit the casts accurately. Under no circumstances should the record base be relined in the mouth or it will no longer fit the master cast.
The bases are built up with rims of hard wax or resin in the areas of missing teeth. If the vertical dimension is to be increased, the remaining teeth are also covered. The occlusal surfaces of the rims are adjusted using occlusal ribbon or tape and then refined with Aluwax or registration paste. It is essential that there be no occlusal contact against the hard rims. An alternate method for free-end situations in the mandible is to add to the upper record base an elongated rim that will contact the opposing alveolar ridge.
574 Try-in of the preadapted record base
The fit of a record base constructed previously of light-cured resin on a cast of the upper teeth is checked in the mouth. The base has an anterior bite plane to meet the lower incisors and ensure a slight disclusion of the posterior teeth.
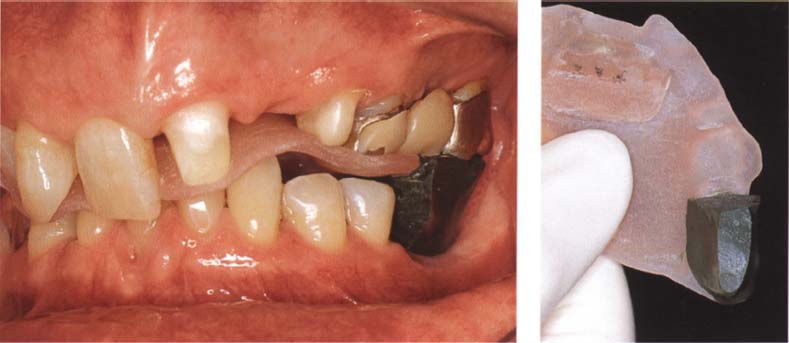
575 Addition to the base over the opposing edentulous ridge
The record base is built up with impression compound over the edentulous region until an imprint of the alveolar ridge is made in the warmed compound as the jaws are closed.
Right: Occlusal view of the record base. The impression of the alveolar ridge is trimmed back so that it does not quite touch the ridge mucosa. The only occlusal contact is now on the anterior bite plane.
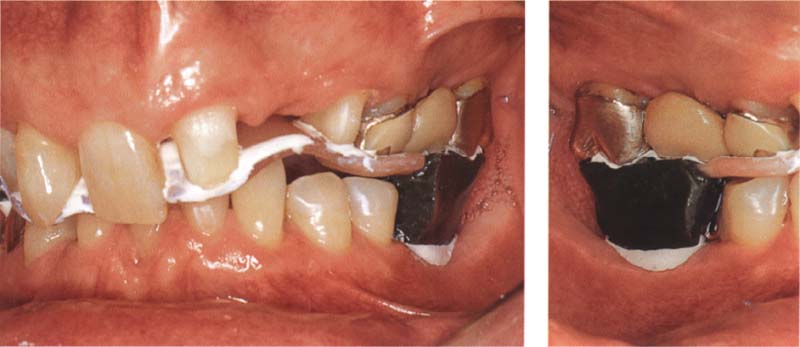
576 Corrective lining of the record base
Whether or not the record base should be lined with registration paste against the maxillary teeth depends upon the quality of the original fit.
Right: Buccal view of the “free-end saddle” completed with a high-definition registration paste. The impression of the crest of the ridge is formed without pressure.
Jaw Relation Determination for Edentulous Patients
With the loss of the last remaining pair of opposing teeth, the orientation of the mandible to the cranium as determined by the patient’s occlusion is lost. In determining the correct jaw relation for an edentulous patient one is faced with the challenge of defining anew a physiological mandibular position not only in the horizontal plane but also in the vertical dimension. Determination of the edentulous jaw relation is best accomplished in two steps at two different appointments:
• Relation determination I: Establishment of a functionally and esthetically acceptable vertical dimension.
Relation determination II: While preserving the vertical relation established in the first step, the second step involves the actual recording of the centric, adapted, or therapeutic mandibular position in the horizontal p/>
Stay updated, free dental videos. Join our Telegram channel
VIDEdental - Online dental courses


