Fig 20.1 A one-piece lateral basal implant (BOI) for insertion into the basal jawbone. This implant features two bending zones along the vertical shaft. The fracture-proof design of the base plate was introduced in 2002. In this design the prosthetic construction is cemented.

Fig 20.2 Triple BOI implant (BBB 7 H6) for multicortical anchorage. This design is frequently used in the area of the canines in both jaws. For triple base plate implants the term ‘basal implant’ is misleading, as of course only one or at maximum two base plates can be actually positioned in the basal bone. The surgeon should position the implant in such a way, that as many as possible base plates get engaged into the cortical bone.
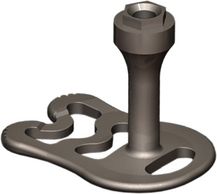
Fig 20.3 A lateral basal implant for screw-connection (TOI® IE). This type is compatible to the standard external hex 2.7 mmd. The implant provides a platform of 3.7 mm.
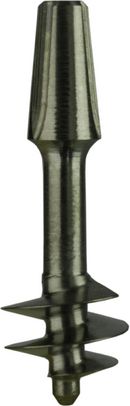
Fig 20.4 A one-piece basal screw implant (BCS®). The cortical load transmission is done through the large basal threads. These threads should be anchored in the cortical opposite to the crest. Some BCS implants provide lengthy grooves or holes in the threads for the in-growth of vessels or bone. Screwable basal implants are available in diameters 3.5–12 mm and in lengths of 10–38 mm. Load transmission along the polished vertical shaft is not required for the functioning of this type of implant. This implant features some structural elasticity, and masticatory loads are transmitted into the basal bone and into resorption-free bone areas.
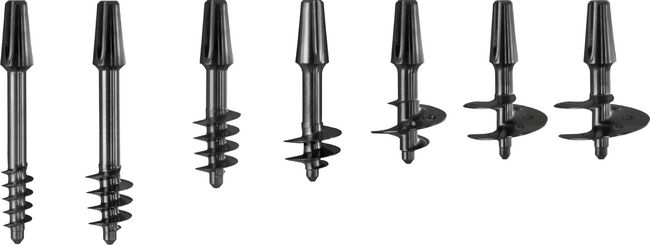
Fig 20.5 A large variety of BCS implants allow placement in all bone situations. Thereby either the width of the bone is utilized (through threads of 3.5–12 mm in width) or the height of the bone (through implants with 10–38 mm length), or both. Since only small bone cavities of 2–2.5 mm are drilled out, the threads have to compress the bone considerably. Therefore not all types of BCS implants can be inserted into the lower jaw with high mineralization (high density bone).

Fig 20.6 For use as zygoma implants, ZSI implants have been developed. They feature an aggressive thread for zygomatic anchorage and a bending zone near the abutment. The bending zone allows insertion from the palatal aspect of the maxillary alveolar crest and subsequent bending of the implant. This way the head reaches the crest and fits under the prosthetic construction. ZSI implants are available in lengths 35–50 mm and are used after preparing the bone with a twist drill 2.2 mm/50 mm. Both intrasinusal and extrasinusal placements are possible.
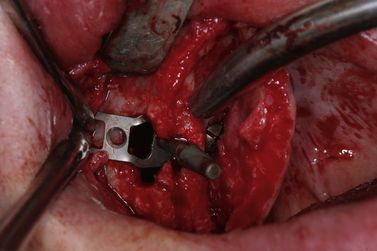
Fig 20.7 Transsinusal placement of a BOI-BAC implant, with vertical screw anchorage on the palatal bone, and before lateral screw anchorage on the lateral cortical of the maxillary sinus.
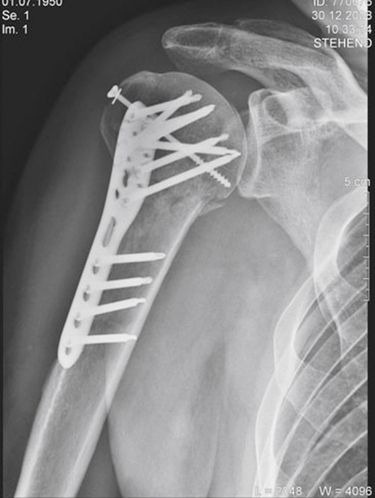
Fig 20.8 Treatment of the fracture of an upper arm in an immediate loading protocol. The positioning of the implant is strictly cortical (although some implants, due to the projection of the radiograph, seem to be without cortical anchorage). The implants are not placed parallel. The fracture plate allows immediate splinting of all implants.
Insertion of screwable basal implants (tubero-pterygoid screw implants/GBC)
In the upper jaw, the opposing (second) cortical must be reached by the screw thread. The preparation is best done with a handgrip and the pathfinder drill, followed by a 2 mmd twist drill. This is the best way to find out the correct direction for the implant. To penetrate the second cortical, a tapping instrument is used (i.e. a Bein elevator). The quality of the bone can be evaluated through the sound of the taps.
In the lower jaw long tubero-pterygoid screw implants (i.e. BCS—diameter 3.5–4.6 mm; length 23–29 mm) are often used in the anterior region, while shorter but wider designs (i.e. 5.5 × 10⁻¹⁴ mm) are suitable in the posterior region. In many cases, the bone lateral and below the mylohyoid ridge forms an almost horizontal plate. This plate is suited perfectly as a second cortical.
Placement of lateral basal implants (BOI/TOI)
For lateral basal implants, the preparation of a full thickness flap is mandatory. Good vision on the bone surface must be given and all soft tissues including muscle attachments must be removed.
Treatment rationale in basal implantology
General comments
Conventional dental implantology has developed independently from the field of orthopaedic surgery and traumatology. In retrospective this was unfortunate, because both orthopaedic surgery and traumatology had discovered the secret of safe, immediate loading a long time ago, whereas dental implantology was still working with ‘healing times’, considering the importance of implant-surface alterations and bone augmentations.
The two main principles used in fracture treatment with plates and screws are bicortical or multicortical anchorage and immediate splinting of implants (< ?xml:namespace prefix = "mbp" />
The principles of fracture treatment have been explained in textbooks. In surgical fracture treatment, immediate splinting (and thereby loading) is a pure necessity, because a second or third surgical approach through the skin and around often massive packages of muscle clearly must be avoided. In addition, every intervention is followed by massive swelling and the burdens of rehabilitation. Other than in the dental field, local resistance against infection in the long bones is poor and the occurrence of osteomyelitis is a realistic threat. Massive and long-lasting swellings occur and require intense postoperative care. In addition, such intervention requires surgery under total anaesthesia, which increases risks and costs. Hence, surgery on fractured long bones from early times aimed at one surgical intervention and immediate loading.
Another reason why ‘immediate loading’ was always the preferred method in traumatology and joint replacement is found in the nature of bone – immobilization quickly reduces the degree of mineralization, because the bone responds with strong remodelling both to increased and to decreased loads. Osteoporosis due to inactivity may reduce the overall mineralization of a patient’s bone by 15% after 6 weeks. This is a dramatic figure and it shows how quickly bone responds. The response is invisible to our eyes.
In dental implantology, these problems are not of much concern, because resistance against infection in the jawbone and access to bone in the oral field are good. In living patients, jawbones never become inactive because even edentulous patients eat and carry out oral functions one way or another. Probably for this reason, dental patients were treated for decades, without concern of infection, in two-stage protocols. It was actually increasing competition between dentists who made ‘immediate loading’ an issue. In addition, avoiding bone augmentations (including their cost and suffering) became a competitive advantage.
The ‘All-on-4’ concept and the inclusion of zygoma screw implants changed the situation a bit; however this treatment is accessible only through specialized treatment providers and involves extremely high overall costs for implants, central treatment support, and templates.
The bone sets the clock
The ‘healing’ of bone starts 3 days after any bone surgery or fracture through a process of remodelling. Hence, within the first 3 days of surgery or fracture, a very stable type of bone becomes available. For this reason, the authors recommend insertion of the implant within this short period with prosthetic reconstruction, and recommend that it is left in place for a minimum of 6–9 months. This ensures that the remodelling (‘healing’) of the bone does not reduce its stability in the very critical phase before implants are splinted. During a metal try-in, the peri-implant bone around each single implant can be much more traumatized than during regular mastication while the implant is splinted.
Different ways to “osseointegration”
A few words must be spent on what is called ‘osseointegration’. The term has been defined as ‘direct contact between implant and bone’. The authors add that this contact must also be durable, whereas the degree of mineralization of the bony interface is not a criterion for successful osseointegration.
In the authors’ view, at least three roads can lead to this desired result. Two of these roads take separate routes.
1. Traditionally, the active growth of bone towards the implant surface was considered to be the (only) way to achieve osseointegration. The process requires at least a minimal amount of space around the endosseous implant surface and it requires blood access to support the production of the woven bone matrix and its subsequent mineralization. Workers in the scientific field discussed the significance of specific implant surfaces and assumed that the ‘healing time’ could be brought down by altering or ‘improving’ the surfaces. All evidence presented for this theory was proved wrong. What is called the ‘biologic osseointegration’ definitely works, but it must be accepted that this pathway is not the only possible road. This process of gradual integration was never used in the field of orthopaedic surgery and its usage in dental implantology is unique. No rationale whatsoever supports the placement of dental implants in the worst bone available – the native spongious bone.
When observing implants after their osseointegration, it is found that mainly secondary osteons are in direct contact with the implant. These osteons have remodelled the primary woven bone or previous osteonal bone. Depending on whether direct matrix deposition as a function of woven bone takes place, or if there is direct integration through osteons, a small layer of what was called ‘soft tissue’ and is in fact the most peripheral collagen layer of the circumferential lamella of the osteon, is visible under the microscope. Workers in the scientific field have for decades been fighting about the question of direct bone-to-implant contact without understanding that different types of bone (woven bone, osteonal bone) yield different results when performing ‘osseointegration’.
2. Orthopaedic surgeons always create direct contact between the implant and the cortical bone. Their treatment rationale coincides with the fact that defects in the cortical bone are always repaired, and consequently, implant bodies which are placed in the sphere of the corticals will be integrated almost regardless of the biocompatibility of the implant material and its surface.
3. Whenever spongious bone is compressed, its structure gets damaged and the degree of mineralization of this compressed bone is increased notably. Compression screws (e.g. single piece KOS®, or two-stage Hexacone®) utilize the stability which results out of this compression and they take advantage of the fact that the osteonal remodelling cannot have its origin in the compressed bone areas. Hence, compression screw implants like KOS and Hexacone provide grounds for a treatment protocol in immediate loading.
Treatment planning for basal implants
Diagnostics
Basal implants may be used as single tooth replacement by experienced treatment providers, but this application is not their central function. Excellent results are achieved if three or more implants are splinted in a segment or a full bridge. In selected situations two splinted implants can also be successful in an immediate loading protocol, and in a number of situations the trained implantologist can work even with single implants in this way. Although BOI implants are three-dimensional, the two dimensions shown on a panoramic radiograph are sufficient to plan a case. Three-dimensional planning is helpful to identify irregularities in the bones (i.e. leftover roots) and the true periodontal state of teeth. Often a three-dimensional exploration gives indications for additional extraction, thus making the case safer to treat and improving the overall prognosis.
Choice of implant sites
The resorption-stable areas in the jawbone are located as follows:
2. The pterygoid plate of the sphenoid bone
4. Bone caudal to the oblique line in the mandible
Depending on the pathway of past atrophy and changes in morphology, bone configurations which are not present in all patients, can be considered to be resorption-stable: the bone caudally to the attachment of the mylohyoid muscle on the lingual side of the mandible. This bone is easy to access, especially if this bone is provided (almost) horizontal. For providing additional stability in immediate loading cases, resorbable bone areas may also be used, although these areas are prone to remodelling and loss of their cortical properties (
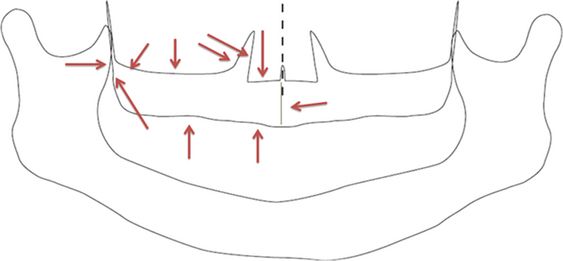
Fig 20.9 Visualization of accessible corticals in the right maxilla – besides the first (crestal) cortical all other corticals shown here can serve as second corticals. The bone in the area of the nasal spine (arrow from the right) is often through and through cortical – for this reason it is often unnecessary to reach the floor of the nose as second cortical. Note that in addition to the corticals shown here, the pterygoid plate of the sphenoid bone offers two more corticals for posterior support.
Stay updated, free dental videos. Join our Telegram channel
VIDEdental - Online dental courses


