
Fig 22.1 Flaps are elevated to expose the bony ridge, and the mental foramina are located. An osteotomy of approximately 10 mm depth in the midline is prepared using a ϕ 2 mm twist drill and the All-on-4 guide is correctly placed in this midline osteotomy. The posterior osteotomies are prepared to the appropriate depth and tilted distally to the maximum angle of 45°. (A) The posterior osteotomies are prepared in such a manner that the posteriorily tilted implants are placed minimum 2 mm anterior to the inferior alveolar nerve. The osteotomies for the anterior implants are prepared in the usual manner. (B and C) After placing all the four implants, the straight or 17° multiunit abutments are placed on top of the anterior implants whereas the 30° multiunit abutments are inserted over the posterior tilted implants. Multiunit abutments of appropriate collar height should be selected for each implant and should be tightened to 15 Ncm using torque ratchet. (D and E) Immediate provisional and later on definitive hybrid prosthesis are fixed over these implants using fixation screws.
(Courtesy: Nobel Biocare, India).
Step by step diagrammatic presentation of All-on-4™ in the maxilla is shown in < ?xml:namespace prefix = "mbp" />
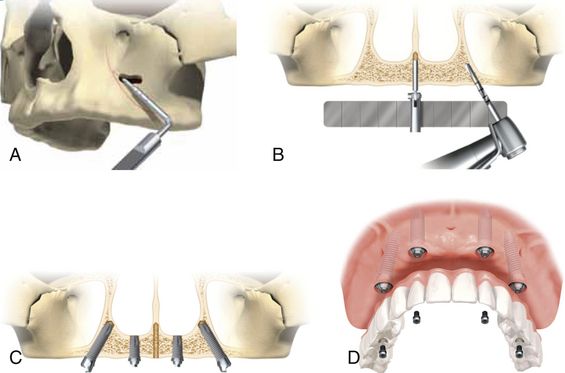
Fig 22.2 Flap is elevated to expose the bony ridge as well as lateral wall of the maxillary sinus. A small opening on the lateral wall of the sinus is prepared where the anterior wall of the sinus is expected. Further, the anterior wall of the maxillary sinus is explored by using a probe through this opening. (A) The lateral window is extended if necessary and position of the anterior wall is marked using a sterile pencil. An osteotomy approximately 10 mm depth is prepared in the midline using a ϕ 2 mm twist drill and the All-on-4™ guide is correctly placed in the midline osteotomy. (B) The osteotomies for the posterior implants should be started as posterior as possible to minimize the cantilever and allowing approximately 4 mm distance from the sinus. The posterior osteotomies are prepared to the appropriate depth and tilted to the maximum angle to the 45°, so that the posteriorly tilted implants are placed a minimum 2 mm anterior to the anterior wall of the sinus. Two implants at the most-anterior position are placed in the usual manner. (C) The 17° or straight multiunit abutments are placed on the anterior implants whereas the 30° multiunit abutments are placed on the posterior implants. (D) Immediate provisional and later on definitive hybrid prosthesis are fixed over the implants using fixation screws.
(Courtesy: Nobel Biocare, India)
All-on-6 technique
Because of graftless implant placement and immediate loading, the All-on-4™ technique is very successfully being performed by many dentists and has gained high popularity among implant dentists as well as patients. The only limitation with this technique is that prosthesis with only limited number of teeth (10–12 units) can be fixed over these four implants. Further, the loss of any one implant reverts the entire procedure to the initial stage.
To avoid such problems and also for the patients who express the desire for a 14-unit prosthesis, two more implants can be inserted posterior to the posterior wall of the sinus in the maxillary tuberosity and tilted anteriorly at 45° to minimize the length of the unsupported bridge framework between two distal implants. The severely resorbed posterior maxilla with a large volume of posterior expansion of the sinus often does not leave enough bone volume in the tuberosity region to place an implant of an adequate size. In such cases, the implant is inserted in the tuberosity with the apex of the implant at the junction of the pyramidal process of the palatine bone and the pterygoid process of the sphenoid bone. The implant placed would then engage all three bone segments that constitute this region. The implant placement in the tuberosity with its apex engaging the medial pterygoid process of sphenoid bone is the most preferred option because it allows the multicortical engagement of the implant to achieve adequate initial stability for the implant.
To perform the All-on-6 procedure in the mandible, the two straight implants should be inserted usually at the first or second molar site but if inadequate ridge height above the mandibular canal does not allow placement of implants in the molar region, then the short and wide implant can be inserted at the angle of the mandible (into the buccal shelf area) tilted anteriorly at 30–45°.
With the few advantages, there are also several disadvantages with All-on-6 procedures such as increased cost, need of a highly skilled approach to correctly place implants in pterygoid process, difficult approach for the insertion and restoration of posterior implants, need of a skilled technician to fabricate the prosthesis, and problems in oral hygiene maintenance in the back region.
Comparative features of the traditional versus All-on-4™/All-on-6 approach
Advantages of the All-on-4™/All-on-6 technique
1. Vast numbers of the edentulous patients can be treated with the technique.
2. Being a graftless and immediate loading technique, it is more acceptable to patients.
3. Fewer implants are inserted.
4. Fixed teeth can be given on four implants to patients for whom sinus grafting/nerve transpositioning procedures are contraindicated.
Table 22.1 Comparison of the graftless All-on-4™/All-on-6 approaches with the conventional full-arch implant procedure
| COMPARATIVE FEATURE | TRADITIONAL APPROACH FOR RESTORING FULL-ARCH | ALL-ON-4™/ALL-ON-6 APPROACH |
|---|---|---|
| Sinus grafting | May be required | Not required |
| Only grafting | May be required | Not required |
| No. of implants | More no. of implants are inserted | Less no. of implants are needed |
| Immediate fixed restoration in function | May not be possible | Possible |
| Surgery | More invasive | Less invasive |
| Surgical steps | May require multiple surgical steps like grafting procedures, implants insertion, uncovery, etc. | Only one surgical step, i.e. implant insertion |
| Time span needed to deliver the final prosthesis | May take 6 months to 1 year | Can be completed in a few weeks |
| Sinus pathology contraindicating the grafting and implant placement | May not be possible | Possible |
| Patient’s acceptance | Less | More |
| CT guided implant placement | Possible in selective cases | Possible in most cases |
5. Lower cost of the treatment compared to the traditional implant-supported full-arch fixed prosthesis which often needs bone grafting, more implants, multiple surgical steps, etc.
6. Long tilted distal implant can be maximally stabilized by utilizing high-density bone of the anterior region. Placement of longer implants, enhancement of the area of interaction between bone and implant, and also primary anchorage.
7. A greater distance between implants, allowing the elimination of cantilevers in the prosthesis, which results in better load distribution.
8. By reducing the number of implants to four, each implant can be placed without interfering with the adjacent implants.
9. The placement of implants in residual bone, avoiding more complex techniques of bone graft and/or sinus lift.
10. Immediate loading is done in most of the cases so that the patient gets at least provisional fixed teeth on the day of implant placement for aesthetics and function.
11. It can be performed by implant surgeons who are not very expert at performing procedures like sinus grafting, block grafting, nerve transpositioning, etc.
12. Only one surgical step is required (no implant uncovery).
13. The high success rate of the procedure (as shown in the various studies).
14. Treatment completed in very short period of time (in a few weeks) whereas the traditional technique may however take years to complete treatment.
Disadvantages of the All-on-4™/All-on-6 technique
1. It cannot be performed in patients presenting with large osseous defects in the anterior region, which needs grafting procedures to regenerate new bone before All-on-4™ implant placement.
2. Extraction of firm, healthy teeth is mandatory, if any are present in the anterior jaw.
3. Reduction of bone crest causes increased soft tissue height which in turn leads to increased pocket depth around the abutment, more chances of bacterial growth, and peri-implantitis.
4. With the All-on-4™, only the 10- to 12-unit prosthesis is delivered over the four implants, and often patients request the addition of more posterior teeth to maximize chewing efficiency and improve the overall maxillofacial prosthesis.
5. Oral hygiene: Maintenance of the hybrid prosthesis is often difficult for some patients and they need regular visits to the dentist for its cleaning.
Indications
1. Edentulous patients who need fixed implant-supported prosthesis – maxillary, mandibular or both.
2. Patients with partial maxillary/mandibular edentulism with only few intact natural teeth in the anterior region.
3. Patients with worn out dentition which needs extraction and replacement of all teeth.
4. Patients with periodontally compromised mobile teeth which need extraction and replacement.
5. Edentulous or partially edentulous patients with very limited subantral bone height in the posterior maxilla.
6. Edentulous or partially edentulous patients with very limited bone height above the mandibular canals in the posterior mandible.
7. Edentulous patients with maxillary sinus pathologies contraindicating the sinus grafting procedure.
8. Patients with adequate volume of healthy bone in the maxillary and mandibular anterior region to place implants.
9. Implant overdenture cases with severe ridge resorption – tilting posterior implants give more support to the denture and prevent soft tissue abrasion and further bone loss in the posterior region.
Contraindications
1. Patients with inadequate bone volume in the maxillary and mandibular anterior region to place implants.
2. Anterior wall of the sinus is located far anterior to the usual position, contraindicating tilting of the posterior implants to reach the second premolar or first molar position (
Key points for successful All-on-4™/All-on-6 implant therapy
1. Meticulous treatment planning to see the position and path of anterior, inferior, and posterior wall of maxillary sinus.
2. Dental CT planning if possible, to see the possible placement of the implants with desired dimensions and their three-dimensional positioning for the best possible prosthesis.
3. Placement of longest possible implants and stabilization in the cortical bone such as nasal floor, basal bone of the anterior mandible, pterygoid process, etc. to achieve high primary stability.
4. Tilting of the posterior implants using the All-on-4™ guide to avoid extreme tilting which may result in parallelism problems during restoration.
5. Selection of multiunit abutments with proper collar height and angulation.
6. Sequential radiographs with the drill into the osteotomy during initial osteotomy preparation for posterior implants, to evaluate the direction of the drilling in respect to vital structures such as the sinus wall and the mandibular canal.
7. Placement of the implants with minimum diameter of 3.3mm at the anterior positions and 3.75–4.2mm for the posterior positions to avoid problems such as connection screw loosening and implant body fracture.
8. Adequate vertical ridge reduction before implant placement to avoid the display of the unaesthetic transition line of prosthesis and ridge tissue when the patient smiles (
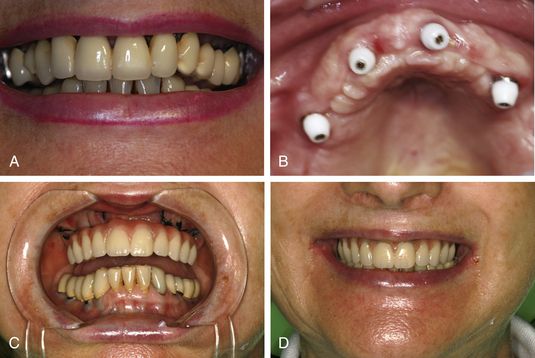
Fig 22.4 (A) Unaesthetic gingival line with the old prosthesis is visible during the smile. A planned vertical ridge reduction before the implant placement results in nonvisibility of the transition line of the final All-on-4™ implant prosthesis, when the patient smiles. (B–D) This gives a natural appearance to the All-on-4™ prosthesis.
(Courtesy: Saad Zemmouri, Morocco).
Management of complications
1. Over or inadequate tilting of the posterior implants. It can be avoided with accurate treatment planning and use of the All-on-4™ guide available from Nobel Biocare.
2. Perforation through the inferior or anterior wall of the sinus. It can be avoided by proper exploration of the anterior wall of the sinus. Pilot drilling should begin a minimum of 4 mm anterior to the sinus, evaluated with a radiograph. If the pilot drill has perforated the sinus cavity, it should be evaluated with a radiograph and the osteotomy preparation should be redirected to the planned direction, avoiding the enlargement of the perforation. The path of the anterior wall of the sinus should be marked on the facial wall using a sterile pencil, so that it can be visualized when drilling for implants.

CASE REPORT-1
Step by step procedure for All-on-6 in the maxilla (
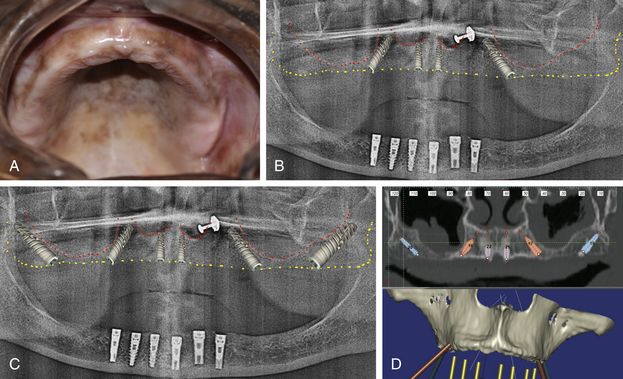
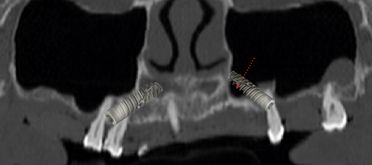
Fig 22.5 (A) Edentulous maxilla. (B) The panoramic radiograph shows adequate bone for All-on-4™ (C) as well as All-on-6 procedure. (D) The dental CT scan shows sinus membrane thickening, contraindicating sinus grafting procedure. Adequate amount of bone is luckily present bilaterally posterior to the sinus to insert adequate size implants, but needs to be laterally condensed to achieve adequate stability for the inserted implants.
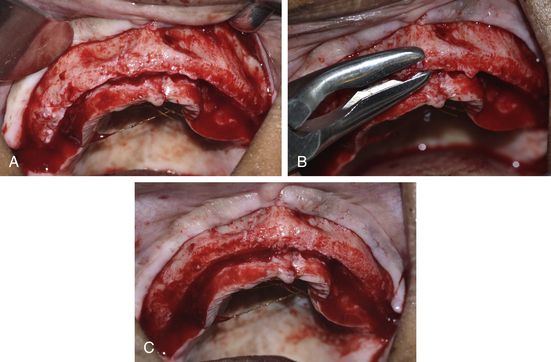
Fig 22.6 (A) Mucoperiosteal flaps are elevated to expose the bone ridge as well as the facial wall of the ridge and (B and C) planned amount of vertical ridge reduction is done using a bone rongeur to achieve the wide ridge crest to place implants with adequate diameters as well as to shift the transition line of the future prosthesis and ridge tissue apical to the high smile line of the patient.
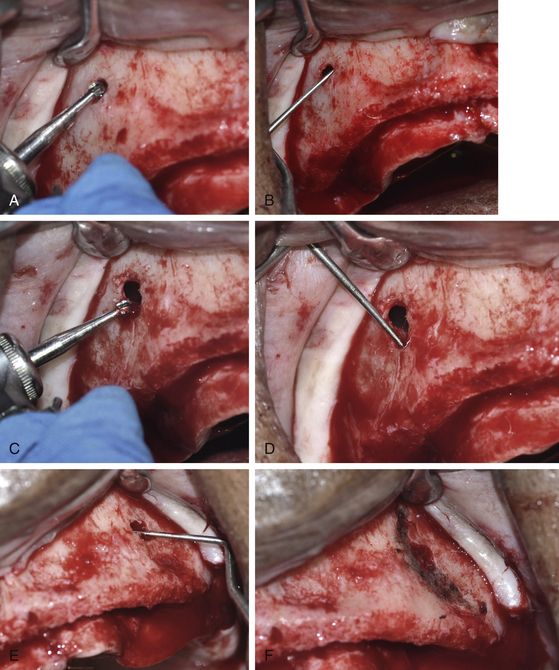
Fig 22.7 (A) A small opening at the lateral wall of the right sinus is prepared using a round carbide bur. (B) The anterior wall of the sinus is explored using a probe. (C) The opening is extended to appropriately explore (D) the complete path of the anterior wall of the sinus. (E) The anterior wall of the left sinus is also explored in the same way and (F) it is marked using a sterile HB pencil.
Stay updated, free dental videos. Join our Telegram channel
VIDEdental - Online dental courses


