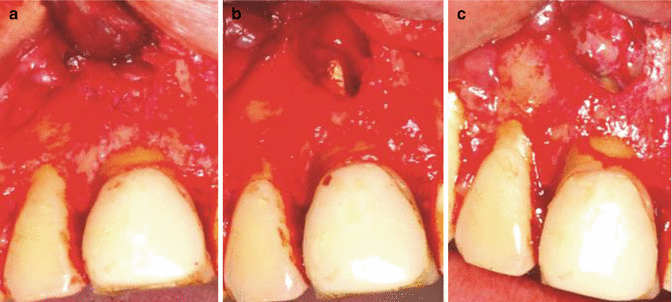
Fig 13.1
Clinical radiographs and photographs showing endodontic cases which have failed despite attempts at treatment. (a) Missed anatomy, (b) persistent disease despite well-obturated canal system, (c) overextension resulting in extraction, (d) overfill causing possible foreign body reaction, (e) complex anatomy, (f) suspected root fracture, (g) previous surgical failure, and (h) persistent apical pathosis despite re-treatment attempts
Systematic reviews comparing the outcome of non-surgical root canal retreatment and surgical endodontics suggest that the latter offers more favourable initial success. However, non-surgical retreatment offers a more favourable long-term outcome [11, 12]. If the root canals are accessible, then non-surgical retreatment is the treatment of choice [13].
Pre-surgical rinsing with chlorhexidine mouth rinse helps to reduce bacterial load and plaque formation, which in turn promotes healing of the surgical site [14]. There is no indication to provide preoperative prophylactic antibiotics prior to periapical surgery to prevent post-operative infections in a healthy patient with no medical indications [15]. Preemptive use of oral non-steroidal drug therapy should be considered prior to surgery as an effective method of reducing post-operative pain [16].
The use of the dental operating microscope in terms of enhanced magnification and illumination to facilitate and enhance each phase of endodontic surgery has been well documented [17–20].
The generation of successful intraoperative anaesthesia and haemostasis are critical pillars supporting the foundation of effective endodontic surgical procedures. Local anaesthesia with a vasoconstrictor is useful in terms of minimizing pain and providing effective haemorrhage control [21]. Tissue blanching is a characteristic sign of effective vasoconstriction.
Management of soft tissues is important from an aesthetically successful treatment point of view [22]. When designing a tissue flap, various methods of incision can be selected depending on the flap selected. It is important that incision, elevation and reflection of soft tissue are performed in a way that is conducive for healing by primary intention. This goal is facilitated by ensuring all incisions are complete, sharp and placed on sound bone. Great care must be taken throughout the surgical procedure ensuring tissue damage is kept to a minimum. Tearing or severing of tissue should be avoided during elevation and flap reflection [22]. The tissues should be kept moist and prevented from drying out throughout the procedure by applying a damp gauze using saline. This will help minimize tissue shrinkage, which would result in further difficulty with tissue re-approximation and higher tension when suturing [23]. The use of a papillary preservation flap can be considered where feasible to further minimize recession post-operatively, particularly where gingival biotype is thick and flat and aesthetics is of primary concern [24, 25].
Flap retraction is dependent on correct retractor selection and placement on sound bone not soft tissues, which would result in further trauma.
It has been demonstrated that leaving bleeding tissue tags intact on the exposed bone or periodontal ligament fibres that were severed on flap reflection will facilitate healing [26] (Fig. 13.2).
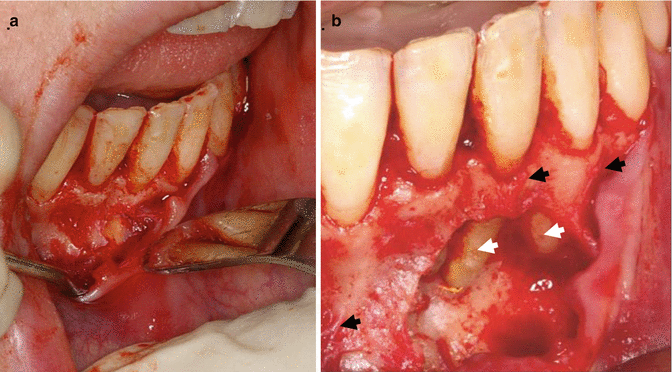

Fig 13.2
Clinical photographs showing (a) flap reflection and (b) bleeding tags of tissue attached to overlying cortical bone (black arrows) and exposed root surfaces (white arrows). These tags should never be intentionally removed
The uncertainty in knowing the true extent of the periapical lesion combined with the increased risk of scarring means submarginal flaps such as Ochsenbein-Luebke semilunar flaps are no longer recommended [27].
Osteotomy is a critical step, where cortical bone is still intact, allowing adequate access and facilitating subsequent removal of soft tissue lesion surrounding the apical and/or lateral aspects of the root apex. This unimpeded access is critical to ensure root-end resection, and preparation is carried out correctly without compromising adjacent structures. If the cortical plate has already been breached or thinned by underlying pathology, then curettes may be used to expose the apex of the root. Bone removal is recommended with an appropriate bur (surgical round bur) using a reverse-air handpiece (Impact Air 45) to reduce the risk of surgical emphysema [28]. Copious amounts of sterile water or saline should be used throughout the procedure to prevent overheating of the surrounding bone [29]. Steel and tungsten carbide burs have been shown to produce less heat than diamond burs resulting in the possibility of compromised healing [30]. The osteotomy should be carried out with a light shaving motion to further reduce any heat generated. A bony lid technique has been advocated in the past for accessing the apical region of mandibular teeth. With the advent of modern microsurgical techniques, which are more conservative, these techniques are likely obsolete [34].
After the cortical bone is removed to expose the lesion, the soft tissue is curetted from the crypt (peri-radicular curettage). The majority of soft tissue should be removed if possible and sent for histopathological diagnosis. Numerous case reports have been presented in the literature where suspected periapical pathosis was in fact something more sinister [35–37]. In some instances it may not be possible to remove the lesion in its entirety due to risk of damaging adjacent structures. In this case further excision may be possible following root resection.
Usually removal of the granulation tissue, which is chronically inflamed, will reduce the amount of bleeding within the surgical crypt [38]. Haemostasis in the surgical crypt can also be managed by several pharmacological techniques including resorbable sponges containing epinephrine and calcium sulphate paste [39] or direct application of ferric sulphate [40]. Potential delayed wound healing may occur if the entire ferric sulphate is not removed [41].
Root-end resection should be carried near perpendicular to the long axis of the root where possible. This makes it much easier for the operator to resect the root end completely, to detect multiple or aberrant canals and subsequent ease of retrograde preparation [31–33]. Dentinal tubules are also more perpendicular in orientation to the long axis of the tooth so this type of resection will expose fewer tubules [42]. It has been shown that 98 % of apical canal anomalies and 93 % of lateral canals system ramifications occur in the apical 3 mm [43]. Where possible it is recommended to remove at least 3 mm of root end with an appropriate bur (Lindemann H151) with appropriate water cooling.
The resected root end should be inspected under magnification and illumination using a micro-mirror to ensure resection is complete and there are no cracks in the root and to check for any anatomical canal irregularities, missed canals or isthmuses. The bevelled root surface can also be inspected after staining with a neutral, buffered, sterile dye such as methylene blue [31–33]. A radiograph can be taken at this stage to ensure resection has been carried out to the appropriate level.
The aim of root-end preparation using ultrasonic instrumentation is to clean and shape the apical 3 mm of the root canal system. The instrumentation is parallel and confined to within the root canal. Aberrant anatomies such as fins and isthmuses are cleaned without damaging the remaining dentinal walls [31–33].
Root-end preparation may create a smear layer, consisting of organic and inorganic substances, which may prevent complete adaptation of root-end filling material. Removal of this smear layer using EDTA or citric acid may be beneficial [44].
Prior to root-end filling, the surgical crypt should be isolated from fluids, bleeding controlled and root-end preparation dried. There are several methods of root-end filling each having been used with various degrees of success. Amalgam is no longer recommended based on its increased micro leakage compared to other materials, risk of tissue argyria and no evidence of its ability to support tissue regeneration and unfavourable biocompatibility [45–48]. Current evidence suggests the use of MTA, ZOE cements, Diaket and Retroplast is acceptable dependent on prevailing clinical conditions [49–53].
A final debridement of the crypt is carried out using sterile saline to ensure that no foreign material is left in situ. Radiographic evidence of the quality of the root-end filling is recommended prior to wound closure.
Good tissue re-approximation with minimal tension using an appropriate suturing technique will allow for optimal healing by primary intention. Non-absorbable sutures in sizes 5-0 to 8-0 are preferred using gentle manipulation with microsurgical instruments. The smallest number of sutures should be used, thereby minimizing tension, foreign body reaction and irritation [23–25, 54]. Compression of the repositioned tissues with a saline moistened piece of gauze will reduce the coagulum to a thin fibrin layer between the repositioned tissue and cortical bone. This will further reduce post-operative bleeding and swelling [54]. Sutures can be removed 48–96 h post-operatively provided the wound is stable [54].
In summary, the expected outcome of apical surgery is good, and therefore, before considering tooth extraction and replacement, apical surgery should be attempted when it is feasible [55].
13.2 Indications and Contraindications
When endodontic treatment fails, the clinician and patient are faced with the dilemma of either considering endodontic retreatment or surgery to maintain the tooth. There is an agreement that non-surgical retreatment prior to a surgical approach will offer the tooth the best chance of success because all possible sites of infection are treated (clinical case 3, 4, 5 and 6). The decision-making process for retreatment and/or surgery is usually driven by periodontal assessment, restorative considerations and endodontic status of the tooth (see Fig. 13.3). A cost-benefit analysis is carried out including extraction and replacement options. A well-fitting coronal cast restoration does not preclude retreatment since minimal access cavities can be prepared through the crown and restored without complication upon completion. Conversely a poor coronal restoration needs to be sacrificed and dismantled to assess restorability prior to considering retreatment. In those cases, which have been restored with posts, sacrificing the crown is not always necessary. Endodontic access and post removal are still possible through the crown in some cases although if the post was placed for retention of the crown, then debonding is highly likely. The benefit of post removal must be weighed up against the risk of further weakening of the tooth and possible root fracture.
Well-fitting post crown restorations may be more amenable to microsurgical techniques with favourable outcomes (clinical Case 2) (Fig. 13.33).
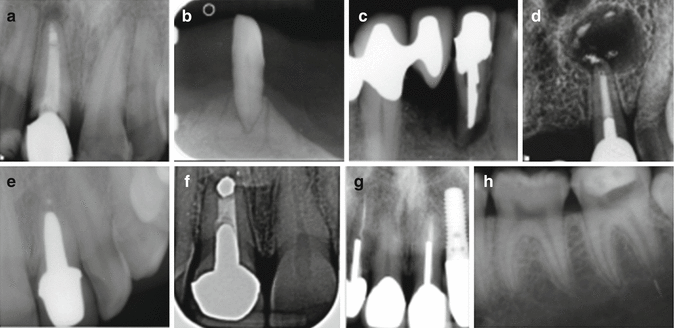

Fig 13.3
Clinical radiographs showing indications and contraindications to endodontic surgery or re-surgery. Note (a–c) poor restorability or periodontal support contraindicating a surgical approach, (d, e) well-fitting post crown restorations which would support a surgical approach, (f) failing post crown restoration which would not be suited to re-surgery, and (g, h) separated instruments which would only be amenable to a surgical approach for removal
The other situations where surgery is more beneficial compared to endodontic retreatment are those cases where the aetiology of the endodontic lesion is independent of the root canal system such as foreign body reactions to gutta-percha (clinical case 1) (Fig. 13.32), extra-radicular infections and true cysts (radicular).
Intra-canal obstructions and aberrant anatomy preventing access to the apical tissues will all require surgery to rectify the problem (clinical Case 4) (Fig. 13.35, Table 13.1).
Table 13.1
Indications and contraindications for surgical endodontics
|
A. Indications
|
|
(i) Peri-radicular disease associated with a well-treated previous root treatment where retreatment would be deemed detrimental to the tooth or where no improvement may be gained
|
|
(ii) Peri-radicular disease associated with anatomical deviations such as tortuous roots, sharp angle bifurcations, pulp stones and calcifications preventing non-surgical retreatment to be undertaken
|
|
(iii) Peri-radicular disease associated with procedural errors such as instrument fractures, ledges, blockages or perforated canals, which cannot be corrected non-surgically
|
|
(iv) Where a biopsy of the peri-radicular tissues is indicated
|
|
(v) Exploratory surgery to visualize the peri-radicular tissues and tooth/root is required when perforation or fracture is suspected
|
|
B. Contraindications
|
|
(i) Anatomical factors
Proximity to neurovascular bundles, unusual bone or root configurations, proximity to maxillary sinus, lower second molars with thick cortical plate and lingual inclination of roots. Limited mouth opening resulting in reduced surgical access
|
|
(ii) Periodontal and restorative factors
Poor supporting structures, active moderate-severe periodontal disease and failing or failed coronal restorations
|
|
(iii) Medical factors
Severe systemic disease (ASA III–IV), patients with diseases such as leukaemia or severe neutropenia in the active stage and uncontrolled diabetes or patients who have recently undergone cardiac or cancer therapy
|
|
(iv) Surgeons skill and ability
The clinician’s surgical skills and knowledge. Where in doubt a referral should be made to an appropriate endodontist
|
13.3 Microsurgical Versus Traditional Approaches
Endodontic microsurgery encompasses the magnification and illumination provided by the dental operating microscope with the use of specifically designed micro-instruments. The use of the operating microscope during surgery offers the clinician a number of advantages including higher magnification enabling precise anatomical detail to be observed including root apex identification and anatomical details including microfractures, isthmuses and lateral canals; precise and complete removal of diseased tissue; conservative ultrasonic root-end preparations; and precise root-end filling placement. Traditional endodontic surgery had a number of disadvantages including difficulties with root apices identification, large osteotomies and long resection angles that would invariably lead to destruction of surrounding cortical bone and root length. Soft tissue management has also changed with the use of micro-instruments enabling precise incisions to be made preserving papilla, thereby reducing post- operative complications including gingival recession and scar formation. The use of smaller suture materials such as 5-0 or 6-0 monofilaments result in not only less trauma but also more rapid healing. Atraumatic tissue retraction using a groove technique (i.e. placement and prevention of retractor slippage is facilitated by making a resting groove in bone) aims to further reduce the risk of post-operative pain and swelling (see Table 13.2 and 13.7).
Table 13.2
Differences between traditional and microsurgical approaches in surgical endodontics
|
Traditional
|
Microsurgery
|
|
|---|---|---|
|
Osteotomy size
|
Large 8–10 mm
|
Small 3–4 mm
|
|
Bevel angle
|
Long 45–65°
|
Shallow 0–10°
|
|
Resected root surface inspection
|
Not possible with standard instruments
|
Always possible
|
|
Isthmus identification
|
Impossible
|
Possible
|
|
Root-end preparation
|
Difficult to ensure only within the canal
|
Always within the canal
|
|
Root-end filling material
|
Amalgam often used
|
MTA or Super EBA
|
|
Sutures
|
3-0 or 4-0 silk
|
5-0 or 6-0 monofilaments
|
|
Suture removal
|
7 days post-operatively
|
2–3 days post-operatively
|
|
Healing success at 1 year
|
40–90 %
|
85–97 %
|
Endodontic microsurgery uses state-of-the-art equipment, instruments and materials aimed at satisfying both mechanical and biological concepts to produce predictable outcomes compared to traditional techniques. The endodontist can easily incorporate these techniques and concepts into their everyday practice enhancing available treatment strategies for the management of peri-radicular disease.
13.4 Anaesthesia and Haemostasis
- 1.
Premedication with an NSAID such as ibuprofen 400 mg can be given to the patient 1 h preoperatively in patients that have no contraindications. A pre-surgical rinse of chlorhexidine can be recommended for 1 day preoperatively and for 1 min prior to commencing surgery. The protocol can be continued post-operatively until sutures are removed.
- 2.
The administration of local infiltration of lidocaine 1:50,000 epinephrine is injected in the surgical site (2–3 cartridges). The injection is given slowly and steadily to allow time for diffusion of the fluid and avoid accumulation in the submucosa. A further infiltration is given in small increments directly in the region of the intended flap site resulting in tissue blanching. One must avoid injecting into the skeletal muscle in the area; otherwise, there will be an activation of the B-adrenergic receptors resulting in vasodilation and increased haemorrhage after flap reflection.
- 3.
Block infiltrations can be administered using lidocaine to obtain a sustained level of anaesthesia during surgery. For posterior mandibular teeth, an inferior alveolar nerve block is supplemented with a mental block. Posterior surgeries involving maxillary teeth can be supplemented with posterior superior and middle superior alveolar nerve blocks and infraorbital blocks depending on the tooth in question. Anterior maxillary teeth can be supplemented with nasopalatine blocks.
13.5 Flap Design
A number of basic flap designs exist including envelope, triangular, rectangular, semilunar, Ochsenbein-Luebke and papillary base preservation flap. Maxillary palatal root access requires a palatal flap to be elevated with separate design features. It is critical that tissue incision, reflection and retraction are performed in a way that allows for healing by primary intention. Soft tissue manipulation should avoid tearing, severing, trauma and desiccation. The following principles are discussed broadly in relation to the specific types of flap designs, which can be selected:
- 1.
Incisions
All incisions are continuous in nature and penetrate through the mucosa, underlying periosteum down to cortical bone. The exception to this rule is when making the split thickness incision in relation to the papillary preservation flap. These sharp incisions to the bone ensure unfavourable tearing of tissues, and damage to marginal gingivae is reduced.
Vertical incisions should not extend near muscle attachments or highly vascular areas such as beyond the submucosa. The vertical incision is made originating at the line angle of the most anterior tooth of the flap and drawn parallel to the long axis of the adjacent roots. Horizontal incisions should follow the contour of the labial surface of teeth with particular attention being paid to the intrasulcular or interproximal areas. The papilla needs to be excised completely, and both buccal and palatal/lingual incisions are made to ensure this (Fig. 13.4).
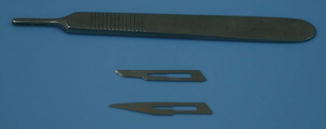

Fig 13.4
Clinical photograph showing scalpel holder and blades number 15 and 11 useful for intrasulcular and vertical relieving incision
Care must be excised when placing incisions in areas of bony prominence such as the canine region and areas of the jaws where bony architecture is irregular. Flap design and placement of relieving incisions must take these factors into account to minimize tearing and possible post-operative complications such as flap dehiscence, scarring and gingival recession.
- 2.
Reflection
Reflection of the soft tissues should be carried out purposefully, slowly and with care to avoid accidental slippage. One should start in the area of the vertical relieving incision using an appropriate elevator (Molt no. 4 or Howarth’s periosteal elevator). One must ensure that periosteum has been identified and the elevator is placed under this layer and is in contact with the underlying bone at all times. A piece of gauze can be useful to protect the soft tissues, as you reflect pushing against the bone and the gauze, not the flap. The sharp convex end of the elevator is used to carefully reflect the flap.
Care must be taken in regions of bony prominences, irregularities, concavities and areas of fenestrations where risk of tearing is high (Fig. 13.5).


Fig 13.5
Clinical photograph showing the molt elevator (above) and Howarth periosteal elevator (below) used to reflect the flap once incision has been made
- 3.
Retractor placement
A suitable retractor (Minnesota) should be selected to protect the soft tissue flap and also prevent slippage of instruments that can cause further damage to soft tissues by tearing or crushing. The retractor, in turn, allows the operator to have a clear field of vision to the periapex of the tooth, which is unimpeded by the reflected flap. It may be useful to run a small round bur in a horizontal direction creating a small depression/groove in the bone above the root apex and the pathological defect where the retractor can rest in a firm secure position avoiding slippage. One must remember that whenever the flap is repositioned, it is worthwhile covering with a damp gauze soaked in saline to prevent drying out and shrinkage (Figs. 13.6 and 13.7).
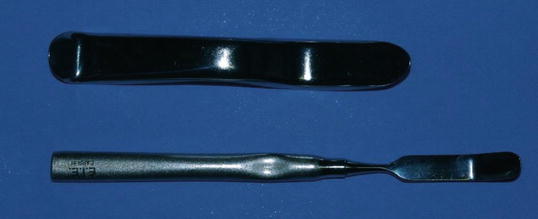
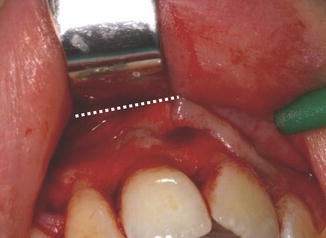

Fig 13.6
Clinical photographs showing Minnesota retractor (above) and Carr retractor (below)

Fig 13.7
Retractor placement and potential site for groove where retractor could sit above root apex and pathological defect preventing trauma to soft tissues during procedure
Triangular/Rectangular Flap
The triangular flap design (Fig. 13.8) comprises a horizontal incision extending to several teeth and distal to the involved tooth and one vertical relieving incision placed mesially. If access is difficult, then the triangular flap can be converted to a rectangular one by placing an additional vertical relieving incision. This type of flap can be used for periapical surgery, root resorption, cervical resorption, perforation and resection of short roots. The main advantage of this type of flap is minimal disruption of the vascular blood supply of the reflected tissues and ease of repositioning. Healing following sulcular marginal incisions may lead to varying amounts of recession. Complete elevation of the papilla is technically difficult, especially in narrow interproximal areas. Frequently the most coronal portion of the papilla will be separated from the body of the papilla and left behind. Separated tissue fragments often necrotize during the healing phase resulting in loss of papilla height. The risk of gingival recession is of particular concern in patients with thin gingival biotypes and high lip lines (“gummy smiles”).
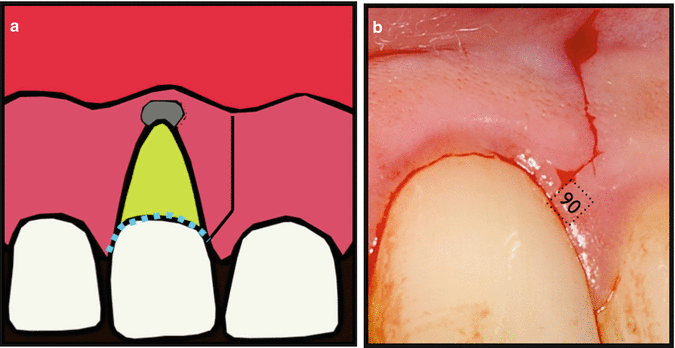

Fig 13.8
(a, b) Triangular flap design
Submarginal Flap
Often referred to as the Ochsenbein-Luebke flap (Fig. 13.9), it is similar to the rectangular flap except the scalloped horizontal incision is placed within the attached gingivae. This flap was used to prevent recession in aesthetically demanding cases. The disadvantages of this flap include risk of scar formation, possibility of incisions in close proximity to the bony cavity resulting in wound dehiscence and loss of attachment. This type of flap is now considered historical.
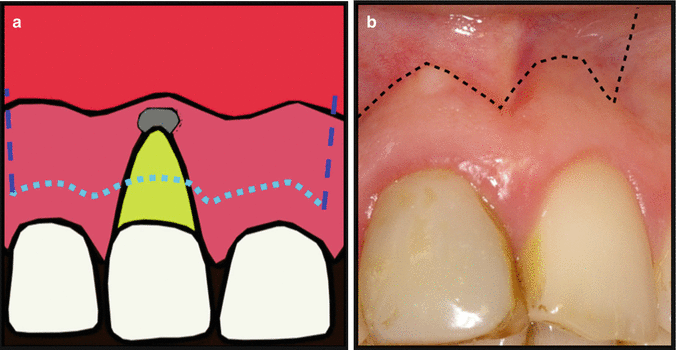

Fig 13.9
(a, b) Submarginal or Ochsenbein-Luebke flap
Papillary Preservation Flap
For a papillary based flap (Fig. 13.10), a split thickness incision is made; the first is a shallow cut perpendicular to the gingival margin. It is meant to sever the epithelium and connective tissue to a depth of approximately 1.5 mm from the surface of the gingivae. This is carried out in a curved line connecting one side of the papilla to the other. The second incision traces the first but is more vertical to alveolar bone. This cut will result in a split thickness flap at the apical portion of the papilla base. Intrasulcular incisions are made in the remaining cervical aspects of the surgical sites and vertical relieving incision either side of the surgical site or papilla to be reflected. The use of a microsurgical blade is essential for the execution of this type of flap.
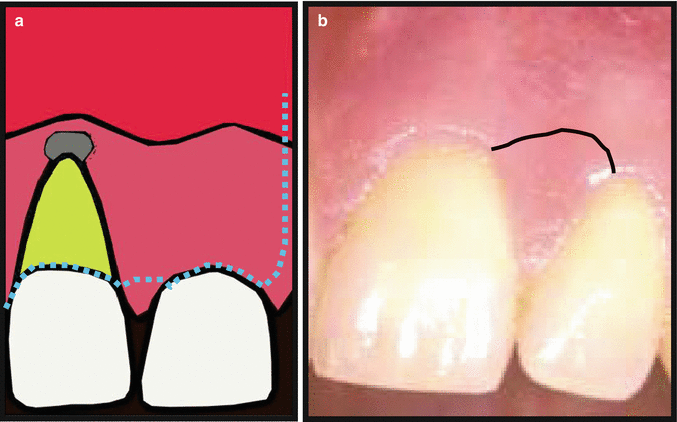

Fig 13.10
(a, b) Papillary base flap
This incision allows preservation of the entire papilla, thus eliminating any substantial loss of papilla height as a result of the surgical or healing process. A thick and flat gingival biotype is ideal to ensure optimal recession free healing post-operatively.
Envelope Flap
A simple horizontal intrasulcular incision is made following the labial contour of the teeth. No vertical incisions are made allowing ease of repositioning (Fig. 13.11). This type of flap design is only useful in case of cervical resorption defects, cervical perforations and periodontal procedures. Due to limited access and visibility, this type of flap is not indicated in peri-radicular surgery.
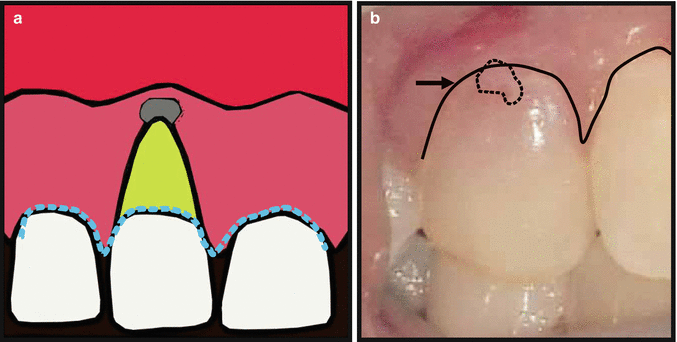

Fig 13.11
(a, b) Envelope flap. Black arrow signifies contour of gingival sulcus which incision line will follow
Semilunar Flap
This type of flap (Fig. 13.12) has been indicated when carrying out surgical trephination or where aesthetic crowns are at risk of gingival recession from the proposed surgery.
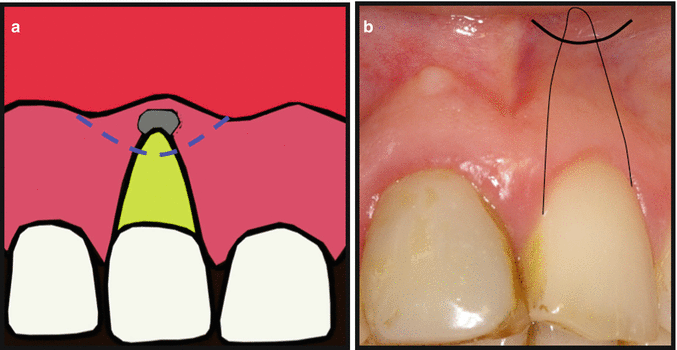

Fig 13.12
(a, b) Semilunar flap
The flap itself expedites surgery by reducing incision and reflection times, maintains the integrity of the gingival attachment and eliminates potential crestal bone loss. Disadvantages include limited access and visibility, difficulties repositioning, increased incidence of postoperative scarring, predisposition to stretching and tearing of the flap and difficulties exposing the lesion in its entirety. Again this flap is mentioned from a historical point of view and is now somewhat obsolete in cases of peri-radicular surgery (Table 13.3).
Table 13.3
General points to consider regarding incisions and flap design
|
Firm continuous incisions should be made to sound bone
|
|
An incision should not cross an underlying bony defect
|
|
The vertical incision should be in the concavities between bone eminences
|
|
The vertical incision should not extend into the mucobuccal fold
|
|
The termination of the vertical incision at the gingival crest must be at the mesial or distal line angle of the tooth
|
|
The base of the flap must be at least equal to the width of its free end
|
|
The flap should offer adequate access and have an adequate blood supply
|
|
The flap must be of adequate size and fully reflected
|
|
The edges must lie on the sound bone
|
|
The flap should be protected throughout the surgical procedure with care not to cause further trauma to the soft tissues
|
13.6 Osteotomy
An initial assessment has been made from a parallel preoperative view as to the distance where the pathological defect lies in relation to the crown of the tooth (Fig. 13.13). This measurement is transferred to the mouth and the area explored for any pathological perforation of the cortical bone. If the soft tissue lesion has perforated the buccal plate, then osseous entry is simple.
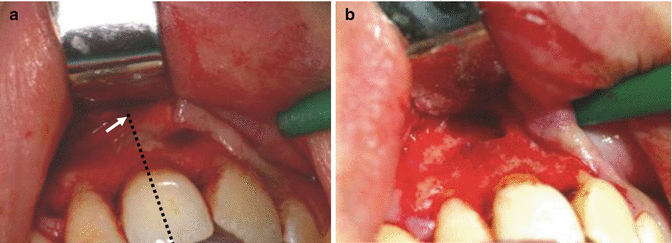

Fig 13.13
Clinical photographs showing (a) approximate measurement of estimated apex of the tooth (white arrow) based on preoperative radiographs and measurement of root length and (b) retractor sitting above pathological defect
Where an intact cortical plate is present, the area can be probed with an explorer to locate any area, which is reduced in density. Where the underlying soft tissue pathology is present but has not breached the cortical plate often, a thin amount of the bone may be present which is easily penetrated with a probe and removed using curettes (Fig. 13.14). Some authors have recommended drilling a small depression in the cortical bone and placing some radiopaque material such as softened gutta-percha, which can aid in orientation once a periapical radiograph is taken. The osteotomy is then extended in the appropriate direction.
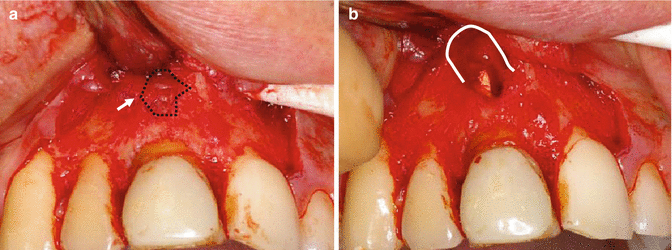

Fig 13.14
Clinical photographs showing (a) cortical plate intact but easily penetrable with a probe. White arrow signifies area overlying the apex where the bone is intact but thin. (b) Following removal of this layer of cortical bone exposed underlying pathology
Initial osteotomy should expose the apical portion of the root surface which is used as a guide to the apex. The osteotomy site is enlarged to expose the apical 3 mm of the root, which is to be resected.
It is important to make a distinction between root tip and surrounding bone. The operating microscope is useful for this purpose. Note root tissue is often more yellow and darker than adjacent bone. Unlike the bone, which is softer, it is not possible to indent with a probe and it does not bleed. The outline of the root also has a periodontal ligament, which can be stained using methylene blue dye (Fig. 13.15).
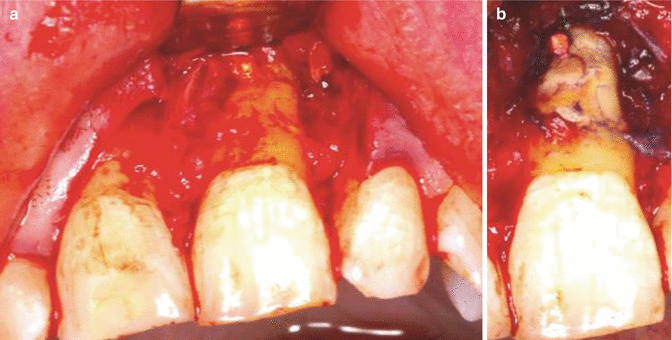

Fig 13.15
Clinical photographs demonstrating (a) exposed root surface and (b) following methylene blue staining. The dye is useful to confirm the periphery of the root as outlined with the periodontal ligament space and also for identifying root fractures as seen in this case
Osteotomy is carried out slowly with copious irrigation using an Impact Air 45 handpiece with an H161 Lindemann bone cutter bur (Fig. 13.16). The size of the osteotomy is based on access to the root tip with ultrasonic instruments freely within the bony crypt. Traditional peri-radicular surgery without the use of a microscope resulted in large osteotomies resulting in slower healing. The use of a dental microscope has resulted in smaller osteotomies – approximately 5 mm in diameter will be sufficient in most cases.
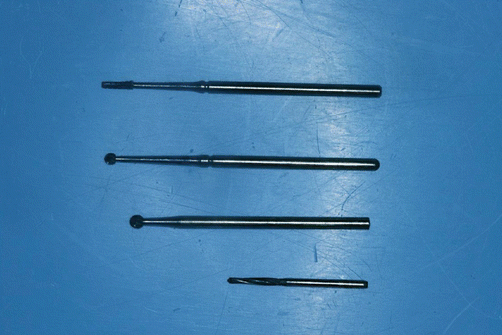

Fig 13.16
Clinical photograph showing typical burs used for surgical bone removal. Note fissure bur and round bur used for osteotomies and the Lindemann H161 bur at the bottom which is useful for root resection
13.7 Peri-radicular Soft Tissue Curettage
Peri-radicular curettage alone does not eliminate the causative factors for a persistent lesion in most cases. However, it is an essential part of the procedure to remove the bulk of the diseased tissue, which surrounds the apex of the tooth. Removal of this tissue will allow unimpeded access for resection and retrograde obturation (Fig. 13.17).
