Dentistry in general, and orthodontics in particular, strongly rely on advances in material science. However, these advances do not attract as much attention as the extraction/nonextraction dilemma, the effects of orthodontics on facial esthetics, or the one phase/two phase debate. Indeed, materials often seem less important than these issues. Nonetheless, material development has probably had the greatest single effect on the practice of orthodontics since the introduction of modern orthodontics by Edward H. Angle. The changes in orthodontic clinical practice following the introduction of superelastic wires in the 1980s attest to this effect.
Another important development in orthodontics was the introduction of direct bonding. With the development of reliable and reproducible bonding techniques to enamel surfaces, cemented bands were replaced by bonded brackets on incisor, cuspid, and bicuspid teeth. The many advantages of bonded brackets over cemented bands include esthetic improvement, elimination of band seating, and the need for tooth separation as well as elimination of band material thickness, which affected the arch length. Improved oral hygiene through easier access to the interproximal dental areas helps reduce the risk of enamel decalcification. Accessibility to the interproximal area also allows for earlier detection of caries at these sites and their restoration, improved access to interproximal contacts for air-rotor stripping, and elimination of the need for posttreatment space closure. The ability to bond partially erupted and malaligned teeth enable earlier force application during treatment, which was previously not possible with banded attachments.
Direct bonding of orthodontic attachments has also increased the acceptability of orthodontic appliances by the public and popularized orthodontic treatment, thus increasing new enrollments each year. Advances in direct bonding have led to new techniques such as lingual orthodontics that could not be used with circumferential bands.
ORTHODONTIC APPLIANCE
At present, direct bonding is the method of choice for attaching orthodontic appliances. However, most bracket bases do not chemically bond to enamel or resin. For most clinical applications, removal or failure of bonded metal brackets occurs at the weaker resin-metal interface. The improvement in this macromechanical interface is of critical importance. Bracket base designs include mesh wires, perforations, and undercuts, to provide mechanical interlocking with the resins that have been developed. Some companies also add smaller-scale micromechanical retention, obtained through abrasion, etching, or spray coating, along with retention from the meshes. Many bracket base designs are available for clinical use, such as standard mesh base (Ultraminitrim, Dentaurum, Ispringen, Germany), supermesh base (Microarch, GAC International, Bohemia, N.Y.), integral base (Dyna-Lock, 3M Unitek, Monrovia, Calif., and Microloc, GAC International), microetched base (Miniature Twin, 3M Unitek), and laser-structured base (Discovery, Dentaurum) ( Fig. 6-1 ).

Although mesh pad is most often used for retention, improving these other systems has been the goal of many research projects. One study found that a new type of laser-structured base retention resulted in double the bond strength produced by foil mesh, without compromising debonding characteristics. The laser-structured Discovery (Dentaurum), integral-based Microloc (GAC International), and microetched-based Miniature Twin (3M Unitek) performed statistically better than the mesh-based brackets with the light-cured composite resin used in another study.
SURFACE PREPARATION AND BRACKET BONDING
Bonding of brackets and other orthodontic attachments is a crucial stage in the treatment process. Minor errors at this stage will be dramatically reflected in the active treatment phase in the form of improper alignment of teeth; premature failure of attachments, which will require time-consuming and costly replacements; and increased susceptibility to demineralization around the attachment. This seemingly “easy” stage should never be underestimated, and care should be taken when bonding each attachment. The principles of “ideal” bonding are not specific to orthodontics and are well addressed by other disciplines of dentistry that use adhesive resins. The basic principles for a successful bonding are (1) cleaning the adhesive surfaces, (2) providing good wetting, (3) ensuring intimate adaptation, (4) making use of every possible bonding force, and (5) providing good curing (polymerization).
Preparation for Bonding
Cleaning
The labial or lingual adhesive surface of teeth should be free of calculus and plaque for efficient bonding. This is most frequently performed by using pumice prophylaxis. However, enamel pumicing before etching has been found of limited value when the tooth surfaces are free from visible plaque precipitation, and pumicing might not be an integral part of the etching process because neither bond strength nor enamel-surface etch pattern is altered by pumicing clean enamel. Despite not being mandatory, pumicing will help the clinician to achieve more optimal results, particularly when bonding posterior teeth, which are sometimes out of reach of efficient brushing activity.
Preparing the working area
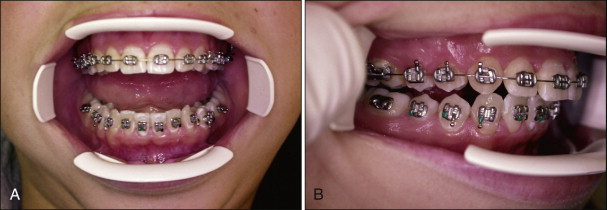
Moisture control is crucial during orthodontic bonding because moisture contamination of pretreated enamel can cause failure of the bond or weakening of the shear bond strength. Salivary control and maintenance of a dry working field are essential throughout the bonding procedure, usually accomplished by lip expanders, cheek retractors, saliva ejectors, and cotton rolls. The wire cheek retractor is the most common form of retractor but causes difficulty in bonding the posterior region because it is difficult to swing on either side. Careful bracket placement is important when the wire cheek retractor is used. A useful alternative to wire retractors is the OptiView (Kerr Hawe, Bioggio, Switzerland), which is easily moved to either side when placing premolar brackets ( Fig. 6-2 ). This versatile retractor is also available in “petit” size.
Antisialagogue agents
Antisialagogues are agents that counteract any influence that promotes the flow of saliva. These chemicals may provide quick and excellent saliva flow restriction. However, a recent randomized clinical trial found no statistically significant effect of atropine sulfate premedication on bond failure rates. The advantage of atropine sulfate is questionable and should be avoided.
Enamel Pretreatment
Conventional adhesive systems use three different agents—enamel conditioner, primer solution, and adhesive resin—in the process of bonding orthodontic brackets to enamel. Untouched enamel surface is hydrophobic, and wetting is limited. This makes bonding to intimate enamel surface a challenging procedure. Enamel pretreatment or surface conditioning is necessary to make successful bonds, usually accomplished by etching the surface by various acids.
The most frequently used etchant is 37% orthophosphoric acid. Phosphoric acid is an inorganic substance. Many authors reported changes in surface characteristics, loss of enamel substance, and white, frosty appearance from decalcification and crystal structure deformation with this acid.
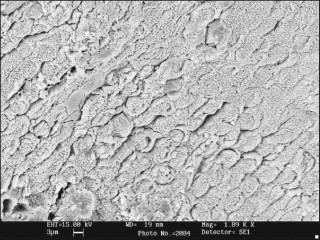
Bonding to enamel with acid etching has significantly changed and facilitated clinical practice in all fields of dentistry. Characteristics of the enamel surface are altered by acid dissolution, which creates microporosities that result in a micromechanical bond ( Fig. 6-3 ).
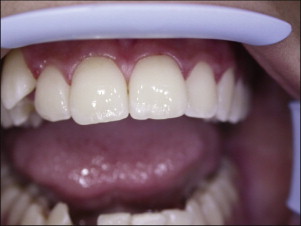
The orthophosphoric acid is applied over the enamel surface for 30 seconds after careful isolation of the operative field. The etching time can range from 15 to 60 seconds without compromising the shear bond strength (SBS). Etching duration shorter than 15 seconds or longer than 60 seconds has been shown to decrease SBS. At the end of the etching period, the bulk of the etchant is cleaned off the teeth with a cotton roll, and the teeth are rinsed with abundant water spray. A powerful evacuator is crucial for increased efficiency in collecting the etchant-water rinse. The teeth are then thoroughly dried with a moisture-free and oil-free air source to obtain the well-known “frosty” appearance ( Fig. 6-4 ).
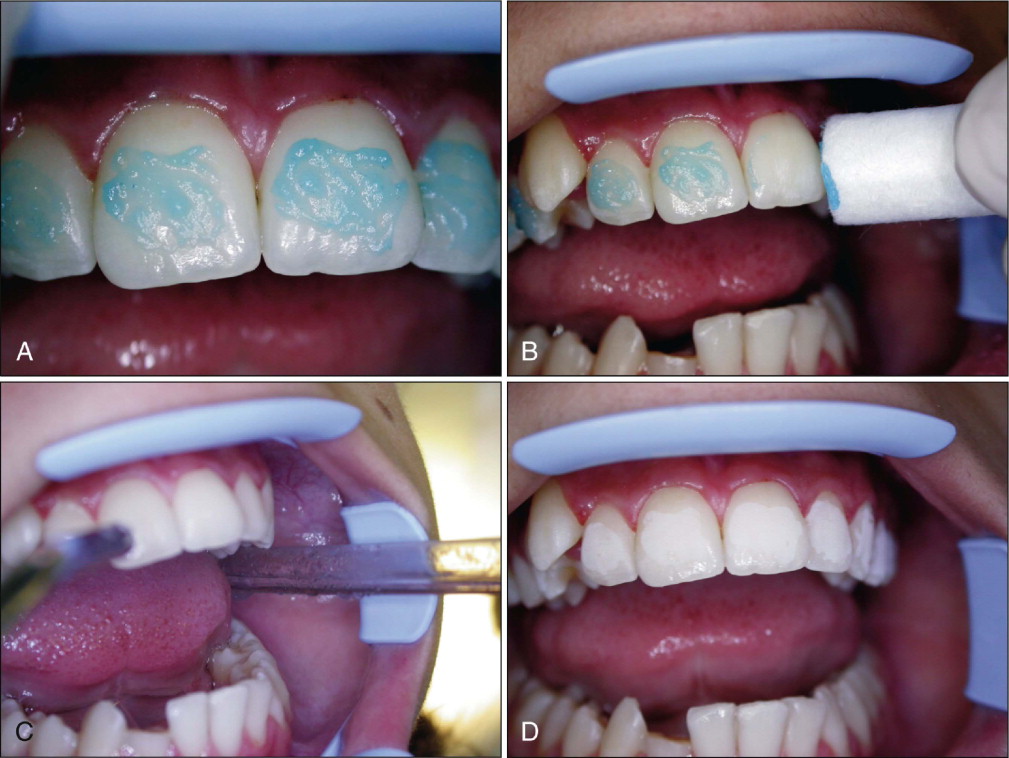
Teeth that do not appear frosty should be reetched. Saliva contamination does not require rerinsing, but blood contamination has been shown to decrease SBS, and teeth contaminated with blood should be rerinsed and dried. A protective liquid polish (e.g., BisCover, Bisco, Inc., Schaumburg, Ill.) may be applied to the etched surface before contamination can occur, to prevent the adverse effect of blood contamination. This product may also be beneficial in difficult bonding areas, such as partially erupted or impacted teeth.
Alternatives to orthophosphoric acid etching
Use of milder acids.
Research showed that 10% maleic acid, which is believed to decrease mineral loss alone, may produce similar bond strengths to 37% orthophosphoric acid. However, the use of maleic acid have never been popularized. Gottlieb, Nelson, and Vogels reported that 95.6% of U.S. orthodontists never used maleic acid, 3.9% used it occasionally, and 0.5% used it routinely.
Laser etching.
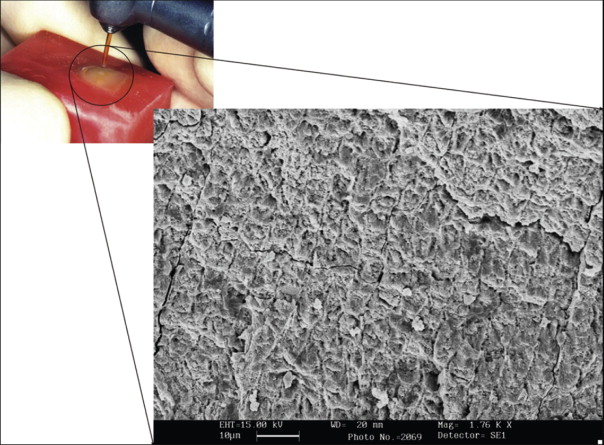
Laser treatment of dental enamel causes thermally induced changes within the enamel to a depth of 10 to 20 µm, depending on the type of laser and the energy applied to the enamel surface. Laser etching involves a process of continuous vaporization and microexplosions caused by vaporizing the water trapped within the hydroxyapatite matrix ( Fig. 6-5 ). The degree of surface roughening depends on the system used and the wavelength of the laser. The results on achieved SBS vary, and in general, lasers currently are unable to produce a standard, reliable etching pattern.
Sandblasting.
Another method of enamel pretreatment is the “air-abrasive technique” (sandblasting). However, even the enamel loss resulting from sandblasting at low pressure and short exposure time was found to be smaller than in acid etching. The bond strengths achieved with sandblasting alone were not clinically acceptable.
Crystal growth.
In 1979, Maijer and Smith reported a method of bonding that involved crystal growth on the enamel surface. This system consists of a polyacrylic acid treatment liquid containing a sulfate component that reacts with the calcium in the enamel surface to form a dense growth of small, needle-shaped crystals. The crystal buildup on the enamel serves as an additional retentive mechanism for the resin that bonds the orthodontic attachment to the teeth. Micromechanical interlocking is created at the enamel surface, and most of the problems associated with conventional acid etching are said to be eliminated.
Although debonding and adhesive cleanup were facilitated with this technique, achieved SBS values consistently remained below those of conventional acid etching.
Sealing and Priming
Application of a thin layer of bonding agent (sealant, primer) over the entire etched enamel surface is suggested by all the manufacturers ( Fig. 6-6 ). If excessive, the coating should be thinned by a gentle air burst. A thick layer may cause “drifting” before curing is initiated and may interfere with the precise adaptation of the bracket base.
Separate curing of the bonding agent is not necessary, even when light-cured products are used. The layer may be precured in difficult-to-reach areas where moisture contamination is likely. Reapplication of the sealed layer is not required when saliva contamination occurs, but the area should be air-dried before bracket placement.
Self-etching primers
A unique characteristic of some new bonding systems in operative dentistry is that they combine the conditioning and priming agents into a single, acidic primer solution for simultaneous use on both enamel and dentin ( Fig. 6-7 ). Combining conditioning and priming into a single treatment step results in improved chair-side efficiency and cost-effectiveness for the clinician and saves time for patients.
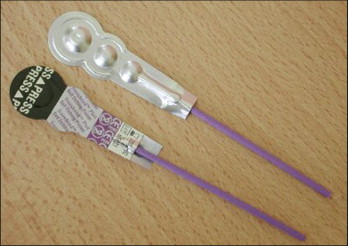
In a self-etching primer (SEP) the active ingredient is a methacrylated phosphoric acid ester. The phosphoric acid and methacrylate group are combined into a molecule that etches and primes at the same time. The phosphate group dissolves the calcium and removes it from the hydroxyapatite. The removed calcium forms a complex with the phosphate group and is incorporated into the network when the primer polymerizes. Agitating the primer on the tooth surface serves to ensure that fresh primer is transported to the enamel surface. Etching and monomer penetration to the exposed enamel rods are simultaneous. In this manner, the depth of the etch and depth of the primer penetration are identical.
Bonding with an SEP is significantly faster than using conventional acid etching (75.5 vs. 97.7 seconds per bracket), and recent studies indicate that SEPs may provide similar SBS values and failure characteristics. However, it should be noted that pumicing before the use of an SEP is crucial.
Conventional acid etching is still the “gold standard” for bracket bonding, and clinical observations indicate that use of milder self-etching systems increase the bond failure rates.
Types of Adhesives
Composite resins
A large number of dental composite products have appeared in the past 15 years, all having simple, common characteristics. They are all combinations of silane-coated inorganic filler particles with dimethacrylate resin, either bisglycidil methacrylate (BISGMA) or urethane dimethacrylate (UDMA). In some cases, a proportion of a lower-molecular-weight monomer such as triethyleneglycol dimethacrylate (TEGDMA) is introduced to lower the viscosity. The filler particles used are barium silicate glass, quartz, or zirconium silicate, usually combined with 5% to 10% weight of microscopic (0.04-µm) particles of colloidal silica. Modern dental composite materials are thus a blend of glass or ceramic particles dispersed in a photopolymerizable synthetic-organic resin matrix. The polymer materials are blended with the finely divided inorganic material, such as barium aluminosilicate glass or other glass composition, having an effective amount of radiopaque oxide that renders the resultant glass radiopaque to x-rays.
Many independent investigations indicate that the filled BISGMA resins have the best physical properties and are the strongest adhesives for metal brackets. Reported failure rates for steel mesh–based brackets directly bonded with highly filled diacrylate resins are as low as 1% to 4%.
Glass ionomer cements
Glass ionomer cements have distinctive properties that make them potentially useful in clinical orthodontics. First, they adhere to both enamel and metal. Second, these cements release fluoride and therefore may prevent enamel decalcification. Third, glass ionomer cements can be removed with much less difficulty than composite resin after debonding, because the cement remaining on the tooth surface can be desiccated by simply air drying it, thus rendering it more friable.
Recent research also demonstrated that the use of resin-modified glass ionomer cement (RM-GIC) alone can significantly decrease enamel demineralization compared with composite resin. Although the increased fluoride release from the glass ionomer cements has the potential for lessening decalcification around orthodontic brackets, SBS of the material is relatively low compared with composite adhesive.
It is advisable to limit use of glass ionomer cement to at-risk orthodontic patients to provide preventive actions and potentially remineralize early (subclinical) enamel demineralization.
Cytotoxicity of orthodontic resins
Regardless of polymerization method, in vitro studies have shown that the polymerization reaction that produces the cross-linked polymer matrix from the dimethacrylate resin monomer is never complete; 15% to 50% of the methacrylic group remains unreacted (32.4% and 44.5% for Transbond LR and Lightcure LR orthodontic adhesives, respectively). Because of the material industry’s efforts, the percentage of unbound monomers has been decreased in the past decade, but the problem remains. The quantity of residual monomers is less than a tenth of the remaining methacrylic groups, evaluated as 1.5% to 5%, but sufficient to cause major cytotoxic effects.
Monomers identified in orthodontic composites (Transbond XT, Transbond LR, Reliance Light Bond, Reliance FlowTain, Fuji Ortho LC) by liquid chromatography include bisglycidil methacrylate (BISGMA), triethyleneglycol dimethacrylate (TEGDMA), urethane dimethacrylate (UDMA), and 2-hydroxyethyl methacrylate (HEMA) in the 0 to 99.8 µM range. Resins and RM-GIC also release ions such as fluoride, strontium, and aluminum. These unbound free monomers seem to be directly responsible for the cytotoxicity of resin composites on pulp and gingival cells and are implicated in the allergic potential of the material.
Leaching of some ions also seems to be implicated in cell alterations. Depletion of glutathione, production of reactive oxygen species, and a few other molecular mechanisms have been identified as key factors leading to apoptosis and pulp necrosis. In addition, resin monomers stimulate the development of cariogenic bacteria at the interface between the material and the walls of the cavity.
Currently, it seems inevitable to avoid this resin monomer and ion release. However, some simple and basic precautions may help prevent or decrease the adverse effects of these materials on patients. First, the amount of composite resin used should be kept at a minimum, and any excess resin (“flash”) around the orthodontic attachments should be removed before the resin is polymerized. Minimizing the use of adhesive material may be more important when bonding fixed orthodontic retainers because these are left in the oral environment for a long time and are exposed to the cavity, unlike resin beneath the bracket base. Also, the speed of monomer release is maximal in the first 10 to 60 minutes. It might be advisable to have the patients wash their mouth right after the bonding session, or have them spit into a disposable cup for the first 30 minutes when resin is used after topical fluoride applications.
Light Sources in Orthodontics
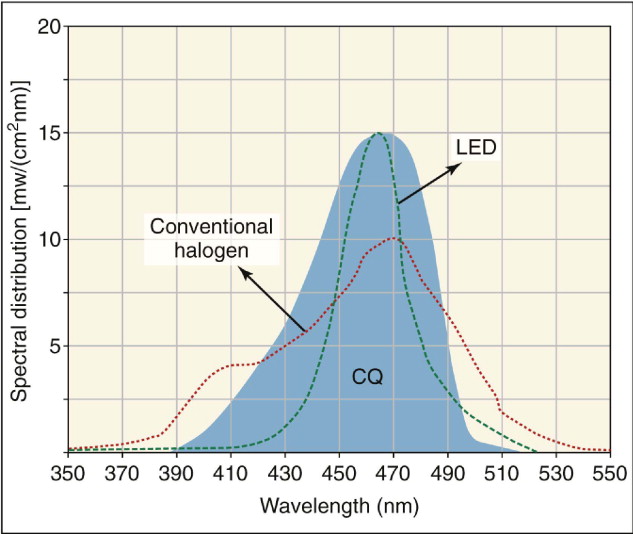
The introduction of light-cure adhesives not only removed a step in the bonding procedure, but also allowed practitioners to choose when to initiate the adhesive curing cycle after bracket placement. Light-curing resin composites were introduced in the 1970s. In light-cure adhesives, the curing process begins when a photoinitiator is activated. Most dental photoinitiator systems use camphoroquinone as the diketone absorber, with the absorption maximum in the blue region of the visible light spectrum at a wavelength of 470 nanometers (nm).
The light-polymerized resins offer the advantage of extended, although not indefinite, working time. This provides the opportunity for assistants to place the brackets, with the orthodontist following up with any final positioning. Light-cured adhesives are particularly useful when a “quick set” is required, such as rebonding one loose bracket or placing an attachment on an impacted canine after surgical uncovering, with the risk for bleeding. Light-cured adhesives are also advantageous when extralong working time is desirable, as when difficult premolar bracket positions need to be checked and rechecked with a mouth mirror before the bracket placement is considered optimal.
The first light-cured resin products were polymerized with ultraviolet light, with later versions cured by visible light, which has a wavelength between 400 and 500 nm. An advantage of using visible light is greater depth of polymerization in shorter periods. Full bonding of upper and lower arches with a conventional tungsten-quartz halogen light source at 40 seconds per bracket may require 15 to 20 minutes. The long cure times are inconvenient for the patient, impractical with children, and uncomfortable for the orthodontist and results in lost chair time. A more efficient and faster curing light is needed.
Conventional halogen lights
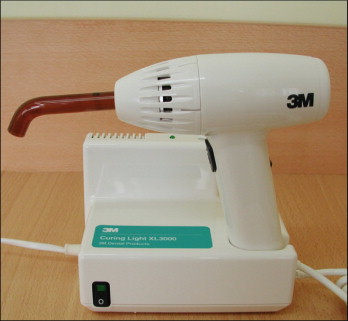
Currently, the most popular method of delivering blue light is halogen-based light-curing units (e.g., Ortholux XT, 3M Unitek; Fig. 6-8 ). These provide a light intensity of about 500 mW/cm 2 and a wavelength range of 420 to 500 nm. Halogen bulbs produce light when electrical energy heats a small tungsten filament to high temperatures. Despite their common use in dentistry, halogen bulbs have several disadvantages. The basic principle of light conversion by this technique is said to be inefficient because the light power output is less than 1% of the consumed electrical power. Halogens also have a limited effective life of approximately 100 hours because of the degradation of the bulb’s components by the high heat generated. The halogen lights can cure orthodontic composite resins in 20 seconds and light-cured RM-GICs in 40 seconds per bracket. Table 6-1 provides the authors’ recommendations for light curing various adhesives with different light sources.
| Adhesive | S uggested T ime of L ight E xposure ( seconds ) | ||
|---|---|---|---|
| ConventionalHalogen Transbond XL |
Fast Halogen Optilux 501 |
Plasma Arc Light Power Pac |
|
| Transbond XT (3M Unitek) | 40 | 10 | 3 |
| Light Bond (Reliance) | 40 | 20 | 3 |
| Quick Cure (Reliance) | 10 | 6 | 3 |
| Transbond LR (3M Unitek) | 20 | 10 | 6 |
| Light Cure Retainer (Reliance) | 40 | 10 | 15 |
High-intensity halogen lights (“fast halogens”)
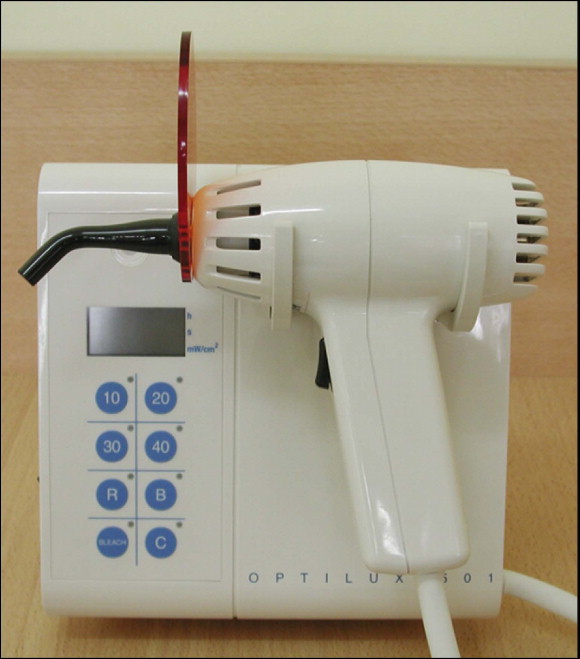
Halogen lights were followed by “fast halogens” with halogen bulbs of increased light intensity and “turbo tips” to focus the light emitted (e.g., Optilux 501, Demetron/Kerr Corp., Orange, Calif.; Fig. 6-9 ). These provide a light intensity of 800 to 900 mW/cm 2 and a wavelength range of 400 to 505 nm. Fast halogens can reduce curing time to half that needed with conventional halogen lights.
Plasma arc units
Plasma arc lamps have a tungsten anode and a cathode in a quartz tube filled with xenon gas. The gas becomes ionized and forms a plasma that consists of negatively and positively charged particles and that generates an intense white light when an electrical current is passed through the xenon. Plasma arc lights are contained in base units rather than in the “guns” because of the high voltage used and heat generated ( Fig. 6-10 ). Plasma arc light sources do not emit distinct frequencies, but rather continuous-frequency bands that are much narrower than those of conventional lights. Consequently, less radiation is filtered with undesired frequencies. Plasma arc lights provide a light intensity of 1200 to 1500 mW/cm 2 and a wavelength range of 380 to 495 nm. Because of the high intensity, manufacturers claim that 1 to 3 seconds of plasma irradiation cures many resin composites to hardness comparable with that achieved after 40 seconds of conventional curing lights.
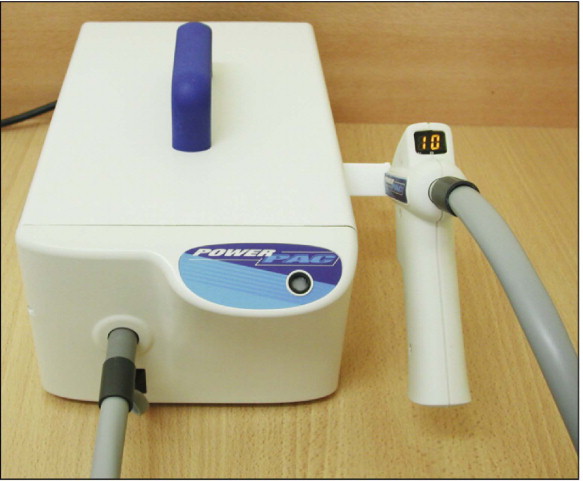
Rapid composite curing with the plasma arc lights clearly is beneficial for the clinician. However, high-intensity plasma arc lights may not be compatible with every orthodontic adhesive. The clinician should perform a basic compatibility test before using these light sources with some orthodontic adhesives.
Another concern with plasma arc lights is the high heat generated. Zach and Cohen reported permanent pulp damage in primates when the pulpal temperature rose above 42.5° C. The increase in pulpal temperature in a restorative preparation was found to reach 5.16° C with plasma arc light, versus only 1.86° C with conventional halogen. In orthodontic bonding the untouched enamel and dentin layer may provide additional heat insulation, and thus the use of the plasma arc light for curing orthodontic adhesives for 5 to 10 seconds should be safe in regard to the pulp temperature.
Also, studies have shown that plasma arc–generated blue light causes some damage to cells, particularly to DNA, and thus a long curing time exceeding that recommended can cause biological damage to oral tissue.
Light-emitting diodes
Mills, Jandt, and Ashworth proposed solid-state light-emitting diode (LED) technology for the polymerization of light-activated dental materials to overcome the disadvantages of halogen visible-light curing units ( Fig. 6-11 ). LEDs use junctions of “doped” semiconductors to generate light instead of the hot filaments used in halogen bulbs. LEDs have a lifetime of over 10,000 hours and undergo little degradation of output over this time. LEDs do not require filters to produce blue light, are resistant to shock and vibration, and take little power to operate. Earlier LED designs provided unsatisfactory with metal brackets, possibly because of their low power output.
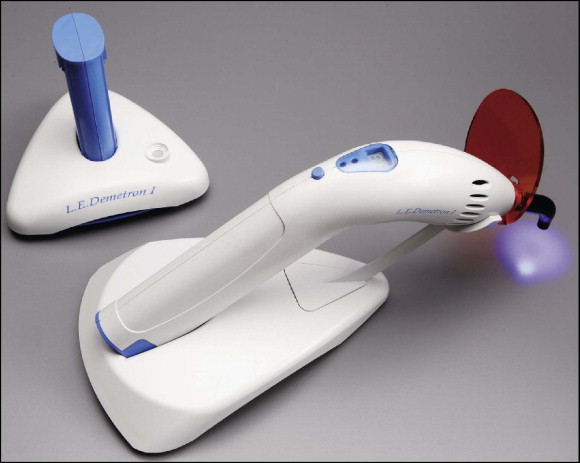
Current LED light sources combine high power output (∼1000 mW/cm 2 ) with a very narrow wavelength range of about 465 nm, which matches well with the absorption peak of camphoroquinone ( Fig. 6-12 ). These light sources are currently replacing the conventional halogens in all dental fields.
Safe operation of curing lights
The normal spectral output from a visible-light curing (VLC) unit extends into both ultraviolet (UV) and infrared (IR) ranges. This spectral region is often referred to as the retinal hazard region. Inexpensive bandpass filters incorporated into the VLC unit eliminate unnecessary light energy, although extraneous visible light still reaches the operator’s eye during the curing process ( Fig. 6-13 ).
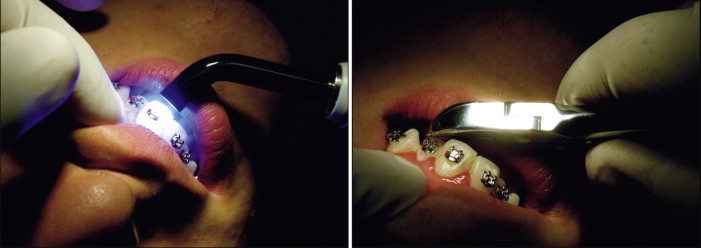
This light energy is dangerous because the cornea, lens, and vitreous fluid of the eye are transparent to these wavelengths, and the light energy is absorbed in the retina. Damage to the retina is possible through thermal or photochemical processes. Photochemical damage to photoreceptor cells of the retina can degrade overall light or color sensitivity, and the IR wavelengths may cause cataract formation in the lens ( Fig. 6-14 ).

What makes UVA and blue light hazardous? Research shows that when blue light strikes the retina, the light waves inhibit the formation of the chemical cytochrome- c oxidase. This chemical is an important part of retinal cells because it transports oxygen to photoreceptor and other retinal cells. Without cytochrome- c oxidase, the cells become deprived of oxygen and eventually die. When enough cells die, retinal degeneration occurs.
Similar research demonstrated that the retinal damage done was a feature of the wavelength, not the duration or frequency, of exposure. This means that even a short exposure to blue light can cause retinal damage without adequate protection. Often the lesions from UVA and blue light are scattered on the retina. Only when enough of them appear and coalesce does a vision loss become noticeable. This is why vision loss is not immediate, but often takes many years to manifest.
On average, orthodontists bond up to 20 attachments per day. With an acceptable curing time of 20 seconds per tooth, they spend 28 hours per year holding the light gun, even longer than their restorative colleagues.
Individuals with a history of retinal disease should seek advice from their ophthalmologist before operating the unit. This group of individuals must take extreme care and comply with all safety precautions, including the use of suitable light-filtering safety goggles.
Direct Bonding
Premedication
Initial activation of the orthodontic attachments may cause significant discomfort to the patient. Recent research revealed that patients premedicated with 550 mg of naproxen sodium 1 hour before archwire placement had significantly lower levels of pain at 2 hours, 6 hours, and later that night after adjustment than patients taking placebo. Analgesic premedication may be considered before proceeding to the bonding stage.
Bonding procedure
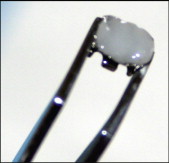
A successful bracket bonding procedure consists of the following steps. First, the bracket is gripped with reverse-action tweezers, and the adhesive is applied to the bracket base. It is important that the adhesive be evenly distributed on the bracket base without leaving a gap between the adhesive ( Fig. 6-15 ). Presence of such a gap may act as the weakest link in the chain and lead to premature failure of the attachment. The bracket is then placed on the tooth immediately.
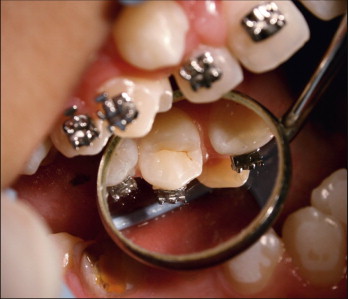
A scaler or a round probe is used to position the bracket on the tooth surface in occlusogingival, mesiodistal directions and in correct angulation. Direct visualization is limited in the posterior area because of tissue stretching from cheek retractors. Correct positioning of posterior teeth requires effort and checking from the occlusal surface with a mirror ( Fig. 6-16 ). Alternatively, these teeth may be bonded separately, or a more flexible type of cheek retractor may be used for direct visualization. The placement of orthodontic brackets is guided either by localizing the center of the clinical crown or by measuring the distance from the incisal edge. It is suggested that bracket bonding guided by measuring the distance from incisal edge may result in improved placement for anterior teeth. Archwire bending or bracket repositioning is still necessary to compensate for the inaccuracies with both techniques.
The attachment is then pressed onto the enamel surface with the scaler or the probe. The fitting of the bracket base to the contour of the tooth is important. Improper fitting of the base leads to unwanted tooth movement, usually in the form of rotation.
It is important to avoid placing the brackets too far gingival, unless dictated by the opposing teeth, as is sometimes the case in the lower arch. This leads to incomplete expression of the torque value built into the bracket and improper hygiene conditions. The brackets may come into contact with the gingival margin, particularly after intrusive tooth movement, because the gingival margin and the mucogingival junction move in the same direction as the teeth by only 79% and 62%, respectively. A statistically significant decrease of the clinical crown length has also been observed after intrusion.
Any excess material expressed around the bracket is removed with a scaler before the material sets or the light polymerizes it. The suggested light-curing times can be monitored according to Table 6-1 . Removal of the “flash” around the margins is important to maintain proper oral hygiene throughout the treatment. Some manufacturers add a coloring agent to assist in the visualization of the excess adhesive (APC Plus, 3M Unitek), although recent research reveals that this method does not reduce the amount of excessive adhesive around orthodontic brackets.
After completion of bracketing, the position of each bracket should be checked carefully. Any attachment that is not in proper position should be removed and rebonded immediately. Rebondings postponed to later appointments will take much longer to perform and may lead to compromised results. Motivational oral hygiene and brushing instructions should follow. The use of additional postoperative doses of analgesics may be recommended to control orthodontic pain completely.
Bonding to artificial tooth surfaces
With increased popularity of orthodontic treatment and advances in the esthetic appearance of attachments, more adults are visiting orthodontic clinics. Bracketing of these patients may frequently require bonding to crown-and-bridge restorations fabricated from porcelain and precious metals in addition to amalgam restorations. This section summarizes current techniques with emphasis on the protection for surrounding periodontal structures. Bonding to an artificial surface requires the use of microetching of these surfaces using 50-µm white or 90-µm aluminum oxide particles at about 7 kg/cm 2 pressure.
Ceramic crowns.
The ceramic restorations should be bonded separately under carefully isolated conditions. A barrier gel such as Kool-Dam (Pulpdent Corp., Watertown, Mass.) is suggested whenever a risk exists that the hydrofluoric acid etching gel may flow into contact with the gingiva or soft tissues. The bonding procedure is as follows :
- 1.
Sandblast an area slightly larger than the base of the orthodontic attachment with 50-µm aluminum oxide for 3 seconds.
- 2.
Etch the porcelain with 9.6% hydrofluoric acid gel for 2 minutes.
- 3.
Remove the bulk of the gel with cotton roll, and then rinse using high-power suction.
- 4.
Immediately dry with air, and bond the bracket as usual.
Amalgam.
The procedure for bonding to amalgam depends on the size of the amalgam restoration and incorporation of the enamel area. For small amalgam restorations with surrounding sound enamel, the following technique has been suggested :
- 1.
Sandblast the amalgam alloy with 50-µm aluminum oxide for 3 seconds.
- 2.
Condition the surrounding enamel with 37% phosphoric acid for 15 seconds.
- 3.
Apply sealant, and bond as usual with composite resin.
For large amalgam restoration with minimal enamel inclusion or for amalgam only
- 1.
Sandblast the amalgam filling with 50-µm aluminum oxide for 3 seconds.
- 2.
Apply a uniform coat of metal primer (e.g., Reliance Metal Primer, Reliance Orthodontic Products, Itasca, Ill.) and wait for 30 seconds.
- 3.
Apply sealant, and bond with composite resin.
Gold.
In vitro studies report high bond strengths with gold. New technologies include sandblasting, electrolytic tin plating or plating with gallium-tin solution, and use of different types of intermediate primers, as well as new adhesives that bond chemically to precious metals (Superbond C&B, Panavia Ex and Panavia 21; Kuraray America, New York, N.Y.). Clinical results are, however, far from satisfactory when bonding to gold crowns.
Composite.
Bonding to old composite restorations does not usually present a clinical problem provided that the previous surface is removed with a rotary instrument and the old composite thoroughly dried.
Indirect Bonding
Indirect bonding was first introduced in detail as a concept in 1972 by Silverman and Cohen. There are many proposed advantages associated with indirect bonding, and it has even been proposed as the mandatory mode of placement, especially in lingual cases. Clinical and laboratory studies failed to support this advantage of indirect bonding in labial cases, however, with only a small gain in the accuracy of bracket height.
Many advocates believe that reduced chair time and delegation of the procedure to assistant staff make indirect bonding cost-effective. Hodge et al. found significant cost savings when using indirect bonding versus direct bonding in a hospital dental clinic. In addition to cost-effectiveness, additional benefits include enhanced patient comfort, elimination of the need for separators and bands, easier ability to rebond brackets and build in overcorrections, better in/out and vertical control, and improved oral hygiene because of generally smaller attachments. Other benefits are optimal use of staff, reduced inventory and associated costs, fewer appointments for appliance placement and removal, and overall healthier ergonomics.
In vitro bond-strength studies demonstrate comparable SBS values between the direct and indirect methods. Bond failure rates reported for in vivo investigations also generally fall within clinically acceptable ranges of 1.4% to 6.5%.
Several techniques for indirect bonding are available. The brackets are temporarily bonded to the teeth on the stone models with composite resin, transferred to the mouth with some type of tray into which the brackets become incorporated into the tray, and then bonded all at once using an intermediate sealant.
Rebonding Loose Brackets
Accidental dislodgement of an orthodontic bracket caused by occlusal trauma, or intentional removal of a bracket to reposition, is common in orthodontic practice. Before rebonding an orthodontic attachment, the orthodontist should consider reconditioning of the enamel surfaces, the use of new or the original brackets, and the recycling and bonding system to be used. In general, SBS of a rebonded bracket has been reported to be comparable to that of the original.
The removed bracket should first be inspected for deformation of the slot that may have occurred during breakage. Brackets that seem to be deformed should be replaced with a new bracket. Before proceeding with rebonding, any composite remaining on the tooth surface is removed with a tungsten-carbide bur. The adhesive remaining on the loose bracket is also removed with the bur, until all visible bonding material is removed from the base, with treatment by sandblasting as an option. The tooth then is etched with phosphoric acid gel for 30 seconds. A longer etch is advisable. In contrast to initial bonding, the enamel surface may not appear uniform because some areas may retain composite. After priming, the bracket is rebonded. The bond strength for sandblasted rebonded brackets is comparable to the SBS (and subsequent success rate) for new brackets.
DEBONDING
Unlike other restorative practices in dentistry, the adhesive system set up at the start of orthodontic treatment is dismantled, and the brackets are removed after completion of the therapy. The debonding phase is as important as the bonding phase and should not be underestimated; doing so may result in significant damage to the enamel surface and unnecessary elongation of the chair time to restore the surface to its original gloss.
Debonding sessions are best scheduled on a certain day of the week or month so that both clinician and staff are concentrated to provide the best debonding service to the patient. Whether metal or ceramic, the brackets should be removed individually after removal of the archwires to avoid force transfer from tooth to tooth, which may increase the risk of enamel crack formation.
Bracket Removal
Steel brackets
A peeling-type force technique was recommended by Zachrisson and Büyükyilmaz to break the adhesive bond without deforming the bracket, to allow recycling. The peeling force is said to create peripheral stress concentrations that cause bonded metal brackets to fail at low force values. This type of removal is advantageous because a break is likely to occur in the adhesive-bracket interface, leaving adhesive remnants on the enamel.
Ceramic brackets
Debonding of ceramic brackets is more likely to cause enamel fracture because ceramic brackets adhere more strongly to the enamel surface and will not flex when squeezed with debonding pliers. The risk is lower with ceramic brackets using mechanical retention than those using chemical retention. The bracket should be lifted off with peripheral force application, as with steel brackets, for easier and safer removal.
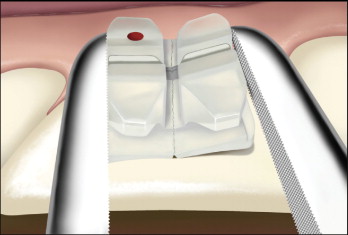
One study showed that new designs with a ball reduction band (e.g., Inspire Ice bracket, Ormco Corp., Orange, Calif.) and the vertical debonding slot (e.g., Clarity bracket, 3M Unitek) significantly reduced the risk of ceramic bracket fracture during debonding ( Fig. 6-17 ). The force required to debond the Inspire Ice bracket was significantly lower than that of the Inspire bracket.
Because of the high heat generated, grinding of ceramic brackets with a low-speed handpiece with no water coolant may cause permanent damage or necrosis of dental pulp. Water cooling of the grinding sites is necessary.
Other efforts to facilitate removal of ceramic brackets include thermal debonding and the use of lasers, which are based on heating and softening of the composite resin. Another recent challenge is the modification of the methylmethacrylate resin to initiate self-removal when activated. These applications may be less traumatic with less risk of enamel damage, but are still at an introductory stage, with definitive results not yet reported.
Residual Adhesive Cleaning
With improvements in the physical and mechanical properties of resin adhesive systems, cleanup of resin remnants after orthodontic bracket debonding has become a clinical problem. The removal of adhesive remnants from tooth surfaces is a final procedure to restore the surface as closely as possible to its pretreatment gloss without inducing iatrogenic damage. If remnants are not completely removed, tooth surfaces are likely to discolor and entrap plaque with time. Many investigators have introduced various resin-remnant removal techniques. Despite the introduction of new methods (e.g., Nd:YAG laser) to remove residues of bonding resin selectively, the most common removal techniques use a low-speed handpiece with a tungsten-carbide bur and a high-speed handpiece with a diamond bur. The preferred method uses a low-speed handpiece with a round, tungsten-carbide bur.
The bulk of the remaining adhesive may be removed with diamond or tungsten-carbide burs attached to a high-speed handpiece. Because of considerable scratching, however, these should not be used closer to the enamel surface. When approaching the enamel, a tungsten-carbide bur attached to a low-speed hand piece operating at 30,000 rpm should be used. For this purpose, the bur is moved in one direction as the resin layers are removed. Water cooling is avoided at this stage to improve the contrast between the adhesive and the enamel surface.
Any recontouring considered necessary should be completed at this stage before proceeding to polishing.
Operator Safety During Debonding
Another important but often ignored issue is the inhalation of aerosols produced during the removal of fixed orthodontic appliances. Recent research shows that aerosol particulates produced during enamel cleanup might be inhaled regardless of handpiece speed or the presence or absence of water coolant. This aerosol may contain calcium, phosphorus, silica, aluminum, iron, and lanthanum. Blood, hepatitis B surface antigen (HBsAg) and hepatitis B virus (HBV) DNA were also detected in excess fluid samples of the two hepatitis B carriers. Although the particles most likely are deposited in the conducting airways and terminal bronchi, some might be deposited in the terminal alveoli of the lungs and cleared only after weeks or months.
Studies indicate that orthodontists are exposed to high levels of aerosol generation and contamination during the debonding procedure, and that preprocedural chlorhexidine gluconate mouthrinse appears to be ineffective in decreasing exposure to infectious agents. Barrier equipment should be used to prevent aerosol contamination.
Detailing and Polishing
After completion of adhesive removal, the enamel surface may be further polished using various soft disks, cups, and pastes. Some authors view this stage as “optional,” considering the normal wear of enamel.
PREVENTION AND TREATMENT OF WHITE SPOTS DURING FIXED-APPLIANCE THERAPY AND AFTER DEBONDING
Preventive Measures
White-spot lesion (WSL) demineralization is a significant problem during orthodontic treatment. The primary measure to prevent WSLs is maintenance of maximum oral hygiene with effective brushing and cleaning of the entire dentition throughout orthodontic treatment. Special attention should be given to oral hygiene instruction and monitoring at the patient’s initial visit and bonding session and throughout treatment when necessary. Parents should also be informed about the outcomes of failure to brush properly. One cross-sectional study found that 50% of individuals undergoing treatment with braces had a nondevelopmental WSL compared with 25% of controls. Another study found that, even 5 years after treatment, orthodontic patients had a significantly higher incidence of WSLs than a control group of patients who had not had orthodontic treatment. This obvious degree of iatrogenic damage suggests the need for preventive programs using fluoride during fixed-appliance orthodontic treatment.
Methods to deliver fluoride to teeth during orthodontic treatment (in addition to fluoridated toothpaste) include the following :
- 1.
Topical fluorides (e.g., mouthrinse, gel, varnish, toothpaste, “tooth mousse”)
- 2.
Fluoride-releasing materials (e.g., bonding materials, elastics)
Daily rinsing with dilute (0.05%) sodium fluoride solution throughout treatment and retention, plus regular use of a fluoride dentifrice, is recommended as a routine procedure for all orthodontic patients. Evidence shows that a daily sodium fluoride mouthrinse reduces the severity of enamel decay surrounding a fixed bracket. For the self-administration methods of applying fluoride (e.g., fluoride toothpastes and mouthrinses) to be effective, the patient’s cooperation is essential. Compliance rates as low as 13% have been reported for patients asked to decrease their caries risk with a daily fluoride mouthrinse.
Professional means of fluoride application have included fluoride-releasing bonding agents, fluoridated elastomeric ligature ties, fluoride varnish, and 10% casein phosphopeptide–amorphous calcium phosphate (CPP-ACP; GC Tooth Mousse, GC America, Alsip, Ill.) ( Fig. 6-18 ). Professional application of 1% chlorhexidine collagen gel is also suggested to control Streptococcus mutans level in orthodontic patients with high caries risk. The use of a polymeric coating on the tooth surface around the brackets showed almost no demineralization-inhibiting effect.

Fluoridated elastomeric modules were considered to be an ideal solution to supplement fluoride around orthodontic brackets because they do not interfere with routine clinical practice and could ensure a “fresh” delivery of fluoride at each visit. Unfortunately, because of their poor mechanical performance and swelling as a result of water absorption, fluoridated elastomers have not provided an acceptable solution to the problem.
The use of glass ionomer cements for bracket bonding also reduces the prevalence and severity of white spots, but the evidence is weak compared with use of composite resins. Although the increased fluoride release from glass ionomers has the potential for decreasing decalcification around orthodontic brackets, the SBS of some glass ionomer cement material is relatively low. If glass ionomer cement is used in a high-risk patient, Fuji Ortho LC (GC America) and Fuji Ortho Band Paste Pak (GC America) may be considered the material of choice because these adhesives reportedly release more fluoride than other commercially available products.
Patients who undergo orthodontic therapy have changes in their oral environment, such as a low pH, increased retentive sites for S. mutans , and increased retention of food particles, which may lead to increased proportions and absolute numbers of salivary S. mutans. These changes may be partly responsible for the post–orthodontic treatment decalcification in certain cases. Øgaard et al. indicated that a high prevalence of caries may be caused by the high cariogenic environment in the plaque around orthodontic appliances. Proper oral hygiene is more difficult to maintain, and pH levels lower than 4.5 have been measured in the plaque around the brackets and the bands during orthodontic treatment. At such a low pH, the remineralization phase is hampered, and more fluoride will not necessarily provide a better cariostatic effect. Therefore, Øgaard and Rølla suggested that fluoride agents could be further improved by the addition of antibacterial agents. Accordingly, the application of Cervitec varnish induced a significant reduction of S. mutans in saliva over 1 month and a reduction in the proportion of S. mutans in the plaque adjacent to brackets, without adversely affecting SBS. No clinical differences were found in the incidence of incipient enamel demineralization around the bracket bases. The differences decreased over time, becoming statistically insignificant during the third month.
Another, newer method of fighting decalcification is the use of probiotic nutritional products or functional foods. A probiotic is a live microbial food supplement that beneficially affects the host by improving intestinal microbial balance. These “beneficial” microorganisms can inhabit a biofilm and protect oral tissue from disease. One mechanism by which these biofilms keep out pathogens is to occupy a space that pathogens might otherwise occupy. An in vitro study suggests that Lactobacillus rhamnosus strain GG can inhibit the colonization of streptococcal caries pathogens, thus reducing the incidence of caries in children. A recent double-blind randomized study showed that daily consumption of Bifidobacterium DN-173 010 containing 200 g of fruit-flavored yogurt was able to decrease salivary S. mutans levels significantly.
Treatment After Bracket Removal
When WSLs are seen at debonding, the orthodontist should allow 2 to 3 months of good oral hygiene without fluoride supplementation. More fluoride applied at this early stage is believed to precipitate calcium phosphate onto the enamel surface and block the surface pores, which limits remineralization to the superficial part of the lesion, and the optical appearance of the white spot is not reduced.
When the remineralizing capacity of the oral fluids is exhausted and WSLs are established, microabrasion as described by Gelgör and Büyükyilmaz is an effective way to remove superficial enamel opacities. This technique can eliminate enamel stains with minimal enamel loss. An abrasive gel (18% hydrochloric acid, fine-powdered pumice, and glycerin) is applied by electric toothbrush for 3 to 5 minutes. Monthly repetition of the procedure for 2 or 3 months may be necessary, depending on the severity of the lesions, until the stains gradually disappear.
BONDING FIXED LINGUAL RETAINERS
Many appliance types have been used for the retention of posttreatment tooth position. The first appliances were based on banded fixed appliances, followed by removable retainers. Most recently, bonded fixed retainers have been introduced, consisting of a length of orthodontic wire bonded to the teeth with acid-etched retained composite.
Early bonded fixed retainers were made with plain, round or rectangular orthodontic wires, but Zachrisson proposed using multistrand wire. Årtun and Zachrisson first described the clinical technique for use of a multistrand-wire, canine-to-canine, bonded fixed retainer. In this retainer the wire was bonded to the canine teeth only. In 1983, Zachrisson reported the use of multistrand wire in a bonded fixed retainer in which the wire was bonded to all the teeth in the labial segment.
These appliances are shown to perform successfully, and long-term retention of mandibular incisor alignment is acceptable with fixed retainers even after 20 years in most patients. Some patients needing re-treatment despite successful retention of fixed lingual retainers has also been reported.
Another issue with the use of fixed lingual retainers is periodontal health. Some consider the retainers compatible with periodontal health even over the long term, whereas others question the appropriateness of lingual fixed retainers as a standard retention plan for all patients, regardless of their attitude toward dental hygiene. Consequently, selection of retention protocol and fixed retainer type may be based on case-specific parameters such as dental and gingival anatomy and oral hygiene status. Regardless of selection, the patient should be given detailed hygiene instruction for healthy preservation of the fixed lingual retainer.
Adhesives Used for Lingual Retainer Bonding
Highly filled resins
Bonded fixed retainers are attached to the teeth with composite. Adhesives used with lingual retainers remain exposed to the oral cavity, so they require certain physical properties and proper management before the curing process. Composites described for this technique include both restorative and orthodontic bonding materials. Thinning of the composite was previously advised to obtain the best handling characteristics, but some difficulty in application remained. Later, several companies developed adhesives for lingual retainer bonding, claiming ease of application and optimal handling characteristics, to allow the clinician to shape and finish the adhesive around the lingual retainer wire for maximum patient comfort. These highly filled, light-cured resin pastes are also said to be a better choice when longevity and durability are required. Light-activated composites may have these properties.
Stay updated, free dental videos. Join our Telegram channel

VIDEdental - Online dental courses


