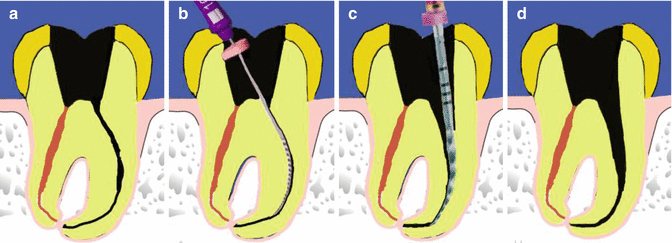
Fig. 1.1
Note (a) and (b) clinical periapical radiographs demonstrating nonsurgical root canal treatment of tooth 25. Note they reveal limited two-dimensional view of the true three-dimensional image. Insert shows (c) access preparation, (d) limited volume cone-beam computed tomography reconstruction of the projection data providing axial and sagittal views of tooth 25 demonstrating extent of periradicular pathology and internal root canal anatomy, and (e) sagittal view and various slices (apical (A), middle (M), and coronal (C) dotted lines) highlight anatomy of the root canal space further seen in Fig. 1.2 axial views
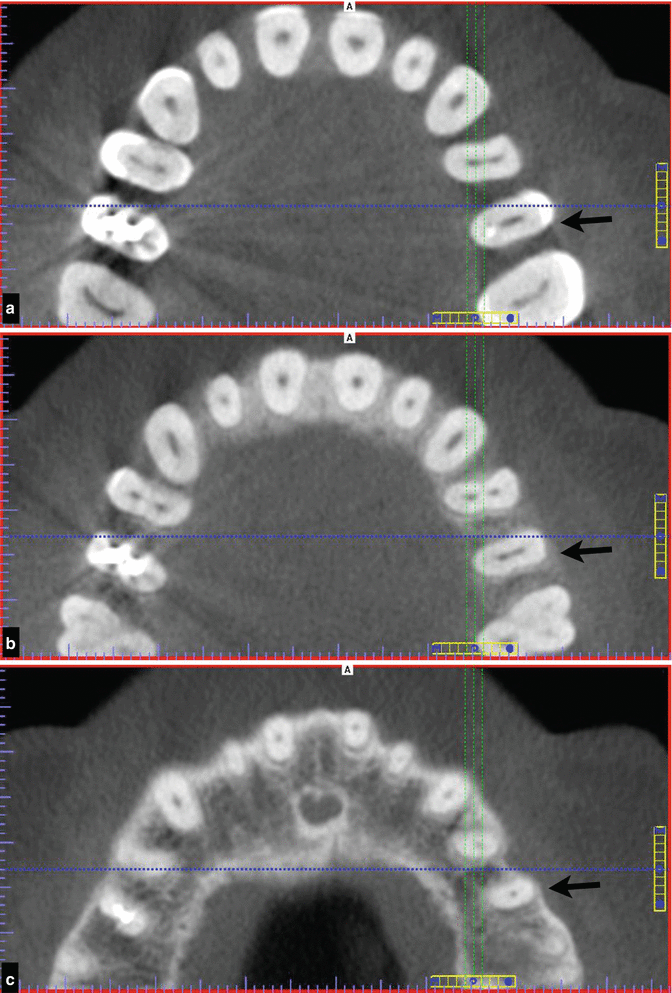
Fig. 1.2
Cone-beam CT axial projection demonstrating (a) coronal, (b) middle, and (c) apical root anatomy. Access preparation could be carried out with confidence confirming a Vertucci 1-2-1 root canal anatomy. Note black arrow showing tooth 25
The anatomical laws formulated by Krasner and Rankow should be taken into consideration when opening pulp chambers because they give clinicians general anatomical landmarks that are very useful when localising all canal anatomy [12].
Several studies have concluded that the dental operating microscope provides and enhances lighting and magnification, which are essential for the clinicians’ ability to correctly localise and negotiate canals [13–15].
The use of an ultrasonic unit (magnetostrictive or piezoelectric) with an appropriate tip confers unique advantages for refinement of access cavities, location of canal orifices and removal of obstructions such as calcifications. Magnetostriction ultrasonic unit devices operate between 18 and 4 kHz, converting electromagnetic energy into mechanical oscillation when an alternating magnetic field is applied to metal strips in a stack. Piezoelectric units operate between 28 and 36 kHz, converting electrical energy into mechanical energy through a crystalline piezoelectric material. This mechanical energy is transferred to the cutting tips resulting in micro-vibratory movements in the ultrasonic frequency range. The tips should be used with a light brush and touch action, selecting a medium power setting under direct control using the operating microscope [16–18].
Ultrasonic tips are available in different lengths, diameters, angles and designs used with or without water. Length of tip is critical when determining whether the tip is to be used solely in the coronal aspect of the pulp chamber or within the root canal itself. Longer thinner tips are ideal in the case of the latter. Tip design is further classified according to whether it is constructed from stainless steel or titanium alloy. Stainless steel tips may be coated with zirconium nitride (ProUltra ultrasonic instruments; Dentsply, Tulsa, Oklahoma) or diamond grit (Spartan CPR instruments, Fenton, Missouri), which increases efficiency and durability. Most current available systems are designed to function either wet or dry. The former come with water ports to increase washing and cooling effects [19, 20].
Patients with cardiovascular implantable electronic devices, such as pacemakers, and the use of ultrasonics has been a concern. Dental equipment, which can pass a current to a patient, can potentially interfere with the pacemaker. Current guidelines recommend the avoidance of magnetostrictive devices, whereas the use of piezoelectric devices does not seem to have an affect on pacemakers [21, 22]. In the best interests of the patient, it would be prudent to discuss the case with the patients’ cardiologist to ensure that there are no undue concerns with this regard.
1.2 Opening the Pulp Chamber
A front surface mirror, a Hu-Friedy DG16 endodontic probe, illumination and magnification are essential for preparation of the tooth for endodontic treatment. Caries and failing restorations must be completely removed prior to endodontic access cavity preparation. Where there is any doubt in relation to the restorability of the tooth in question, then dismantling of the existing restoration and preliminary assessment of the remaining tooth structure is an essential first step.
Removal of existing restorations also allows the examination of axial walls and the presence of any hairline cracks which could also influence the endodontic outcome. A restorability assessment is made in order to ensure that the planned future permanent coronal cast restoration is feasible.
Unsupported cusps are removed, and where any axial wall crack-lines are evident or a diagnosis of cracked tooth syndrome is suspected, then the tooth should be protected by placement of an orthodontic band during and following completion of treatment.
The roof of the pulp chamber should be penetrated through the central portion of the crown at a point where the roof and floor are at the widest (e.g. the palatal canal of a maxillary molar). An EndoZ bur, which has a non-end cutting tip, is ideal once the roof is penetrated, preventing potential damage to the floor of the pulp. All dentine ledges and lips should be removed.
Once the roof, in its entirety, has been removed, then the floor of the pulp chamber can be inspected. In cases, which are not calcified, dark developmental lines may be identifiable linking canal entrances. Following this ‘road map’ may reveal additional undetected canal entrances, and further probing with the DG16 may confirm a ‘sticky’ feeling.
Typical textbook description of pulp chamber anatomy is based on teeth with complete crowns and pulp chambers that are ideal in terms of position and width. Most clinical situations are far from ideal where teeth have been previously treated resulting in large restorations, cast restorations or dystrophic calcifications, which significantly alter the normal anatomy. Ideal access preparation may lead to iatrogenic errors due to inadequate or over-aggressive preparations. Access cavities should be prepared according to the internal anatomy of the tooth and refined according to the individual tooth and its unique anatomy accordingly (Fig. 1.3).
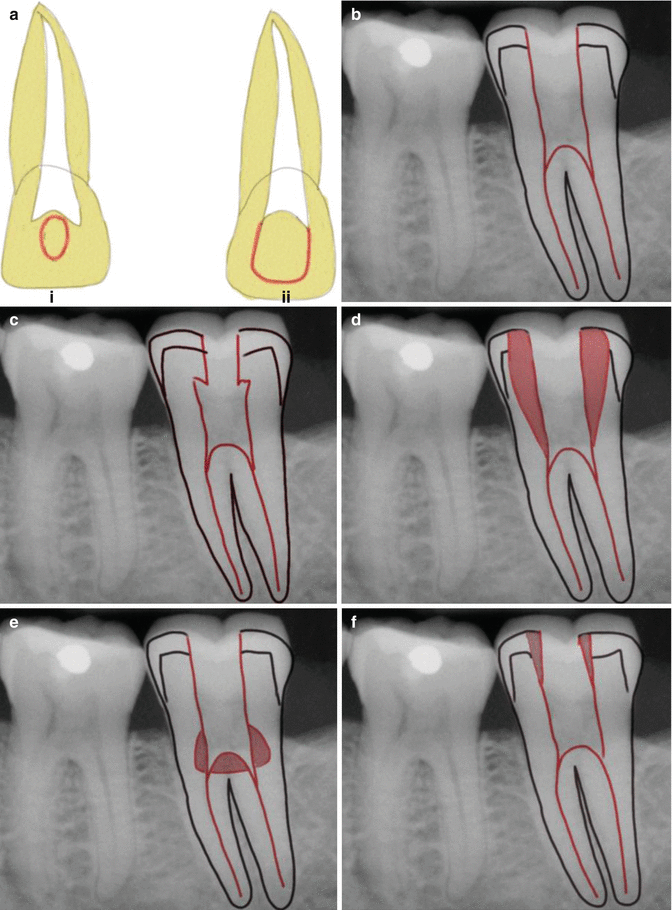
Fig. 1.3
Diagrams representing (a) incorrect (i) and correct (ii) removal of the pulp chamber in an incisor tooth. (b) Correct and (c) incorrect straight-line access in a posterior molar tooth. (d) Excessive removal of tooth structure leading to weakening and potential fracture of the tooth. (e) Damage to the floor of the pulp chamber will not only risk possible perforation but also hinder location of canal entrances. (f) The walls of the coronal access should not deflect an instrument placed in the canal
Krasner and Rankow evaluated the pulp chamber anatomy of 500 extracted teeth, and based on their findings, the following laws pertaining to general anatomical guidelines were made:
- 1.
The floor of the pulp chamber is always a darker colour compared to the surrounding dentinal walls. This colour difference creates a distinct junction where the axial walls and floor of the pulp chamber meet (law of colour change).
- 2.
The orifices of the root canals are always located at the junction of the axial walls and floor (law of orifice location 1).
- 3.
The orifices of the root canals are located at the angle in the floor-wall junction (law of orifice location 2).
- 4.
The orifices of the root canals lie at the terminus of developmental fusion lines, if present (law of orifice location 2).
- 5.
The developmental root fusion lines are darker than the colour of the floor.
- 6.
Except for maxillary molars, the orifices of canals are equidistant from a line drawn in a mesial-distal direction through the pulp chamber floor (law of symmetry 1).
- 7.
Except for the maxillary molars, the orifices of canals lie on a line perpendicular to a line drawn in a mesial-distal direction across the centre of the floor of the pulp chamber (law of symmetry 2).
These generalised laws should be taken into consideration when preparing access cavities since they give clues to generalised landmarks independent of the crown anatomy (Fig. 1.4).
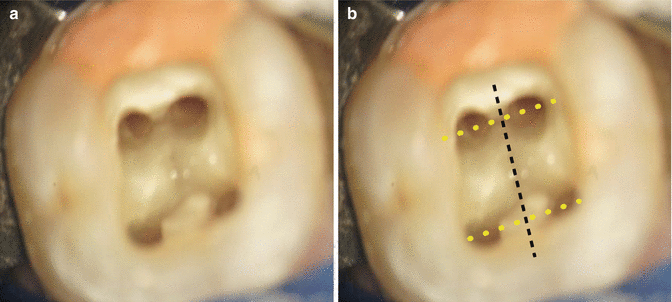
Fig. 1.4
Clinical photographs showing (a) internal anatomy of a tooth. Note dark developmental grooves on the floor of the pulp and darker color associated with root canal orifices. (b) As described by Krasnoe and Rankow Law of symmetry 1 and 2
1.3 Access Through a Crown
It is not uncommon to carry out endodontic treatments in teeth already restored with crowns. Access preparations through existing crowns whose margins are deemed good require careful consideration and diligence. It is necessary to mentally visualise the pulp chamber position from preoperative parallel radiographs. The distance of the pulp chamber floor from the most coronal aspect of the crown can be premeasured and noted. The angulation and any rotation of the tooth should be assessed and initial access preparation without the use of rubber dam may be advisable to ensure that penetration is carried out correctly without risk due to mis-angulation resulting in perforation. The position of the cement-enamel junction and furcation should also be noted as these landmarks help the clinician locate the level of the pulpal floor and likely position of canal entrances.
Tungsten carbide burs are ideal for cutting through metal such as full gold crowns. When mapping out the access through initial porcelain, a diamond bur should be used to reduce the likelihood of porcelain fracture. If the canals cannot be identified, then removal of the crown may be indicated to prevent iatrogenic perforation and unnecessary removal of sound dentine (see Figs. 1.5, 1.6 and 1.7).
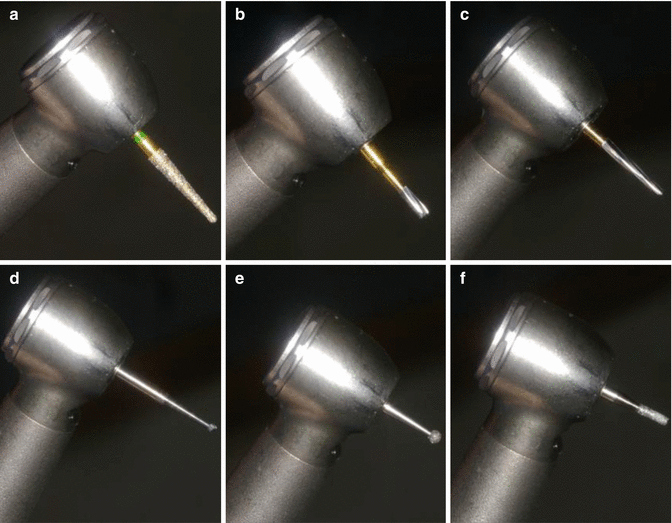
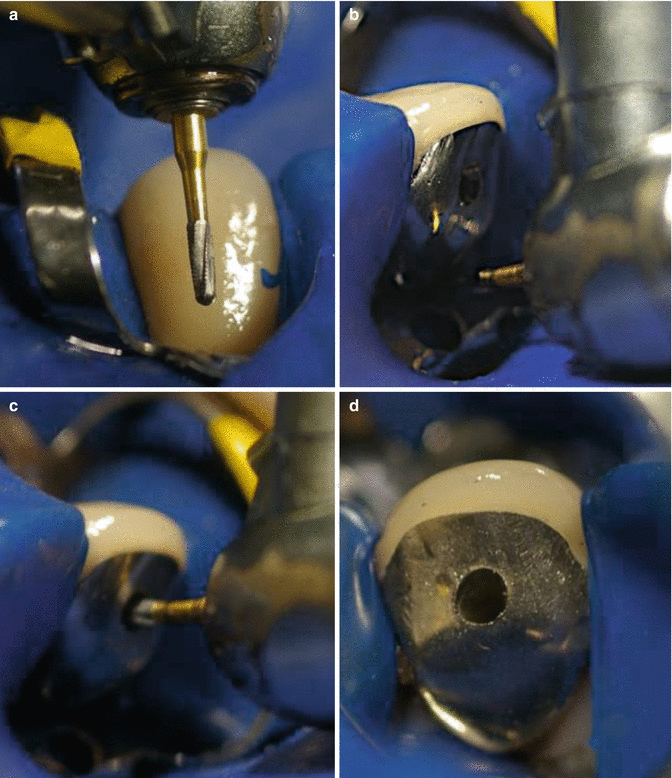
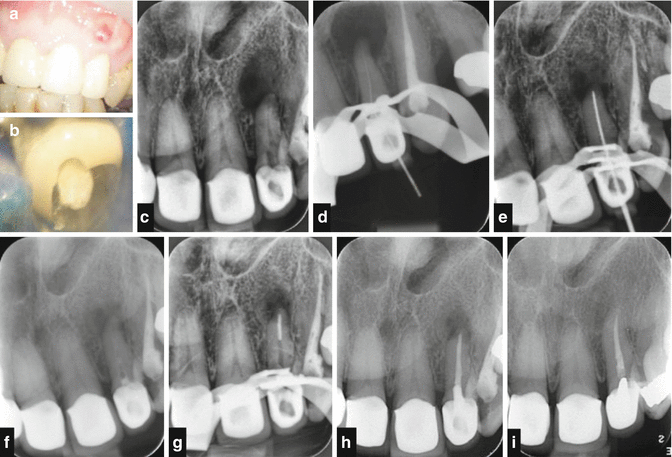
Fig. 1.5
Clinical photographs showing typical armamentarium of burs used for access preparations: (a) diamond grit tapered bur, (b) tungsten carbide bur, (c) non-end cutting Endo-Z bur, (d) long shank diamond, (e) diamond grit round diamond, and (f) parallel tapered short diamond bur
Fig. 1.6
Clinical photographs showing access preparation through a porcelain-metal crown. (a) Tungsten carbide bur is selected and (b) carefully aligned to long access of the tooth to (c, d) gain initial access through the metal infrastructure. Preoperative radiographs and clinical assessment of the tooth-root relationship is important to prevent misalignment. Occasionally, access can be carried out prior to placement of rubber dam if the long axis tooth is difficult to ascertain or the crown-root relationship is of concern
Fig. 1.7
Clinical photographs and radiographs demonstrating nonsurgical endodontic treatment through a ceramic-metal crown. Note (a) draining sinus in relation to tooth 22 and (b) prior endodontic access carried out by the general dental practitioner. (c) Preoperative radiograph confirming endodontic access. The dentist was unable to locate the canal orifice. Note access preparation extends below the cervical margin of the tooth and an obvious root canal can be seen. An extensive peri-radicular radiolucency is evident. (d) IAF demonstrating successful canal negotiation after careful access refinement. Initial access was misaligned due to orientation difficulties arising from the cast restoration in place. Access had been directed towards the facial aspect but no perforation was noted. Access refinement was carried out using ultrasonic troughing under constant guidance using magnification. (e) MAF radiograph following working length determination. (f) 3-month follow-up radiograph showing intra-canal medicament dissolution and significant reduction in the pre-operative radiolucency. (g, h) Obturation was completed using a warm vertical compaction technique using AH plus cement. (i) The patient was reviewed a further 9 months later. The radiograph demonstrates an intact periodontal ligament space associated with the peri-apex of tooth 22 correlated with complete healing
1.4 Straight-Line Access
Once the canal entrances have been identified, it may be necessary to refine the outline shape of the access cavity to allow endodontic instruments unimpeded straight-line access in the coronal 1/3rd of the canal. Straight-line access will prevent or reduce the likelihood of unfavourable iatrogenic mishaps such as canal transportation including ledging, zipping and perforation. Straight-line access will also reduce file distortion, particularly important when using rotary nickel-titanium instruments, which may undergo unnecessary torsional loading and cyclic fatigue leading to instrument fracture (see Chap. 11). Access openings must be designed to preserve sound tooth structure and is fundamentally important to prevent unintentional gouging laterally, cervically or into/beyond the floor of the pulp chamber (see Fig. 1.11). Conversely, access that is too restricted may impact on correct identification of all internal anatomy leading to iatrogenic errors during subsequent preparation as discussed earlier (Fig. 1.8).

Fig. 1.8
Diagrammatic representation of straight-line access preparation in a mandibular molar tooth. A parallel preoperative radiograph is obtained, and (a) an initial measurement is calculated as to the depth of the pulp chamber in relation to the occlusal surface (red arrow). (b) This length is used as a guide for initial penetration into the pulp chamber. (c) Initial access preparation is incomplete with inadequate extension distally. Note file deflection as a result causing increased stress and potential for iatrogenic errors. (d) Correct access extension using appropriate non-end cutting to refine distally. Note file is now no longer deflected and therefore less likely to result in iatrogenic errors such as apical canal transportation or file separation
Whilst unmistakable orifice location and careful canal penetration are warranted, efforts should be made to minimise excessive removal of cervical tooth structure in the canal orifice. Commonly used instruments such as Gates Glidden drills should be avoided since these instruments tend to straighten the canal and weaken the root canal walls, and overzealous use in some cases may lead to irreparable defects such as stripping or perforation.
Straight-line access is achieved by firstly correct access preparation with correct axial wall refinement. Once the floor of the pulp chamber has been identified, the use of a non-end cutting bur (Endo Z) is excellent for gross refinement and removal of dentinal overhangs that prevent unimpeded orifice location. Finer refinement can be carried out using ultrasonic tips under magnification allowing precision removal with minimal damage when carried out correctly. Creating straight-line access within the coronal 1/3rd of the canal can be achieved by introduction of initial rotary instruments that can be safely used in a brushing action, away from the danger areas, removing cervical dentine efficiently. Initial pre-flaring with the S1 ProTaper file can effectively remove this triangle if dentine is commonly encountered coronally. The angle of the inserted instrument within the canal is a good indicator as to whether straight-line access has been achieved (i.e. the instrument should stand upright). Radiographic imaging of initial apical file placement will also indicate whether any further coronal dentine removal is indicated. Once straight-line access is achieved, the clinician can be assured that iatrogenic errors such as transportations, which are common in any curved canal space, can be minimised with subsequent apical preparation and introduction of files of greater taper (Fig. 1.9).