8: Problem Solving in Tooth Isolation, Access Openings, and Identification of Orifice Locations

Chapter 8

Problem Solving in Tooth Isolation, Access Openings, and Identification of Orifice Locations

Problem-Solving List

Problem-solving issues and challenges in pulp chamber access addressed in this chapter are:

Critical Factors in Tooth Isolation Within the Standards of Care
Major Problems or Errors in Endodontic Access Openings
Techniques for Safe and Accurate Access Cavity Preparations
Problem-Solving Challenges in Access Openings

    Pulp chamber calcifications
    Use of magnification during access preparation
    Preventing and managing coronal perforations
    Potential problems in access openings through crowned teeth or teeth with excessively large restorations
    Clinical considerations in preventing and managing problems in tooth isolation and access preparation
    Problem Solving in Recognizing or Locating Canal Orifices

       Calcification of the dental pulp and pulp canal space
       Maxillary central and lateral incisors and canines
       Maxillary premolars
       Maxillary molars
       Mandibular incisors, canines, and premolars
       Mandibular molars
       Clinical considerations in preventing and managing problems in orifice identification

“The first step in the treatment of a tooth … is the adjustment of the rubber dam over the diseased tooth to preclude the possibility of the entrance of any germs in the oral secretions into the pulp chamber. This should be the invariable rule.”< ?xml:namespace prefix = "mbp" />14

Anonymous, 1900

“The first essential in getting at any root-canal is to gain direct access, and not to try to work around corners, whatever tooth-structure may have to be sacrificed.”24

R.H. Hofheinz, 1892

The main purpose of a lingual or occlusal endodontic access opening is to develop an unimpeded passageway to the pulpal space and apical foramen of the tooth. This unrestricted opening should be specifically designed for each tooth to facilitate proper canal cleaning, shaping, and obturation. In some cases, a problem-solving approach may dictate the need to initiate the access opening in a surface other than the lingual or occlusal (Figs. 8-1 and 8-2). Although rare, these creative approaches should only be used when standard entries to the canal system are impossible or the loss of tooth structure permits. A properly prepared access opening can eliminate many technical difficulties encountered in root canal treatment.42,43 In fact, many of the problems discussed in this book regarding locating and negotiating fine and calcified canals, cleaning and shaping, disinfection, obturation, and revision of treatment may be avoided or eliminated with a proper coronal access opening.

image

FIGURE 8-1 A, Rotated mandibular canine. B, Access is made through the facial surface.

image

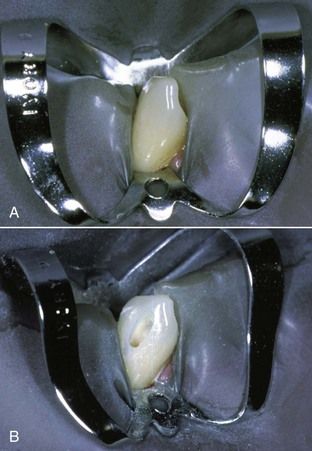
FIGURE 8-2 A, Maxillary molar exhibits extensive buccal cervical erosion and abrasion. B, Initial access is made in a buccal-palatal direction without a dental dam. C, Closer view shows access after the canal orifices are opened.

The major consideration in all access openings is that coronal tooth structure should not be retained if its preservation prevents direct pathways to the canal orifices. This admonition does not imply that radical removal of the coronal tooth structure is necessary simply to obtain unimpeded access to the pulpal space; caution is also advised in creating excessively large access cavities for the convenience of operating microscope visualization. Rather, the statement implies that the clinician must be thoroughly knowledgeable about pulpal and external root anatomy and must be capable of proper radiographic assessment of the three-dimensional relationship of the pulpal space within the confines of the tooth.38 When these factors are all considered, a properly placed and shaped access opening can be made. Failure to approach this initial technical step in root canal treatment in this manner not only invites problems during access opening preparation but also unleashes a plethora of technical problems in all phases of treatment. Subsequently, treatment will be compromised or teeth will be lost unnecessarily.

image

CLINICAL PROBLEM

Problem

A 37-year-old female presented with acute pain to biting on her mandibular left first molar. Following diagnostic testing, a diagnosis of irreversible pulpitis with acute apical periodontitis was made. Root canal treatment was initiated on the tooth, and the final radiograph showed poorly filled canals with significant canal space apical to the gutta-percha filling in all canals (Fig. 8-3). The mesial canals were prepared to a size No. 30 K-file and the distal canal to a size No. 35 K-file. The working length was established 1 mm from the radiographic apex, and the final file sizes were used to the full length in the root. The general dentist was concerned about not being able to obturate the canals well, even after the instruments would go to the working length, so the patient was referred to a specialist.

image

FIGURE 8-3 Mandibular molar had been accessed, and clinician could not penetrate canals fully with the filling materials. All the cleaning, shaping, and obturation had been done through the pulp horns, and the roof (arrow) of the pulp chamber had never been removed.

Solution

An assessment of the tooth indicates that the roof of the pulp chamber had not been removed (see Fig. 8-3, arrow). Failure to remove this anatomic obstruction forces the clinician to prepare and obturate the canals through the pulp horns. A major constriction of this nature due to an improper access opening significantly influences access to the canals, quality of canal cleaning and shaping, canal disinfection, and obturation. Clearly not all inflamed/infected pulp tissue has been removed, yet the clinician’s problem focused on errors in obturation.

image

Critical Factors in Tooth Isolation Within the Standards of Care

Proper tooth isolation is essential to all phases of root canal treatment, particularly patient protection and asepsis.3,8,21,40,63 Tooth isolation with a dental dam (formerly known as a rubber dam), using creative approaches to ensure these attainments is often required (Fig. 8-4).4 Questions or concerns frequently asked include:

“Do I really need to use a dental dam all the time? It is so hard to place.”
“The patient does not want to have the dental dam used in their mouth.”
“I was taught that in dental school, but is it really relevant in dental practice?”
image image

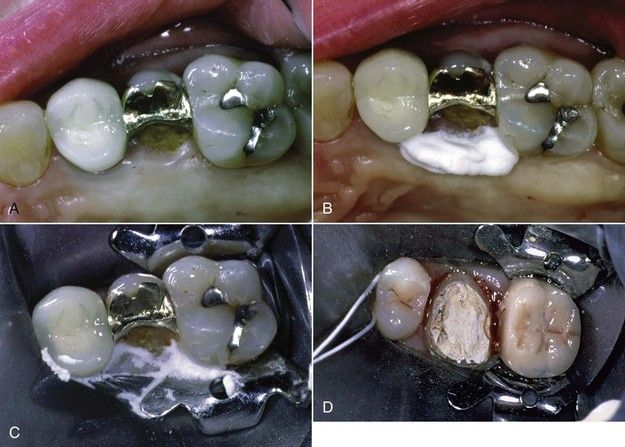
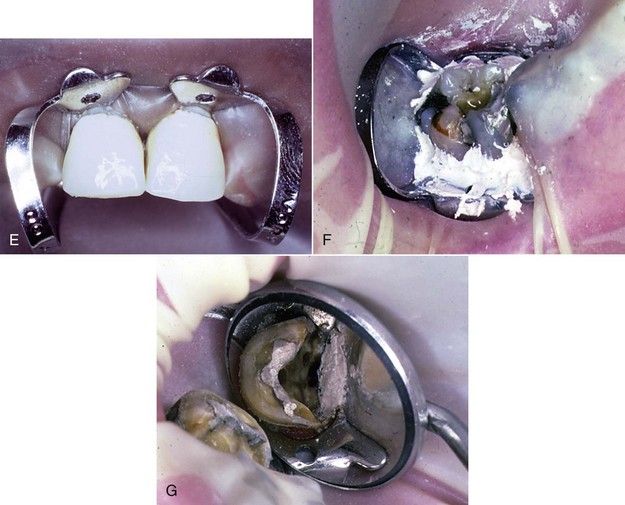
FIGURE 8-4 A, Maxillary premolar with subgingivally fractured palatal cusp. B, An oral sealing agent is placed along the palatal margin. C, A rubber dam is sealed in place. D, Clamping of adjacent teeth facilitates isolation of a tooth prepared for a crown. E, Two central incisors are isolated using two clamps. F, The tooth is isolated with excessive amounts of temporary material. This approach may prevent the necessary excavation and determination of restorability before root canal procedures. G, Temporary material adjacent to two mesial canals is used to isolate the tooth. Scraping the material with files and carrying it into the canal create a strong possibility of blocking the canal.

These are important issues because what is being taught in dental education may not be viewed seriously by the dental clinician once in practice.* Nevertheless, use of the dental dam is the standard of care in providing root canal treatment and certainly can and should be used in other aspects of restorative dentistry.9,16,18,63

There are several directives that should be considered for all cases of root canal treatment. Prepare access openings after a well-fitted and disinfected dental dam is placed, isolating the tooth to be treated. This is followed by disinfecting the dental dam with 2.5% sodium hypochlorite or alcohol before access to enhance asepsis (Fig. 8-5).22 The dental dam will protect the patient’s tissues and seal the mouth from root canal irrigants and disinfectants. This will prevent patient ingestion of irrigants and aspiration of instruments or materials during root canal procedures. The dental dam also facilitates procedures by creating a clear, dry field while enhancing infection control.3,31,32 In some cases, the initial access opening outline can be prepared immediately before placing the dental dam, so long as the tooth is not contaminated further before placing the dam (see Fig. 8-3).

image

FIGURE 8-5 Well-fitted rubber dam prior to disinfection and access opening.

Major Problems or Errors in Endodontic Access Openings

Many problems can occur during access opening preparation that will impact greatly on the subsequent phases of root canal treatment. Major shortcomings tend to occur in the following areas. First, all caries and unsupported weak tooth structure must be removed. This will enable the determination of tooth restorability and identification of any defects such as cracks (Fig. 8-6).33 Developing straight-line access to the pulp chamber and root canal system and establishing an aseptic environment for treatment procedures are critical steps. Moreover, stable coronal reference points can be established, and loosening of restoration debris that may be pushed into the canal is avoided.48

image

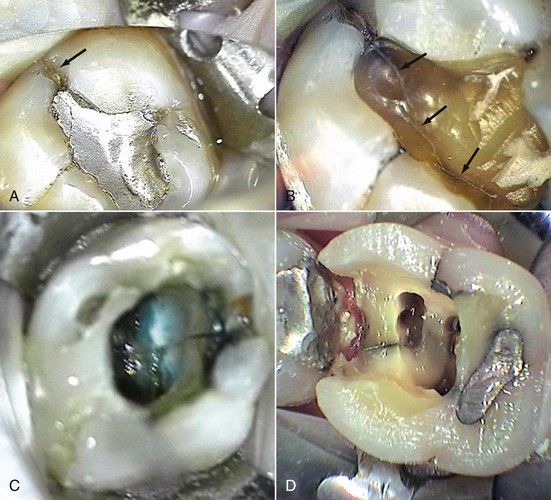
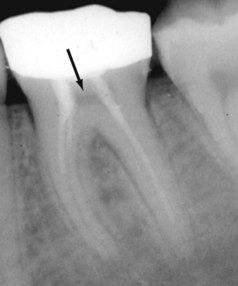
FIGURE 8-6 A, Apparent small crack on the marginal ridge of a mandibular molar (arrow). B, Same tooth as in A after removal of the restoration. Note the crack line extending almost completely across the pulpal floor. This is an obvious cause of pulpal pathosis but may not be significant in treatment planning if it does not extend apically to the pulpal floor. C, Coronal fracture extending across the pulpal floor. Careful assessment of the periodontal attachment in this area should be done to rule out extension of the fracture below crestal bone. Note the use of Methylene Blue 1% to stain fracture line. D, Large crack on the mesial floor of cavity preparation in a maxillary molar. A large crack at the level of the gingival margin could easily extend apically below the level of crestal bone.

image

CLINICAL PROBLEM

Problem

A 54-year-old male presented with episodic pain in the mandibular left quadrant. All teeth in this quadrant had extensive restorations. He believed his pain was coming from the first molar, but he was not sure. Pain was evident in response to percussion on the first molar; all other teeth responded normally. Cold elicited prolonged pain on the first molar, with normal responses on the adjacent and contralateral teeth. Periodontal probings and palpation were normal, but an explorer was easily placed under the mesial buccal margin of the crown on the first molar. A radiograph showed an invasive carious lesion on the mesial of the first molar, along with radiolucencies at the apices of both roots (Fig. 8-7, A). The diagnosis was irreversible pulpitis with acute apical periodontitis. The dilemma with this case focused on the access opening. Preparation of an access through the crown creates a situation in which all the previous problems described can occur.

image

FIGURE 8-7 A, Radiograph showing apical lesions on both roots and recurrent caries under mesial margin of the crown. B, Cutting of the crown from the tooth. C, Crown has been removed, and decay is evident under the old restoration. D, Removal of the old restoration shows significant decay. E, Final excavation that allows for evaluation of the tooth structure and facilitates direct access to the pulp chamber.

Solution

All potential problems with gaining access to the pulpal space can be prevented with crown removal. In this case, the tooth was isolated, and the crown was cut off using a bur to cut a groove from buccal to lingual (see Fig. 8-7, B and C). Attempting to retain this crown is futile because there is loss of marginal integrity. Complete removal and excavation of the caries provided the opportunity to evaluate the remaining coronal tooth structure (see Fig. 8-7, D and E), which contributed greatly to the treatment plan for this tooth.

image

During the removal of carious tooth structure, the peripheral decay is removed first, and then the carious material is removed inward toward the pulp chamber (Fig. 8-8, A). Penetrating a pulp chamber in which pulp is hyperemic or purulence has accumulated creates the difficulties of working in a confined space in a pool of blood or pus (see Fig. 8-8, B). Attempts to unroof a chamber or enlarge the access at this point can lead to crown or furcation perforation. Careful excavation around the pulp chamber before penetration will generally prevent this problem.

image

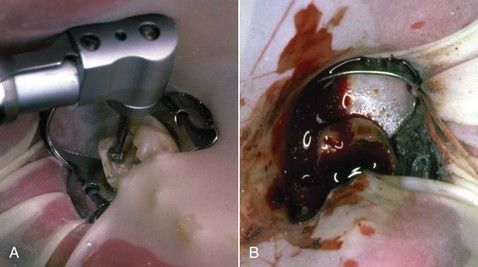
FIGURE 8-8 A, Caries around margins and under cusps must be excavated before the endodontic access opening is made. B, Excessive hemorrhage from inflamed pulp tissue can impair visualization of the pulp chamber.

Along with caries excavation, removal of unsupported tooth structure and weakened or faulty restorations enhances access to the canal system and visibility of tooth fractures (see previous Clinical Problem) and helps prevent fracture of fragile enamel walls and possibly the entire tooth during treatment33 (Fig. 8-9). Further excavation will also remove restorations from the borders of the access opening, thereby preventing the loosening of alloy or composite particles that may enter and block the root canal system—a common occurrence when large pin restorations or crowns are present. If the restoration is intact and provides an adequate seal, total removal is unnecessary. In these cases, the clinician should (1) use water during the access opening preparation to eliminate debris and (2) flare the cavity walls occlusally in an accentuated manner to enhance straight-line access (Fig. 8-10). This approach also prevents scraping metallic margins with the intracanal instruments and carrying metallic particles into the canal and blocking its pathway. Removal of foreign debris inadvertently carried into the canal is possible with gentle ultrasonic canal instrumentation.41 In cases in which a temporary restorative material such as zinc oxide eugenol is present, removal of the entire restoration is recommended,48 except in those areas where avenues of leakage may be opened. However, crown lengthening may be the preferred alternative to leaving deep temporary restorations in place (see Chapter 17). (Indications for restoration removal can be found in Boxes 8-1 and 8-2.)

image

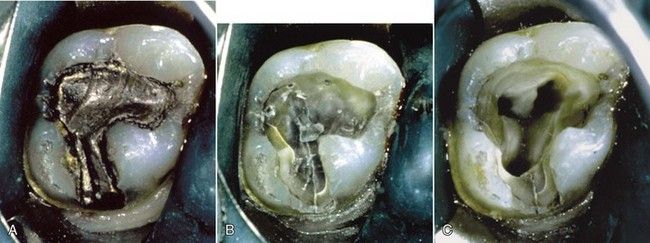
FIGURE 8-9 A, Maxillary molar requires root canal treatment. Exploration showed evidence of decay around distal margins of amalgam. B, Removal of amalgam reveals a vertical fracture on the palatal margin. C, Complete cleaning and shaping of canals are shown. Fracture lines are still visible, but no periodontal defects are present.

image

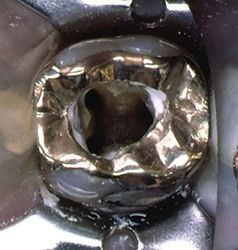
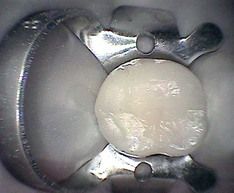
FIGURE 8-10 Crowned tooth with endodontic access opening is shown. All canals are visible when viewed from the occlusal perspective.

image

BOX 8-1 Compelling Reasons to Remove Restorations

Evidence of continued leakage of salivary contaminants into the canal during treatment
Unexpected carious invasion beneath restorations, especially full crowns
Fractures uncovered during access preparation
Loose, defective, or undermined restorations
Treatment-planned restoration replacement

image

image

BOX 8-2 Reasons of Convenience to Remove Restorations

Malpositioned teeth or restorations that impede direct access to the canals
Need to search for calcified orifices
Need to establish tooth restorability, especially with possible chamber perforations
Need to enhance clinician orientation

image

Oftentimes the crown of the tooth is not in direct alignment with the long axis of the root, so preparation of the access with only the angle of the crown in mind invites a coronal perforation or gouging of the crown. Teeth that normally exhibit significant altered crown-root angulations are maxillary lateral incisors and mandibular first premolars,19 but any tooth in the mouth may present this anatomic challenge (Fig. 8-11). In molar teeth during access opening in the presence of these altered angular relationships, misidentification of canals (e.g., mistaking the mesial lingual canal for the mesial buccal canal) may occur.7 Subsequent searching for the other canals often results in gouging or perforating areas far removed from the true canal orifice(s).

image

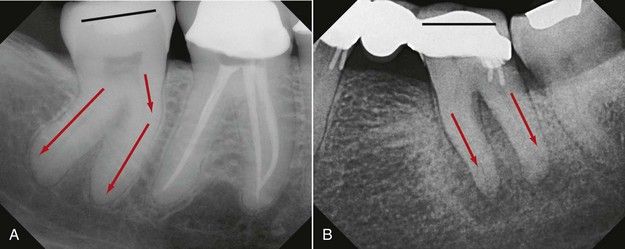
FIGURE 8-11 A and B, Two mandibular molars with the occlusal surface at divergent angles to the long axes of the roots. Occlusal surface orientations are indicated by the black lines on both teeth. Root angulations are indicated by the red arrows on both teeth. Penetration perpendicular to the occlusal surface may lead to ultimate chamber/furcation perforation.

Undermining and weakening coronal or radicular tooth structure is inevitable when anatomic relationships are not readily identified, even if a perforation does not occur. To compound this situation, extra canals are commonly found (Fig. 8-12), and failure to identify and clean these anatomic variants will often lead to treatment failure. The best way to manage such problems is to prevent them. Continuous recognition of deviations thorough periodic radiographic review and the possible use of magnification are essential. See Chapter 3 for additional discussion and examples.

image

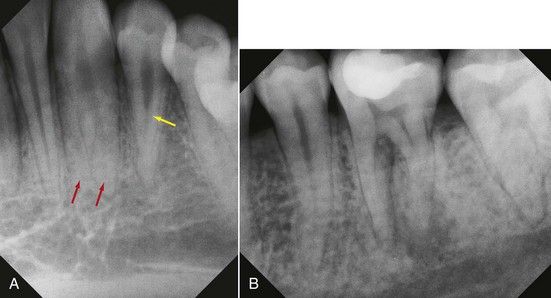
FIGURE 8-12 A, Both canine and lateral incisors have multiple canals. B, Distal roots of a mandibular molar with two distinct roots/canals.

Coupled with a smaller or calcified pulp chamber or canal, failure to take into account altered coronal-radicular relationships will usually lead to irreparable damage to the tooth structure (Fig. 8-13). Additionally, the location of the canal or canals will often be missed. Pulp chamber spaces are generally located in the center of the crown.59,60 Many teeth that have had multiple restorative procedures over time exhibit pulpal response to these irritations. The result is usually a reduction in the dimensions of the root canal space that is visible on a good-quality, two-dimensional radiograph.1 In many cases, especially when large restorations are present, bite-wing radiographs are necessary for proper visualization of the chamber space relative to the alignment of the crown to the root. Often, angled radiographs from the mesial and distal aspects will also be necessary when teeth are rotated or have abnormal root configurations28 (see Chapter 2).

image

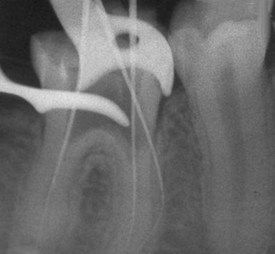
FIGURE 8-13 Access perforation in a mesially tipped mandibular molar with calcified canal orifices. Access was cut through a large composite restoration. Despite its eventual removal, the clinician remained disoriented as to the location of the second mesial orifice. A preoperative bitewing radiograph might have established the true orientation of the long axis of the tooth with the occlusal plane.

Access openings in artificial crowns or excessively large restorations also invite possible perforation if the three-dimensional relationship of the pulp chamber in relation to the altered crown anatomy (due to restorations) is not considered.37,53 Here again, the use of angled radiographs is most useful for determining relationships prior to preparing an access opening. Additional concerns with access into these teeth are the distribution of metallic or composite debris into the chamber and root canals that may ultimately block the canals or be pushed beyond the end of the root, creating potential long-term sources of irritation and lack of healing of the periapical tissues.34,62 High-speed suction and frequent irrigation are essential.

Techniques for Safe and Accurate Access Cavity Preparations

Access opening preparation is a dynamic, three-dimensional process.23 The old adage in access opening preparation, “Go for the pulp horns,” is reasonable in most cases. The pulp horn areas are targets in the process of early excavation (Fig. 8-14). In more routine cases in which the pulp chamber is visible on the preoperative film, location of the pulp horns is an early confirmation of spatial orientation (Fig. 8-15). In anterior teeth, the lingual surface is penetrated at right angles to the lingual/palatal surface of the crown. After penetration through the enamel (or artificial crown), the bur is reoriented as much as possible to the long axis of the root. Some clinicians describe this as “keeping the bur to the lingual of the initial opening.” From this standpoint, the pulp horns, if present, should be located. Once the pulp chamber has been accessed, the lingual ledge or shoulder is removed by “cutting on the outstroke.” This will establish a straight-line access opening into the root canal (Fig. 8-16). If removal of the lingual ledge is done with a “cutting-in stroke” there is a greater chance for gouging or even a buccal/facial perforation.

image

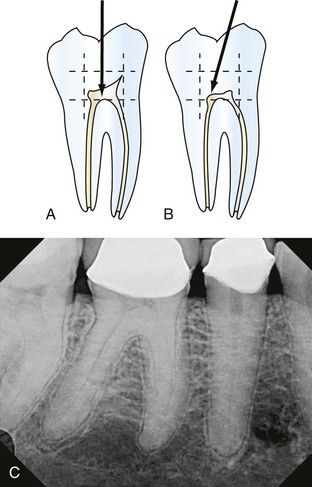
FIGURE 8-14 A, Diagram of mandibular molar shows anticipated parameters of the pulp chamber. Access entry must proceed into the center of these parameters (arrow). B, Access entry may be directed to the largest canal (arrow) in cases of tooth misalignment, calcification, or lack of visible pulp chamber. C, With a crown in place and evidence of calcifications in the pulp chamber, a direct-line access opening into the center of this tooth is recommended.

image

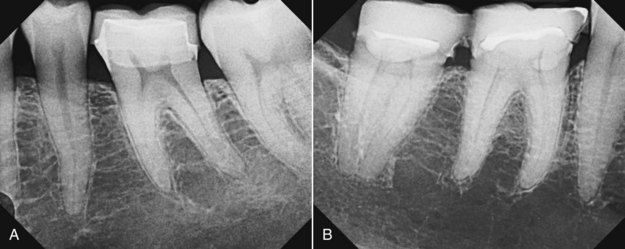
FIGURE 8-15 A and B, Two molars requiring root canal treatment, each with pulp horns visible even in the presence of some calcifications. Once these pulp horns are reached with a bur, there is initial spatial confirmation of the pulp chamber location and dimensions.

image

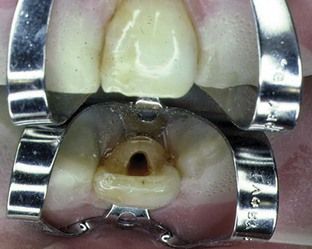
FIGURE 8-16 Access opening in maxillary central incisor demonstrates straight-line access to the pulp space.

Complete removal of the lingual ledge will often uncover extra canals in mandibular incisors, canines, and premolars (Fig. 8-17). Failure to locate these canals often leads to severe postoperative pain or ultimate treatment failure (see Chapter 5). The blame for failure of this nature is often transferred to the patient or tooth, when in fact the clinician should have full knowledge and control in these situations.

image

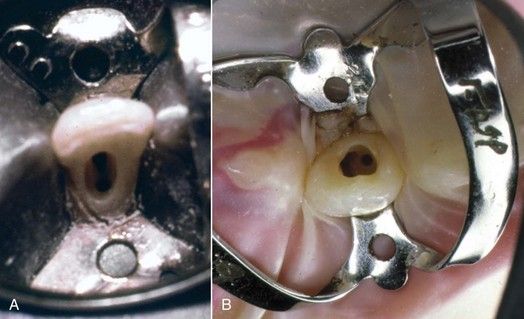
FIGURE 8-17 Access opening in mandibular incisor (A) extends lingually. The second canal located under the cingulum is noted. B, Two canals in a maxillary lateral incisor.

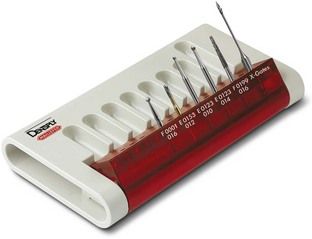
Burs that are recommended for access to anterior teeth include small to medium round burs, tapered diamonds and/or Endo-Z burs for refinement of the access outline, and possibly Gates-Glidden burs or X-Gates to assist in lingual ledge removal (Fig. 8-18: Anterior Access Kit [Dentsply Maillefer, Ballaigues, Switzerland]).

image

FIGURE 8-18 Anterior Access Kit (Dentsply Maillefer, Ballaigues, Switzerland).

In posterior teeth, failure to remove the entire roof of the pulp chamber is a />

Only gold members can continue reading. Log In or Register to continue

Stay updated, free dental videos. Join our Telegram channel

Jan 2, 2015 | Posted by in Endodontics | Comments Off on 8: Problem Solving in Tooth Isolation, Access Openings, and Identification of Orifice Locations

VIDEdental - Online dental courses

Get VIDEdental app for watching clinical videos