8
Fitting and Checking Retainers
This chapter will provide guidance on what should be checked once retainers have been fitted following the end of active treatment. It will be assumed that treatment has been completed satisfactorily as planned and that two-arch fixed appliances have been used.
Many operators will not see the patient again for about 3 months after retainers are fitted. Ideally, it might be argued that an earlier check (perhaps 4–6 weeks after the retainers have first been fitted) would ensure that there are no problems or misunderstandings with retainer wear at this crucial stage of treatment. Unfortunately, should either the patient or operator not appreciate this, then an entire 2-year treatment can easily be rendered useless due to poor or no retainer wear leading to rapid and gross relapse. It is therefore extremely important that operators ensure that patients are aware of the need and importance of the retention period.
- Be able to explain the importance of regular retainer checks to patients
- Have the knowledge to be able to undertake a retainer check
- Have the knowledge to undertake simple retainer adjustments
First Fitting of Removable Retainers
When the appliance is received from the laboratory, as with any appliance, basic checks should be undertaken to confirm:
- It is the correct appliance for the patient
- It is the prescription requested
- The appliance fits the model correctly
- There are no obvious deformities in the working model. This is not always possible to assess for VFRs, since the model may have been destroyed when the appliance was removed from it.
In addition, once the above are confirmed as correct, the appliance should be checked to see there are no sharp edges or acrylic ‘blips’, which may cause discomfort or damage to the patient (see Chapter 4).
Checking the Fit of Hawley Retainers in the Mouth (See Chapter 4)
The appliance should seat down fully around the teeth and the labial bow (modified with or without an acrylic facing) should fit snugly against the teeth without any obvious air gaps between the wire and the teeth or between the acrylic facing (if used) and teeth.
Appliance Not Seating Down Fully
If well made, these appliances should fit down properly. However, occasionally the appliance may not seat down fully if the colleting has not been sufficiently trimmed from around the teeth. If this occurs, often further trimming is needed in the premolar or molar region. You will need to check how far occlusally the acrylic lies. If it is preventing full seating, then an acrylic bur and straight handpiece should be used to trim the acrylic in the colleted areas such that the collets rise only to about half way along the palatal surfaces of, for example, the premolars and/or first permanent molars.
Another reason the appliance may not seat fully is if acrylic has crept along the arms of the fly-overs between the contact points. In this circumstance, Adams’ pliers can be used to simply ‘crunch’ off any stray acrylic by squeezing the acrylic between the beaks of the pliers.
Where any acrylic is to be trimmed, this should of course be done outside the mouth. The patient, nurse and operator should wear eye protection whilst trimming is being undertaken.
Appliance Loose
If the appliance fits properly, but is loose, there are usually two simple solutions:
- Consider tightening the Adams’ clasps to engage the undercuts more deeply using Adams’ pliers. This should be done by gripping each of the fly-overs in turn at the most buccal point and bending the arrowheads downward so that they engage the undercuts more.
- Either alternatively or in addition to the Adams’ clasp adjustment, it may be necessary to adjust the labial bow. This will depend on where the appliance is loose.
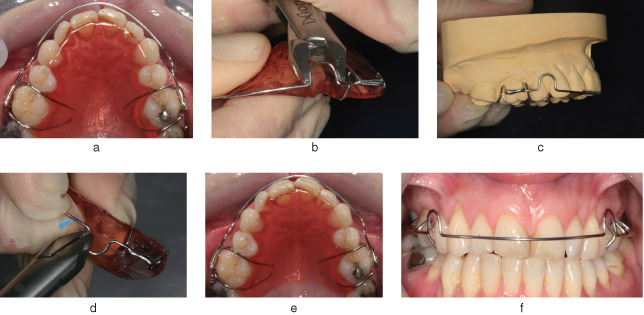
Figure 8.1 demonstrates a poorly fitting, loose labial bow and how to adjust it. As shown, once the retention has been improved, the final adjustment that may be required is to reposition the labial bow. This is sometimes needed due to the fact that when the U-loops are tightened, this tends to move the labial bow incisally. This can only be tolerated for a small number of visits since the bow will gradually edge toward the incisor tips. This will lead to poor retention and, with a Hawley retainer in the lower arch, potentially occlusal interferences with the upper teeth. In order to avoid this, a simple adjustment needs to be made in the U-loop such that the anterior part of the bow is pushed gingivally. This is done using Adams’ pliers to push the mesial component of the wire (which projects anterior to the U-loop) in a gingival direction so that the labial bow lies in the middle of the incisor crowns or as close to this as possible.
Figure 8.1 A poorly fitting, loose labial bow (a). To tighten the labial bow, the U-loops of the labial bow are gently squeezed using either Adams’ pliers or spring-forming pliers: place the U-loop between the beaks and squeeze gently so the U-loop closes or tightens a little (b). This should bring the labial bow into closer contact with the teeth; this should be done carefully and relatively symmetrically, so that the bow does not distort to one side – leading to no fit at all. Once the retention has been improved, the final adjustment that may be required is to reposition the labial bow. This is sometimes needed due to the fact that when the U-loops are tightened, this tends to move the labial bow incisally (c and d). This should bring the labial bow into closer contact with the teeth, but again this should be done carefully and relatively symmetrically, so that the bow does not distort to one side – leading to no fit at all. The improved fit is shown (e and f).
(Photographs courtesy of Simon Littlewood and Carol Bentley.)
Appliance Not Fitting
If a new appliance simply does not fit, despite undertaking the checking and adjustments described above, the fit on the working model should be checked. If it fits the model well, but not the mouth, then it may be that:
- A tooth or teeth have moved since the impression was taken, or
- The impression was dragged or has otherwise been distorted, either at the time it was taken or at some point subsequently.
Any such scenario will mean a re-make with a new impression is needed.
Checking the Fit of Vacuum-Formed Retainers
The appliance should seat down fully around the teeth and there should be no rebound as it is seated. The margin of the appliance extends just onto the gingivae, buccally and palatally/lingually, in both arches. These appliances will normally fit very tightly, so to avoid surprising the patient, they should be advised of this before you actually fit them.
As you push the appliance down over the teeth, be vigilant: if on fitting down, the appliance is seen to be forcibly pressing against the gingivae (causing blanching), stop and remove the appliance as this is likely to be painful for the patient; it will need easing in those areas before attempting the fit again. The appliance can be trimmed with scissors and then smoothed with a greenstone in a straight handpiece if it is extended excessively onto the gingivae and engages undercuts. Alternatively, or as well, it may need easing on the inner (fit) surface, again using a greenstone. Care should be taken when easing the appliance as the material is thin and it is easy to pierce it.
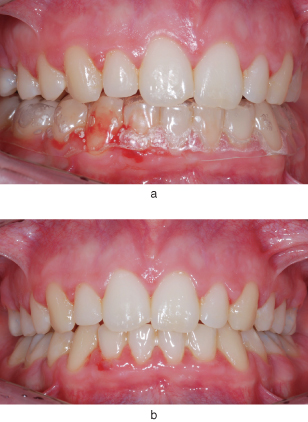
Once the appliance is seated, ask the patient whether there are any particular areas that feel much tighter than elsewhere or whether any points actually feel sore. If so, the above adjustments may be needed once more. In addition, with the appliance in place, look around the appliance and check whether the gingivae are blanching. If there are any such areas, again easing as above will be needed. Figure 8.2 shows actual trauma caused by a new vacuum-formed retainer (VFR) being fitted following debond. If during the fitting of the appliance it becomes clear that the appliance simply will not fit down or fails to seat down fully, despite the adjustments noted previously, then, as with a Hawley retainer, it suggests either:
- A tooth or teeth have moved since the impression was taken, or
- The impression was dragged or has otherwise been distorted, either at the time it was taken or at some point subsequently.
Figure 8.2 This vacuum-formed retainer (VFR), just fitted at debond, is causing not just blanching of the gingivae but actual bleeding (a). However, it is very clear where easing is needed once the VFR is removed (b).
Any such scenario will mean a re-make and a new impression will be needed.
Checking and Fitting Bonded Retainers
Checking Bonded Retainers
Bonded retainers should be checked in the mouth before they are cemented.
It is essential to check that they:
- Fit closely to the lingual or palatal surfaces of the relevant teeth
- Are as far away from the gingivae as possible (but not visible when viewed from the front) to maximise the patient’s ability to clean effectively
- Are not a/>
Stay updated, free dental videos. Join our Telegram channel
VIDEdental - Online dental courses


