5
Follow-up Appointments: What to Check and Why
It is obvious to all that follow-up appointments are an essential part of orthodontic treatment and these fulfil a number of roles, not only to check on the amount of tooth movement. They should also be used to check on oral hygiene and patient co-operation, and to provide praise and encouragement, as appropriate.
- What to monitor at regular follow-up appointments
- How to spot when something is going wrong
- The necessary adjustments to removable appliances
- How to manage the end of treatment and retention
- What not to treat
- How/when to refer
Appointment Frequency
Once the removable appliance has been fitted and activated, it will be necessary to review the patient’s progress at regular intervals; every 4–6 weeks. This time interval is ideal because it allows plenty of time for the appliance to work and for the cellular processes involved to settle once more. If any shorter than this, the appliance may not have fully achieved the tooth movement it should do. Furthermore, it may also predispose to root resorption if the appliance is re-activated too frequently. If any longer than 4–6 weeks, treatment progress may be delayed since the appliance will become passive and lie idle, and the period of time for which the appliance needs to be worn will be lengthened. Of course, the patient and parents/guardian should be fully aware that regular appointments will be required as part of the informed consent process and before the appliance is fitted.
Tooth movement, trouble-shooting and adjustments to the appliance will be covered for each type of tooth movement.
What to Monitor
There are a number of key markers that must be observed at each follow-up appointment:
- Whether the patient is wearing the appliance as requested
- Oral hygiene
- The maintenance of the appliance
- Tooth movement, both wanted and unwanted.
Obviously, there is some overlap between these areas, but performing the examination of the patient in a systematic and logical manner will ensure that nothing is forgotten.
Is the Patient Wearing the Appliance, and How?
Perhaps the first and most telling sign that a patient has not been wearing their appliance as requested is that they still have a pronounced lisp on speaking with the appliance in place. If an appliance is being worn appropriately, speech, in the vast majority of individuals, will return to normal within 1–2 days of having the appliance fitted as the tongue adapts to the thickness of the acrylic baseplate over the palate.
If the patient has worn the appliance, they will be able to insert and remove the appliance with ease, without the need for a mirror or any help. It is likely that a patient who demonstrates difficulty when attempting to remove or insert the appliance has not been wearing the appliance as requested.
Also, an appliance that has been worn becomes loose as the wire-work of the retentive components deflects on removal and insertion and, eventually, plastically deforms. An appliance that has not been worn remains ‘tight’ and requires some effort to remove.
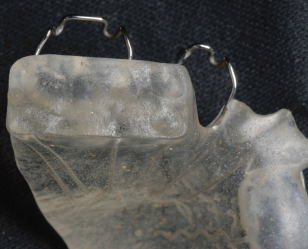
An appliance that has been worn shows signs of wear: either tooth marks on the acrylic (if biteplanes/capping have been included in the design) or tarnishing of the metal components. An appliance that still has completely clear acrylic with no signs of occlusal wear (and whose wire-work is still very shiny) has not been worn appropriately (Figure 5.1).
Figure 5.1 URA with posterior capping showing wear.
It is necessary to check that the appliance is being inserted correctly by the patient and that any active components, especially palatal finger springs, are being placed on the correct side of each tooth.
If the appliance does not seat as well as it did at the fitting appointment, this is an indication that the appliance has been left out of the mouth for at least a few days, allowing teeth to move independently. This is especially the case in patients whose permanent teeth are erupting or whose teeth have been removed, allowing adjacent teeth to tip into the extraction sites.
Oral Hygiene
The standard of oral hygiene often deteriorates when an orthodontic appliance is first fitted, even though the removable appliance should be taken out during oral hygiene measures. Patients will often brush their teeth well immediately before their dental/orthodontic appointment and so it is important to check the health of the gingivae and the appliance hygiene, as well as the cleanliness of the teeth.
Gingivitis may be hidden. It is commonly occurs on the palatal/lingual gingival margins when wearing a removable appliance, especially if the appliance is not removed each time the teeth are brushed and/or oral hygiene measures are inadequate.
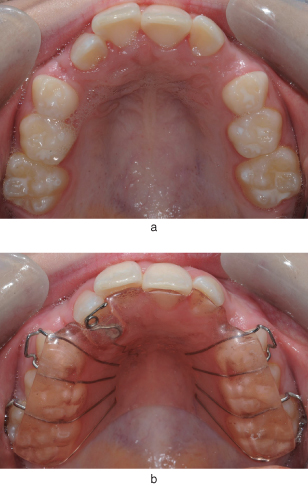
Also, the palatal/lingual gingival margins are covered by the removable appliance, which traps plaque against the soft tissue and hinders the anti-bacterial properties of the saliva from reaching the gingival margins. This also leads to more plaque build up on the palatal/lingual surfaces of the teeth, compounding the problem (Figure 5.2).
Figure 5.2 Oral health can easily deteriorate under a URA (a). Note the gingival inflammation around all the palatal gingival margins and buccally where there is also staining. The appliance associated with the poor oral hygiene is shown (b).
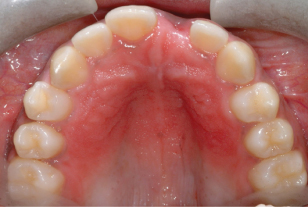
Poor appliance hygiene can be a significant problem, especially in younger patients. Plaque left on the fit surface of the acrylic baseplate not only exacerbates the gingivitis, but can cause a denture-stomatitis type of reaction to the palatal mucosa. This is due to the presence of candida species being held in contact with the palatal mucosa by the fit surface of the appliance (Figure 5.3).
Figure 5.3 A denture-stomatitis type of reaction affecting the palatal mucosa is caused by poor appliance hygiene.
Initial treatment of this condition should concentrate on improving the appliance hygiene, ensuring that the appliance is thoroughly cleaned three times per day with the patient’s toothbrush and toothpaste. With denture stomatitis from wearing a denture, the patient can be advised to leave the appliance out at night. In contrast, this cannot be advised for patients who are wearing an active orthodontic appliance, as if the appliance is left out overnight and therefore for 8-hour periods, the teeth will start moving back (relapsing) and prevent the appliance from seating properly. If the stomatitis does not resolve with improved oral hygiene, then it may be necessary to prescribe a course of topical miconazole (an anti-fungal), which should be placed on the fit surface of the appliance.
Maintenance of the Appliance
All appliances that are being worn appropriately become loose between review appointments, as described above. Therefore, at each review appointment, it will generally be necessary to increase the retention of the appliance, as detailed in Chapter 4. Obviously, any active components will require re-activation.
However, it is also important to check thoroughly the overall status of the appliance to ensure that the wire-work has not fractured and that no acrylic has been lost. This usually occurs on anterior biteplanes or posterior capping, due to the occlusal forces, but may occur anywhere on the baseplate. It is often possible just to remove any sharp edges from the acrylic, but if a large piece has fractured off an anterior biteplane or posterior capping, it may be that the appliance is no longer controlling the eruption/position of certain teeth. If this is the case, then the appliance will need to be repaired, either at the chairside using cold-cure acrylic or by a laboratory.
Any damage to the wire-work should also be assessed. Damage can occur in the form of distortion or fracture. Distortion is usually caused by the patient removing the appliance in the wrong way, e.g. pulling down on the labial bow, rather than applying a downward force on the clasps. Other reasons for distortion include: inserting the appliance with the springs in the wrong position or the appliance being sat on!
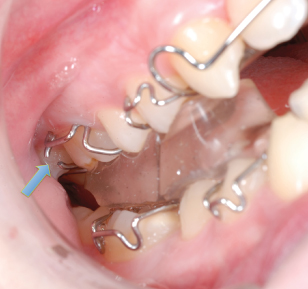
Fracture of the wire-work occurs where the metal has been work hardened due to repeated reactivation, e.g. by the arrowheads of the Adams’ clasps (Figure 5.4) or the U-loops of a labial bow, or because of repeated flexion of the wire due to occlusal trauma, e.g. the fly-overs of retentive components such as clasps and labial bows.
Figure 5.4 A fractured Adams’ clasp (arrowed).
Whenever an active, removable appliance needs to be removed to be repaired, you must remember that any teeth that have been moved will start to drift back toward their starting position within hours of the appliance being taken out. Therefore, if the appliance can be repaired to a satisfactory standard at the chairside, or there is a laboratory on site, then this is preferable to having to leave the patient without the appliance for a few days. If the appliance does need to be sent to a laboratory, remember to de-activate the active components a little before re-fitting the appliance once it returns from the laboratory.
Tooth Movement, Both Wanted and Unwanted, and Adjustments
In order to be certain that tooth movement has occurred appropriately, it is essential to compare the patient’s dentition at each visit with the pre-treatment study models and to note details of the:
- Overjet
- Overbite
- Canine and molar relationships
- Size of any spaces (this includes measuring spaces and checking they are not closing during space maintenance)/open bites
- Transverse relationships – depending on what movement you are trying to achieve.
However, it is very important to be aware of the direction in which unwanted tooth movements may occur, e.g. due to loss of anchorage, and to check thoroughly at each visit that unwanted movements are not occurring, especially if there does not appear to be any movement of the tooth/teeth that you are attempting to move with the appliance.
If such measurements are not taken regularly, assessing treatment progress becomes impossible as any developing problems will be missed; it is not appropriate to rely on one’s memory.
Adjustments at Follow-Up Appointments
Retentive components almost always need to be adjusted to increase the retention of the appliance and, obviously, active components, e.g. springs, will need to be re-activated. Always adjust the retention before reactivating the springs. However, there are other specific adjustments that are required depending on exactly what type of tooth movement you are trying to achieve.
Expansion
What to Check
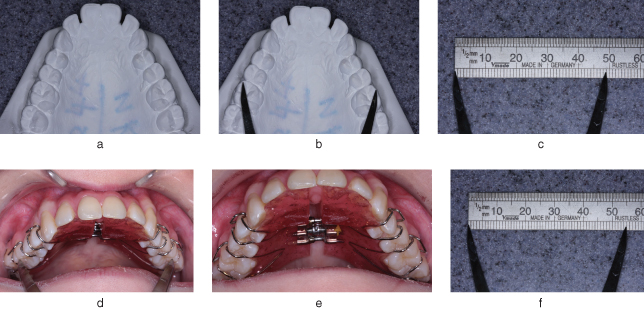
Improvement in, or correction of, the posterior crossbite is obviously a good indication that expansion has occurred. Likewise, no change in the occlusion indicates that the appliance is not being worn. However, since it is likely to take several months to correct a posterior crossbite, one needs to be able to assess whether improvements are taking place from visit to visit. This can be done by measuring the width between two obvious landmarks at each review visit. For example, the inter-molar width can be measured between the mesio-buccal cusp tips using dividers and a ruler (Figure 5.5) or Vernier divider.
Figure 5.5 When the inter-molar width is to be expanded, the amount of expansion needs to be measured at each visit. Dividers and a ruler can be used as shown here. The upper model (a) is initially measured using clear landmarks such as U6 mesio-buccal cusp widths (b). This width is measured on the ruler (c) and noted. This measurement can then be repeated at future visits (d), each width being recorded in the patient’s records. Here, expansion has progressed (e), from 49 mm (c) to 55 mm (f).
Trouble-Shooting
The following need to be checked when all the indications are that the patient has been wearing the appliance, yet there has been minimal improvement in transverse discrepancy since the patient was last reviewed:
- That the patient is turning the expansion screw in the right direction, by the correct amount and the requested number of times per week. It is possible to check all of these by turning the screw backward yourself and counting how many turns you are able to make, e.g. if you have asked the patient to turn the screw twice per week and it is 6 weeks since you last saw them, then you should be able to turn the screw backward by 12 1/4 turns. If you cannot, then you should question the patient and/or parent/guardian regarding the activation. It is also advisable to ask the patient and/or parent/guardian to demonstrate to you how they are turning the screw. You may be surprised. Also, the split in the baseplate should have opened by a set number of millimetres, calculated by multiplying the number of 1/4 turns of the screw made by the patient by 0.25 mm (the amount of expansion per 1/4 turn). So, in the example above, the split in the baseplate should have widened by 3 mm.
- Whether the lower arch has expanded as well. If posterior capping was included in the design to disengage the occlusion, then this should not happen. However, it is very straightforward to check whether this has happened by measuring between two clearly defined points on the study models, e.g. the mesio-buccal cusps of the lower first permanent molar teeth, and comparing this with the same measurement taken in the patient’s mouth. The measurement should be the same in the mouth as on the study models. If the measurement in the mouth is greater than on the study models, then some expansion of the lower arch has occurred and you need to check for occlusal interferences in the transverse dimension.
- Whether the appliance has been left out for any reason and some relapse of the expansion has already occurred. This will be very apparent as the appliance will not fit properly because it will be wider than the dentition. The reason that the patient has stopped wearing the appliance needs to be investigated thoroughly, as, if the reason persists, compliance with wear will continue to be poor.
- It is unlikely that anchorage will be lost in expansion cases as anchorage is usually reciprocal.
Next Stage
If the expansion is going well and the patient is compliant, then all that is necessary at this stage is to determine whether further expansion is required to fully correct the crossbite. It is always useful to overcorrect if possible, because a little bit of relapse of the tooth movement is to be expected. If further expansion is required, then the patient should be asked to continue turning the screw once or twice per week.
Moving Teeth Around the Arch
When teeth are being moved around the arch, they are usually being tipped, either mesially or distally, into a space, so that as the teeth move, the space relocates. However, it is very easy to lose anchorage when teeth are being moved in this way, especially if more than one tooth is being moved at any one time in the same direction. Therefore, it is imperative that the position of the anchor teeth and overjet are also checked at every review appointment.
What to Check
Good indications that the teeth are being moved in the appropriate manner are:
- The teeth to be moved are in a different position in the mouth from on the study models.
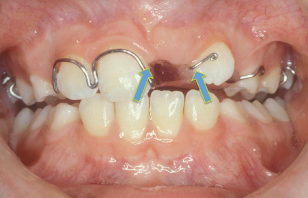
- Measure the space you are moving the tooth into. Depending on what is planned, of course the space should get smaller or larger at each visit. Again this movement can be measured with dividers and a ruler or Vernier dividers. Figure 5.6 shows a space being opened and demonstrates the gap to be measured:
- There is now more space apparent behind the tooth
- There is an increased tip on the tooth, in the direction of movement
- There has been no movement of any of the other teeth that are in contact with the appliance (the anchor teeth).
Figure 5.6 In this case, a URA is being used to retract UL2 out of the UL1 space. In order to assess progress, the space between UR1 and UL2 (arrowed) should be measured with dividers at each visit.
All of the above indicate that the appliance has been worn well by the patient and that the amount of force delivered by the active component is appropriate.
Trouble-Shooting
However, if the above points are not evident and you are certain that the patient’s compliance with your instructions has been good, then you need to consider if the force applied by the active component has been too large? If so, the tooth to be moved is likely still to have moved, albeit in a step-wise rather than continuous manner. This is due to the occurrence of hyalinisation in the periodontal ligament followed by undermining resorption of the alveolar bone. This may take 10–14 days. During this time period the tooth is prevented from moving, but the force from the active component continues to be dissipated to all the other teeth in contact with the appliance (the anchor teeth), but in the opposite direction. If the threshold force level required for tooth movement is exceeded, then the anchor teeth will move.
Example: Consider the case of a removable appliance to distalise UR2, UL1 and UL2 to re-create space to allow the eruption of UR1 (design shown in Figure 3.4). If the combined force placed on these teeth exceeds the force threshold for movement on the anchor teeth (because either excessive force levels are being used or too many teeth are being moved at the same time), then the following effects will be seen:
- The space between UR2 and UL1 will have increased. If this is the only thing that is checked, then this can give the erroneous impression that the treatment is going well.
- The space distal to UR2 and UL2 will have decreased significantly.
- The overjet will have increased.
- The molar relationship will have become more Class II.
These effects are all due to loss of anchorage, with the anchor teeth moving in the opposite direction to the teeth to be moved. Once anchorage has been lost, rescuing the situation is very difficult.
Next Stage
Assuming tooth movement is progressing as planned, then the following adjustments need to be made to the appliance:
- Adjust the retention as necessary, ensuring that the arrowheads of the clasps do not impinge on the gingivae.
- Check that there is no hindrance to further tooth movement in the form of acrylic collets, wire-work or the occlusion.
- Check that palatal finger springs can still move freely and that there has been no distortion.
- Re-activate the springs by the required amount.
- Check that the springs are still adapted around the tooth appropriately.
- As the last check, ensure that the appliance is comfortable for the patient and that the patient can still remove and insert the appliance appropriately.
You may wish to refer to Chapter 4 for a recap on activation and adjustment of clasps and springs.
If anchorage has been lost, resulting in a change in molar relationship and an increase in overjet, then you will need to ask for the advice/services of a specialist orthodontist (see later). If things are not going well, it is best to seek advice early. Do not just leave things to get worse.
Moving Teeth Labially
What to Check
Anterior crossbites are often treated very quickly (in 3 or 4 months) in a compliant patient and when the treatment has been planned appropriately. This is because appliances of the sort shown in Chapter 2 (see Figure 2.2) automatically eliminate the mandibular displacement by disengaging the occlusion, leaving the teeth to move only a small distance for a positive overjet to be achieved. Teeth that hav/>
Stay updated, free dental videos. Join our Telegram channel
VIDEdental - Online dental courses


