7 Surgical Protocol
The placement of an immediate dental implant offers unique challenges to the surgeon compared to placement at other time points following tooth extraction. These issues have been addressed by numerous authors over the years, yielding a “basic” surgical protocol with universally accepted pre-requisites for successful osseointegration (Gelb 1993; Lazzara 1993; Schwartz-Arad and Chaushu 1997; Chen, Wilson, et al. 2004; Chen, Beagle, et al. 2009). Regardless of the site being treated, the morphology of the extraction socket is essential in the placement of an immediate dental implant and affects the clinician’s choice of flap designs, implant size selection, achievement of primary stability, necessity for hard tissue grafting, and whether to submerge or non-submerge the implant during healing. The violation of these basic tenets for immediate implant placement may result in a significant complication, and the surgeon may find the site best treated using a different timetable following tooth extraction. This chapter will focus on the salient aspects of the immediate placement technique and offer special considerations for sites requiring unique challenges.
PRE-SURGICAL PREPARATION
No variation from the standard protocol for non-immediate placement is instituted pre-surgically. The patient should begin with a broad-spectrum antibiotic 24 hours prior to treatment and continue for a period of 10 days post-surgery. One hour prior to treatment, the patient should be given an anti-sialagogue to reduce salivary secretions, as well as a non-steroidal anti-inflammatory. Prior to delivering a local anesthetic to the site, the patient should rinse with chlorhexidine for 30 seconds and the extraoral tissues should be scrubbed and prepped from nose to chin using an antimicrobial scrub such as Betadine. In situations in which the patient is quite anxious, or when the surgical procedure is to be lengthy, the use of an oral, IM, or IV sedation should be considered. Local anesthesia using lidocaine 2% in an epinephrine concentration of 1:100,000 or 1:50,000 should be utilized for those patients having no allergies to the medication. Delivery of the anesthesia should be via infiltration to the surgical area. Block style anesthesia methods should be avoided, especially in the mandibular posterior sextants.
INCISION DESIGNS
The majority of sites treated will benefit from a full-thickness flap design as opposed to a flapless technique (Figures 7.1–7.6). Flapless techniques should only be employed when there is a favorable zone of attached gingiva, there are low esthetic demands, and the site has been assessed radiographically with a cone beam CT scan indicating favorable clinical conditions such as intact, thick facial boney walls. Anterior and posterior sites can be treated with minimal horizontal flap extension that can often be limited to only the tooth being replaced by the implant. It is generally necessary to utilize a vertical releasing incision into the mesial or distal papilla to gain access to the site and inspect the buccal plate for any dehiscence or fenestration defects. Bilateral vertical releasing incisions are suggested in sites where flap advancement is desired for a submerged or semi-submerged healing approach. This is often the case in the esthetic zone to allow for overcontouring of the buccal profile using soft and/or hard tissue grafting.
Figure 7.1 Pre-op buccal view of tooth #10 placement for extraction and immediate implant placement.
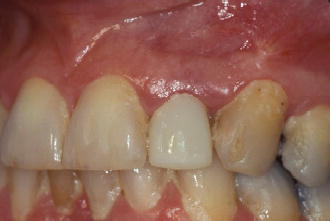
Figure 7.2 Pre-op radiograph of tooth #10.
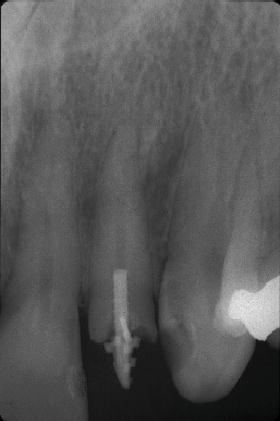
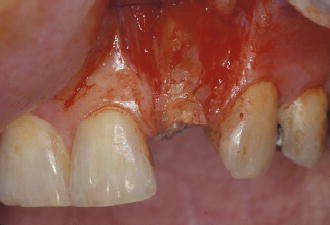
Figure 7.3 Pre-op of tooth #10 with crown removed.
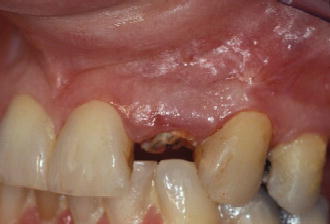
Figure 7.4 Pre-op occlusal view of tooth #10.
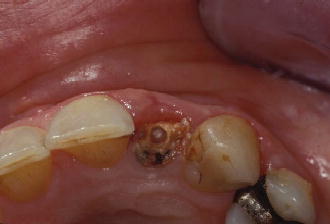
Figure 7.5 Initial incision design for full-thickness flap elevation.
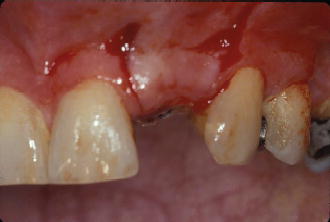
Figure 7.6 Full-thickness buccal flap elevation illustrating root surface fenestration.
TOOTH EXTRACTION
One of the keys to successful immediate implant placement is to minimize trauma to the site during the extraction process (Figures 7.7 and 7.8). In a previous chapter, a variety of methods were discussed regarding extraction protocols and instrumentation. All teeth should be viewed as either a single root or multiple single roots, as in the case of maxillary first premolars and all molars. As such, multi-rooted teeth should be sectioned into separate roots prior to removal in an effort to avoid trauma to the hard tissues. No universal method of tooth removal is suitable for all teeth, and the clinician must rely upon his or her level of experience when dealing with particularly difficult sites. Quite often, the extraction phase of the treatment may require the greatest percentage of treatment time to preserve the site for immediate implant placement.
Figure 7.7 Buccal view of tooth #10 site following extraction with a periotome.
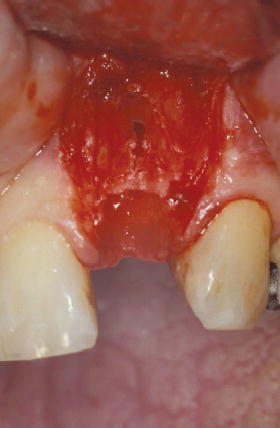
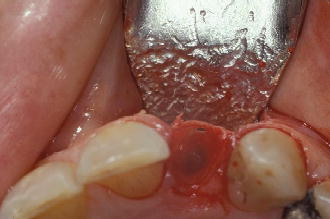
Figure 7.8 Occlusal view of tooth #10 site following extraction with a periotome.
SITE PREPARATION
Following the extraction, the site should be thoroughly degranulated and all remnants of fibers and soft tissues removed with curettes and/or low-speed rotary instrumentation using a round diamond bur, with copious chilled irrigation (Figures 7.9–7.12). Using a series of depth gauges of various diameters, the site should be inspected and a determination made as to whether the implant can be successfully positioned into an ideal prosthetic relationship with primary mechanical stability. The morphology of the extractions socket will give the clinician guidance as to the length and diameter of implant to be chosen to obtain primary mechanical stability. In almost all situations, there will be both a vertical and horizontal defect between the implant and socket walls following placement.
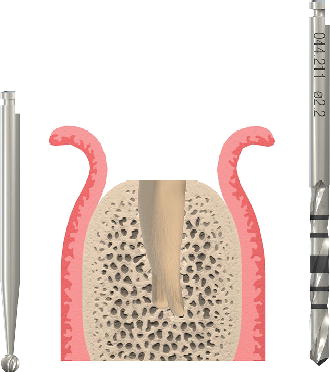
The preparation of the osteotomy should follow the sequence of round burs, pilot drills, twist drills, and profile drills as recommended by the given manufacturers. All mechanical preparations should be performed using handpiece speeds of <800 RPM with copious irrigation using chilled saline. For maxillary incisors and maxillary cuspids, it is paramount to direct the preparation along the palatal wall of the extraction socket and initially engages bone 2–3 mm coronal to the root apex. If this guideline is not followed, the implant will be positioned too close to the labial plate, potentially resulting in a poor esthetic outcome due to loss of crestal bone and associated marginal tissue recession. Proper positioning of immediate implants in the maxillary second premolar and the mandibular incisors, cuspids, and premolars directs the initial preparation toward the root apex. For multi-rooted teeth, it is desirable to initiate the osteotomy preparation into the inter-root septum. In all instances, the axial orientation of the preparation should allow for a direct screw-retained restoration with the access located in the cingulum of anterior teeth or central fossae of posterior teeth, or alternatively, a cemented restoration using a stock abutment without modifications.
Figure 7.9 Try-in of 2.2 mm depth gauge before osteotomy.
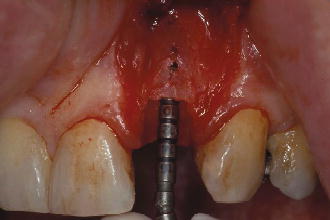
Figure 7.10 Try-in of 2.8 mm depth gauge before osteotomy.
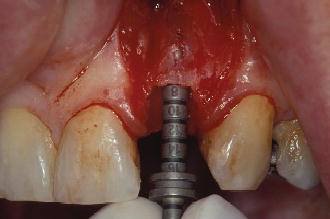
Figure 7.11 Try-in of 3.5 mm depth gauge before osteotomy.
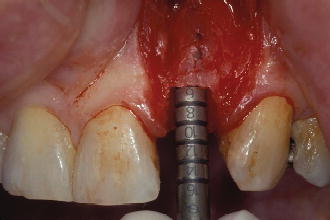
Figure 7.12 Diagram of round bur/pilot drill penetration location into extraction socket. Images courtesy of Straumann USA, LLC, its parents, affiliatesor subsidiaries.© Straumann USA LLC, all rights reserved.
The depth of the osteotomy should allow for primary mechanical stability to be achieved and position the restorative platform 2–4 mm from the cervical of the planned restoration (Buser, Martin, et al. 2004). The use of a surgical guide generated from a laboratory wax-up can greatly help in the 3-D positioning of the implant at the time of surgical preparation.
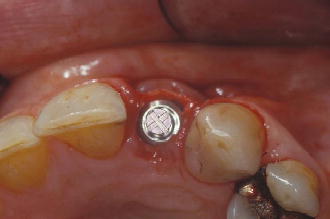
Figure 7.13 Occlusal view of immediate implant placement for tooth #10.
IMPLANT SELECTION
Care should be taken to avoid the placement />
Stay updated, free dental videos. Join our Telegram channel
VIDEdental - Online dental courses


