CHAPTER 7
Functional Occlusion and Stability
“If nature is given a fair chance to right herself, she will return to the normal standard of mathematical and mechanical precision.”
—William G. A. Bonwill
This chapter discusses the general concepts of occlusion, not the detailed functional occlusion addressed by temporomandibular joint (TMJ) and prosthetic specialists.
The general concepts of canine-protected articulation, anterior guidance, and centric occlusion versus maximal intercuspation are built into our bracket placement and anterior/posterior sagittal skeletal correction (see chapters 7 and 8 of volume 1 of this series). The challenge is to achieve all these goals in the finished result in addition to long-term stability.
Functional Occlusion
After all these years of research and clinical experience, much controversy regarding final functional occlusion still exists. This controversy, states John Kois, “makes us realize that we really do not have solid evidence-based science to help us make decisions.”1 Some “occlusionists” state that to have ideal occlusion, the patient must have a canine-protected articulation. In my practice, however, we have long-term patients who were finished in various occlusions, including patients finishing with Class I, II, or III molar occlusions as well as canine functions in Class I, II, or III occlusions. These various patients had no breakdown of hard or soft tissues, no TMJ dysfunctions, and positive and stable long-term orthodontic results.
Glenn DuPont summarizes functional occlusion in a simple and yet dynamic way: “Two points of similarity are that teeth should fit evenly, with no one tooth hitting higher. When moving laterally, anterior teeth should take over and posterior teeth should disocclude.”2
Mechanics
To be able to finish the patient in a close-to-ideal occlusion, each bracket, when accurately placed, is designed to produce the ideal tooth position. Considerations while placing the brackets include bracket height, rotational corrections, labiolingual offsets, molar rotations, and proper torque positions. The more accurate the initial bracket placement, the better the finished occlusion.
Ideal occlusion, as I understand it, begins with canine-protected articulation. After the arches are leveled at the end of treatment, a “canine rise” will be created during lateral excursions if proper canine-bracket placement was performed at the beginning of treatment.

Fig 7-1 (a to c) Intraoral views of ideal occlusion.
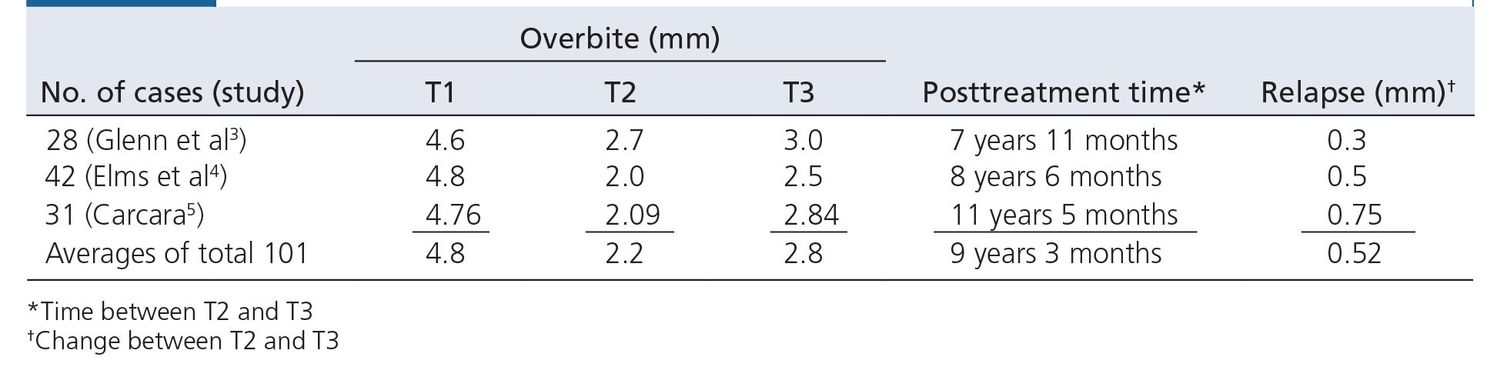
Table 7-1 Long-term overbite relapse as shown by pretreatment (T1), final (T2), and posttreatment (T3) measurements of overbites
After bracket placement, a series of archwires position the teeth and eventually create the final arch form in the maxillary and mandibular arches. Proper posterior torque will ensure no balancing interferences. Proper anterior guidance is achieved by creating specific curve of Spee in both maxillary and mandibular finishing archwires.
In the meantime, orthopedic appliances such as the facebow or face mask, if needed, will help coordinate the two arches skeletally. Normally, the last 6 to 8 months of treatment include the wearing of various intraoral elastics in order to achieve proper centric relation and final intercuspation (see chapter 16 of volume 1 of this series). Class II elastics can achieve a balanced centric occlusion–centric relation relationship during these last months, and maximal intercuspation (Fig 7-1) is then achieved through the use of finishing elastics. The final overbite is approximately 2 mm. The long-term overbite relapse, as shown in three studies of our patients,3–5 falls between 0.3 and 0.75 mm (Table 7-1).
Finishing elastics
After everything possible has been done to move the teeth and jaws into their proper positions and we are almost ready to remove the braces, one more thing needs to be accomplished. By spending an additional 6 weeks using finishing elastics, we are putting the icing on the cake, the finishing touch for a great result. The very light forces of the finishing elastics combined with muscular occlusal forces guide the teeth into their own physiologically ideal positions. I feel strongly that the following procedure is the best way to obtain the final buccal occlusion because it allows the teeth themselves, as opposed to a lab technician, to determine their final positions. This procedure can be called vertical driftodontics.
The procedure begins by sectioning archwires. Archwires are cut distal to the canines, and the posterior section of wire is removed, leaving only a canine-to-canine segmental archwire. Occasionally, if a maxillary canine is still slightly “high,” the wire may be cut mesial to it. The mandibular arch is sectioned in a deep bite case, and the maxillary arch is sectioned in an open bite case. If the original overbite was normal, either or both arches could be sectioned.
There is a special elastic attachment for each specific malocclusion. The size of the elastic used is ¾ inch (2 oz), and only this elastic is used. The patient is asked to wear the elastics 24 hours a day. As aforementioned, the goal of this procedure is for final posterior settling, and it usually takes place during the last 6 weeks of active treatment.
Soft tissue profile
Orthodontic treatment will almost always affect the patient’s soft tissue profile. Because the lips “drape” the ante-
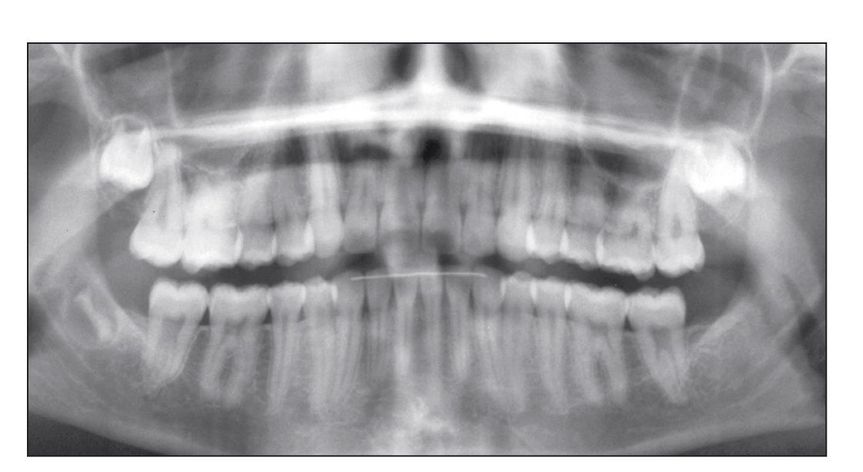
Fig 7-2 Panoramic radiograph showing excellent anterior root positions.
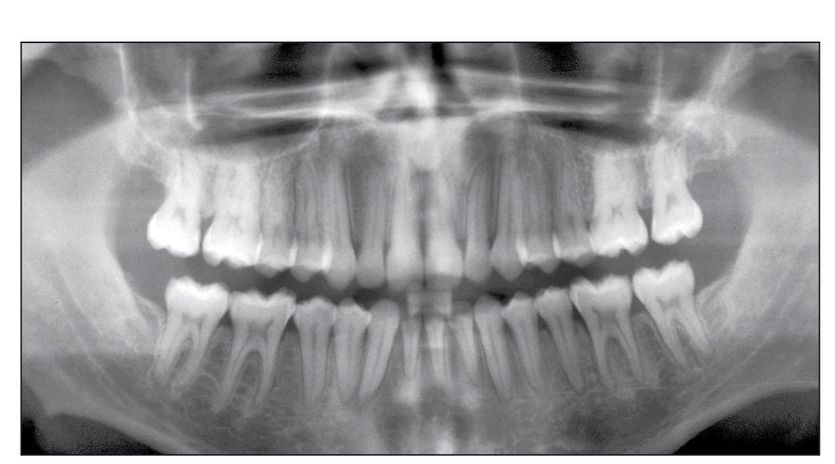
Fig 7-3 Root angulation when one incisor is missing.
rior teeth, the angulation of the incisors (interincisal angle) as well as the anterior and posterior position of these teeth will determine the final position of these teeth and lips. This will have a profound influence on the soft tissue profile.
According to Holdaway, the ideal profile can be determined by drawing a line touching the soft tissue pogonion and the upper lip (Holdaway C, personal communication, 2011). If this line also touches the tip of the lower lip and bisects the nose, the result is considered an ideal soft tissue profile for white people. Chapter 8 expands on this subject.
Long-Term Stability Goals
Five specific goals must be met in order to achieve long-term stability in orthodontic treatment:
- Control incisor mandibular plane angle (IMPA) (see chapter 4)
- Control mandibular intercanine width (see chapter 6)
- Spread roots of mandibular anterior teeth
- Level mandibular arch
- Perform interproximal enamel reduction on mandibular anterior teeth canine to canine (see volume 1)
The first two goals are addressed elsewhere in the book. Goals three and four are explained here. For a discussion of interproximal enamel reduction, see volume one of this series.
Root positioning
Anterior teeth
Proper root positioning of the anterior teeth serves two functions. First, by diverging the maxillary roots, the patient’s smile will be esthetically more pleasing. And second, although there is no evidence as of yet, I believe that when the maxillary lateral incisor roots are tipped more distally, these teeth are also more stable.
Evidence. In 1985, Raleigh Williams proposed that when mandibular anterior teeth were spread apart, there would be no need for mandibular retention.6 However, when I looked at my own mandibular anterior teeth, I found that the straight lateral incisor was also parallel to the canine while the root of the opposite lateral incisor was tipped mesially and the crown was rotated. These two observations led to the change in mandibular canine-to-canine root positions in our bracket prescription (see chapter 7 of volume 1 of this series).
Mechanics. Properly bonding Alexander brackets in the mandibular canine-to-canine position and then using a 17 × 25 stainless steel (SS) finishing archwire will automatically spread the roots apart (Fig 7-2).
Exceptions. This procedure is performed on every patient in our practice. The only alteration would occur when only three incisors will be in the final arch. In this situation, the middle incisor is placed with no angulation (0 degrees) and the two lateral incisors are placed at 4-degree angulations. The canine brackets are then placed in their regular angulation of 6 degrees (Fig 7-3). However, because there are no preangulated brackets with this prescription, this bracket placement must be performed by hand.
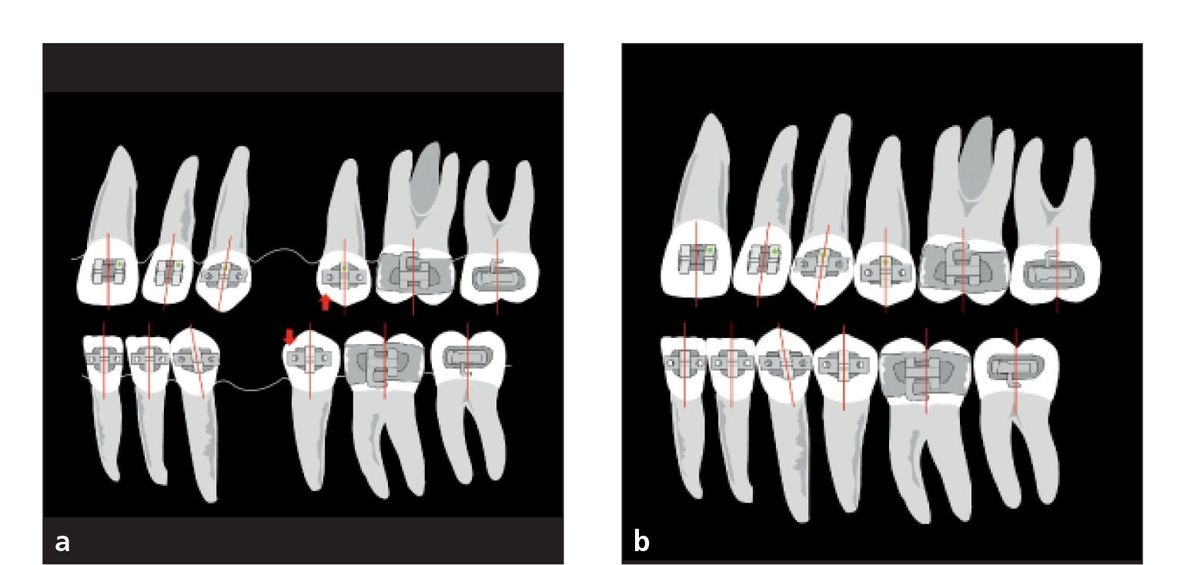
Fig 7-4 Bracket angulations with first premolar extractions change the angulation of only the second premolar by–3 degrees (arrows). (a) Pretreatment. (b) Posttreatment.

Fig 7-5 Bracket angulations with second premolar extractions change the angulation of only the first premolar by +3 degrees (arrows). (a) Pretreatment. (b) Posttreatment.
Premolar extraction site
Dr Tweed taught us to parallel the roots as premolar extraction sites were closed (Figs 7-4 and 7-5). The purpose was to maintain marginal ridges with the remaining posterior teeth, which may improve periodontal health in the area. If roots are not parallel but tipped into the extraction site, it is more difficult to clean the plaque from the adjoining teeth, therefore increasing the tendency for periodontal problems.
Because the teeth adjacent to extraction sites tend to tip toward the extraction space, causing the roots to tip, the brackets in extraction cases are specifically angulated to avoid root tipping. In first premolar extraction, for example, the second premolar bracket is angulated by–3 degrees. Chapter 7 of volume 1 of this series provides more information about bracket and root positioning in extraction treatment.
Mandibular first molar
Mandibular first molars should be uprighted in relation to the remaining mandibular teeth. This is accomplished in all malocclusions except open bite cases because the uprighting of first molars in an open bite case will open the bite even more.
Historically, the Tweed technique taught us to prepare anchorage. This was accomplished by making tip-back bends in the mandibular archwire to give the first and second molars an uprighted, tipped-back position. The major purpose was to preserve anchorage or prevent the molars from coming forward when using Class II elastics.
In my initial graduate order of brackets and bands (1964), I asked for the–5-degree torque for mandibular incisor brackets and–6-degree tip-back angulation on the mandibular first molar bands. The plan was to eliminate two steps in wire bending when preparing anchorage. So,
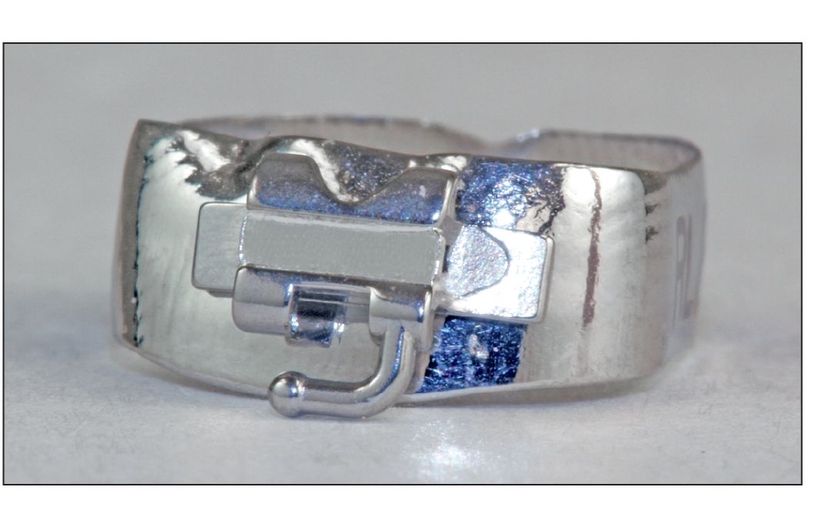
Fig 7-6 Prewelded first molar band with–6-degree angulation.
I only needed to tip back the second molar with the archwire.
As chance would have it, early in my career, I became very busy and forgot to tip back the archwire for the mandibular second molar, but because of the pretipped first molar band, all my finished cases had the mandibular first molar upright and the second molars level.
I also noticed at this time how simple it was to level the mandibular arch in deep bite cases. But how was it different from how we were trained in school? Was it the 0.018 slots, the smaller archwires, or the interbracket space? These were the mechanics I had changed from graduate school. Finally, it occurred to me that only the mandibular first molar with that–6-degree angulation was being uprighted. This also forced the extrusion of the mandibular premolars, which helped in leveling the arch. Later, we would learn that this first molar uprighting would also be stable and improve the stability of the curve of Spee in the mandibular arch.
Mechanics. The mandibular first molar bracket is prewelded to the band with a–6-degree tip (Fig 7-6).
Exceptions. As mentioned previously,–6-degree angulations should not be used in open bite malocclusions because this uprighting of the molars would cause premature contacts with the maxillary molar and thus open the bite even further. Instead, use 0-degree angulation of the bracket on the tube, or angulate the band to eliminate the–6-degree tip.
Marginal ridges. Going back to our training in general dentistry, we are expected to keep marginal ridges parallel with each other when finalizing the arch. When the mandibular first molar is tipped back 6 degrees, it is impossible to keep the marginal ridges even with the adjacent teeth.
So the logical question is: Is it really important to have parallel marginal ridges? In my opinion, there are two desirable reasons for keeping the marginal ridges uneven. First, when the mandibular first molars are tipped back with the archwire during treatment, this will automatically extrude the premolars, thus helping to level the mandibular arch. The Elms et al4 and Bernstein et al7 studies showed the long-term stability of the first molar uprighting.
The second reason to keep the first molar marginal ridges uneven is to resist mesial drift. A generally accepted theory suggests that posterior teeth are normally angulated in such a way that they will drift mesially over a long period of time. This concept is often quoted as a reason that anterior teeth tend to crowd with age.
Leveling the mandibular arch in deep bite treatment
One of the most common malocclusions treated in the orthodontic office is low-angle, deep bite occlusions. Early in my career, this problem was very difficult to solve using Tweed tip-back bends. While in school and in the clinic, I remember my chairman, Dr Westfall, showing me an alternative to tip-back bends: a reverse curve of Spee in the mandibular archwire. And suddenly it was like a light being turned on in my brain.
With the combination of the–6-degree angulation on the first molar and the use of reverse curve in the archwire, leveling the mandibular arch became simpler. During these early years, much trial and error ensued to finally determine the correct amount of curve to use depending on the size of the archwire and the severity of the patient’s curve of Spee. I also quickly noticed that if the archwire was not tied back, the mandibular incisors would flare.
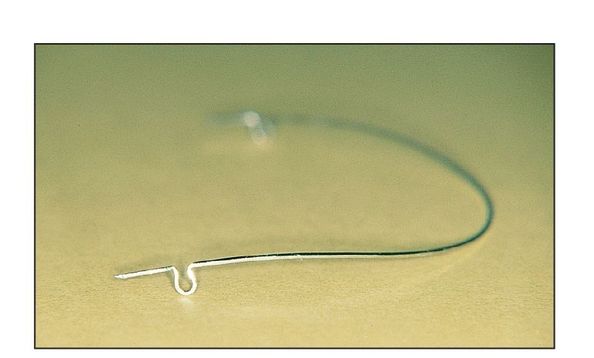
Fig 7-7 Curve of Spee in archwire.

Fig 7-8 Archwire not fully engaged.
Measuring the curve of Spee
When a straight line is drawn from the mandibular incisal edges to the occlusal cusps of the second molars, the space between the line and the mandibular first premolar cusp tips measures the amount of curve in the mandibular arch. The ideal goal is to eliminate this space, making the curve 0 degrees. In combination with maxillary arch treatment, the patient’s final overbite should be approximately 2 mm.
Evidence
The best way to determine the success of deep bite treatment is to measure the long-term stability of a patient’s overbite correction (see Table 7-1).
Two of the great studies to come from the Room of Truth were those of Carcara5 and Bernstein et al.7 They found 31 deep bite patients who had been out of treatment an average of 11 years 5 months. The major discovery was that using our bracket system and reverse curve in the mandibular arch allowed the mandibular premolars to extrude and remain stable in the long term.
Mechanics
Placement of the curve. In SS and titanium-molybdenum alloy (TMA) archwires (0.016, 16 × 22, and 17 × 25), the curve is placed just mesial to the omega loop and is extended to the distal side of the canine in both maxillary and mandibular archwires. In SS wires, the curve is created by sliding the wire over the index finger (Fig 7-7).
Amount of curve. The amount of curve placed in the maxillary archwire is dependent on (1) the overbite and (2) the patient’s smile line. If the patient has excessive soft tissue showing (gingival display) when smiling, a larger curve is placed in the maxillary archwire. In the opposite situation, if a patient reveals only part of the clinical crown when smiling, the maxillary archwire will receive no curve; often some reverse curve will be placed. The correction of the overbite in these patients is accomplished mainly in the leveling of the mandibular arch.
When the time comes to place the curve in the archwire, the patient is first asked to smile. Rarely, in such a case, will he or she give a full, natural smile. This could result in a false appraisal. To rectify this problem, the “Gucci Gucci” technique is used. The orthodontist asks the patient to smile, scratches the patient behind the ear, and says, “Gucci Gucci.” The result will always be a full smile, and the orthodontist will be able to determine the proper amount of curve to place in the archwire.
In the maxillary arch, the average curve placed in a 0.016-inch SS archwire is normally 5 to 6 mm. This curve can be measured by placing the archwire in the molar tubes without fully engaging the archwire in the anterior brackets. In the mandibular arch, the anterior portion of the archwire should be approximately at the gingival line (Fig 7-8) or about 5 mm from the bracket slot. The same amount of curve can also be placed in a 16 × 22 SS wire. However, when a significant curve is placed in a 17 × 25 SS wire, more care must be taken because this wire has much greater stiffness. The amount of curve placed in the SS wire will be replicated almost 100% in the arch. When I first started incorporating a curve in this archwire, I was taking deep bites and almost turning them into open bites by placing too much curve in the archwire. It was often necessary to remove the archwire to reduce the curve.
Exceptions
Regardless of the amount of anterior overbite, if there is no contact of the anterior teeth and if the incisal edges of the mandibular incisors are not touching the lingual surface of the maxillary incisors, a subtle open bite is present (Schudy F, personal communication, 2011). Although a positive overbite is present, these patients usually have a more normal mandibular curve of Spee and may even exhibit a high-angle pattern. When an orthodontist encounters this particular situation, he or she should be very careful in placing a reverse curve in the mandibular archwire. The space between the anterior teeth may be the result of a tongue thrust. If too much curve is created in the wire, the tongue can accentuate the force of the wire and create an open bite very quickly (see Case 9-4).
A good rule to follow is to never place curve of Spee in the archwire if the mandibular arch is already level. Instead, the wire should be flat with no curve. This condition will be routinely present in open bite malocclusions.
Conclusion
The argument against using a reverse curve in mandibular archwires is that it flares the mandibular incisors as it levels. This can happen if round rather than rectangular archwires are used. Four factors must be considered in leveling the mandibular arch:
- Torque of–5 degrees must be placed in the 0.018-slot mandibular incisor brackets.
- Angulation of–6 degrees must be placed in the mandibular first molar brackets.
- Only rectangular archwires should be used.
- The archwire is tied back using omega loops or posts.
With this prescription, the molars upright distally while the torque controls the incisors. This places an extrusive force on the premolars, causing them to extrude (or erupt) and aids in leveling the arch without flaring the incisors.
By controlling each tooth with full archwire engagement (rather than segmented arches), positioning of the teeth within the arch form is completed much faster. Most important, Carcara5 and Bernstein et al7 showed that the use of this approach in resolving deep bite malocclusions is proven to be stable.
Stay updated, free dental videos. Join our Telegram channel
VIDEdental - Online dental courses


