Emergency Airway Management in the Traumatized Patient
Airway-related medical interventions have been documented for centuries. The Bible contains references to airway interventions dating back as far as 850 BC.1,2 More recently, in 2007, the National Confidential Enquiry into Patient Outcome and Death published a report regarding trauma care in the United Kingdom. The study found that although 19.8% of patients presented noisy or blocked airways, the failed intubation rate for prehospital intubations was 12%.3 Another study, from 2010, focused on the airway management of combat-injured patients in Operation Iraqi Freedom. Although the effectiveness of body armor has improved, the head and neck regions are often unprotected and susceptible to serious injury. The high-velocity, penetrating trauma associated with war only adds to the difficulty of securing a patent airway in these patients. Of the 196 patients in the study, 68% of them had potentially lifesaving airways placed.4 This high percentage reinforces the priority of the airway and the role of a head and neck or airway specialist in times of trauma.
Despite recent major medical advancements, the basic priorities and principles of airway management remain the same. The American College of Surgeons Advanced Trauma Life Support (ATLS) ABCDE mnemonic is as follows: A, airway maintenance with cervical spine protection; B, breathing and ventilation; C, circulation with hemorrhage control; D, disability, the neurologic status of the patient; and E, exposing or undressing the patient to facilitate a complete physical examination.5 This chapter focuses on the first two steps.
Systematic Approach to Airway Management
The approach to airway management in the patient who has suffered from trauma is as follows:
1. Initial assessment: Recognize airway obstruction.
2. Perform airway maneuvers, clear the airway, and reposition the patient
3. Use artificial airways, and perform bag-valve-mask ventilation
Initial Assessment: Recognition of Airway Obstruction and Breathing
The primary goal of the initial assessment is to determine if the injuries sustained have compromised the airway and/or breathing in the patient (Figs. 5-1 and 5-2). A failure to recognize the need for an airway or the inability to establish an airway can lead to death.6 Injuries that result from direct airway trauma are dynamic and require frequent reexamination (Tables 5-1 and 5-2). A standard “look, listen, and feel” approach is often used to identify breathing difficulties.
Table 5-1
Causes of Airway Injury Specifically Related to Maxillofacial Trauma
| Unstable facial fractures | Hemorrhage |
| Soft tissue swelling and edema | Displacement of larynx and trachea |
| Smoke inhalation | Airway burns |
| Hematoma | Head injury, reduced consciousness |
| Aspiration caused by fractured teeth, bone fragments, vomitus, blood, debris, foreign body obstruction |
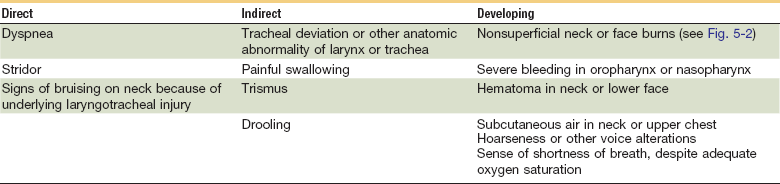
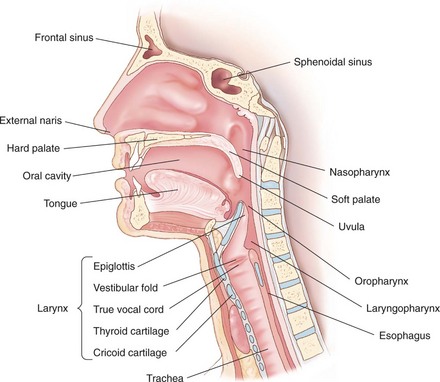
FIGURE 5-2 Airway damaged by burns.
Look. Patients with a compromised airway tend to sit upright because they do not tolerate the supine position well. A look of panic or terror may accompany obvious breathing irregularities such as gasping, retraction, heaving, quick but shallow breaths, and large gulping breaths. Anxiety or agitation may be a sign of hypoxia and the patient should be treated as such until proven otherwise. Obtundation, on the other hand, may be a sign of hypercapnia and the patient’s quality of air movement should be examined. The oropharynx should be inspected using a light source and tongue blade to evaluate injuries and to clear the airway of blood, emesis, secretions, loose teeth, bone fragments, or foreign bodies.6,11–13
Listen. A quick test of airway patency is to have the patient describe the injury. If they are able to speak clearly and coherently, in full and nonlabored sentences, the patient is unlikely to require immediate airway assistance. Chest sounds should be noted to determine the quality of air flow. It should be assumed that an unresponsive patient has a compromised airway until proven otherwise. Obstruction of the airway causes noisy breathing such as stridor, gurgling, or wheezing. Foreign body upper airway obstruction, secretions in the airway, soft tissue damage, and respiratory tract irritation are all potential causes of an obstructed airway.10,11,14
Feel. It is of importance to feel for facial fractures, soft tissue swelling, subcutaneous air in the neck, laryngeal tenderness, and dental injuries during the primary assessment. Additionally, all blunt trauma patients should be assumed to have a cervical spine injury until examinations show otherwise. In the absence of imaging studies, a trauma patient can be cleared of a cervical spine injury if they exhibit the following6,11:
In cases in which the patient is neurologically unstable, the cervical spine must be immobilized until further examinations can clear the patient of such an injury.12
Assessing for Potentially Difficult Laryngoscopy
The clinician must be able to quickly determine the potential for a difficult airway in each patient before choosing the best intubation method (Fig. 5-3). The inability to recognize general characteristics associated with a difficult airway can lead to a failed airway. The mnemonic LEMON describes a series of physical evaluations that assist in determining the difficulty of the airway9,15:
L: Look externally. What is the general impression of the airway? Is there any unusual anatomy or facial trauma that should be considered?
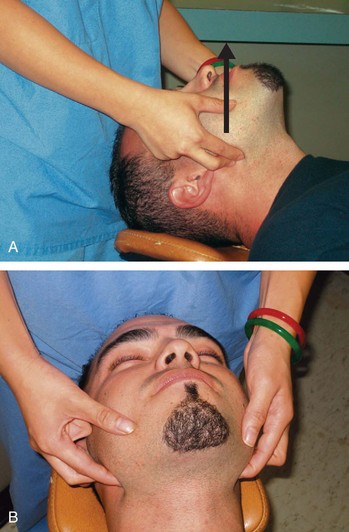
E: Evaluate (3-3-2 rule). Take note of the following measurements: mouth opening, mandible size, and distance between the mentum and hyoid bond. If these measurements are not represented in the 3-3-2 relationship (Box 5-1), the possibility for a difficult laryngoscopy remains (Fig. 5-4).
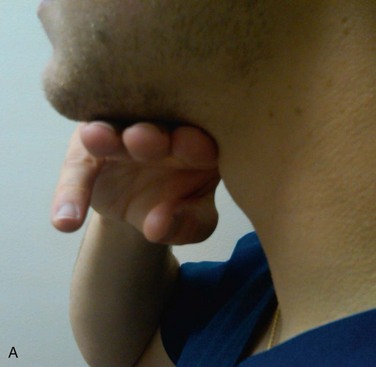
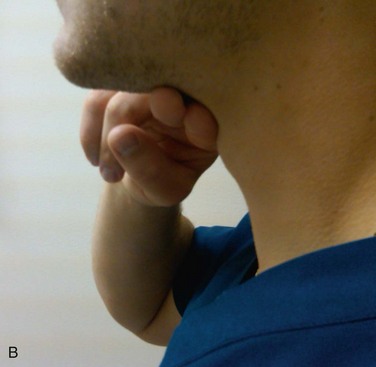
FIGURE 5-4 3-3-2 rule. A, Three fingers are placed along the floor of the mouth beginning at the mentum. B, Two fingers are placed in the superior laryngeal notch.
M: Mallampati score. This assessment serves as a predictor for difficult intubation. By estimating the space for oral intubation, in addition to determining the mouth opening and the size of the tongue, the Mallampati score gives clinicians another tool for assessing potentially difficult airways. There are four classes:
Classes I and II on the Mallampati spectrum should result in an easy laryngoscopy. Difficulty should be expected with class III; the most extreme cases of difficult airways are class IV (Fig. 5-5).
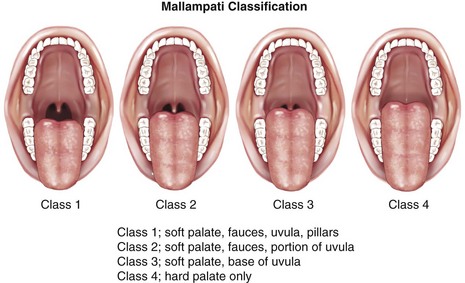
FIGURE 5-5 Mallampati classifications.
In cases of severe trauma or unconsciousness, when the patient is unable to assist in the Mallampati assessment, the clinician should use a laryngoscope blade or tongue blade and attempt to open the mouth and examine the tongue-to-oropharynx ratio. If this test shows a large tongue to oropharynx ratio, a difficult laryngoscopy should be anticipated.9,15
O: Obstruction, obesity. An upper airway obstruction can block access to the airway and make it difficult to view the glottis. In obese patients, the extra tissue layers in the upper airway make direct laryngoscopy more challenging.
N: Neck mobility. Because maxillofacial trauma patients are assumed to have a cervical spine injury until otherwise cleared, the patient may not be able to maintain the proper positioning for an intubation. If possible, patients are put in the sniffing position prior to intubation. In cases of cervical spine immobilization during intubation, the view of the glottis is limited. Neck mobility is also limited in patients with severe rheumatoid arthritis and ankylosing spondylitis.
Beyond the LEMON test, other potentially difficult situations include airway burns, notable facial trauma with bleeding and swelling of the soft tissues, and patients with previously difficult intubations. Securing an airway in trauma patients is vital and clinicians must anticipate these potentially complex scenarios before they occur to increase the chances of maintaining a successful airway.9,15
Airway Maneuvers and Adjuncts
Basic Maneuvers
Once it has been determined that an airway is obstructed because of maxillofacial trauma, basic airway maneuvers are used (Fig. 5-6). The most basic airway maneuvers are the chin lift and jaw thrust. In the case of an unconscious patient, these simple techniques may be enough to restore the airway if the obstruction was caused by the tongue or relaxed upper airway muscles. Severe fractures of the mandible can also cause the tongue to become displaced posteriorly, leading to an obstructed airway.6,16,17
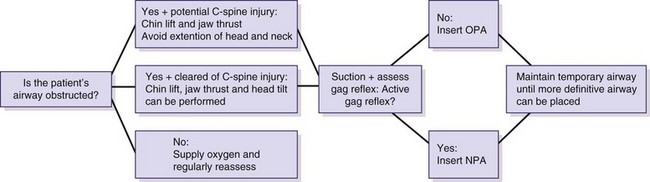
In a patient who has not been cleared of a cervical spine injury, these maneuvers must be done without significant neck extension. The chin lift (Fig. 5-7) is performed to open up the hypopharynx. It is done with two fingers under the point of the chin and jaw while the soft tissue is lifted forward. The jaw thrust (Fig. 5-8) is performed with the physician behind the patient. The knuckles of the index fingers are placed behind the angle of the mandible on each side, and the physician’s thumbs apply pressure on the cheek bones at the same time that the jaw thrust lifts and displaces the mandible forward. The jaw thrust without head extension is especially important in cases of suspected spinal injury.6,10,16,18
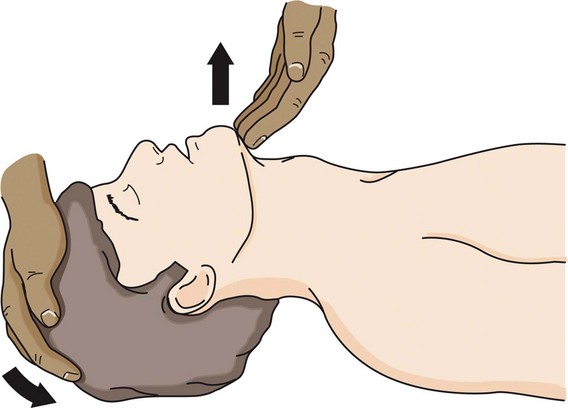
The chin lift and head tilt (see Fig. 5-7) can be performed if the patient has been cleared of a cervical spine injury. These can be done by grasping the mandible and lifting up while rotating the occiput caudad.6
The suctioning of debris such as broken teeth or bones, other foreign objects, or secretions should be completed once the basic maneuvers have been performed. This is done carefully to avoid gagging a conscious patient, which could lead to vomiting and a more serious situation. 10
Adjuncts
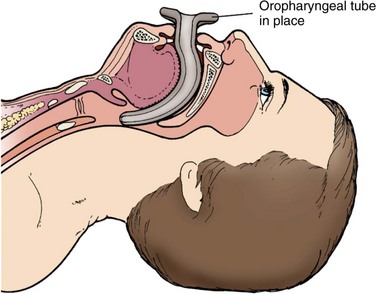
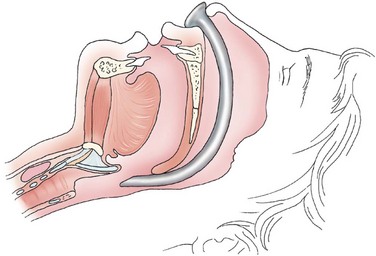
Oropharyngeal (Fig. 5-9) and nasopharyngeal airway devices (Fig. 5-10) can be effective in temporarily maintaining the airway in a patient, but these adjuncts are not considered definitive airway management. Rather, these devices are used until the patient is ready for intubation.6,11
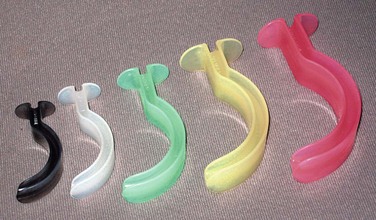
The oropharyngeal airway (OPA) should be used in a patient who lacks an active gag reflex. In adult patients, the size of the OPA is measured so that it reaches from the mouth angle to the ear lobe. When placed in the mouth, the OPA (Fig. 5-11; see Fig. 5-9) is inserted upside down and turned 180 degrees once it reaches the level of the uvula (Table 5-3). This technique helps the device to push the tongue down anteriorly and away from the posterior pharyngeal wall. It should be emphasized that the most critical part of the assessment is the presence or absence of the gag reflex. If the reflex can be stimulated, do not use the oropharyngeal airway.6,10,11,16
Table 5-3
Technique for Placement of Oropharyngeal Airway
| Step | Instructions |
| 1 | Use suction to clear mouth of secretions and assess gag reflex; if no gag reflex present, then continue. |
| 2 | Select OPA size; OPA should be measured so that it stretches from the corner of the mouth to the angle of the mandible. |
| 3 | Insert device upside down so that it curves upward. |
| 4 | Rotate OPA into proper position so that tongue is pulled forward and away from pharynx. |
Adapted from references 6, 10, and 11 and American Heart Association: ACLS advanced cardiovascular life support provider manual: Professional. Chicago, 2011, American Heart Association.
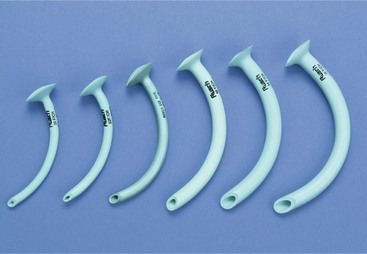
An alternative to the oropharyngeal airway is the nasopharyngeal airway (NPA). The NPA provides a passage of airflow between the nares and pharynx and can be used in patients who are conscious or semiconscious, with an intact gag reflex (Table 5-4). The device is prepped with lubricant, ideally one that contains a local anesthetic agent, before it is placed in the larger nasal passage. The length of the NPA should approximate the distance between the end of the patient’s nose and the ear lobe (Fig. 5-12). If there is slight resistance during the insertion of the device, it should be rotated slightly to allow it to pass down behind the tongue and into the oropharynx. If there is stiff resistance during device insertion, a smaller NPA should be selected to fit the patient’s nasal passage better. Because of its small size, it is not uncommon for the NPA to become obstructed. Consequently, the airway should be regularly reevaluated until an airway is definitively established.10,11,16
Table 5-4
Technique for Placement of Nasopharyngeal Airway
| Step | Instructions |
| 1 | Select NPA size. |
| 2 | Prepare NPA by applying lubricant with local anesthetic. |
| 3 | Gently insert device while passing it along the nasopharynx; slightly rotate NPA during insertion if met with light resistance. |
Adapted from references 10 and 11 and American Heart Association: ACLS advanced cardiovascular life support provider manual: Professional. Chicago, 2011, American Heart Association.
Bag-Valve-Mask Ventilation
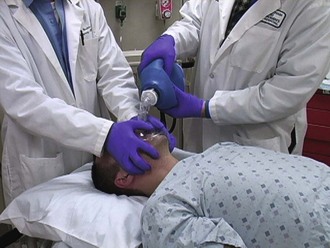
If other basic maneuvers and adjuncts are unsuccessful in maintaining a patent airway, bag-valve-mask (BVM) ventilation is performed to achieve oxygenation and ventilation for the patient.19 Bag-mask devices are the most common method of providing positive-pressure ventilation16 (Fig. 5-13). The importance of this skill cannot be understated. If done correctly, it can serve as a definitive airway in many cases. When comparing the survival rates of trauma patients who had prehospital endotracheal intubations to those who had BVM ventilations, it was found that there was no survival advantage to endotracheal intubations when the severity of their injuries were taken into account.20
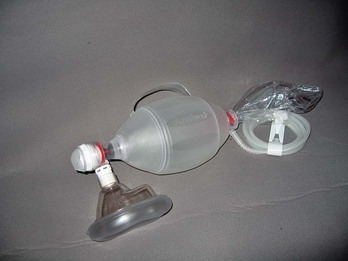
Basic airway adjuncts and maneuvers are often performed in conjunction with BVM ventilation to assist in the maintenance of the airway. This includes the use of oropharyngeal and nasopharyngeal airways, along with the jaw thrust, chin lift, and head tilt techniques. The equipment needed for proper BVM ventilation includes the bag-valve device, masks of different sizes, oxygen source, oxygen connector tubing, pulse oximeter, suction and vacuum power source, OPAs or NPAs, and water-based lubricant.21
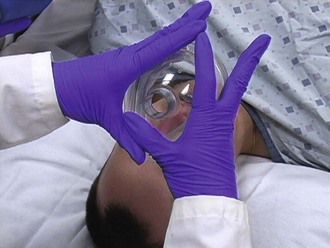
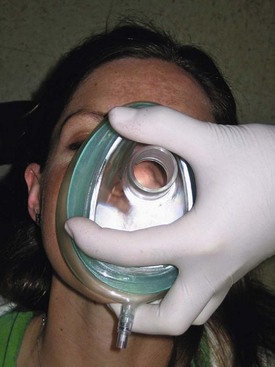
There are three main techniques for BVM ventilation. Ideally, three individuals should be assigned to this task. Because this is not always feasible, it is imperative that providers are adept at completing this alone, with one partner, or as part of a three-person team. The preferred method for BVM ventilation requires two people, and is known as the two-hand or two-provider technique (Fig. 5-14). The patient is positioned so that the ear is in line with the sternal notch.22 An OPA or NPA should already be in place and the mask size should be chosen. A correctly sized mask fits just below the eyes, does not extend past the chin, and completely covers the nose and mouth.21 This allows the mask to create a good seal and provide more effective ventilation. With two providers present, one is responsible for delivering the bag ventilations. According to the 2011 Advanced Cardiac Life Support (ACLS) guidelines, this should be done at an approximately 600-mL tidal volume to produce chest rise over 1 second.16 Gastric inflation is one major risk of BVM ventilation, but the established tidal volume of 600 mL minimizes this risk.23 The second provider should secure the mask on the patient’s face by creating a C shape with the thumb and index finger of each hand and gently pressing down on the mask. By using the remaining fingers to lift up on the mandible, the second provider can simultaneously perform the chin lift and hold the mask in place while the first provider delivers bag ventilations. In rare cases in which a third provider is available, they should supply cricoid pressure to avoid excess air in the esophagus and stomach while remaining aware of the potential for airway obstruction because of the cricoid pressure.11,21
An alternative method for the two-hand technique (Fig. 5-15) uses different hand positioning for the provider responsible for securing the mask. Both thumbs face away from the provider and run parallel to each other as the thenar eminences hold the mask against the patient’s face and the remaining fingers lift the mandible.19
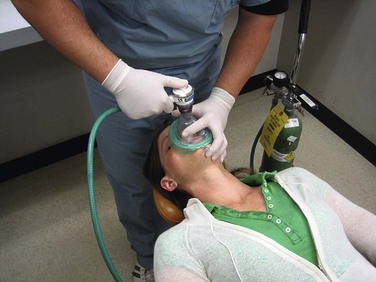
When only one provider is available, the one-hand E-C technique is used (Figs. 5-16 and 5-17). The thumb and index finger of the nondominant hand form a C shape over the mask and apply pressure. The remaining fingers lift up the mandible to perform the jaw thrust, creating the E shape.19
The mnemonic MOANS is used to identify potential difficulties with BVM ventilation (Box 5-2). It is not uncommon for providers to hyperventilate patients during BVM ventilation and extra care should be taken to avoid this whenever possible. The American Heart Association cautions that the negative impacts of hyperventilation include increased intrathoracic pressure, reduced venous return, diminished cardiac output, and decreased coronary and cerebral perfusion.24
Endotracheal Intubation
According to various studies, between 9% and 28% of trauma patients undergo tracheal intubation.25 Although the exact percentage may be debatable, the failure to secure a definitive airway in a trauma patient is undoubtedly a major cause of preventable death.3
Indications
A definitive airway consists of a cuffed tube that is secured in the trachea.26 Table 5-5 provides a list of indications that a definitive airway should be promptly secured. Providers should err on the side of caution when deciding whether or not to place a definitive airway to avoid the challenges of securing a crash airway.14
Table 5-5
Indications for Definitively Secured Airway
| Apnea | Glasgow Coma Scale score < 9 |
| Sustained seizure activity | Unstable midface trauma, maxillofacial fractures |
| Airway injury or obstruction | Cardiac arrest |
| Persistent hypoxia (SpO2 < 90%) | High aspiration risk, blood, vomit |
| Inability to obtain adequate seal with facemask; insufficient ventilation | Shock; systolic BP < 80 mm Hg |
| Anticipation of impending airway compromise | Hypoventilation |
| Inability to maintain patent airway via other techniques | Severe hypoxemia |
| Combative patient |
There are four major questions outlining the decision to perform an intubation14:
1. Is there a failure of airway maintenance or protection? A loss of airway reflexes, pooling secretions signifying the inability to swallow, and tolerance of the placement of nasopharyngeal airway or oropharyngeal airways indicate a patient’s inability to maintain and protect their airway.
2. Is there a failure of oxygenation? This is illustrated by clinical symptoms of cyanosis, obtundation, restlessness or agitation, and by low oxygen saturation as measured by a pulse oximeter. A lack of oxygen can cause irreversible damage to human tissues in only minutes.
3. Is there a failure of ventilation? This can be observed through the patient’s mental status and observing the patient’s respirations. The inability to release carbon dioxide from the body adequately leads to altered mental status and respiratory acidosis.
4. Is there an anticipated need for intubation? It is absolutely imperative that providers assess the likely progression of symptoms and anticipate impending airway compromise whenever possible.14
Contraindications
Because of the importance of securing an airway, there are few contraindications to intubation.28 The only major contraindication to intubation is the ability to maintain a patent airway in a less invasive manner.11 If it is possible to maintain a patent airway through basic adjuncts and maneuvers, advanced airway measures should be avoided. Possible cervical spine injury is not a contraindication for intubation; however, immobilization of the cervical spine should be maintained throughout the procedure in cases in which the patient’s spine has not been cleared of injury.28 There are several contraindications to specific types of intubation (see later).
Types of Endotracheal Tubes
Endotracheal tubes have many shapes and sizes. The differences in shapes may vary slightly and should be selected based on the specific type of intubation. In general, endotracheal tubes have the following characteristics: two open ends, a 15-mm adapter for a bag-valve or ventilator device, measurements on the side, a large distal port and small side port to reduce chances for occlusion, and a low-pressure, high-volume cuff.11 The cuff is in place to secure a seal with the patient’s trachea, helping minimize leakage during positive pressure ventilation. Additionally, the cuff centers the tube to avoid damaging any surrounding mucosa.29 The cuff can be safely inflated to 10 mL initially but this can be adjusted as needed. Overinflation (>30 mm Hg) of the cuff can cause mucosal necrosis and should be avoided.6
The average man will tolerate an endotracheal tube with an internal diameter of 7.5, 8.0, or 8.5 Fr. The average woman, however, requires a slightly smaller tube of 7.0 or 7.5 Fr in most cases. Tubes that are met with resistance at the vocal cords should be substituted for a smaller one to prevent tracheal damage.6
Direct Laryngoscopy
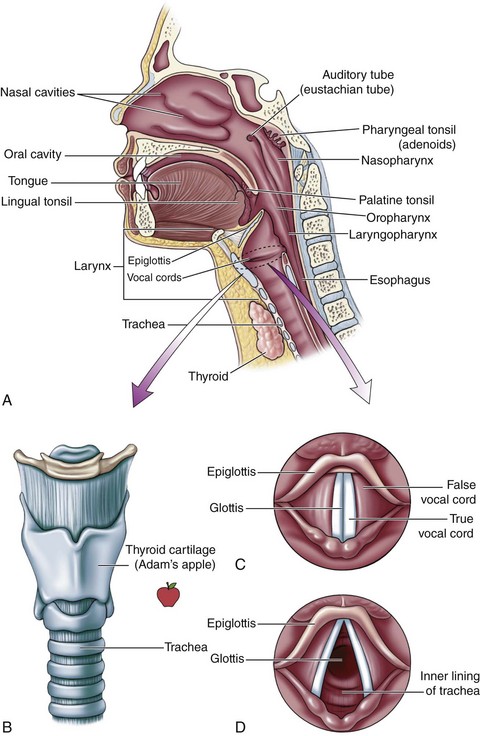
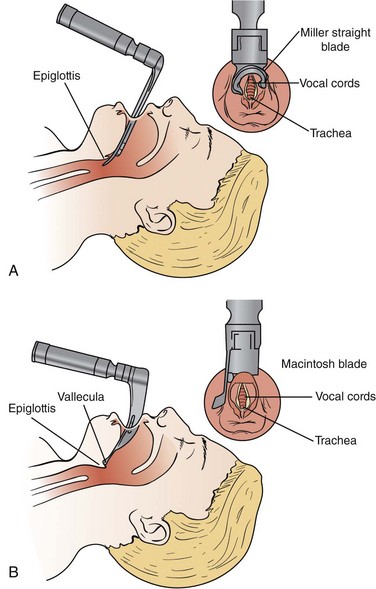
A direct laryngoscopy is a procedure that uses a short rigid instrument to deflect the tongue and jaw, allowing for a view of the larynx and the placement of a tube within the trachea.30 The epiglottis and vallecula are important anatomic landmarks to identify before performing a laryngoscopy (Fig. 5-18; see Fig. 5-3). The epiglottis, found at the base of the tongue, covers the underlying glottis; the vallecula is a cleft between the tongue and epiglottis.31
To move forward with the procedure, it is important to have the proper equipment available and easily accessible. All equipment should be checked to avoid the use of any damaged parts. The necessary equipment includes the following31:
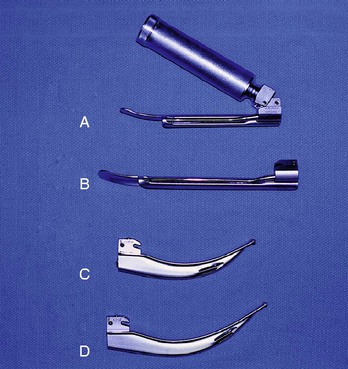
• Laryngoscope handle with various blades (Fig. 5-19)
• Endotracheal tubes of various sizes
• Oropharyngeal and nasopharyngeal airways
• Rescue airway devices—laryngeal mask airway, Combitube
• Monitors—blood pressure, heart, pulse oximeter, end-tidal carbon dioxide
A laryngoscope blade has a light source attached and can be curved (Macintosh) or straight (Miller).11 If the straight blade is used, it should be inserted under the epiglottis so that the glottis becomes exposed. Alternatively, the curved blade should be placed into the vallecula.32 The Macintosh blade tends to provide a better view in adult trauma cases.6
Positioning.
The positioning of the patient is critical during direct laryngoscopy. In a recent study, 10% of the 3400 emergent intubations performed were classified as difficult because they required multiple attempts.33 Proper positioning gives the clinician the best chance of success on the initial attempt. Experienced clinicians should expect to be successful on the first attempt in most cases. However, in difficult airways, multiple attempts may be required before the intubation is completed. Multiple intubation attempts should be avoided, when possible, because they are associated with increased morbidity in emergent situations or with cardiopulmonary instability.31
If the patient has not been cleared of a cervical spine injury, the spine must remain immobilized throughout the procedure. The front of the neck collar is often removed to improve the clinician’s view, but an assistant must stabilize the neck manually. The inability to position the patient may create a more difficult laryngoscopy.11
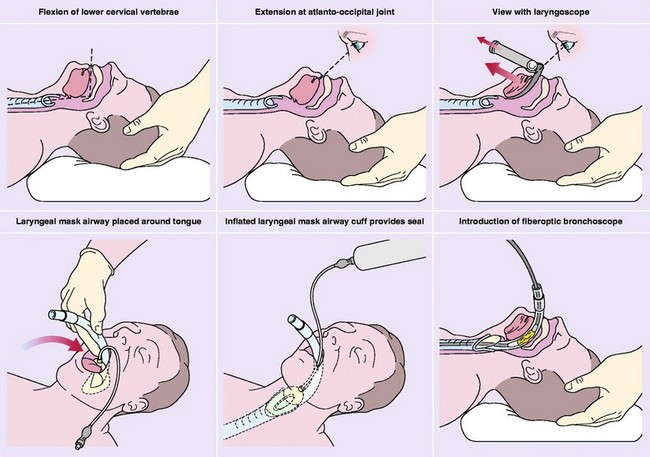
In situations in which the patient is cleared of a cervical spine injury, he or she is placed in a supine position, with an elevated head (5 to 7 cm) and flexion of the neck, to align the pharyngeal and laryngeal axes. The patient’s head is extended at the atlanto-occipital joint so that the oral axis is in line with the other two31,34 (Fig. 5-20).
Technique of Direct Laryngoscopy: Cleared Cervical Spine.
The STOP MAID mnemonic device can be used as a reminder about the steps and tools of intubations31:
T: Tools (e.g., blade, handle.)
M: Monitors (electrocardiogram [ECG], O2, CO2, blood pressure [BP])
Direct laryngoscopy begins immediately after the initial assessment is made. The assistant positions the patient’s body and opens her or his mouth while the clinician grabs the laryngoscope in the left hand. The right hand should be free to suction, manipulate the larynx, and insert the endotracheal tube.34 The curved blade is then positioned along the right side of the tongue, displacing the tongue out of sight and to the left. This allows the epiglottis to come into view so that it can be lifted to expose the glottis.32 The tongue and epiglottis are elevated as the clinician pulls the left hand up and away while keeping the elbow in close to the body. When the epiglottis is identified, the curved blade is advanced until it reaches the vallecula.11 At this time, the endotracheal tube is inserted, its placement is confirmed, and the tube is secured in place.31 The straight blade is advanced in a similar manner, but it can be advanced deeper into the hypopharynx and may be obscured by the tongue. A paraglossal technique can be performed with the straight blade to displace the tongue properly and create a better view. For this technique, the blade is inserted between the tongue and lower right molars and advanced between the tongue and tonsillar pillar until the epiglottis can be seen. At this point, the tongue is displaced laterally and anteriorly.
Confirming Tube Placement
Proper endotracheal tube (ETT) placement can be confirmed clinically by visualization of the tube passing through the vocal cords, observation and auscultation of the chest, and condensation in the ETT from exhalation.35 In many cases, this is not possible or there may be false results, so other methods must be used. The gold standard for verifying proper ETT placement is capnometry, which measures exhaled CO2 from the tube. When the ETT is positioned in the trachea, the carbon dioxide levels should not drop significantly over time. If positioned in the esophagus, however, these levels will drop continuously to near zero. False-positives can occur if the patient has recently ingested a carbonated beverage, causing carbon dioxide levels in the stomach to be higher than normal.11An esophageal detection device can also be used to verify the position of the ETT, although this device is not 100% accurate.36
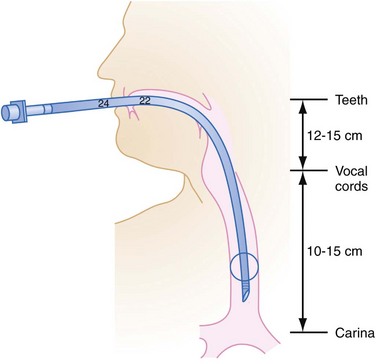
Capnometry and esophageal detection devices provide information immediately, enabling the clinician to perform another intubation if the tube is placed into the esophagus by mistake.37 The use of an ETT introducer also helps confirm proper placement of the ETT, because the rings of the trachea can be felt as the introducer tip is advanced. The introducer tip will also stop abruptly once it reaches the bronchus. If the ETT is in the esophagus instead, the tracheal rings will not be felt, and there will be no abrupt stopping point.38 A chest x-ray provides a view of the depth of ETT placement, but is unable to differentiate between the esophagus and trachea.34 The ideal depth is 5 ± 2 cm above the tracheal carina35 (Fig. 5-21).
Although all these methods are acceptable, it is important to note that a physical examination is not sufficient for the confirmation of proper ETT placement.37 Ultimately, confirmation of proper ETT placement should be done using a number of methods to be sure of the results.
Nasotracheal Intubation
In most cases of maxillofacial trauma, nasotracheal intubation is contraindicated because of the potential risk of brain injury. Fractures of the basilar skull and cribriform plate are especially susceptible to this type of injury.39 Clinicians should also avoid this procedure with pediatric patients, and those showing signs of traumatic brain injuries or rising intracranial pressure.11 On the other hand, if difficulty is anticipated with other airway techniques, and if the clinician is experienced with this method, nasotracheal intubation should be considered. When a conscious patient needs airway intervention, nasotracheal intubation may be preferred because of the patient’s active gag reflex. This technique places less pressure on the tongue and therefore leads to less gagging.32
Properly sized nasotracheal tubes are 0.5 to 1.0 sizes smaller than oral tubes. Other necessary materials include a topical vasoconstrictor anesthetic and fiberoptic bronchoscope, which is placed through the nasotracheal tube. The patient is put in the sniffing position with immobilization measures taken in case of cervical spine injury. The tube should be warm and lubricated before it is advanced into the larger naris along the nasal floor. To minimize potential damage to the Kiesselbach plexus, the bevel of the tube should face the septum.34 The tube is advanced past the vocal cords and eventually down into the larynx on inspiration, where a cough indicates proper placement. Slow and steady insertion of the bronchoscope and nasotracheal tube, along with slight rotation when needed, should be sufficient to overcome slight resistance. As with other methods of intubation, if the tube is met with stiff resistance, the tube should not be forced any further. The procedure should then be attempted through the other side or a smaller sized tube may be required.
The ideal depth of placement for a nasotracheal tube is 28 cm for men and 26 cm for women, as measured at the nares. As with orotracheal intubation, proper tube placement should be confirmed. Vocal cord sounds of any type signify a failed attempt at nasotracheal intubation, which may be modified by repositioning or rotating the tube.34
Rapid-Sequence Intubation
The standard of care for securing an emergency airway in semiconscious or conscious patients is rapid-sequence intubation (RSI).38 The success rate of this procedure by properly trained individuals is greater than 97%, according to various studies.11 RSI uses sedation and paralysis to facilitate intubation and minimize potential risks. The steps of RSI are known as the seven Ps6:
Preoxygenation.
The patient is placed on 100% oxygen through a rebreather mask for 3-5 minutes to create an oxygen reservoir in the lungs prior to paralysis. This helps KEEP the patient’s blood oxygen saturation from dropping to dangerous levels (<90%) during the intubation procedure. If the patient does not respond to the rebreather mask, a bag-valve mask device can be used instead.40,41
Premedication and Induction.
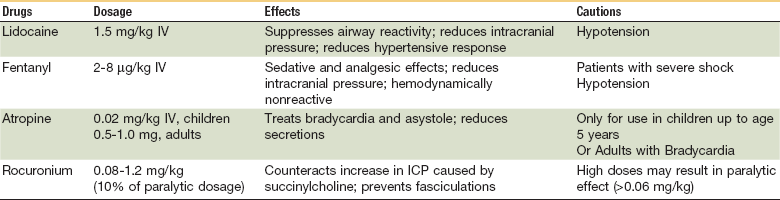
When time permits, it is optimal to administer premedication to the trauma patient prior to induction and intubation. These agents, given approximately 3 minutes before induction, have the ability to mitigate the physiologic responses associated with intubation.40 The mnemonic device LOAD is used to identify the premedication step of RSI42:
Table 5-6 details the four components of premedication. Induction begins a few minutes after the premedication agents are administered. The induction agents have a sedative effect and are given prior to the paralytic agent. The five most common induction agents will be discussed, but only one should be given during RSI. The induction agent is selected based on patient-specific characteristics.42
Table 5-6
Premedication for Rapid-Sequence Intubation
Adapted from references 40 and 41 and from Muskat PC: Emergency airway management in the traumatized patient. In Fonseca RJ, Turvey TA, Marciani RD, editors: Oral and maxillofacial surgery, ed 2, St. Louis, 2008, WB Saunders, pp 25–34.
Induction Agents
In the case of maxillofacial trauma, etomidate is the most commonly used induction agent. This hypnotic agent has a very short half-life (≈5 minutes) and is hemodynamically neutral. The proper dosage is 0.3 mg/kg IV for children and adults.43 However, because of its short half-life, administration of etomidate is typically followed by another sedative agent, such as propofol or midazolam.6 The major drawback of etomidate is that it can cause adrenal suppression. It should not be used in patients suffering from septic shock.
A dissociative anesthetic agent, ketamine is unique because of its amnestic effects in addition to its sedative and analgesic properties. It stimulates the cardiovascular system and relaxes smooth muscle, making it especially useful for patients suffering from hypotension or bronchospasms.11 The proper dosage is 1 to 2 mg/kg IV or 3 to 4 mg/kg IM.6 The major drawback of ketamine is increased intracranial pressure (ICP); therefore, it should not be used in patients with traumatic brain injury.42
This hypnotic agent is a lipid-soluble, alkyl phenol derivative, which causes sedation and amnesia. Propofol has a short half-life, reduces ICP, and has an antiepileptic effect, making it a desirable induction agent. However, it is also a myocardial depressant and is associated with significant hypotension. The proper dosage is 1 to 2 mg/kg IV bolus for children and adults.40
This benzodiazepine causes sedation and amnesia, but also has antiepileptic properties. The proper dosage is 0.1 mg/kg IV, but it is typically underdosed as a precaution for its major drawback, hypotension.40 The speed of onset varies by patient, but tends to be slower than etomidate.
An fast-acting barbiturate, sodium thiopental is known for causing deep amnesia and sedation, although it lacks analgesic characteristics. It is especially helpful for patients suffering from traumatic brain injuries because of its cerebroprotective properties.11 Drawbacks of sodium thiopental include inhibition of the sympathetic central nervous system (CNS) response, lack of availability, and hypotension. The proper dosage is 3 to 5 mg/kg IV in adults and 5 to 8 mg/kg IV in children.41
To achieve optimal intubation conditions, a paralytic agent is administered after the induction agent. Although the induction agent is a sedative with analgesic and amnestic effects, the paralytic agent causes the relaxation of skeletal muscle. Through this relaxation of the facial muscles, the clinician gets a better view during laryngoscopy, which facilitates an easier intubation and reduces the chance of complications.42,44
This depolarizing NMBA is the most commonly used paralytic. It is fast-acting, in less than 1 minute, and has a short half-life. The use of paralytics leads to an apneic patient, emphasizing that they should only be used under the administration of appropriately trained clinicians. The proper dosage is 1.5 to 2 mg/kg IV.11 There are some major contraindications to the use of succinylcholine in RSI (Box 5-3). In the presence of any contraindications, the use of succinylcholine should be avoided.
When succinylcholine is contraindicated, a nondepolarizing NMBA is used instead. The most common nondepolarizing NMBA used in RSI is rocuronium. Similar to succinylcholine, rocuronium is fast-acting and creates ideal intubation conditions, but its paralytic effects last significantly longer. Although other alternatives such as vecuronium and pancuronium exist, rocuronium is the best alternative to succinylcholine.42 The proper dosage is 1 mg/kg IV.
Cricoid Pressure.
The literature exploring cricoid pressure and its role in RSI is inconclusive. Some sources include it as a necessary step, whereas others point to a lack of definitive support and consider it optional.40 When proper technique is not used, cricoid pressure can obscure the view of the glottis, impede passage of the ETT, and prevent adequate ventilation.38 On the other hand, if it is done correctly, it can facilitate intubation and reduce potential complications.
Cricoid pressure (Sellick maneuver) is performed following induction and is maintained until the ETT is properly placed.38 One assistant performs the Sellick maneuver by using the thumb and middle or index finger to apply pressure to the cricoid cartilage. It is performed after the anterior portion of the cervical collar is removed while another assistant maintains cervical spine immobilization. There are three reasons to apply cricoid pressure6:
1. To avoid insufflation of the esophagus and stomach during BVM ventilation, which reduces the risk of vomiting and passive regurgitation. If active vomiting occurs at any time, cricoid pressure should be immediately released to prevent a ruptured esophagus.
2. To prevent passive regurgitation after induction and sedation agents are administered.
Stay updated, free dental videos. Join our Telegram channel
VIDEdental - Online dental courses


