2 DIAGNOSTIC CASTS AND RELATED PROCEDURES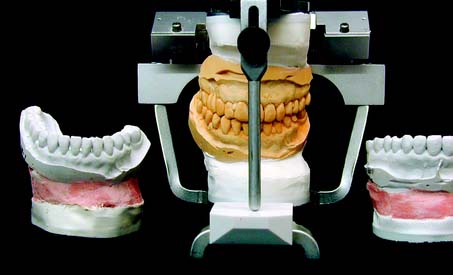
Accurate diagnostic casts (Fig. 2-1) transferred to a semiadjustable articulator are essential in planning fixed prosthodontic treatment. This enables static and dynamic relationships of the teeth to be examined without interference from protective neuromuscular reflexes, and unencumbered views from all directions reveal aspects of the occlusion not always easily detectable intraorally (e.g., the relationship of the lingual cusps in the occluded position). If the maxillary cast has been transferred with a facebow, a centric relation (CR) interocclusal record has been used for articulation of the mandibular cast, and the condylar elements have been appropriately set (such as with protrusive and/or excursive interocclusal records), reproducing the patient’s movements with reasonable accuracy is possible. If the casts have been articulated in CR, assessing both the CR and the maximum intercuspation (MI) position is possible, because any slide can then be reproduced. Other critical information not immediately apparent during the clinical examination includes the occlusocervical dimension of edentulous spaces. On an articulator, these are readily assessed in the occluded position and throughout the entire range of mandibular movement. Relative alignment and angulation of proposed abutment teeth are easier to evaluate on casts than intraorally, as are many other subtle changes in individual tooth position. Articulated diagnostic casts permit a detailed analysis of the occlusal plane and the occlusion, and diagnostic procedures can be performed for a better diagnosis and treatment plan; tooth preparations can be “rehearsed” on the casts, and diagnostic waxing procedures allow evaluation of the eventual outcome of proposed treatment.
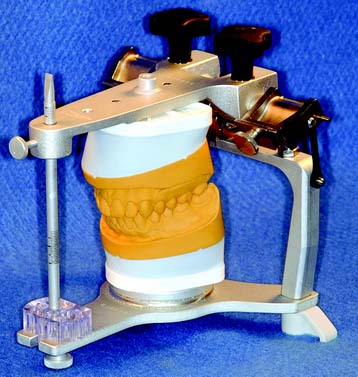
Fig. 2-1 Diagnostic casts mounted on a Whip Mix articulator.
(Courtesy of Whip Mix Corporation, Louisville, Kentucky.)
IMPRESSION MAKING FOR DIAGNOSTIC CASTS
As long as the impression extends several millimeters beyond the cervical line of the teeth, the borders of diagnostic impressions are usually not of great concern for fixed prosthodontic purposes, unless a removable prosthesis is also to be fabricated. Properly manipulated irreversible hydrocolloid (alginate) is sufficiently accurate and offers adequate surface detail for planning purposes. However, the material does not reproduce sufficient surface detail for suitable definitive casts and dies on which actual fixed prostheses are fabricated (see Chapter 17).
Diagnostic Impression Technique
Tray selection
All impression materials require retention in the impression tray. This can be provided for irreversible hydrocolloid by using an adhesive or by making perforations or undercuts around the rim of the tray. All types of trays are capable of producing impressions with clinically acceptable accuracy.1 For irreversible hydrocolloids, the largest tray that will fit comfortably in the patient’s mouth should be selected. A greater bulk of material produces a more accurate impression (i.e., a bulky impression has a more favorable surface area/volume ratio and is less susceptible to water loss or gain and therefore unwanted dimensional change). In contrast, elastomeric impression materials work well with a relatively tightly fitting custom impression tray in which a uniform thin layer of material is used. This produces the most accurate impression (see Chapter 14).
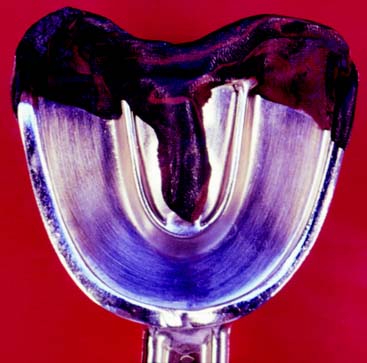
Distortion of irreversible hydrocolloid can occur if any part of the impression is unsupported by the tray or if there is movement of the tray during setting. For these reasons, the tray may need to be extended and its perimeter modified with modeling compound (Fig. 2-2).
Impression making
For optimum results, the teeth should be cleaned and the mouth thoroughly rinsed. Some drying is necessary, but excessively dried tooth surfaces cause the irreversible hydrocolloid impression material to adhere. The material is mixed to a homogenous consistency and loaded into the tray, and its surface is smoothed with a moistened gloved finger.2 Concurrently, a small amount of material is wiped into the crevices of the occlusal surfaces (Fig. 2-3A,B) before the tray is seated (Fig. 2-3C). Also, a small amount can be applied by wiping it into the mucobuccal fold. As the tray is inserted into the patient’s mouth and seated, the patient is reminded to relax the cheek muscles. If a patient continues to stretch wide open while the tray is being fully seated, impression material is often squeezed out of the mucobuccal fold or from underneath the upper lip.
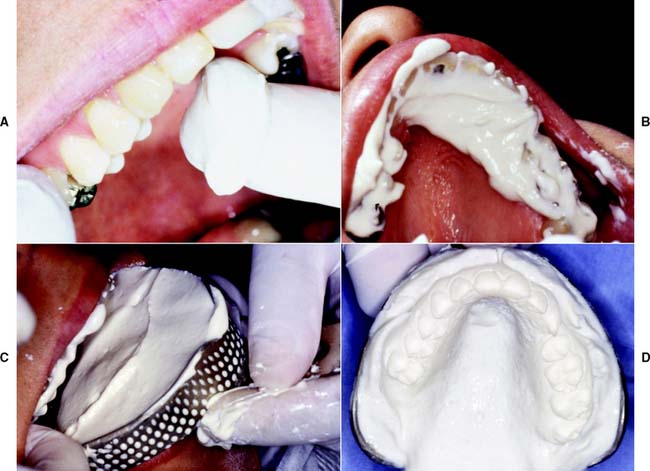
A loss of tackiness of the material (gelation) implies initial set. The tray should be removed quickly 2 to 3 minutes after gelation. Teasing or wiggling the set impression from the mouth causes excessive distortion as a result of viscous flow. Also, certain irreversible hydrocolloid materials become distorted if held in the mouth more than 2 or 3 minutes after gelation.3 After removal (Fig. 2-3D), the impression should be rinsed and disinfected, dried slightly with a gentle air stream, and poured immediately. For disinfection, spraying with a suitable glutaraldehyde and placement in a self-sealing plastic bag for approximately 10 minutes is recommended, after which it can be poured. Alternatively, the impression can be immersed in iodophor or glutaraldehyde disinfectant. The disinfection protocol is an essential precaution for preventing cross-infection and protecting laboratory personnel (see Chapter 14). It should be noted that irreversible hydrocolloid impressions carry significantly higher numbers of bacteria than do elastomeric materials.4 No significant loss of accuracy or surface detail is caused by the disinfection procedure.5,6 To ensure accuracy, pouring should be completed within 15 minutes after the impression is removed from the mouth. Keeping an impression in a moist towel is no substitute for pouring within the specified time. Trimming off gross excess impression material before setting the tray down on the bench top is helpful. A vacuum-mixed ADA type IV or type V stone is recommended. The choice of the brand of stone is important because of the harmful surface interactions between specific irreversible hydrocolloid materials and gypsum products.7
After mixing, a small amount of stone is added in one location (e.g., the posterior aspect of one of the molars). Adding small amounts consistently in the same location helps minimize bubble formation (see the section on pouring stone dies in Chapter 17). If air is trapped, bubbles can be eliminated by poking at them with a small instrument (e.g., a periodontal probe or a wax spatula). While setting, the poured impressions must be stored tray side down, not inverted. Inverting freshly poured impressions results in a cast with a rough and grainy surface.8 Stone is added to create a sufficient base that provides adequate retention for mounting on the articulator. To achieve maximum strength and surface detail, the poured impression should be covered with wet paper and stored in a humidor for 1 hour. This minimizes distortion of the irreversible hydrocolloid during the setting period. The setting gypsum cast should never be immersed in water. If this is done, setting expansion of plaster, stone, or die stone doubles or even triples through the phenomenon of hygroscopic expansion (see Chapter 22). For best results, the cast should be separated 1 hour after pouring.
Evaluation
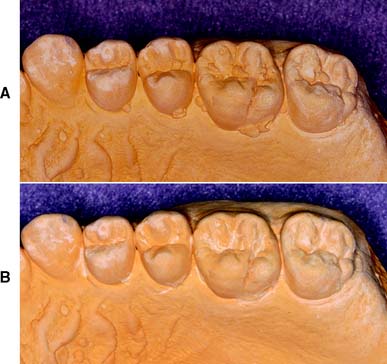
Although it is apparently a simple procedure, diagnostic cast fabrication is often mishandled. Seemingly minor inaccuracies can lead to serious diagnostic errors. Questionable impressions and casts should be discarded and the process repeated (Fig. 2-4). Voids in the impression create nodules on the poured cast. These can prevent proper articulation and effectively render useless a subsequent occlusal analysis or other diagnostic procedure.
Articulator selection
On some instruments, the upper and lower members are permanently attached to each other, whereas on others they can be readily separated. The latter instruments may have a latch or clamplike feature that locks the two components together in the hinge position. Instrument selection depends on the type and complexity of treatment needs, the demands for procedural accuracy, and general expediency. For instance, when a fixed dental prosthesis is waxed, it is advantageous to be able to separate the instrument into two more easily handled parts. Use of the proper instrument for a given procedure can translate into significant time saving during subsequent stages of treatment.
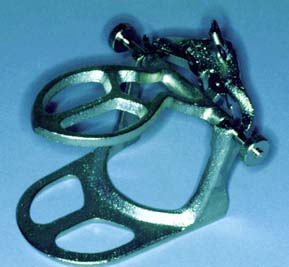
Small Nonadjustable Articulators
Many cast restorations are made on small nonadjustable articulators (Fig. 2-5). Their use often leads to restorations with occlusal discrepancies, because these instruments do not have the capacity to reproduce the full range of mandibular movement. Some discrepancies can be corrected intraorally, but this is often time consuming and leads to increased inaccuracy. If discrepancies are left uncorrected, occlusal interferences and associated neuromuscular disorders may result.
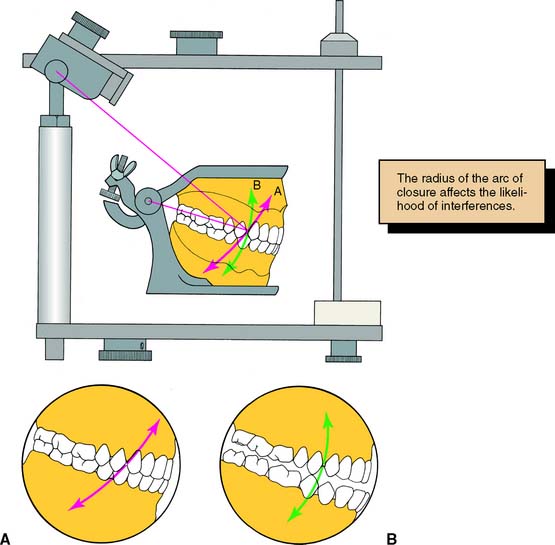
Of practical significance are differences between the hinge closure of a small articulator and that of the patient. The distance between the hinge and the tooth to be restored is significantly less on most nonadjustable articulators than in the patient. This can lead to restorations with premature tooth contacts because cusp position is affected. This type of arcing motion on the nonadjustable articulator results in steeper travel than occurs clinically, which subsequently results in premature contacts on fabricated restorations between the distal mandibular inclines and the mesial maxillary inclines of posterior teeth (Fig. 2-6).
Depending on the specific design of the articulator, ridge and groove direction may be affected in accordance with the same principle. This is important to note, because resulting prematurities are likely on the nonworking side (see Chapters 1, 4, and 6).
Semiadjustable Articulators
For most routine fixed prostheses, the use of a semiadjustable articulator (Fig. 2-7) is a practical approach to providing the necessary diagnostic information while minimizing the need for clinical adjustment during treatment. The use of semiadjustable instruments does not require an inordinate amount of time or expertise. They are about the same size as the anatomic structures they represent. Therefore, the articulated casts can be positioned with sufficient accuracy so that arcing errors are minimal and usually of minimal clinical significance (i.e., minimal time should be required for chairside adjustments of fabricated prostheses).
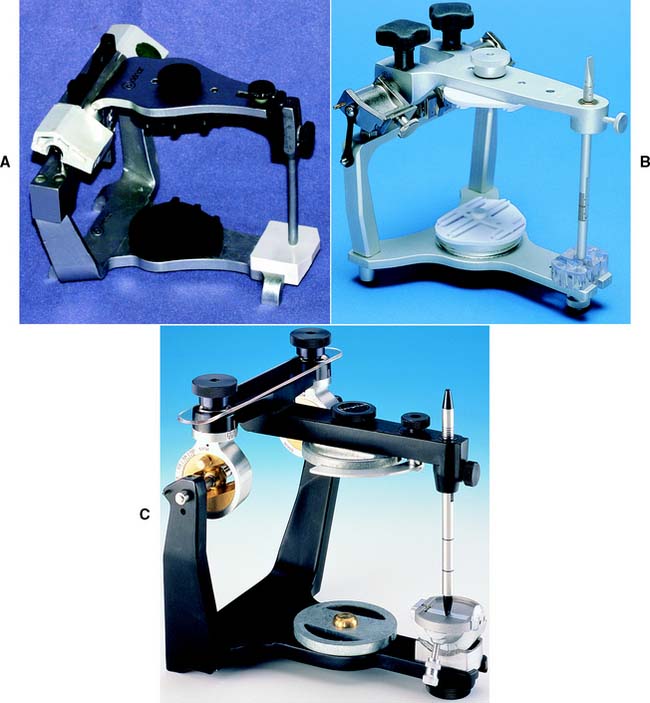
There are two basic designs of the semiadjustable articulator: the arcon (for articulator and condyle) (Fig. 2-8A,C) and the nonarcon (Fig. 2-8B,D). Nonarcon instruments gained considerable popularity in complete denture prosthodontics because the upper and lower members are rigidly attached, enabling easier control when artificial teeth are positioned. As a consequence of their design, however, certain inaccuracies occur in cast restorations, which led to the development of the arcon-type instrument.
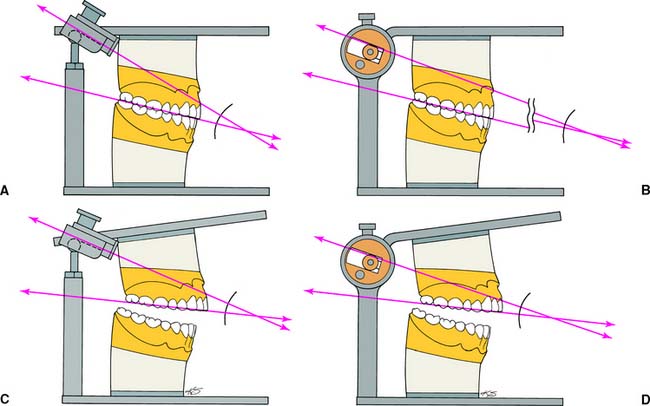
The mechanical fossae on semiadjustable articulators can be adjusted to mimic the movements of the patient through the use of interocclusal records. These consist of several thicknesses of wax or another suitable material in which the patient has closed into. Because these records can be several millimeters thick, an error is introduced when nonarcon articulators are set with protrusive wax records, because the condylar path is not fixed in relation to the maxillary occlusal plane. As the protrusive record used to adjust the instrument is removed from the arcon articulator, the maxillary occlusal plane and the condylar inclination become more parallel, which leads to reduced cuspal heights in subsequently fabricated prostheses (see Table 4-3).
Fully Adjustable Articulators
A fully (or highly) adjustable articulator (Fig. 2-9) has a wide range of positions and can be set to follow a patient’s border movements. The accuracy of reproduction of movement depends on the care and skill of the operator, the errors inherent in the articulator and recording device, and any malalignments resulting from slight flexing of the mandible and the nonrigid nature of the temporomandibular joints.
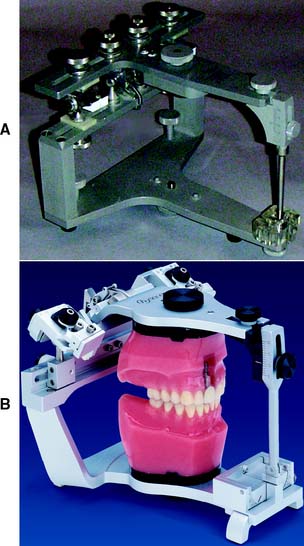
Fig. 2-9 Fully adjustable articulators. A, The Stuart. B, The Denar D5A.
(B, Courtesy of Waterpik Technologies, Inc., Fort Collins, Colorado.)
Rather than relying on wax records to adjust the instrument, special pantographic tracings are used to record the patient’s border movements in a series of tracings. The armamentarium used to generate these tracings is then transferred to the articulator, and the instrument is adjusted so that the articulator replicates the tracings, essentially reproducing the border movements of the patient. The ability of fully adjustable instruments to track irregular pathways of movement throughout entire trajectories enables the fabrication of complex prostheses, which require minimal adjustment at the evaluation and delivery appointment.
FACEBOWS
Transverse Horizontal Axis
Most facebows are rigid, caliper-like devices that allow some adjustments. Two types of facebows are recognized: arbitrary and kinematic. Arbitrary facebows are less accurate than the kinematic type, but they suffice for most routine dental procedures. Kinematic facebows are indicated when it is crucial to precisely reproduce the exact opening and closing movements of the patient on the articulator. For instance, when a decision to alter the occlusal vertical dimension is to be made in the dental laboratory during the fabrication of fixed prostheses, the use of a kinematic facebow transfer in conjunction with an accurate CR interocclusal record is indicated.
Kinematic Hinge Axis Facebow
Hinge axis recording
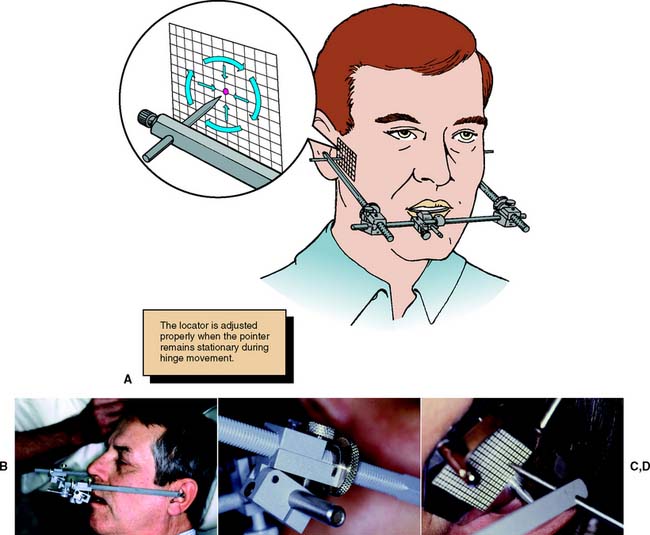
The hinge axis of the mandible can be determined to within 1 mm by observing the movement of kinematic facebow styli positioned immediately lateral to the temporomandibular joint close to the skin. A clutch, which is essentially a segmented impression-traylike device, is attached to the mandibular teeth with a suitable rigid material such as impression plaster. The kinematic facebow consists of three components: a transverse component and two adjustable side arms. The transverse rod is attached to the portion of the clutch that protrudes from the patient’s mouth. The side arms are then attached to the transverse member and adjusted so that the styli are as close to the joint area as possible. The mandible is then manipulated to produce a terminal hinge movement, and the stylus locations are adjusted with thumbscrews (superiorly and inferiorly, anteriorly and posteriorly) until they make a purely rotational movement (Fig. 2-10). Because the entire assembly is rigidly attached to the mandible, a strictly rotational movement signifies that stylus position coincides with the hinge axis. When this purely rotational movement is verified, the position of the hinge axis is marked with a dot on the patient’s skin, or it may be permanently tattooed if future use is anticipated or required.
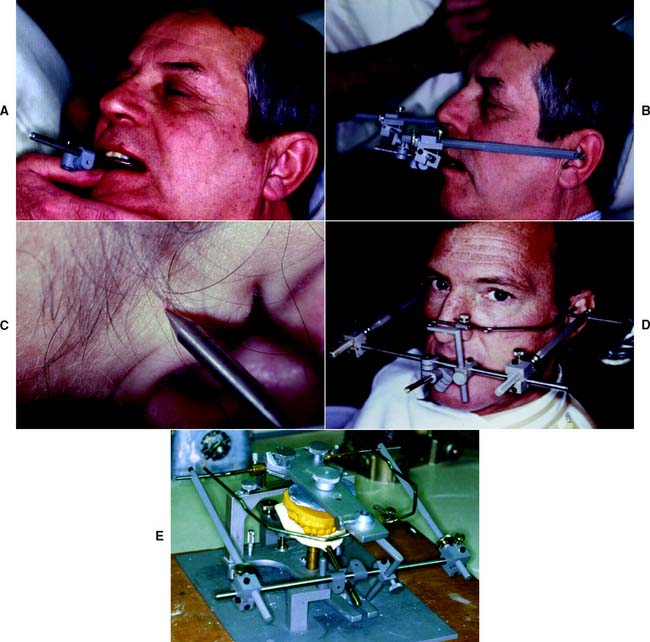
Kinematic facebow transfer
An impression of the maxillary cusp tips is obtained in a suitable recording medium on a facebow fork (Fig. 2-11). The facebow is attached to the protruding arm of the fork. The side arms are adjusted until the styli are aligned with the hinge axis marks on the patient’s skin. The patient must be in the same position that was used when the axis was marked to prevent skin movement from introducing any inaccuracy. A pointer device is usually attached to the bow and adjusted to a repeatable reference point selected by the clinician. The reference point is used later for reproducibility. The kinematic facebow recording is then transferred to the articulator, and the maxillary cast is attached.
Arbitrary Hinge Axis Facebow
Arbitrary hinge axis facebows (Fig. 2-12) approximate the horizontal transverse axis and rely on anatomic average values. Manufacturers design these facebows so the relationship to the true axis falls within an acceptable degree of error. Typically, an easily identifiable landmark such as the external acoustic meatus is used to stabilize the bow, which is aligned with earpieces similar to those on a stethoscope. Such facebows can be used single-handedly because they are self-centering and do not require complicated assembly. They give a sufficiently accurate relationship for most diagnostic and restorative procedures. However, regardless of which arbitrary position is chosen, a minimum error of 5 mm from the axis can be expected,9 as can errors in the steepness of the occlusal plane.10 When coupled with the use of a thick interocclusal record made at an increased vertical dimension, this error can lead to considerable inaccuracy.
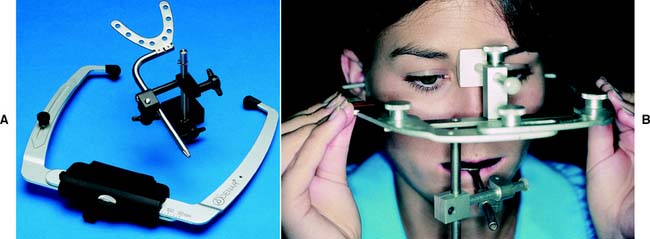
Anterior reference point
The use of an anterior reference point (Fig. 2-13) enables the clinician to duplicate the recorded position on the articulator at future appointments. This saves time, because previously recorded articulator settings can be used again. An anterior reference point, such as the inner canthus of the eye or a freckle or mole on the skin, is selected. After this has been marked, it is used, along with the two points of the hinge axis, to define the position of the maxillary cast in space. This procedure has the following advantages:
Facebow transfer
Step-by-step procedure
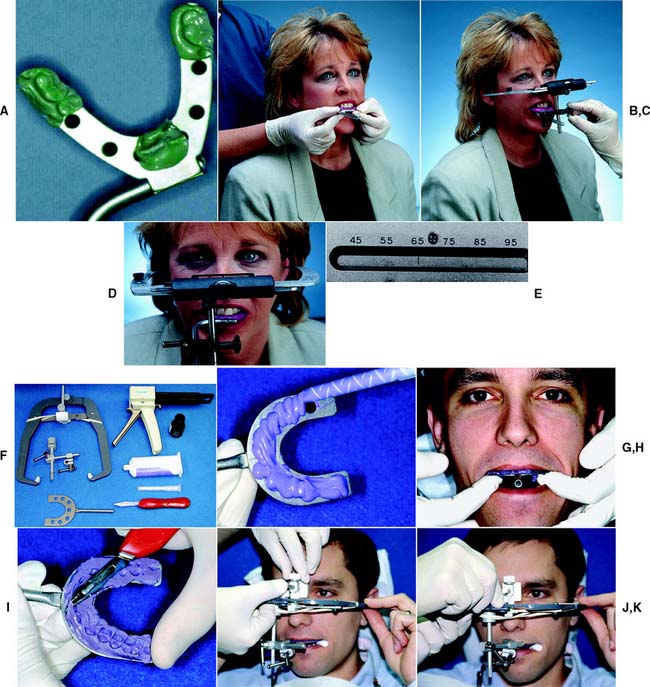
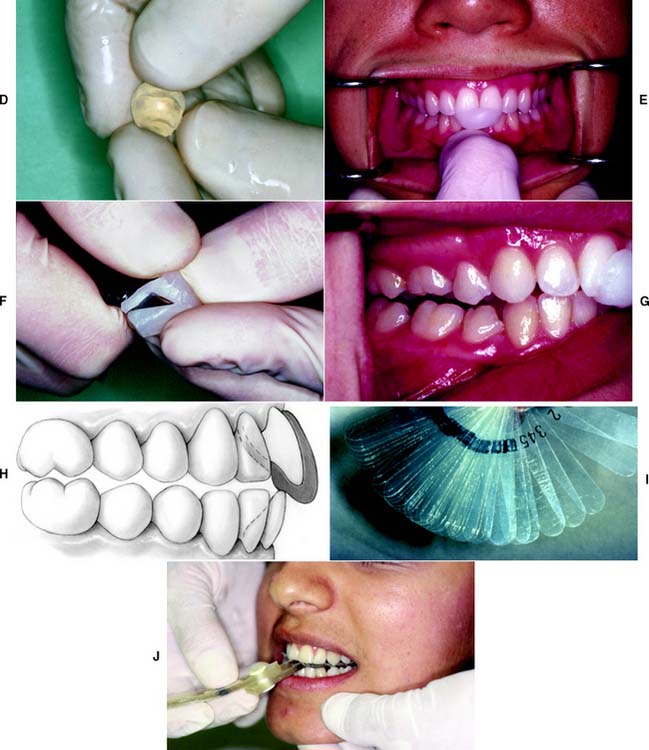
The technique is slightly different with other arbitrary facebows (Fig. 2-14F to K).
Centric relation record
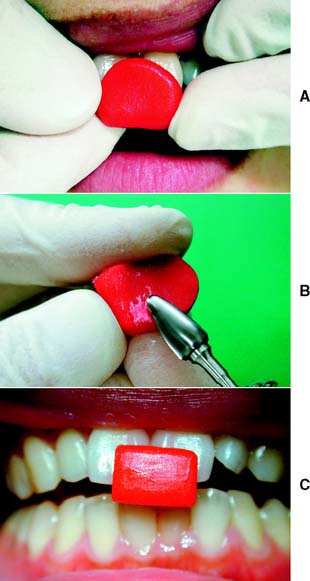
A centric relation record (Fig. 2-15) provides the orientation of mandibular to maxillary teeth in CR in the terminal hinge position, in which opening and closing are purely rotational movements. Centric relation is defined as the maxillomandibular relationship in which the condyles articulate with the thinnest avascular portion of their respective disks with the condyle-disk complex in the anterosuperior position against the articular eminences. This position is independent of tooth contact.
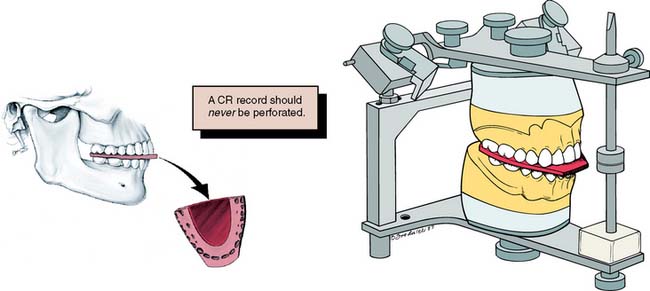
MI may or may not be coincident with the CR position. The CR record is transferred to the maxillary cast on the articulator and is used to relate the mandibular cast to the maxillary cast. Once the mandibular cast is attached to the articulator with mounting stone, the record is removed. The casts then occlude in precisely the CR position as long as the maxillary cast is correctly related to the hinge axis with a facebow (see Fig. 2-14). When the articulator controls are set properly, through the use of appropriate excursive records, translated mandibular positions can be reproduced from CR. A CR/MI slide is readily reproducible on casts that have been articulated in CR. Thus, premature tooth contacts (deflective contacts) can be observed, and it can be determined whether an occlusal correction is necessary or appropriate before fixed prosthodontic treatment. Casts articulated in the MI position do not enable the evaluation of CR and retruded contact relationships. Therefore, the articulation of diagnostic casts in CR is of greater diagnostic value.
In theory, when a kinematic facebow is used, the thickness of a terminal hinge record is unimportant; a thicker record merely increases the amount of rotation. When an arbitrary facebow is used, any arcing movement results in some degree of inaccuracy. Both techniques are subject to small errors, which can be minimized by keeping the record thin.11,12 However, it is essential that the teeth not perforate the record. Any tooth contact during record fabrication can cause mandibular translation because of neuromuscular protective reflexes governed by mechanoreceptors in the periodontium, rendering the resulting articulation useless.
Jaw manipulation
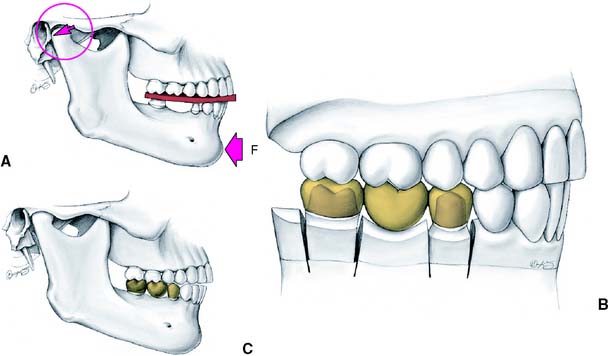
Accurate mounting of casts depends on precise manipulation of the patient’s mandible by the dentist. The condyles should remain in the same place throughout the opening-closing arc. Trying to force the mandible backwards leads to downward translation of the condyles, and restorations made to such a mandibular position are in supraclusion at the evaluation stage (Fig. 2-16).
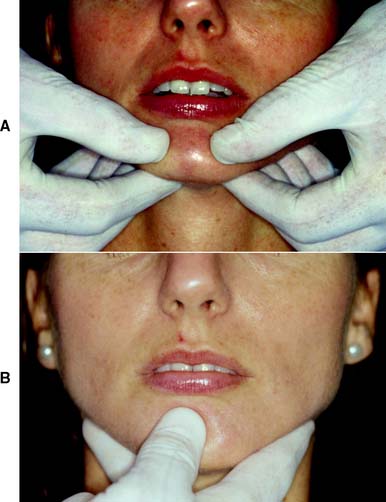
The bimanual manipulation technique described by Dawson13 is recommended as a reproducible technique14 that can be reliably learned.15 In this technique, the dental chair is reclined and the patient’s head is cradled by the dentist. With both thumbs on the chin and the fingers resting firmly on the inferior border of the mandible (Fig. 2-17A), the dentist exerts gentle downward pressure on the thumbs and upward pressure on the fingers, manipulating the condyle-disk assemblies into their fully seated positions in the mandibular fossae. Next, the mandible is carefully hinged along the arc of terminal hinge closure. Note: It is more difficult to ensure that the condyles are properly located when the single-handed approach (Fig 2-17B) is used with the fingers exerting upward pressure, although this technique does allow the other hand to hold the record.
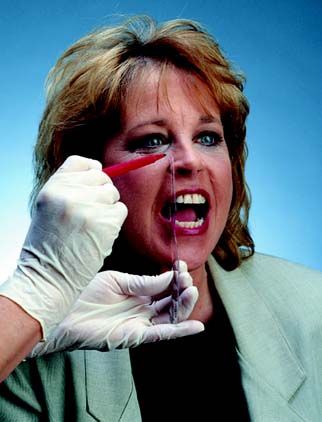
Anterior programming device (Fig. 2-18)
In some patients in whom CR does not coincide with MI, resistance may be encountered when hingeing the mandible. Because of well-established protective reflexes that are reinforced every time the teeth come together, such patients do not allow their mandibles to be manipulated and hinged easily. If tooth contact can be prevented, they “forget” these reflexes, and manipulation becomes easier. The teeth can be kept apart with cotton rolls, a plastic leaf gauge, or a small anterior programming device made of autopolymerizing acrylic resin (also known as a Lucia jig).16
If the mandible cannot be manipulated satisfactorily after an anterior programming device has been in place for 30 minutes, marked neuromuscular dysfunction is likely. Normally, this is relieved by providing an occlusal device (whose fabrication and adjustment are described in Chapter 4).
Stay updated, free dental videos. Join our Telegram channel
VIDEdental - Online dental courses


