Complete prosthetics refers to the provision of complete or full dentures. The procedure for providing dentures consists of five key stages:
(1) Primary impression > Manufacture of customised tray
(2) Secondary impression > Manufacture of registration rims
(3) Occlusal registration > Set up of teeth
(4) Try-in > Processing of denture
(5) Fitting.
(Note: The clinical stages are indicated in bold, and those conducted in the dental laboratory in italics.)
Primary impressions are discussed in the previous chapter, here we will begin with the manufacture of a customised tray.
Overview of custom impression trays
Custom impression trays are used to overcome the inaccuracies associated with primary impressions. They are custom-made to fit the denture-bearing area on the primary model. Their design and accurate fit allows for better control of impression materials that are fluid and must be guided into place. Like stock trays, they are used to support and transport the impression material to the mouth and once set, to the laboratory. The design of the tray will depend on the amount of undercut present and the type of impression material being used.
A well-designed impression tray should:
Support the impression material in contact with the oral tissues
Allow pressure to be applied by the clinician on selected areas of the denturebearing area
Retain its shape throughout the impression procedure and during model production.
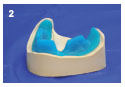
In edentulous cases, the majority of denture-bearing areas are free from large undercuts and impressions may be taken in close-fitting trays using impression materials which are rigid (non-elastic) when set, i.e. zinc-oxide and eugenol paste.
When undercuts are present, spacing is required. The amount depends on the amount of undercut to be recorded, the elastic limit and tear strength of the chosen impression material. A weak material such as alginate requires more spacing than a tough material such as silicone.
Spacing is also required for stiff (high viscosity) impression materials because unless there is some spacing between the tray and the tissues it is difficult to seat the tray without using considerable force. There are few indications in complete denture prosthetics for the use of such high viscosity materials for working impressions.
The information you should find on the prescription card and impression is as follows:
Type of tray required, i.e. close-fitting/spaced
Type of handle required
The outline (peripheral extension) required for the custom-made tray. This is drawn on the primary impression by the clinician with an indelible pencil for alginate or a permanent marker pen for silicone. This should transfer to the model on casting.
Materials for tray construction
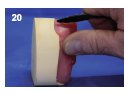
Light-curing composite blanks are the most common and easy to use materials for tray construction. They are supplied in a uniform thickness and are dimensionally stable on curing and in storage. They are more expensive than self-curing acrylic. However, although self-curing acrylic resin is cheap, it has limited working time and easily distorts during curing.
Shellac is a form of wax which softens on heating. It is easy to adjust but is brittle, may distort at relatively low temperatures and is less easy to use.
Heat-cured acrylic resin is accurate and stable during use, however, it is very expensive in terms of the time taken for manufacture.
The main risks associated with custom tray construction relate to the handling of the light-curing composite blanks. These materials can cause skin irritation and surgical gloves should be worn when handling these materials. Wash hands thoroughly after use.
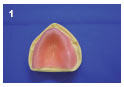
Basic procedure
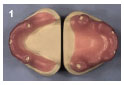
1. If the peripheral outline has not been transferred from the impression to the model, draw the outline of the tray on the model at the deepest part of the sulcus, keeping clear of the muscle attachments.
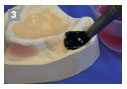
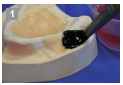
2. Fill any undercuts with molten denture wax.
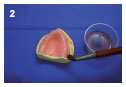
3. Coat the model with a layer of plaster separating solution and allow to dry.
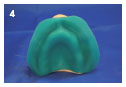
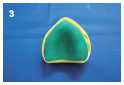
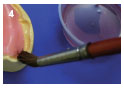
4. Adapt a sheet of light-curing tray material closely to the model; avoid thinning the material.
5. Trim to the marked outline of the tray. Keep the excess for making the handle. Although light-cured tray materials have a long working time, they will partially harden under strong light, so ensure they are stored in a sealed dark box.
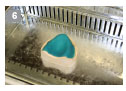
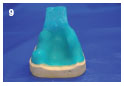
6. Place the tray in a light box and cure following the manufacturer’s instructions. Remove the tray from the model after curing and repeat on the underside ensuring full curing of the material (the light only penetrates to a depth of 1–2mm).
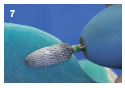
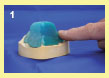
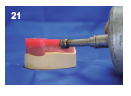
7. Trim the periphery of the tray using an acrylic trimming bur to produce a rounded profile. Care should be taken to ensure that no sharp edges are left on the tray (if it feels sharp against your hand it will feel very sharp against the oral tissues).
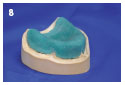
8. After trimming, fit the tray base back onto the model and check the peripheral extension matches the pencil line drawn on the model.
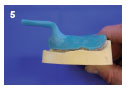
9. Form the tray handle from the surplus material. The handle should extend to the premolar regions and occupy the space of the natural teeth (see Extended information for handle designs).
10. Ensure the handle and base are well blended and then cure the tray for a second time to fix the handle.
11. Remove the tray from the model and trim the handle to shape.
12. Sandpaper may be used to smooth the surface if required.
13. Wash the tray using soapy water and steam clean the model to remove any blocking out wax.
Hints and tips
Custom trays made from light-cured materials can look unfinished even after extensive sandpapering. To improve the finished appearance:
1. Rub Vaseline into the surface of the finished tray until completely covered.
2. Light cure the tray in the light box.
3. Remove any excess Vaseline with boiling water. The surface finish will now be much improved.
Alternatively, some manufacturers supply a finishing varnish to give the light-cured material a smooth, glossy finish. This is applied and light-cured after the tray is completed.
To improve the grip on the handle of the tray during use (the handle can become slippery and hard to grip when wet) a hot wax knife blade can be drawn across the handles to create a ridged groove.
Extended information
Handle design
Different handle types may be requested to suit the preference of the clinician.
An intra-oral handle (as described above).
An extra-oral stepped handle for an edentulous mouth.
Finger stop handles are sometimes preferred for close-fitting trays.
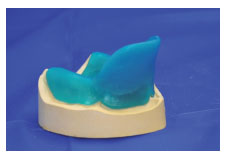
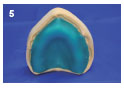
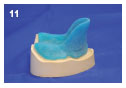
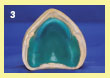
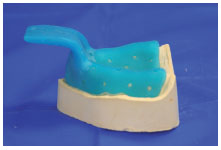
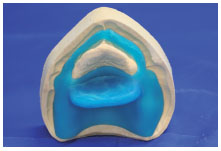
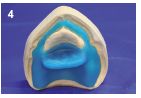
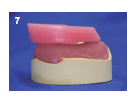
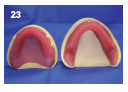
Spaced trays (Figure 2.3.1) are used with alginate and elastomeric impression materials when undercuts are to be recorded. The material must be adequately thick to allow elastic deformation on removal from an undercut and avoid permanent distortion. Alginate, particularly, has low tear strength and must be used in thick sections.
The main risks associated with custom tray construction relate to the handling of the light-curing composite blanks or self-curing acrylic resin. These materials can cause skin irritation and surgical gloves should be worn when handling these materials. Wash hands thoroughly rafter use.
Basic procedure
1. Adapt softened modelling wax onto the model and trim them 1–2 mm short of the required peripheral depth. This ensures that the sulcus is recorded entirely by the impression material. For alginate impression material place two layers of wax, and for silicones place one layer (and two where a deep undercut is located).
2. The exposed surfaces of the model should be coated in plaster separating solution prior to applying the tray material.
3. Apply a light-curing acrylic blank over the wax spacers and trim with a knife to the edge of the wax.
4. Light-cure in a light box.
5. An extra-oral stepped handle is provided on this type of tray.
6. The tray should be finished (including the handle) and trimmed shape as described for close-fitting custom trays.
7. To provide mechanical retention, trays for alginate impressions need to have perforations. The tray produced should have 2mm diameter holes drilled into it at 10 mm intervals. Do not place holes within 2 mm of the periphery of the tray in case minor adjustments to the edge of the tray are needed.
Spaced trays are used with alginate and elastomeric impression materials when undercuts are to be recorded (Figure 2.4.1). The material must be adequately thick to allow elastic deformation on removal from an undercut and avoid permanent distortion. Alginate, particularly, has low tear strength and must be used in thick sections.
The main risks associated with custom tray construction relate to the handling of the light-curing composite blanks. These materials can cause skin irritation and surgical gloves should be worn when handling these materials. Wash hands thoroughly after use.
Basic procedure
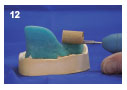
1. Adapt softened modelling wax sheets onto the model to cover the teeth. Trim to 3 mm past the gingival margin.
2. Adapt a second sheet over the entire model and trim 1–2 mm short of the required peripheral depth. This ensures that the sulcus is recorded entirely by the impression material. See Table 2.4.1 for wax spacer thicknesses.
3. If the clinician has requested occlusal or tooth stops, see Extended information below.
4. The exposed edges of the model should be coated in plaster separating solution prior to applying the tray material.
5. The tray construction is identical to that described in Section 2.3 for an edentulous tray with spacer.
6. A light-curing acrylic blank is applied over the wax spacers and trimmed with a knife to the edge of the wax and light cured.
7. An extra-oral handle is provided on this type of tray and is stepped if the anterior section is edentulous.
8. The tray should be finished (including the handle) and trimmed to shape as described for spaced trays.
9. To provide mechanical retention, trays for alginate impressions need to have perforations. The tray produced should have 2 mm diameter holes drilled into it at 10 mm intervals. Do not place hole within 2 mm of the periphery of the tray in case minor adjustments to the edge of the tray are needed. If silicone impression materials are to be used, no perforations are necessary.
Table 2.4.1 Space requirement for impression materials
Impression material
Space required
Zinc-oxide and eugenol paste
No spacer wax (0.5–1mm)
Silicone (medium bodied)
1.5–3mm (1 layer of wax)
Alginate
3mm (2 layers of wax)
Silicone (heavy bodied)
3–4.5mm (3 layers of wax)
Impression plaster
4.5mm (3 layers of wax)
Extended information
Occlusal (or tooth) stops may be used to ensure that the impression material remains at a constant thickness over the denture-bearing area. The technique prevents the impression tray penetrating the impression material.
Occlusal stops are positioned over non-essential areas of the tooth surfaces. This can either be done in the laboratory by cutting into the wax spacer prior to the application of the tray material, or at the chair side by the clinician (by the addition of impression compound).
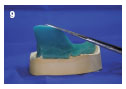
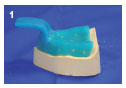
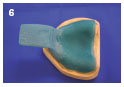
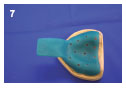
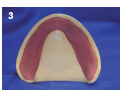
There are occasions when a close-fitting special tray would be desirable, but is contraindicated due to the presence of a section of flabby ridge. The problem is overcome by the use of a close-fitting tray with a window cut in the tray around the fibrous ridge area (Figure 2.5.1). This design enables a close-fitting impression to be taken of the firm areas of the mouth, while impression plaster can be used to record the fibrous part.
The main risks associated with custom tray construction relate to the handling of the light-curing composite blanks. These materials can cause skin irritation and surgical gloves should be worn when handling these materials. Wash hands thoroughly after use.
Basic procedure
1. The flabby ridge section should have been indicated by the clinician on the primary impression. Mark this on the model.
2. Construct the tray base as for the close-fitting tray (see Section 2.2).
3. Trim the material around the flabby ridge as indicated using a knife prior to light curing.
4. The tray handle is placed across the palate in the premolar region (the fibrous areas are usually in the anterior region). The tray is cured again and finished as for the close-fitting tray.
Extended information
The close-fitting part of the impression is taken first, checked and corrected if necessary, then replaced into the mouth. Impression plaster is carefully painted around the flabby part of the ridge, taking care not to distort the fibrous ridge. The plaster adheres to the tray and when it has set, the completed two-material impression can be removed.
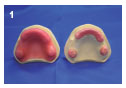
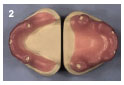
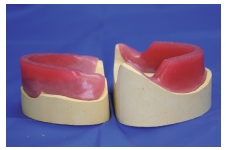
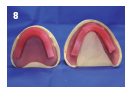
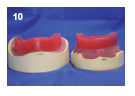
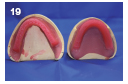
Occlusal registration rims (also known as wax rims, or bite blocks (Figures 2.6.1 and 2.6.2) are used by the clinician to record all the information from the patient that is required to construct the trial dentures.
Six pieces of information are recorded using the registration rims:
(1) Occlusal plane: the plane at which the teeth meet
(2) Lip support: the labial surface of the denture teeth
(3) Centre line: mid-line of the face that will be used to position the teeth
(4) High ‘smile line’ : the extent of the teeth and mucosa shown during a smile
(5) Vertical dimension: the height required for the dentures
(6) Centric relation: jaw relationship required for the dentures.
For further details see the Extended information box. The dimensions used in the following instructions are based on average values found in clinical situations.
You will need:
Working models
A prescription card
Bunsen burner
Light-curing composite blanks
Denture wax
Preformed wax rim (optional)
An occlusal rim inclinator
Wax carver/knife
Plaster separating solution
Light-curing box
Ruler
Cotton wool, lemon oil (or other suitable wax solvent) and liquid soap
Work safety
The main risks associated with custom tray construction relate to the handling of the light-curing composite blanks. These materials can cause skin irritation and surgical gloves should be worn when handling these materials. Wash hands thoroughly after use.
Basic procedure
1. Fill the undercuts on the models with molten denture wax and coat the model with two layers of plaster separating solution. Leave to dry.
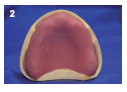
2. Adapt a light-curing composite sheet to the upper model. Trim the excess to reveal the land area of the model. The base should extend to fill the entire sulcus, or to the extension indicated by the clinician.
3. The lower is constructed in the same way, ensuring that the material is bulky enough to resist fracture.
4. Cure the material in the light-curing box (cure both sides to ensure complete curing).
5. Remove the cured baseplates from the model. Trim any excess material or rough edges using a tungsten carbide bur, then sandpaper them smooth.
6. To aid retention of the wax rim, sticky wax may be added to the crest of the base (pass the Bunsen burner over the sticky wax to melt it just prior to placing the wax rim) or the surface may be roughened using a bur.
7. Soften a preformed wax rim in warm water until pliable. Dry the wax and position over the baseplate so that the labial surface replicates the lost teeth (over the ridge in the mandible and slightly forward of the ridge in the maxilla). (A wax rim can be made by tightly rolling three-quarters of a sheet of softened modelling wax if you do not have preformed rims – See Hints and tips).
8. Squeeze the wax rim onto the base between the fingers and thumb to adapt it closely.
9. Using a hot wax knife, seal the wax rim to the base with denture wax.
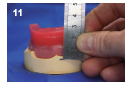
10. Placing a pencil mark on the outside of the models level with the lowest point of the sulcus, next to the central fraenum.
11. On the maxillary model use the pencil mark as a reference point and measure 22 mm and record using a wax knife to establish the anterior level of the rim.
12. Repeat for the mandibular rim, but using 18 mm as the rim height.
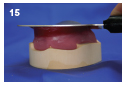
13. Now adjust the occlusal plane: heat the rim inclinator in a Bunsen burner. The right-angled edge of the plate is then placed across the hamular notches.
14. The hot plate is then rotated towards the wax rim, keeping the inclinator plate in contact with the hamular notches at all times.
15. Continue until the excess wax has been removed to the desired height determined previously.
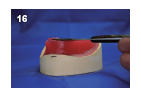
16. For the mandibular rim adjust the height to 18 mm anteriorly and level with a point two-thirds the way up the retromolar pads. Draw a line between these two points with a wax knife.
17. Melt away the excess using a knife or the inclinator as a hot plate.
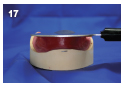
18. Shape and smooth the sides of both rims using a wax knife.
19. The rim width should be between 5 mm and 7 mm anteriorly and between 7 mm and 8 mm posteriorly.
20. Contour the outer surfaces to blend the wax into the baseplate.
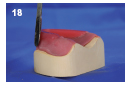
21. Finish the wax surface by passing the flame of the Bunsen burner quickly across the wax to just melt the surface and make it smooth.
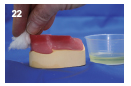
22. Alternatively, a wax solvent, such as lemon oil, can be applied to smooth the surface.
23. Finish the registration rims by scoring the tops of the rims across a piece of sandpaper on a flat surface. Polish the finished rims with cotton wool and soapy water if desired.
Hints and tips
Baseplates are often produced using wax with a wire strengthener or using shellac rather than the light-cured composite. Although cheaper than light-curing bases these materials distort in the mouth and can lead to an incorrect registration. A re-try as a result of distortion requires an extra clinical visit and is expensive in terms of time.
Prior to carving, smoothing or polishing the wax, cool the rims in cold water for a few minutes to harden the wax.
Preformed rims may be made in the laboratory either by pouring molten scrap wax into a mould, or they may be bought from a dental supplier.
When making a rim from a sheet of wax, soften this over a Bunsen flame without melting the surface. Fold 1 cm of the sheet over and gently squeeze out any air. Repeat until you reach the end of the sheet. Use immediately while still soft.
Extended information
Wax registration rims are often poorly constructed. The technique described above is time efficient and produces blocks that are anatomically well designed. If the rims are made to these ‘average’ dimensions and anatomical angles, the registration process will be easier, quicker and more accurately carried out.
Occlusal rim width is a feature often ignored during construction. Wide rims restrict the tongue space and encroach into the cheeks and lips, distorting the denture-bearing area. This can lead to movement of the rims during registration resulting in inaccurate registration of the occlusion. In general rims should be slightly wider than the teeth they will eventually carry.
The information recorded on the rims by the clinician is used to construct the trial dentures. Below is a brief description of what is recorded, how it is recorded and why.
Lip support
The labial lip support is determined by looking at the lip support and facial contour as well as checking for encroachment on the tongue. Wax is added or removed from the rim until correct.
This primarily determines the position of the teeth labially. During positioning of the teeth, the labial surface of the rim will be followed. Having the teeth in the correct position bucco-lingually is important to aid retention and stability as the soft tissues can hold the denture in place and the forces transmitted through the teeth are directed centrally over the alveolar ridge.
Occlusal plane
Using the upper lip as an initial guide the level of the incisal edges of the upper central incisor teeth are scribed on to the rim. This position is then used as the anterior reference point of the occlusal plane. Using a Fox’s guide plane as an aid, the rim is adjusted so that the occlusal plane is parallel to the ala-tragus line (Camper’s line).
The occlusal plane is the plane to which the teeth are placed to meet or occlude. Reasonable accuracy is required to allow enough room for both upper and lower teeth to be positioned. The relationship to the condyle must be correct for a balanced occlusion and good aesthetics.
Vertical dimension
The vertical dimension is the height of the rims when in contact. It is determined by establishing an adequate freeway space (difference between occlusal face height and rest face height). An overprovision of freeway space would allow the patient to over-close. This causes poor aesthetics and possibly temporomandibular joint (TMJ) problems. If not excessively worn, the old set of dentures is a good indicator.
The vertical dimension establishes the tooth position on the trial dentures. It is important that the patient has space between the teeth when relaxing and that they do not over-close on biting. Correct vertical dimension also gives support to facial tissues, preventing creasing at the corner of the mouth.
In a case with a high smile line, this is marked to indicate where the upper lip will be when the patient is smiling, to allow for this in the placement of the teeth and to avoid leaving too much visible gum.
Centre line
This is marked on the rims in line with the centre of the patient’s face, allowing the teeth to be positioned centrally for symmetry.
Centric relation
The patient is asked to touch their soft palate with the tip of their tongue and close their teeth together to the retruded contact position (RCP). This ensures the condyle is in the correct position in the TMJs. The rims are sealed together in this position.
This records the relationship between the maxillae and mandible when the condyle is ideally positioned in the glenoid fossae. The denture teeth will then be set to create an intercuspal position that coincides with the RCP.
The use of gothic arch tracing devices is recommended as being the most predictable and accurate method of recording centric relation.
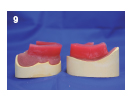
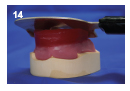
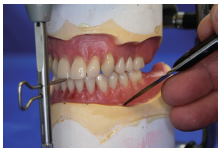
The aim is to place the denture teeth on the registration rims to conform to the recordings made by the clinician in a position that is both functional and aesthetically pleasing (Figure 2.7.1).
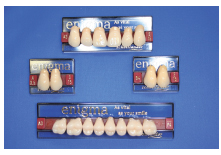
The shape, size and shade of the teeth are chosen by the clinician to harmonise with the patient’s stature, sex, size, age and complexion (Figure 2.7.2). (See Extended information for more details.)
The teeth are arranged such that a balanced occlusion is established. A balanced occlusion is an occlusal scheme designed to make the denture stable during function. Each tooth should contact the opposing tooth in the intercuspal position. This means that the teeth meet at the occlusal plane.
In lateral movements of the mandible, the teeth should contact on the working side and there should also be contact between the palatal cusps of the upper and buccal cusps of the lower teeth on the balancing side. This ensures that the denture will not tip during function. Similarly, when protruding the mandible, there should be contact between the anterior teeth and some posterior teeth on both sides.
You will need:
Prescription (which may include photographs and impressions of the patient’s old dentures or diagrams)
Denture teeth, matching the prescription
Registration rims
Upper and lower models mounted on an articulator
Wax carver/knife
Glass slab
Denture wax
Bunsen burner
Pencil
Tungsten burs (large and small)
Articulating paper
Cotton wool and lemon oil (or other suitable wax solvent) optional
Work safety
Care should be taken when working with a Bunsen burner and hot wax. When grinding the acrylic teeth use dust extraction and wear eye protection.
Basic procedure
1. Place the models on the articulator and ensure that the centric lock is engaged, and that the incisal pin is in contact with the incisal table. This should remain so throughout all steps of the following procedure.
2. Transcribe the centre line from the upper to the lower rim.
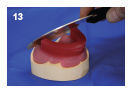
3. Using a hot wax knife remove a section of wax from the wax rim to make room for an upper central incisor.
4. Soften the wax within the cut region and position the central incisor flush with the labial contour of the wax block, and just touching the occlusal plane (the junction of the upper and lower blocks).
5. A glass slab may be used to indicate the occlusal plane, and so aid the positioning of the teeth.
6. If room for the tooth is limited, the baseplate can be reduced in thickness using a tungsten bur. If this is not sufficient the neck of the tooth can also be />
Only gold members can continue reading. Log In or Register to continue