CHAPTER 19
Mini-Screws and Palatal Implants for Orthodontic Anchorage
Anchorage is one of the limiting factors in orthodontics, and its control is essential for successful orthodontic treatment. The term orthodontic anchorage was first introduced by Angle< ?xml:namespace prefix = "mbp" />
Basically, each tooth has its own anchorage potential as well as a tendency to move when force is applied toward the tooth. When teeth are used as anchorage, the inappropriate movements of the anchoring units may result in a prolonged treatment time and unpredictable or less-than-ideal outcomes.
Orthodontic anchorage is oriented to the quality of the biological anchorage of the teeth. This is influenced by a number of factors, such as the size of the root surfaces available for periodontal attachment, the height of the periodontal attachment, the density and structure of the alveolar bone, the turnover rate of the periodontal tissues, the muscular activity, the occlusal forces, the craniofacial morphology and the nature of the tooth movement planned for the intended correction.
Additional anchorage such as extraoral and intraoral forces are visible and compliance dependent and are associated with the risk of undesirable effects such as tipping of the occlusal plane, protrusion of mandibular incisors, and extrusion of teeth.
Implants, mini-screws, and ankylosed teeth, as they are in direct contact with bone, do not possess a normal periodontal ligament. Consequently, they do not move when orthodontic forces are applied
The aim of this chapter is to present skeletal anchorage to be integrated into orthodontic treatment as “absolute anchorage,” thereby avoiding the disadvantages listed previously.
1 Historically, what kind of anchorage devices preceded mini-screws and palatal implants?
The first known attempt to achieve skeletal anchorage was made in 1945 by Gainsforth and Higley.
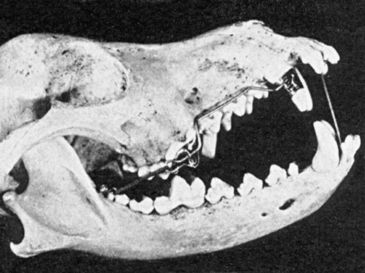
FIG 19-1 Skull of dog with orthodontic appliance using vitallium screw anchorage. Force is applied through traction of the elastic that connects two hooks. The arch wire is welded to the canine band and slides freely in the perforated buccal flange of the molar overlay.
(From Gainsforth BL, Higley LB: Am J Orthod Oral Surg 1945;31:406-416.)
Later, skeletal anchorage systems evolved from two lines. One line originated from dental implants, which have a solid scientific base of clinical, biochemical, and histological studies. The other one developed from screws used in traumatology and orthognathic surgery.
Linkow
The other category developed from surgical screws. The first clinical report of the use of a temporary anchorage device (TAD) appeared in 1983, when Creekmore and Eklund
2 How can the skeletal anchorage be classified?
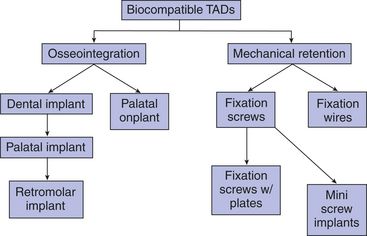
Currently available skeletal anchorage devices can be classified either as biocompatible or biological. Ankylosed teeth are biological anchorage units.
Biocompatible skeletal TADs can be further subclassified based first on the nature of mechanical retention in the bone (modification of surgical fixation methods), such as fixation wires,
From a clinical point of view, it is relevant whether implants are to be used only as TADs or subsequently to be used as abutment for supporting prosthetic appliances. These aspects determine insertion sites, implant types, and dimensions, as well as type of orthodontic anchorage. Moreover, the fact that these devices may have to be placed in a growing patient is of particular importance.
Another device, the Onplant®,
3 What is the definition of temporary anchorage devices?
A TAD is a device that is placed into bone in order to enhance orthodontic anchorage. They either support the anchorage teeth or act by themselves as the anchorage element/unit. They are temporary and are subsequently removed after use. They can be located on the bone surface (transosteal), under the periosteum (subperiosteal), or inside the bone (endosteal) and can be fixed to bone either mechanically (cortically stabilized) or biologically (osseointegration). It should also be pointed out that dental implants placed for the purpose of supporting prosthesis, regardless of the fact that they may be used for orthodontic anchorage, are not conceptually considered TADs since they are not removed after orthodontic treatment. Importantly, the incorporation of dental implants and TADs into orthodontic treatment makes absolute anchorage possible, which has been defined in terms of implants as showing no movement (no anchorage loss) as a consequence of reaction forces.
4 Where can implants used as temporary anchorage be placed?
Since orthodontic patients do not normally display edentulous alveolar bony ridges for the insertion of an implant, implants for orthodontic anchorage must be placed in areas other than the usual topographical locations foreseen for the replacement of missing teeth. Besides the installation of orthodontic anchorage implants into the retromolar area of the mandible,
Incomplete closure of the median palatal suture during childhood and early adolescence, however, prevents placement of orthodontic implants into the midsagittal region of fully grown adolescents and adults because of possible developmental disturbances of the palatal suture.
5 Where can mini-screws or similar devices be placed as temporary anchorage?
The introduction of small temporary orthodontic anchorage devices such as mini-screws (<2 mm) in various lengths
Through an analysis of panoramic radiographs and computed tomographic (CT) images, adequate bone for mini-screw placement exists primarily in the maxillary (mesial to first molars) and mandibular (mesial and distal to first molars) posterior regions. Typically, adequate interradicular bone distance was found more than halfway down the root length, which is likely to be covered by movable mucosa.
6 What kind of imaging measures are recommended prior to palatal implant insertion?
Presurgical dental CT and/or lateral cephalograms have been recommended to evaluate vertical bone volume of the hard palate, which determines whether palatal implants can be used. Examinations of the palate have shown that the vertical bone volume commonly decreases posteriorly.
Dental CT of the alveolar process is well established for the evaluation of the alveolar bone volume before implant placement.
Wehrbein et al.
The vertical bone level in the anterior and middle thirds of the hard palate is at least 2 mm higher vertically than seen on lateral cephalograms. A safety margin of at least 2 mm is recommended when planning treatment on the basis of lateral cephalograms to avoid potential complications.

FIG 19-3 Most palatal implants are installed satisfactorily when the location of entry into the cortical bone is at the anteroposterior level of the maxillary first and second premolars—perpendicular to the palatal surface.
(From Männchen R, Schätzle M: Clin Oral Implants Res [submitted].)
7 Are imaging measures needed prior to mini-screw insertion?
A panoramic radiograph, normally available from pretreatment diagnostic records, is usually sufficient for establishing the insertion areas outside the alveolar process. Where a mini-screw is to be inserted into the alveolar process, a periapical radiograph taken with an acrylic or putty-based template serves as a guideline for establishing the exact height and orientation of the mini-screw.
Stay updated, free dental videos. Join our Telegram channel
VIDEdental - Online dental courses


