18 WAX PATTERNS
This technique consists of obtaining an accurate impression of the prepared tooth (Fig. 18-1A) and making a cast from the impression (Fig. 18-1B) on which a wax pattern that resembles the shape of the final restoration is shaped (Fig. 18-1C). A mold is then made around the wax pattern with a refractory investment material (Fig. 18-1D). When the investment has set, the wax is vaporized in an electric furnace. The hollow mold is then filled with molten casting alloy, reproducing every detail of the wax pattern (Fig. 18-1E). The metal casting is retrieved, excess metal is removed, and after polishing, the cast restoration is ready for clinical evaluation (Fig. 18-1F).
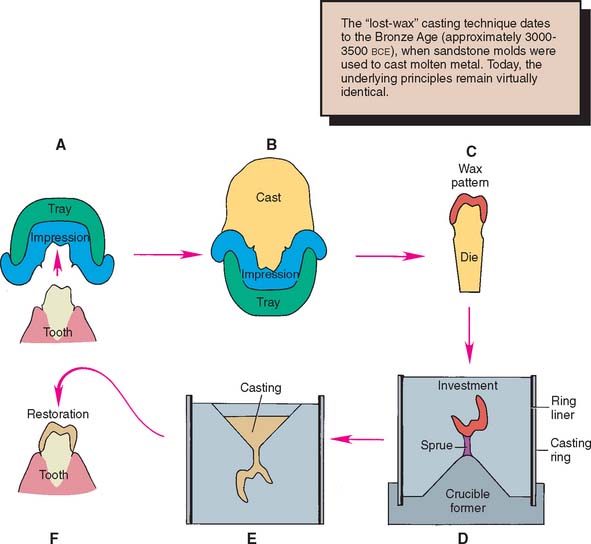
As the solidifying metal (casting) cools to room temperature, it shrinks. Dimensional accuracy of the casting is achieved by balancing this shrinkage against precisely controlled expansion of the mold (see Chapter 22). Wax is used to make the patterns because it can be conveniently manipulated and precisely shaped. By heating, it can be completely eliminated from the mold after investing.
The lost-wax technique is widely used in industrial and jewelry manufacturing. The first bronze castings reportedly were made in the third millennium B.C.E. with beeswax and clay refractory materials. Ancient lost-wax castings such as Chinese bronzes, Egyptian deities, and Greek statues have withstood the centuries, yielding information about ancient societies and cultures. The lost-wax method may have been used in Sumer as early as the Second Early Dynastic Period for figurines and even larger body parts.1
This chapter approaches the waxing procedure in a logical sequence. As with most aspects of fixed prosthodontics, a successful restoration is possible only if each step is carefully followed and evaluated before the dentist moves on to the next.
PREREQUISITES
Correction of Defects
Even a very small undercut on the die of a tooth preparation results in an inability to remove the wax pattern. There may be small dimples in the die (resulting from caries removal or loss of a previous restoration) that are undercut in relation to the path of placement of the new restoration. Normally such areas are blocked out intraorally with glass ionomer or restored with amalgam or another suitable foundation material as part of the mouth preparation phase (see Chapter 6). On occasion, however, blocking them out on the working die may be more practical and convenient, as long as the defect does not extend to within 1 mm of the cavity margin. Zinc phosphate cement is a suitable material (see Chapter 31), but other commercial products (e.g., resin) are available for this purpose (Fig. 18-2).
Provision of Adequate Luting Agent Space
Since the 1920s,2 practitioners have recognized that a space should exist between the internal surface of the casting and the prepared surface of the tooth everywhere except immediately adjacent to the margin. The space provides room for the luting agent (a material that on hardening fills the space and binds the tooth and crown together) and allows complete seating of the restoration during cementation (see Chapters 7 and 31). At the preparation margin, there should be a band of close adaptation (about 1 mm wide) to prevent disintegration and dissolution of the luting agent. The ideal dimension3–5 for the luting agent space has been suggested at 20 to 40 μm for each wall, which implies that a complete crown should have an internal diameter between 40 and 80 μm larger than the diameter of the prepared tooth. Through the use of available techniques in an appropriately standardized manner, such a degree of casting adaptation can routinely be obtained, independent of the geometry of the finish line.6,7
If the luting agent space is too narrow, the casting does not seat properly during cementation because of hydraulic pressure that develops when the viscous mass of luting agent cannot escape through the narrow gap between crown and preparation as the restoration is seated. Conversely, if the luting agent space is too wide, the casting is loose on the tooth, resistance form (see Chapter 7) is reduced, and the position of the casting is difficult to maintain accurately during evaluation and occlusal adjustment. In addition, the risk of the crown loosening during function increases considerably, and its longevity is adversely affected. The precise amount of luting agent space obtained depends on the materials and techniques used in the indirect process, particularly the choice of impression material (see Chapter 14), die material (see Chapter 17), investment (see Chapter 22), and casting alloy (see Chapters 19 and 22 and Fig. 18-1). These factors directly affect the size of the cement space.
Increasing the luting agent space
A number of factors increase the luting agent space for a complete crown:
All other factors remaining equal, each of these factors individually results in an increased distance between the internal surface of the casting and the surface of the prepared tooth. Although the dentist has little control over the polymerization shrinkage of impression materials, die system selection has a direct influence on the size of the wax pattern. With some impression materials, using a multiple-pour system for fabrication of a solid definitive cast and a separate die yields a die that is slightly larger than the prepared tooth. The pattern is, in effect, stretched during manipulation, which results in a proportionally larger internal casting diameter. An internal layer of soft wax is subject to slightly more compression by the setting refractory investment material, leading to a looser fit. Spacers enlarge the die by coating the occlusal surface and vertical axial walls with a thin layer of rapidly drying paint. The expansion of the investment mold can be increased by heating the mold to a slightly higher temperature during the wax elimination phase, and metal can be removed from the internal surface of a cast crown through air abrasion, etching, or milling procedures.
Reduction of the luting agent space
A number of factors reduce the cement space:
Resin and electroplated dies are slightly smaller than stone dies and therefore result in a smaller casting. As alloys cool over a larger temperature range, the additional shrinkage that takes place also results in a smaller casting. There are multiple ways in which to reduce investment expansion. Technique selection, burnout temperature, and water/powder ratio are the most convenient (see Chapter 22). If the investment is mixed with an adjusted water/powder ratio, which results in less setting expansion, the size of the resulting casting is again reduced. When problems routinely surface with castings that are either too loose or too tight, any of the previously mentioned variables may be altered, leading to more predictable results.
Problems with fitting castings become apparent at two stages of the indirect procedure: when the casting is evaluated on the die and when it is cemented. Recognizing problems at each stage and correcting them before proceeding is crucial. Difficulty with seating the casting on the die is generally caused by wax distortion, the presence of flash extending cervical to the preparation margin (excess wax that was not removed before the investing and casting procedure), improper investment expansion (underexpansion) (Fig. 18-3), or a casting nodule. Modification of the investing and casting protocol solves these problems (see Chapter 22). Consistent problems with castings that do not seat completely when evaluated on the prepared tooth may be corrected by changing just one variable in the protocol. Although many technicians advocate the routine use of die spacer, this is just one of many options to influence the size of the resulting cement space.
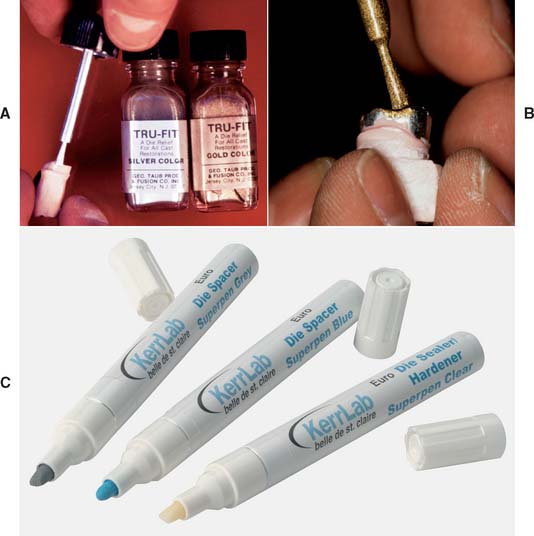
Die spacer
This material (Fig. 18-4) (similar to model airplane paint8) is applied to the die to increase the cement space between axial walls of the prepared tooth and the restoration. It is formulated to maintain constant thickness when painted on the die. However, it should not coat the entire preparation. For adequate marginal adaptation, a band of about 1 mm immediately adjacent to the preparation margin must be left unpainted.9 Thinner is provided to replace the solvent, which tends to evaporate, resulting in an excessive thickness of spacer.
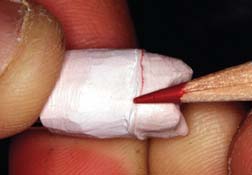
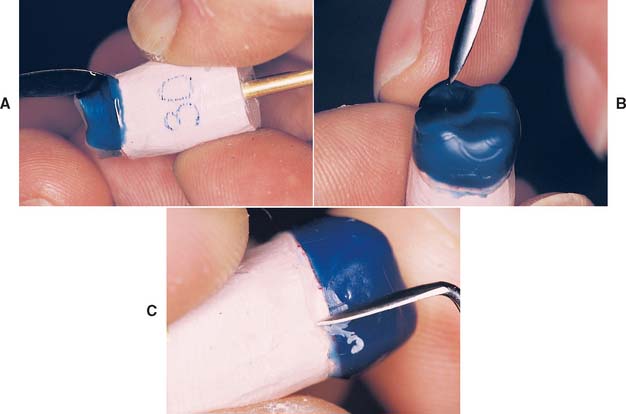
Marking the Margins
The technician’s awareness of the precise location of the preparation margin is crucial. By marking it with colored pencil, the technician can pinpoint this location (Fig. 18-5). The color should contrast with that of the wax that will be used (e.g., a red pencil can be used for a green wax). An ordinary lead pencil is not recommended, because it can abrade the die, its darker color can interfere with efforts to verify that the wax has been properly adapted at the margin, and traces of the graphite (an antiflux) can prevent complete casting of the margins. The marked margins can be coated with low-viscosity cyanoacrylate resin and immediately blown dry. If performed properly, this procedure adds no more than a micrometer10 to the die. Although removing the excess with acetone is sometimes possible, care must be taken not to create a thick layer of cyanoacrylate, which can result in an unacceptable fit of the final cast restoration. For this reason, higher viscosity resins must be avoided.
MATERIALS SCIENCE
Inlay casting wax (the name given all wax used in forming the pattern for cast restorations) is actually composed of several waxes. Paraffin is usually the main constituent (40% to 60%). The remaining balance consists of dammar resin (to reduce flaking) plus carnauba, ceresin, or candelilla wax (to raise the melting temperature) or beeswax. Sometimes a synthetic wax is substituted for the natural material. Dyes are added to provide color contrasts. Exact formulations are trade secrets, but Coleman11 published the formula for an experimental compound.
The American National Standards Institute (ANSI) and the American Dental Association (ADA)12 have categorized waxes into two types:
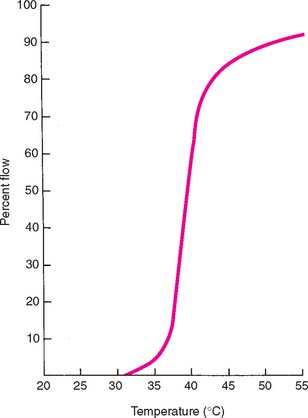
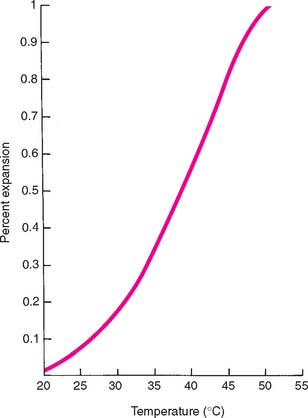
Specifications of the ANSI and ADA govern use of the important properties of residue, flow, and expansion. Because the mold must burn out cleanly to allow the escape of gases and the complete entry of molten alloy, there can be no residual ash. However, the specifications allow a 0.1% residue, which apparently is effectively negligible. Flow requirements, as previously stated, are necessary to control the stability of the wax once it has reached the temperature at which it is carved, burnished, and polished (37° C [99° F] for type I waxes, 25° C [77° F] for type II waxes). In addition, the wax must flow well at typi-cal forming temperatures. Curves of temperature plotted against percentage flow (Fig. 18-6) are furnished by reputable manufacturers and should be consulted when a casting wax is chosen. All waxes expand and contract when heated and cooled, respectively. Manufacturers’ curves of percentage expansion and contraction at various working temperatures (Fig. 18-7) are helpful when methods to use in the investing and casting process are considered. For example, a wax that solidifies at a higher temperature shrinks more and therefore requires more compensation to control fit than does a wax that solidifies at a lower temperature (a reason for not interchanging type I and type II waxes within an established technique). These properties can be adversely affected by repeated heating of the wax, which drives off the more volatile components.13 When waxes are selected for optimal casting accuracy, the use of waxes with different properties for the margin and occlusal portions may be necessary.14 If a casting is to be accurate, the wax pattern must not become significantly distorted. One reason for distortion is that wax has “memory,” which means that it exhibits some elasticity unless it is thoroughly liquefied. This problem can be overcome by applying the initial layer of wax in melted increments or drops. As an alternative, the initial coping can be made by dipping the die into thoroughly melted wax.
However, a serious problem exists when the added wax incorporates strain within the pattern as each increment solidifies. This strain tends to be released with time and subsequently distorts the wax pattern. The rate of wax change is temperature dependent, which means that it increases at higher ambient temperatures. Because wax has a relatively high coefficient of thermal expansion and changes dimension subject to air temperature changes, and because the pattern tends to release its incorporated strain, the margins must be remelted, readapted, and resmoothed immediately before investing. The internal fit of the remelted portion is then closer to the prepared surface of the tooth than is the rest of the casting and therefore may help obtain the necessary space for the luting agent.
TECHNIQUE
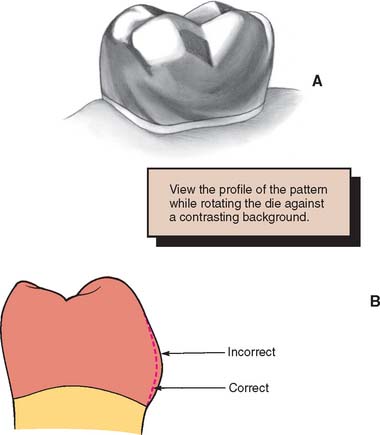
Evaluating a three-dimensional shape with accuracy is difficult. The finished wax pattern for a tooth may be too bulbous or too flat. Although it appears “wrong,” pinpointing and correcting the exact problem is a skill achieved only after in-depth study of what constitutes “normal” anatomic form and after learning how to interpret that shape. To evaluate occlusal structure, breaking down the complex surfaces into individual components is helpful. When evaluating axial contours, the practitioner should assess a series of two-dimensional outlines by rotating the wax pattern. These can easily be compared with an appropriate model, and any aberrations can be corrected. It is helpful to recognize that the human eye excels at interpreting even very small differences in height and width of objects (two dimensional), but is not as adept at interpreting similarly subtle differences in depth. Therefore, assessment is facilitated by systematically looking at cross-sections through the pattern and evaluating its silhouette (Fig. 18-8). Rotation of the pattern and repeating this process from all angles of observation speeds up this intricate process.
Waxing Instruments
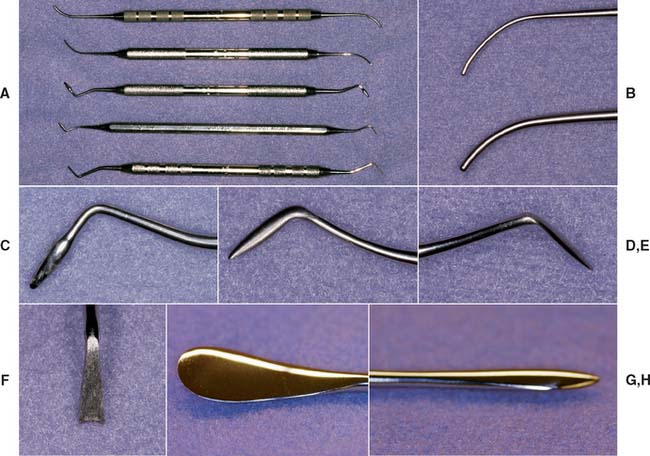
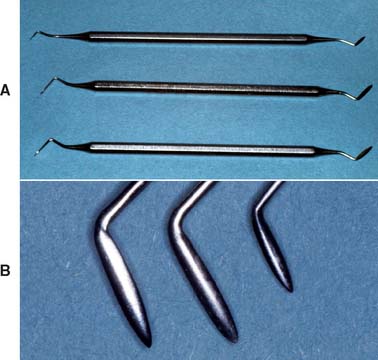
Waxing instruments can be categorized by the intent of their design: wax addition, carving, or burnishing. Of the popular PKT instruments (Fig. 18-10A to F) (designed by Dr. Peter K. Thomas specifically for the additive waxing technique), No. 1 and No. 2 are wax addition instruments, No. 3 is a burnisher for refining occlusal anatomy, and Nos. 4 and 5 are wax carvers.
Wax is added by heating the instrument in the Bunsen flame, touching it to the wax, and quickly reheating its shank in the flame. Wax flows away from the hottest part of the instrument, so that if the shank is heated, a bead of wax flows off the tip (Fig. 18-11). However, if the tip is heated, the wax flows up the shank of the instrument (to the considerable annoyance of inexperienced operators). The PKT No. 1 instrument is used for large increments; the smaller No. 2 is used for lesser additions. A No. 7 or 7A waxing spatula (see Fig. 18-10G and H) is useful for adding large amounts of wax, particularly in forming the initial coping (the thimble-like layer of wax that covers all prepared surfaces). Electric waxing instruments (Fig. 18-12) are preferred by some technicians because they allow precise temperature control of the wax, which is important for proper manipulation. Another advantage is that carbon buildup can be kept to a minimum, which easily results from overheating a waxing instrument in a Bunsen flame.
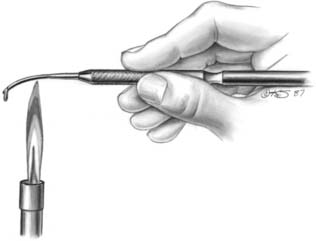
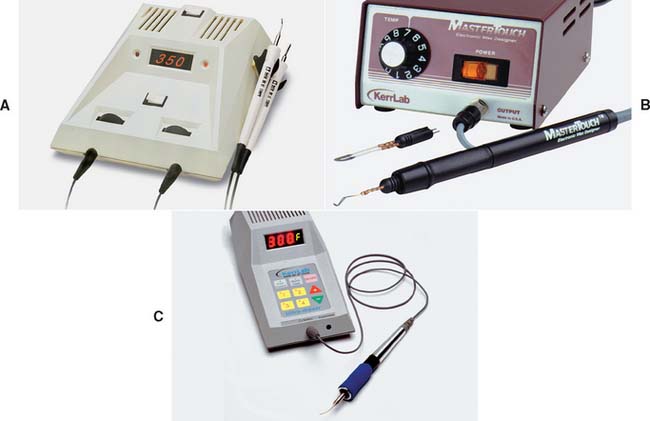
Fig. 18-12 A to C, Electric waxing instruments.
(Courtesy of Kerr Lab Corporation, Orange, California.)
Wax carvers should be kept sharp and should never be heated. In addition to the PKT instruments, the Nos. ½ and 3 Hollenback and the No. 2 Ward carvers (Fig. 18-13) are popular. When carving wax, light pressure should be used to obtain the desired smooth surface.
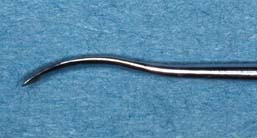
Burnishing is an alternative to carving for obtaining a smooth wax pattern of the desired contour. Burnishing consists of slightly warming a blunt instrument and rubbing the wax. The instrument should not be so hot that it melts the wax surface. The PKT No. 3 instrument is useful for burnishing the occlusal surfaces. The PKT Nos. 1 and 2 can be used for burnishing as well as for wax addition. Another popular burnisher is based on the DPT6 Darby Perry trimmer* (Fig. 18-14).
For removing wax, burnishing is less effective than carving, but it is probably easier to control. It leaves a smoother surface, which can be particularly important when excess wax is trimmed near the margin. Careless (excessive) carving in this area can result in abrasion of the die, resulting in a ledge at the margin of the finished casting.
Posterior Teeth
The following sequence is recommended for waxing posterior teeth:
Internal surface
Step-by-step procedure
Stay updated, free dental videos. Join our Telegram channel
VIDEdental - Online dental courses


