17
Extractions and Minor Oral Surgery
- simple extraction techniques
- surgical extraction techniques
- the instruments and equipment used in simple tooth extractions
- the instruments and equipment used in surgical extractions and minor oral surgery procedures
- the complications of extraction and their avoidance
- other minor oral surgery procedures
Many procedures carried out daily in the vast majority of dental workplaces can be collectively termed as ‘minor oral surgery’ (MOS), as opposed to major oral surgery procedures such as treatment and reconstructive surgery for oral cancer, orthognathic surgery to correct skeletal problems, and head and neck trauma surgery. Those minor surgical procedures to be discussed here are the following.
- Simple extractions – of roots or whole teeth, where no soft tissue or bone removal is required.
- Surgical extractions – of roots or whole teeth, where soft tissue alone, or with bone, has to be removed to gain access to the root or tooth.
- Operculectomy – the surgical removal of the gingival flap overlying a partially erupted tooth, especially a lower third molar.
- Alveolectomy – the surgical adjustment and removal of bone spicules from the alveolar ridge after tooth extraction, to produce a smooth base for denture seating.
- Gingivectomy and gingivoplasty – periodontal soft tissue surgery to adjust the shape of the gingivae to aid oral hygiene measures.
- Periodontal flap surgery – the surgical raising and replacing of surgical flaps, to enable subgingival debridement to be carried out.
- Soft tissue biopsies – the partial or complete removal of soft tissue oral lesions, for pathological investigation and diagnosis.
Arguably, these surgical procedures constitute those most worrying to the patient, as bleeding and possible postoperative pain are quite likely to occur. The dental nurse has a very important role in the reassurance and monitoring of the patient during these procedures, so that the patient remains less anxious and more co-operative throughout.
As always, Health and Safety and infection control procedures must be strictly adhered to before, during and after the surgical procedure.
Extractions
These procedures involve the removal of teeth, or their roots if the crown of the tooth has disintegrated, to leave a section of the alveolar ridge bare and ready for tooth replacement by:
- the pontic of a bridge
- a denture
- an implant.
Reasons for tooth extraction
Both deciduous and permanent teeth may require extraction at some point. This is usually due to infection and pain being present following caries, periodontal disease or trauma, but may also be due to the following reasons.
- The tooth is unrestorable, whether pain and infection are present or not.
- The position of the tooth prevents the placement of a fixed or removable prosthesis.
- The tooth is too poorly positioned to be aligned orthodontically.
- The tooth may be selectively extracted to provide space in a crowded dental arch.
- Attempts to save the tooth by root filling have failed.
- The tooth may be partially erupted and impacted, and suffer from recurrent painful infections (pericoronitis) due to food trapping.
- Deciduous teeth can be selectively extracted to encourage the timely eruption of their permanent successors into more favourable positions.
- The patient’s choice, where attempting to save the tooth by root filling is not the preferred option.
To ensure that any tooth is extracted painlessly and successfully, the dentist has an in-depth knowledge of the anatomy and physiology of the head and neck region, as well as the oral cavity and its nerve supply. An efficient and supportive dental nurse must also have a background knowledge of these subjects, to be able to provide the level of preparation, chairside support and help required during any likely complication that may arise.
When the dentist has no choice and decides that a tooth has to be extracted, it will be for one or more of the following reasons.
- Unless successful treatment to save it can be carried out, a carious or periodontally involved tooth is a continual source of infection in the patient’s oral cavity.
- Any infection may be intermittent, but often there are acute and very painful episodes that may require analgesic and antibiotic treatment.
- Infection can spread into the bloodstream (bacteraemia) and the patient can become generally unwell – this can be a serious event in elderly and medically compromised patients.
- Repeat prescriptions of antibiotics to treat infection without tooth removal are considered poor practice.
- No replacement of the tooth can be carried out to restore oral health until the tooth has been extracted.
Once it has been determined that a tooth or root requires extraction, the complexity of the procedure depends mainly on which tooth is involved, how much tooth or root is present, and its position in the jaw bone. The options available for the extraction procedure will then fall into one of the following categories.
- Simple extraction.
- Surgical extraction involving soft tissue removal to expose an unerupted tooth or buried root.
- Surgical extraction involving dissection of the tooth in its socket and removal in sections.
- Surgical extraction involving the raising of a mucoperiosteal flap and bone removal to gain full access to a tooth or root.
If the tooth involved is a deciduous one, the following points need to be considered.
- Resorption – has root resorption occurred so that effectively just the crown of the tooth remains, attached merely to the gingivae?
- Permanent successor – is the underlying permanent tooth present, and likely to be damaged during the extraction procedure?
- Infection – is any dental infection present, that may make the procedure unnecessarily painful?
- Age and co-operation – younger patients are usually less willing to undergo extraction procedures than older patients and, along with some of those with special needs, are less able to understand the need for the procedure nor the consequences if it is not carried out.
- Medical history of the patient – some medical conditions contraindicate extraction.
- Tooth status – a grossly carious deciduous tooth may be difficult to extract simply and quickly, but a surgical procedure is not usually feasible in conscious younger patients, so some form of anxiety control will have to be considered.
If the tooth involved is a permanent one, the following points need to be considered.
- Infection – is any dental infection present, that may make the procedure unnecessarily painful?
- Medical history of the patient – some medical conditions contraindicate extraction.
- Medications – some adult medications will mean hospitalisation for extractions or MOS, because of possible serious side-effects.
- Co-operation – some adults and some patients with special needs will require some form of anxiety control to undergo these types of procedure.
- Age – older patients have more friable soft tissues which are more easily traumatised during surgical procedures, and their jaw bones will be more brittle and more easily fractured.
- Tooth status – a grossly carious tooth is more likely to require a full surgical procedure to complete its removal.
- Post extraction – will the missing tooth require replacement, and if so what are the options and cost implications?
Simple extractions
Simple extractions are so called because the tooth or root is removed whole from the dental arch without involving tooth sectioning, flap raising or bone removal. Any or all of these additional techniques may be required during a surgical extraction. Whether the tooth is still vital or has died from any associated infection, local anaesthesia will always be required to numb the surrounding gingivae at least, even for a simple extraction.
The specific instruments, equipment and medicaments that may be required for a simple extraction are shown in Table 17.1.
Forceps are the instruments most frequently used to extract a tooth, and are handled by being pushed along the sides of the root to sever the periodontal membrane. Once a reasonable position has been achieved, the root is gripped and gentle wrist movements are employed to gradually loosen the tooth in the socket. The forceps are gradually worked further towards the apex of the tooth until it is loose enough in the socket to be removed. In effect, then, a tooth is actually extracted by being pushed out of the socket, rather than being pulled out of it, as most people would assume.
Table 17.1 Specific instruments, equipment and medicaments that may be requiredfor a simple extraction
| Item | Function |
| Forceps | Range of sterile hand instruments used to grip a tooth or root at its neck before applying appropriate wrist actions to loosen the tooth/root in its socket during the extraction procedure. Various designs are available for use on upper or lower teeth, and for each individual tooth |
| Luxators | Sterile hand instruments used to widen the socket and sever the periodontal ligament attachment |
| Elevators | Sterile hand instruments used to prise the tooth/root out of the socket. Various patterns are available – Cryer’s, Warwick James’, Winter’s |
| Fine-bore aspirator | Disposable suction tip used to suck away all blood and maintain good moisture control during the procedure; also useful for sucking and holding tooth debris so that it can be removed from the mouth safely |
| Haemostats | Gelatine sponges or oxidised cellulose packs, which are inserted into the socket after extraction to aid blood clotting and achieve haemostasis – can be used with or without a suture |
Figure 17.1 Upper and lower pattern of forceps.
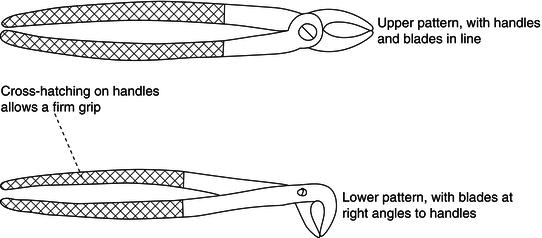
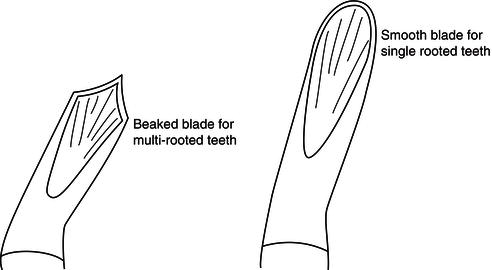
Figure 17.2 Blade detail of forceps.
Unnecessary force during extractions often results in tooth or root fracture, although this can also occur anyway with grossly carious teeth.
Forceps are designed in various patterns, to be used individually for each type of tooth. Upper tooth forceps tend to have their handles and blades roughly in line with each other, whereas lower tooth forceps tend to be at right angles to each other for ease of access to the lower arch (Figure 17.1). Multi-rooted molar tooth forceps have blades which are shaped like beaks so that they can grip the furcation area between the roots, but single-rooted tooth forceps are smooth (Figure 17.2).
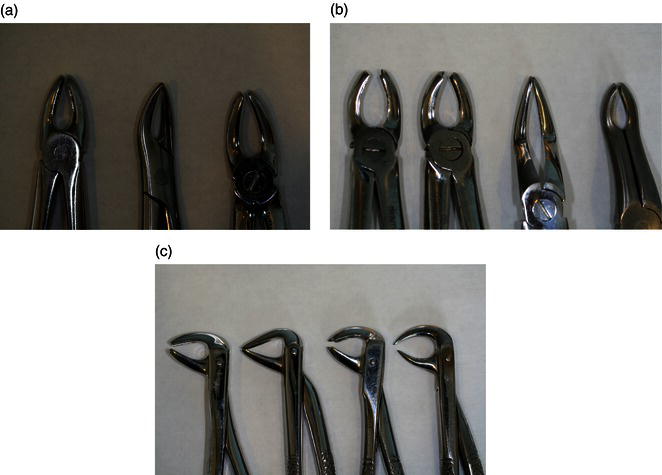
The most common patterns of forceps are shown in Figure 17.3.
- Upper incisor and canine forceps are straight with single rounded blades and have both wide and narrow patterns.
- Upper root forceps are similar in appearance, with narrow, straight blades.
- Upper premolar forceps have slightly curved handles and single rounded blades.
- Upper left molar forceps have curved handles and a beaked blade to the right of the instrument, and a rounded blade to the left to grip the buccal roots and the palatal root respectively (many dental nurses identify upper molar forceps by the mantra ‘beak to cheek’).
- Upper right molar forceps have curved handles and the beaked blade is to the left of the instrument.
- Upper bayonet forceps have extended handles and angled blades to gain access to third molars, or have angled pointed blades to gain access to fractured roots.
- Lower anterior forceps have single, rounded blades at right angles to the handle that are particularly useful for extracting lower premolars.
- Lower root forceps are similar, with narrow and straight blades that are also particularly useful for extracting small or crowded incisors.
- Lower molar forceps have beaked blades at right angles to the handles, to grip the furcation of the two roots.
- Lower ‘cowhorn’ forceps have curved and pointed blades at right angles to the handles, to grip the furcation of lower molar teeth.
- Smaller versions of most patterns exist, for deciduous tooth extractions.
Figure 17.3 Extraction forceps. (a) Upper straight, root, premolar. (b) Upper left and right molar, bayonets. (c) Lower anterior, root, molar, cowhorns.
Similarly, elevators are available in a variety of patterns and are used to gradually sever the periodontal membrane and loosen the tooth in the socket (Figure 17.4). They are specifically used to elevate retained roots and impacted teeth, where adequate access to the root or tooth is not possible with conventional forceps, or where the angle of elevation required to loosen the root or tooth is not possible with forceps.
The more common types are as follows.
- Cryer’s elevators are available as left and right patterns, but can be used on either side of the mouth, depending whether they are engaged mesially or distally – the tips are triangular shaped and pointed.
- Winter’s elevators have a similar blade design as Cryer’s, but have a corkscrew style handle to give more leverage.
- Warwick James’ elevators are available as left, right and straight patterns – the tips are a similar shape to the round blade of forceps.
Figure 17.4 Types of elevators.
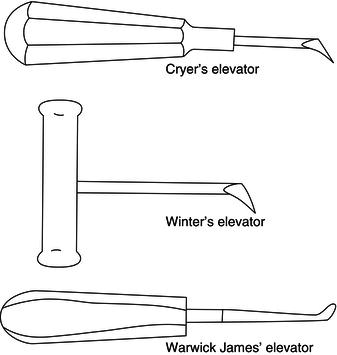
Figure 17.5 Luxator.
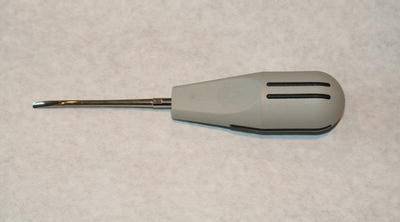
Alternatively, the dentist may choose to use one of a variety of luxators (Figure 17.5) that are available and are used in a similar fashion to an elevator but with greater effect, as the tips are sharper and finer and therefore more easily pushed into the periodontal space between the root and the bony socket. It is possible to extract practically any tooth using a luxator alone, and many dentists are able to do so.
Figure 17.6 Coupland’s chisels – sizes 1, 2, 3.
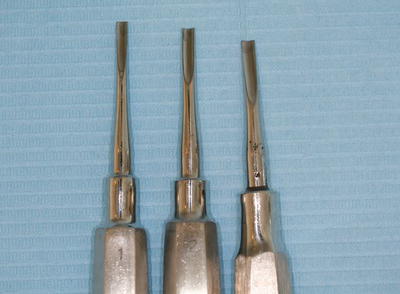
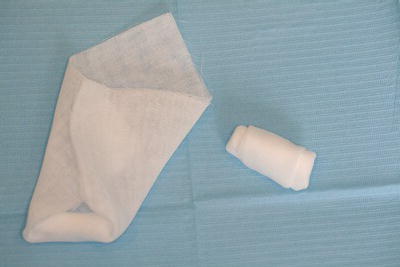
Figure 17.7 Bite pack construction.
A single-bladed chisel is also available for splitting multi-rooted teeth, called a Coupland’s chisel and available in sizes 1, 2 and 3 (Figure 17.6).
Difficult extractions can be quite exhausting for the dentist and the patient, and it often helps both for the dental nurse to actually support the patient’s head or mandible during the extraction. In this way, the dentist is not wasting energy by rocking the patient’s head rather than loosening the tooth, and it also allows the patient to relax more, rather than trying to hold their head still for the dentist.
Upon removal of the tooth, the dentist squeezes the socket walls together, places a bite pack over the socket, and instructs the patient to bite on it for 10 min to help to achieve haemostasis (stop the bleeding). After treatment, the patient is not dismissed until the bleeding has ceased and postoperative advice has been given. A suitable bite pack can be made from a cotton wool roll and gauze sheets, as shown in Figure 17.7.
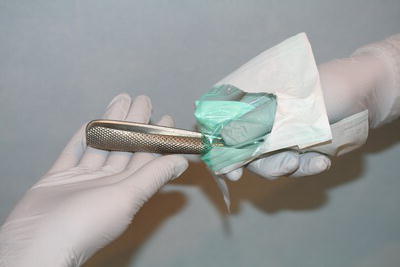
Figure 17.8 No-touch technique of passing forceps.
Role of the dental nurse during the procedure
The dental nurse should have a full working knowledge of each instrument likely to be used, including the full range of forceps available, to ensure the ability to provide close support and assistance to the dental team during the procedure.
Each instrument will be sterile and bagged, and should be carefully opened without touching it and then handed to the dentist handles first, while holding the tips still within the sterile pouch – this is the ‘no-touch’ technique (Figure 17.8). In this way, infection control is maintained.
As with any dental procedure, all the required instruments and equipment will have been made ready before the procedure begins and laid out in their bags, close to the dental chair for easy access but not in full view of the patient – this is likely to increase their anxiety.
The dental nurse will anticipate the dentist with regard to the instruments required and their order of need, and safely pass them as required using the ‘no-touch’ technique described above.
Throughout the procedure, the dental nurse will monitor the patient for any signs of distress (such as feeling pain) and notify the dentist accordingly. A calm, reassuring manner is required to put the patient at their ease and this must be adapted for the various types of patient that may be treated – whether a child, an adult or elderly person, or a patient with special needs. When treating patients from different ethnic backgrounds, it is very useful to have a friend or family member present to interpret as necessary.
As the forceps, luxators and elevators used have to be pushed into the tooth socket, the dental nurse may also be required to stabilise the patient’s head or mandible so that the dentist’s efforts are not wasted. The purpose of the support should be briefly explained to the patient beforehand.
Surgical field considerations
Whichever technique is used to extract a tooth or root, the procedure is considered a surgical one, as bleeding will definitely occur and the tissues of the patient’s oral cavity will be breached by the instruments used. If the working area is not treated as a sterile field during the procedure, there is a potential risk of cross-infection occurring and this is more likely with oral surgery procedures than with any other in dentistry.
Consequently, the following special precautions are taken.
- Sterile bagged instruments – all instruments to be used must have been individually sterilised and bagged before the procedure, unlike restorative instruments that are bagged together.
- PPE for the dental team – over and above the usual PPE requirements for dental procedures, surgical gowns or single-use plastic aprons should be used to prevent blood contamination of the uniform.
- Disposable items – wherever possible, disposable items should be used to prevent cross-infection, including aspirators, scalpel blades, needles, suture needles, etc.
- Contamination policy – any single-use items and materials that are opened but not used during the procedure should be disposed of anyway, to avoid their possible contamination and then spread of infection by resealing and using at a later date.
- Suction equipment – must be run through immediately after the procedure with the required disinfectant solution to remove all traces of blood from its inner workings, rather than at the end of the session as usual.
- Operative field – should be assumed to be blood contaminated and wiped down thoroughly with sodium hypochlorite (bleach) or another accepted decontaminant.
- Equipment coverage – items such as the dental chair will obviously be reused and are not sterilisable, so they must be covered before the procedure with a single-use impervious membrane, to prevent blood contamination.
- Sterile field – the oral cavity and its immediate vicinity will be regarded as a sterile field during the procedure, and any team member who is not wearing suitable PPE should not enter it nor pass instruments into it without using a ‘no-touch’ technique.
The aspects of infection control and Health and Safety that are relevant to these procedures, especially cleaning methods, infection control and sterilisation, are fully discussed in Chapters 4 and 8. They are summarised below.
- All sharps are carefully disposed of in the sharps box – this includes local anaesthetic needles.
- All autoclavable items are placed in a washer-disinfector unit or an ultrasonic bath, and decontaminated thoroughly before being placed in the autoclave for sterilisation.
- All contaminated waste is placed in hazardous waste sacks – this includes all the impervious covers used as barriers on equipment items.
- All surfaces ar/>
Stay updated, free dental videos. Join our Telegram channel
VIDEdental - Online dental courses


