Quality Assurance and Infection Control
A quality assurance program in radiology is a series of procedures designed to ensure optimal and consistent operation of each component in the imaging chain. When all components are functioning properly, the result is consistently high-quality radiographs made with low exposure to patients and office personnel.
The goal of an infection control program in radiology is to avoid cross-contamination among patients and between patients and the dental staff in the course of imaging.
Radiographic Quality Assurance
Because radiographs are indispensable for patient diagnosis, the dentist must ensure that optimal exposure and film processing conditions are maintained. To reach this goal, a quality assurance program includes evaluation of the performance of x-ray machines, manual and automatic film processing procedures, image receptors, and viewing conditions. Optimization of all steps in the imaging chain results in the most diagnostic images and the lowest exposure for patients. Examples of common faults in digital sensor handling are provided in Chapter 4, and problems with film processing are presented in Chapter 5. To minimize these problems, it is best if one individual is given the responsibility for implementing the quality assurance program and for taking corrective action when indicated. Most of these tasks refer to film processing. Using digital sensors greatly simplifies these tasks. Most of these steps are quickly accomplished, yet they can have a significant influence on radiographic quality (Box 15-1).
Daily Tasks
Several tasks should be performed daily to ensure excellent radiographs.
Compare Film Radiographs with Reference Film
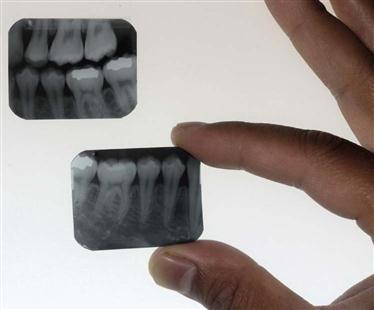
One of the most common causes of poor film radiographs is poor processing in the darkroom, in particular, the use of depleted solutions. A simple and effective means for constant monitoring of the quality of images produced in an office is to check daily films against a reference film. Soon after film processing solutions are replaced, a patient film that has been properly exposed and processed with exact time-temperature technique is mounted on a corner of the viewbox. This image, with optimal density and contrast, serves as a reference for the radiographs made in the following days and weeks (Fig. 15-1). All subsequent images should be compared with this reference film.
Comparison of daily images with the reference film may reveal problems before they interfere with the diagnostic quality of the images. When a problem is identified, it is important to determine the probable source and to take corrective action. For instance, if the processing solutions have become depleted, the resultant radiographs are light and have reduced contrast. Both developer and fixer should be changed when degradation of the image quality is evident. Light images may also result from cold solutions or insufficient developing time. Dark images may be caused by excessive developing time, developer that is too warm, or light leaks.
There are two methods that are more accurate than a reference film but require additional equipment and more time to perform. These are use of a sensitometer and densitometer and the use of a step wedge.
Sensitometer and Densitometer
The most accurate and rigorous method of testing film processing solutions is to use a sensitometer and densitometer. A sensitometer exposes film to a calibrated light pattern. After processing, a densitometer is used to measure the optical density of each step in the test pattern of the film exposed by the sensitometer. A change in the density readings from day to day indicates a problem in the darkroom.
Enter Findings in Retake Log
Another simple and effective means of reducing the number of faulty radiographs is to keep a retake log. All errors for images that must be reexposed are recorded. This process quickly reveals the source of recurring problems.
Replenish Processing Solutions
At the beginning of each work day, the levels of the processing solutions should be checked and replenished if necessary. The developer is replenished with fresh developing solution, and the fixer is replenished with fresh fixing solution.
Check Temperature of Processing Solutions
At the beginning of each work day, the temperature of the processing solutions should be checked. The solutions must reach the optimal temperature before use—68° F (20° C) for manual processing and 82° F (28° C) for heated automatic processors. The instructions accompanying the film and processor verify the optimal temperature. Unheated automatic processors should be located away from windows or heaters that may cause their temperature to vary during the day. Proper temperature regulation is required for accurate time-temperature processing.
Weekly Tasks
Replace Processing Solutions
How frequently processing solutions are replaced depends primarily on the rate of use of the solutions but also on the size of tanks, whether a cover is used, and the temperature of the solutions. In most offices, the solutions should be changed weekly or every other week. The results of the step-wedge test help determine the proper frequency.
Clean Processing Equipment
Regular cleaning of the processing equipment is necessary for optimal operation. The solution tanks of manual and automatic processing equipment should be cleaned when the solutions are changed. The rollers of automatic film processors should be cleaned weekly according to the manufacturer’s instructions. After cleaning, the tanks and rollers should be rinsed twice as long as the manufacturer recommends to prevent the cleaner from interfering with the action of the film processing solutions.
Clean Viewboxes
Viewboxes should be cleaned weekly to remove any particles or defects that may interfere with film interpretation.
Review Retake Log
The retake record should be reviewed weekly to identify any recurring problems with film processing conditions or operator technique. This information can be used to educate staff or to initiate corrective actions.
Monthly Tasks
Photostimulable Phosphor Plates
Photostimulable phosphor (PSP) plates may become scratched in the course of use. These scratches may be seen as light streaks on processed images (see Fig. 4-22, A). Plates should be inspected monthly for such defects and removed from service when such defects are found.
Check Darkroom Safelighting
Film becomes fogged in the darkroom because of inappropriate safelight filters, excessive exposure to safelights, and stray light from other sources. These films are dark, show low contrast, and have a muddy gray appearance. The darkroom should be inspected monthly to assess the integrity of the safelights (preferably GBX-2 filters with 15-watt bulbs). The glass filter should be intact, with no cracks. To check for light leaks in a darkroom, all lights are turned off; the individual allows his or her vision to accommodate to the dark and checks for light leaks, especially around doors and vents. Light leaks should be marked with chalk or masking tape. Weather stripping is useful for sealing light leaks under doors.
Clean Intensifying Screens
All intensifying screens in panoramic and cephalometric film cassettes should be cleaned monthly. The presence of scratches or debris results in recurring light areas on the resultant images. The foam supporting the screens must be intact and capable of holding both screens closely against the film. If close contact between the film and screens is not maintained, the image loses sharpness.
Rotate Film Stock
Dental x-ray film is quite stable when it is properly handled. X-ray film should be stored in a cool, dry facility away from a radiation source. Stock should be rotated when new film is received so that old film does not accumulate in storage. The oldest film always should be used first but never after its expiration date.
Check Exposure Charts
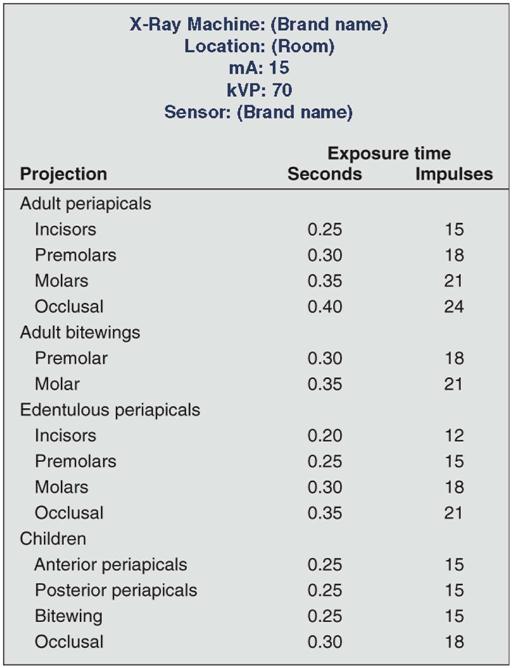
Each month, inspection should be done of exposure tables listing the proper peak kilovoltage (kVp), milliamperes (mA), and exposure times for making radiographs of each region of the oral cavity that are posted by each x-ray machine (Fig. 15-2). One should verify that the information is legible and accurate. These tables help ensure that all operators use the appropriate exposure factors. Typically, the mA is fixed at its highest setting; the kVp is fixed, usually at 70 kVp; and the exposure time is varied to account for patient size and location of the area of interest in the mouth.
Exposure times are initially determined empirically. In the case of PSP plates and digital sensors, one should start by using the exposure times suggested by the manufacturer. Exposure times are slowly and systematically reduced to the point that image degradation is noticed. With film, careful time-temperature processing (described in Chapter 5) must be used with fresh solutions during this initial determination of exposure times.
Check Leaded Aprons and Collars
Leaded aprons and collars should be visually inspected for evidence of cracking. A fluoroscopic examination performed by a qualified individual can confirm any cracks in the lead shielding. These items should be replaced as necessary. Cracking is usually caused by folding the shields when not in use. It can be minimized by hanging the aprons from a hook or draping them over a handrail.
Yearly Tasks
Digital Sensors
Digital sensors and PSP plates should also be checked yearly for signs of image degradation. Failing sensors may reveal loss of sensitivity, contrast resol/>
Stay updated, free dental videos. Join our Telegram channel

VIDEdental - Online dental courses


